props 的只读性
“props” 是 react 中用于传递数据给组件的一种机制,通常作为组件的参数进行传递。在 react 中,props 是只读的,意味着一旦将数据传递给组件的 props,组件就不能直接修改这些 props 的值。所以组件无论是使用函数声明还是通过 class 声明,都决不能修改自身的 props。
所以react有一个严格的规则:所有 react 组件都必须像纯函数一样保护它们的 props 不被更改。
为什么props是只读的呢?
当我们在父组件中将数据传递给子组件时,子组件只能使用这些 props 来读取数据,而不能修改它们。这是为了确保数据的单向流动,使得数据的流动更加可控和可预测。当 props 是只读的时候,我们可以确保数据只能从父组件流向子组件,而子组件不能直接修改父组件传递的数据。这种单向数据流有助于维护组件的可预测性和代码的可维护性。
如果我无法避免要在组件内部修改数据,该怎么办?
如果你需要在组件内部修改数据,你可以使用组件的状态(state)。状态是组件内部的可变数据,可以通过特定的方法来修改。但是这些状态无法直接传递给其他组件,如果需要在多个组件之间共享数据,可以考虑使用上层组件的状态或者全局状态管理工具(如 redux)
代码示例:
import react, { usestate } from 'react';
function parentcomponent() {
  const [count, setcount] = usestate(0);
  const incrementcount = () => {
    setcount(count + 1);
  };
  return (
    <div>
      <h2>父组件</h2>
      <p>count: {count}</p>
      <childcomponent count={count} increment={incrementcount} />
    </div>
  );
}
function childcomponent(props) {
  return (
    <div>
      <h2>子组件t</h2>
      <p>总和: {props.count}</p>
      <button onclick={props.increment}>+1</button>
    </div>
  );
}
export default parentcomponent;
如何将函数组件转换成 class 组件 创建一个同名的 es6 class,并且继承于 react.component。
- 添加一个空的
render()方法。 - 将函数体移动到
render()方法之中。 - 在
render()方法中使用this.props替换props。 - 删除剩余的空函数声明。
函数式组件
function tick(props) {
  const element = (
    <div>
      <h1>hello, world!</h1>
      <h2>it is {props.time.tolocaletimestring()}.</h2>
    </div>
  );
  root.render(element);
  }
class组件
    class clock extends react.component {
      render() {
        return (
          <div>
            <h1>hello, world!</h1>
            <h2>it is {this.props.date.tolocaletimestring()}.</h2>
          </div>
        );
      }
    }
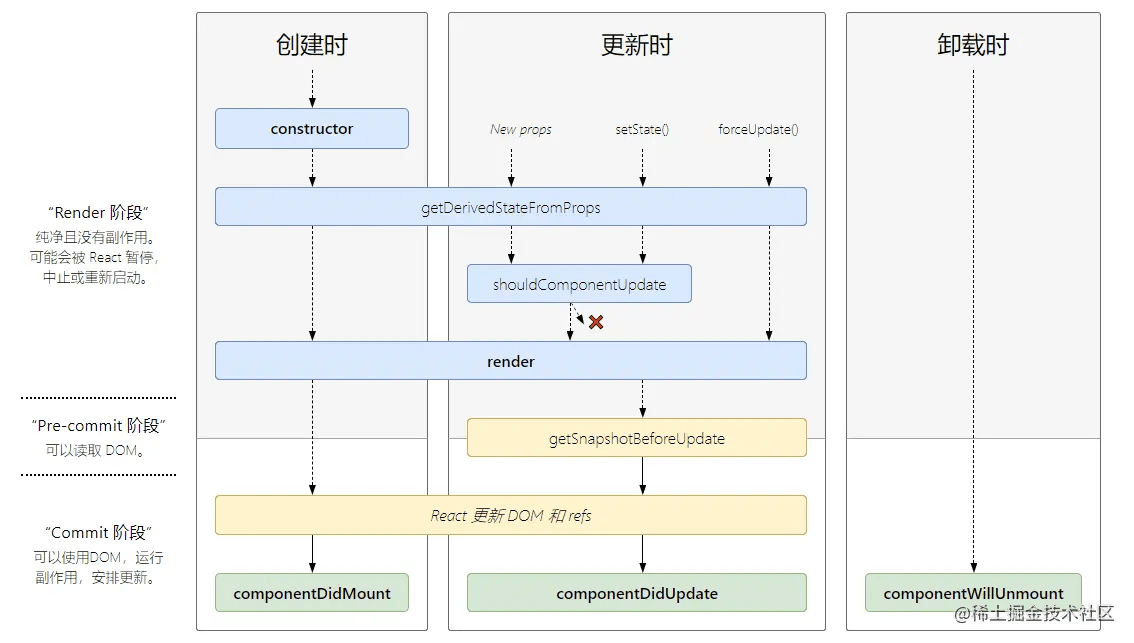
生命周期
挂载
- constructor--------组件实例化时执行,用于初始化state和绑定事件等操作
- getderivedstatefromprops --------在render方法执行之前调用,用于根据props设置state。
- render--------渲染组件
- componentdidmount(-------组件挂载到dom后执行,用于执行一些需要dom的操作,如获取数据。
更新
- getderivedstatefromprops-------在render方法执行之前调用,用于根据props设置state
- shouldcomponentupdate------判断组件是否需要重新渲染,默认返回true
- render------渲染组件
- getsnapshotbeforeupdate------在更新前获取dom信息,如滚动位置等。
- componentdidupdate--------组件更新后执行,用于执行一些需要dom的操作,如更新数据
卸载
- componentwillunmount------组件从dom中移除时经历的阶段

写一个时钟案例,每秒都会更新时间
    class clock extends react.component {
      constructor(props) {
        super(props);
        this.state = {date: new date()};
      }
      componentdidmount() {
        this.timerid = setinterval(
          () => this.tick(),
          1000
        );
      }
      componentwillunmount() {
        clearinterval(this.timerid);
      }
      tick() {
        this.setstate({
          date: new date()
        });
      }
      render() {
        return (
          <div>
            <h1>hello, world!</h1>
            <h2>it is {this.state.date.tolocaletimestring()}.</h2>
          </div>
        );
      }
    }
    const root = reactdom.createroot(document.getelementbyid('root'));
    root.render(<clock />);
让我们来快速概括一下发生了什么和这些方法的调用顺序:
- 当
<clock />被传给root.render()的时候,react 会调用clock组件的构造函数。因为 clock 需要显示当前的时间,所以它会用一个包含当前时间的对象来初始化this.state。我们会在之后更新 state。 - 之后 react 会调用组件的
render()方法。这就是 react 确定该在页面上展示什么的方式。然后 react 更新 dom 来匹配clock渲染的输出。 - 当
clock的输出被插入到 dom 中后,react 就会调用componentdidmount()生命周期方法。在这个方法中,clock 组件向浏览器请求设置一个计时器来每秒调用一次组件的tick()方法。 - 浏览器每秒都会调用一次
tick()方法。 在这方法之中,clock组件会通过调用setstate()来计划进行一次 ui 更新。得益于setstate()的调用,react 能够知道state已经改变了,然后会重新调用render()方法来确定页面上该显示什么。这一次,render()方法中的this.state.date就不一样了,如此一来就会渲染输出更新过的时间。 - react 也会相应的更新 dom。一旦 clock 组件从 dom 中被移除,react 就会调用
componentwillunmount()生命周期方法,这样计时器就停止了。
到此这篇关于react的props、生命周期的文章就介绍到这了,更多相关react的props、生命周期内容请搜索代码网以前的文章或继续浏览下面的相关文章希望大家以后多多支持代码网!


发表评论