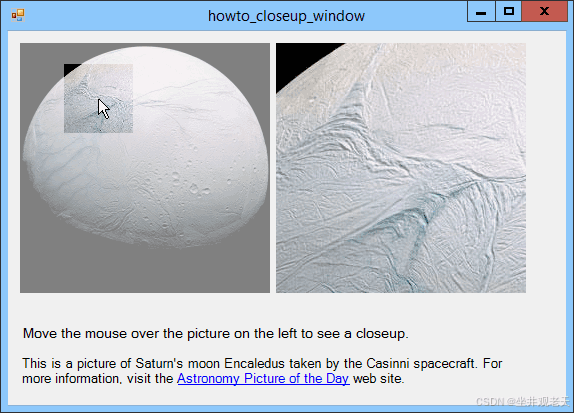
许多网站都会显示一个特写窗口,其中显示放大的图像部分,以便您可以看到更多细节。您在主图像上移动鼠标,它会在单独的图片中显示特写。此示例执行的操作类似。(示例使用的一些数学运算非常棘手,因此您可能需要仔细查看才能了解其工作原理。)
特写图实际上只是原始图像的全尺寸副本。(“主”图像是较小比例的相同图像。)要显示特写图,程序会在名为piccloseup的picturebox中显示全尺寸图像。该控件位于名为pancloseup的panel内。通过在pancloseup内移动piccloseup,程序可以显示全尺寸图像的不同部分。
以下代码使程序准备启动。
// save the original image.
private bitmap originalimage, shadedimage;
private int smallwidth, smallheight;
private float scalex, scaley;
private void form1_load(object sender, eventargs e)
{
    originalimage = picwhole.image as bitmap;
    piccloseup.image = originalimage;
    piccloseup.sizemode = pictureboxsizemode.autosize;

    // make a shaded version of the image.
    shadedimage = new bitmap(originalimage);
    using (graphics gr = graphics.fromimage(shadedimage))
    {
        using (brush br =
            new solidbrush(color.fromargb(128, 255, 255, 255)))
        {
            rectangle rect = new rectangle(0, 0,
                shadedimage.width, shadedimage.height);
            gr.fillrectangle(br, rect);
        }
    }

    // get scale factors to map from big scale to small scale.
    scalex = (float)pancloseup.clientsize.width /
        originalimage.width;
    scaley = (float)pancloseup.clientsize.height /
        originalimage.height;

    // see how big the closeup is on the small scale.
    smallwidth = (int)(scalex * picwhole.clientsize.width);
    smallheight = (int)(scaley * picwhole.clientsize.height);
}
此代码保存原始图像并制作该图像的亮化版本。要制作亮化版本,它会复制原始图像,然后用半透明的白色矩形填充它。这将成为您将鼠标移到其上的主图像。
当鼠标移入或移出主图像时,将执行以下代码。
// use the shaded background image.
private void picwhole_mouseenter(object sender, eventargs e)
{
    picwhole.image = shadedimage;
    pancloseup.visible = true;
}

// use the regular image.
private void picwhole_mouseleave(object sender, eventargs e)
{
    picwhole.image = originalimage;
    pancloseup.visible = false;
}
当鼠标位于主图像之外时,程序显示正常的非亮化版本。当鼠标进入图像时,程序切换为显示亮化图像。
当鼠标在主图像上移动时,以下代码会显示鼠标周围区域的特写。
// display a closeup of this area.
private rectangle viewingrectangle;
private void picwhole_mousemove(object sender, mouseeventargs e)
{
    // position piccloseup inside its parent panel.
    float x = (float)e.x / picwhole.clientsize.width *
        originalimage.width -
        (float)pancloseup.clientsize.width / 2;
    float y = (float)e.y / picwhole.clientsize.height *
        originalimage.height -
        (float)pancloseup.clientsize.height / 2;
    if (x < 0) x = 0;
    if (y < 0) y = 0;
    if (x > originalimage.width - pancloseup.clientsize.width)
        x = originalimage.width - pancloseup.clientsize.width;
    if (y > originalimage.height - pancloseup.clientsize.height)
        y = originalimage.height - pancloseup.clientsize.height;
    piccloseup.location = new point(-(int)x, -(int)y);

    // record the position we are viewing.
    viewingrectangle = new rectangle((int)x, (int)y,
        pancloseup.clientsize.width,
        pancloseup.clientsize.height);

    // draw the closeup area.
    picwhole.invalidate();
}
首先,代码决定鼠标周围的区域在哪里。如果该区域部分位于主图像之外,则代码会调整其 x 和 y 坐标,使该区域位于主图像内。这样可以让特写显示尽可能多的图像。
代码将piccloseup移动到pancloseup内,以显示全尺寸图像的正确部分。然后,它将在变量viewingrectangle中记录主图像上将显示的区域,并使主图像无效以使其重绘。以下代码显示了主图片的paint事件处理程序,该处理程序处理该重绘。
// draw the viewing area.
private void picwhole_paint(object sender, painteventargs e)
{
    // scale so we can draw in the full scale coordinates.
    e.graphics.scaletransform(scalex, scaley);

    // draw the viewing area using the original image.
    e.graphics.drawimage(originalimage, viewingrectangle,
        viewingrectangle, graphicsunit.pixel);
    //e.graphics.drawrectangle(pens.red, viewingrectangle);
}
此代码使用变换,因此它可以使用全尺寸图像的坐标而不是主图像(您可能还记得,主图像是缩小比例的)的坐标进行绘制。然后,它将原始全尺寸图像的一部分复制到主图像上,以显示鼠标周围的区域。结果是主图像除了此区域外都被阴影化,此区域以原始亮度绘制。取消注释此方法中的最后一行,以在主图像的特写区域周围绘制一个红色矩形。
我承认这是一个令人困惑的例子,但它的效果非常酷,所以我鼓励你下载并尝试一下。如果你对代码进行一些实验,你就能弄清楚它是如何工作的。(土卫二是一颗特别奇怪的卫星!)
到此这篇关于基于c#一个制作图像的特写窗口的文章就介绍到这了,更多相关c#图像特写窗口内容请搜索代码网以前的文章或继续浏览下面的相关文章希望大家以后多多支持代码网!


发表评论