一、简介
-
本文只介绍单个项目配置,所有项目配置自行百度。
-
新老版本
android studio配置文件稍有不同。-
pluginmanagement和dependencyresolutionmanagement里面的repositories都需要填写。 -
不同版本的
gradle文件的url格式不一样。
-
-
备用一套镜像地址,这套与下面的镜像地址不同,如果下面的案例中的不行可以替换成这份,注意
url书写格式// 新版本 settings.gradle.kts maven { url url=uri ('http://maven.aliyun.com/nexus/content/groups/public/')} maven { url url=uri ('http://maven.aliyun.com/nexus/content/repositories/jcenter')} maven { url url=uri ('http://maven.aliyun.com/nexus/content/repositories/google')} maven { url url=uri ('http://maven.aliyun.com/nexus/content/repositories/gradle-plugin')} // 老版本 build.gradle maven { url 'http://maven.aliyun.com/nexus/content/groups/public/'} maven { url 'http://maven.aliyun.com/nexus/content/repositories/jcenter'} maven { url 'http://maven.aliyun.com/nexus/content/repositories/google'} maven { url 'http://maven.aliyun.com/nexus/content/repositories/gradle-plugin'}
二、单个项目生效 - 新版本 android studio
-
打开
android studio工程文件,找到settings.gradle.ktspluginmanagement { repositories { google() mavencentral() gradlepluginportal() } } dependencyresolutionmanagement { repositoriesmode.set(repositoriesmode.fail_on_project_repos) repositories { google() mavencentral() } } rootproject.name = "my application" include(":app") -
修改为
pluginmanagement {
    repositories {
        maven { url=uri ("https://www.jitpack.io")}
        maven { url=uri ("https://maven.aliyun.com/repository/releases")}
        maven { url=uri ("https://maven.aliyun.com/repository/google")}
        maven { url=uri ("https://maven.aliyun.com/repository/central")}
        maven { url=uri ("https://maven.aliyun.com/repository/gradle-plugin")}
        maven { url=uri ("https://maven.aliyun.com/repository/public")}
        google()
        mavencentral()
        gradlepluginportal()
    }
}
dependencyresolutionmanagement {
    repositoriesmode.set(repositoriesmode.fail_on_project_repos)
    repositories {
        maven { url=uri ("https://www.jitpack.io")}
        maven { url=uri ("https://maven.aliyun.com/repository/releases")}
        maven { url=uri ("https://maven.aliyun.com/repository/google")}
        maven { url=uri ("https://maven.aliyun.com/repository/central")}
        maven { url=uri ("https://maven.aliyun.com/repository/gradle-plugin")}
        maven { url=uri ("https://maven.aliyun.com/repository/public")}
        google()
        mavencentral()
    }
}

rootproject.name = "my application"
include(":app")
三、单个项目生效 - 老版本 android studio
-
打开
android studio工程文件,找到build.gradle// top-level build file where you can add configuration options common to all sub-projects/modules. buildscript { repositories { google() jcenter() } dependencies { classpath 'com.android.tools.build:gradle:4.1.1' // note: do not place your application dependencies here; they belong // in the individual module build.gradle files } } allprojects { repositories { google() jcenter() } } task clean(type: delete) { delete rootproject.builddir } -
修改为
// top-level build file where you can add configuration options common to all sub-projects/modules.

buildscript {

    repositories {
        // google()
        // jcenter()
        maven { url "https://www.jitpack.io"}
        maven { url "https://maven.aliyun.com/repository/releases"}
        maven { url "https://maven.aliyun.com/repository/google"}
        maven { url "https://maven.aliyun.com/repository/central"}
        maven { url "https://maven.aliyun.com/repository/gradle-plugin"}
        maven { url "https://maven.aliyun.com/repository/public"}
    }
    dependencies {
        classpath 'com.android.tools.build:gradle:4.1.1'


        // note: do not place your application dependencies here; they belong
        // in the individual module build.gradle files
    }
}

allprojects {
    repositories {
        // google()
        // jcenter()
        maven { url "https://www.jitpack.io"}
        maven { url "https://maven.aliyun.com/repository/releases"}
        maven { url "https://maven.aliyun.com/repository/google"}
        maven { url "https://maven.aliyun.com/repository/central"}
        maven { url "https://maven.aliyun.com/repository/gradle-plugin"}
        maven { url "https://maven.aliyun.com/repository/public"}
    }
}

task clean(type: delete) {
    delete rootproject.builddir
}
四、配置 http 代理
-
代理服务器的作用
-
内容缓存:缓存经常访问的网页和数据,当再次访问时可以直接从代理服务器获取,加快访问速度。 -
绕过限制:某些国外源在国内访问的速度极慢,通过代理可以绕过限制,实现跨地域访问。 -
安全性:匿名浏览,数据加密
-
-
配置
http代理【方式一】-
镜像地址
腾讯: https://mirrors.cloud.tencent.com/androidsdk/ 阿里: https://mirrors.aliyun.com/android.googlesource.com/ -
打开
settings,搜索http proxy,然后填入镜像地址,点击apply,在点击ok。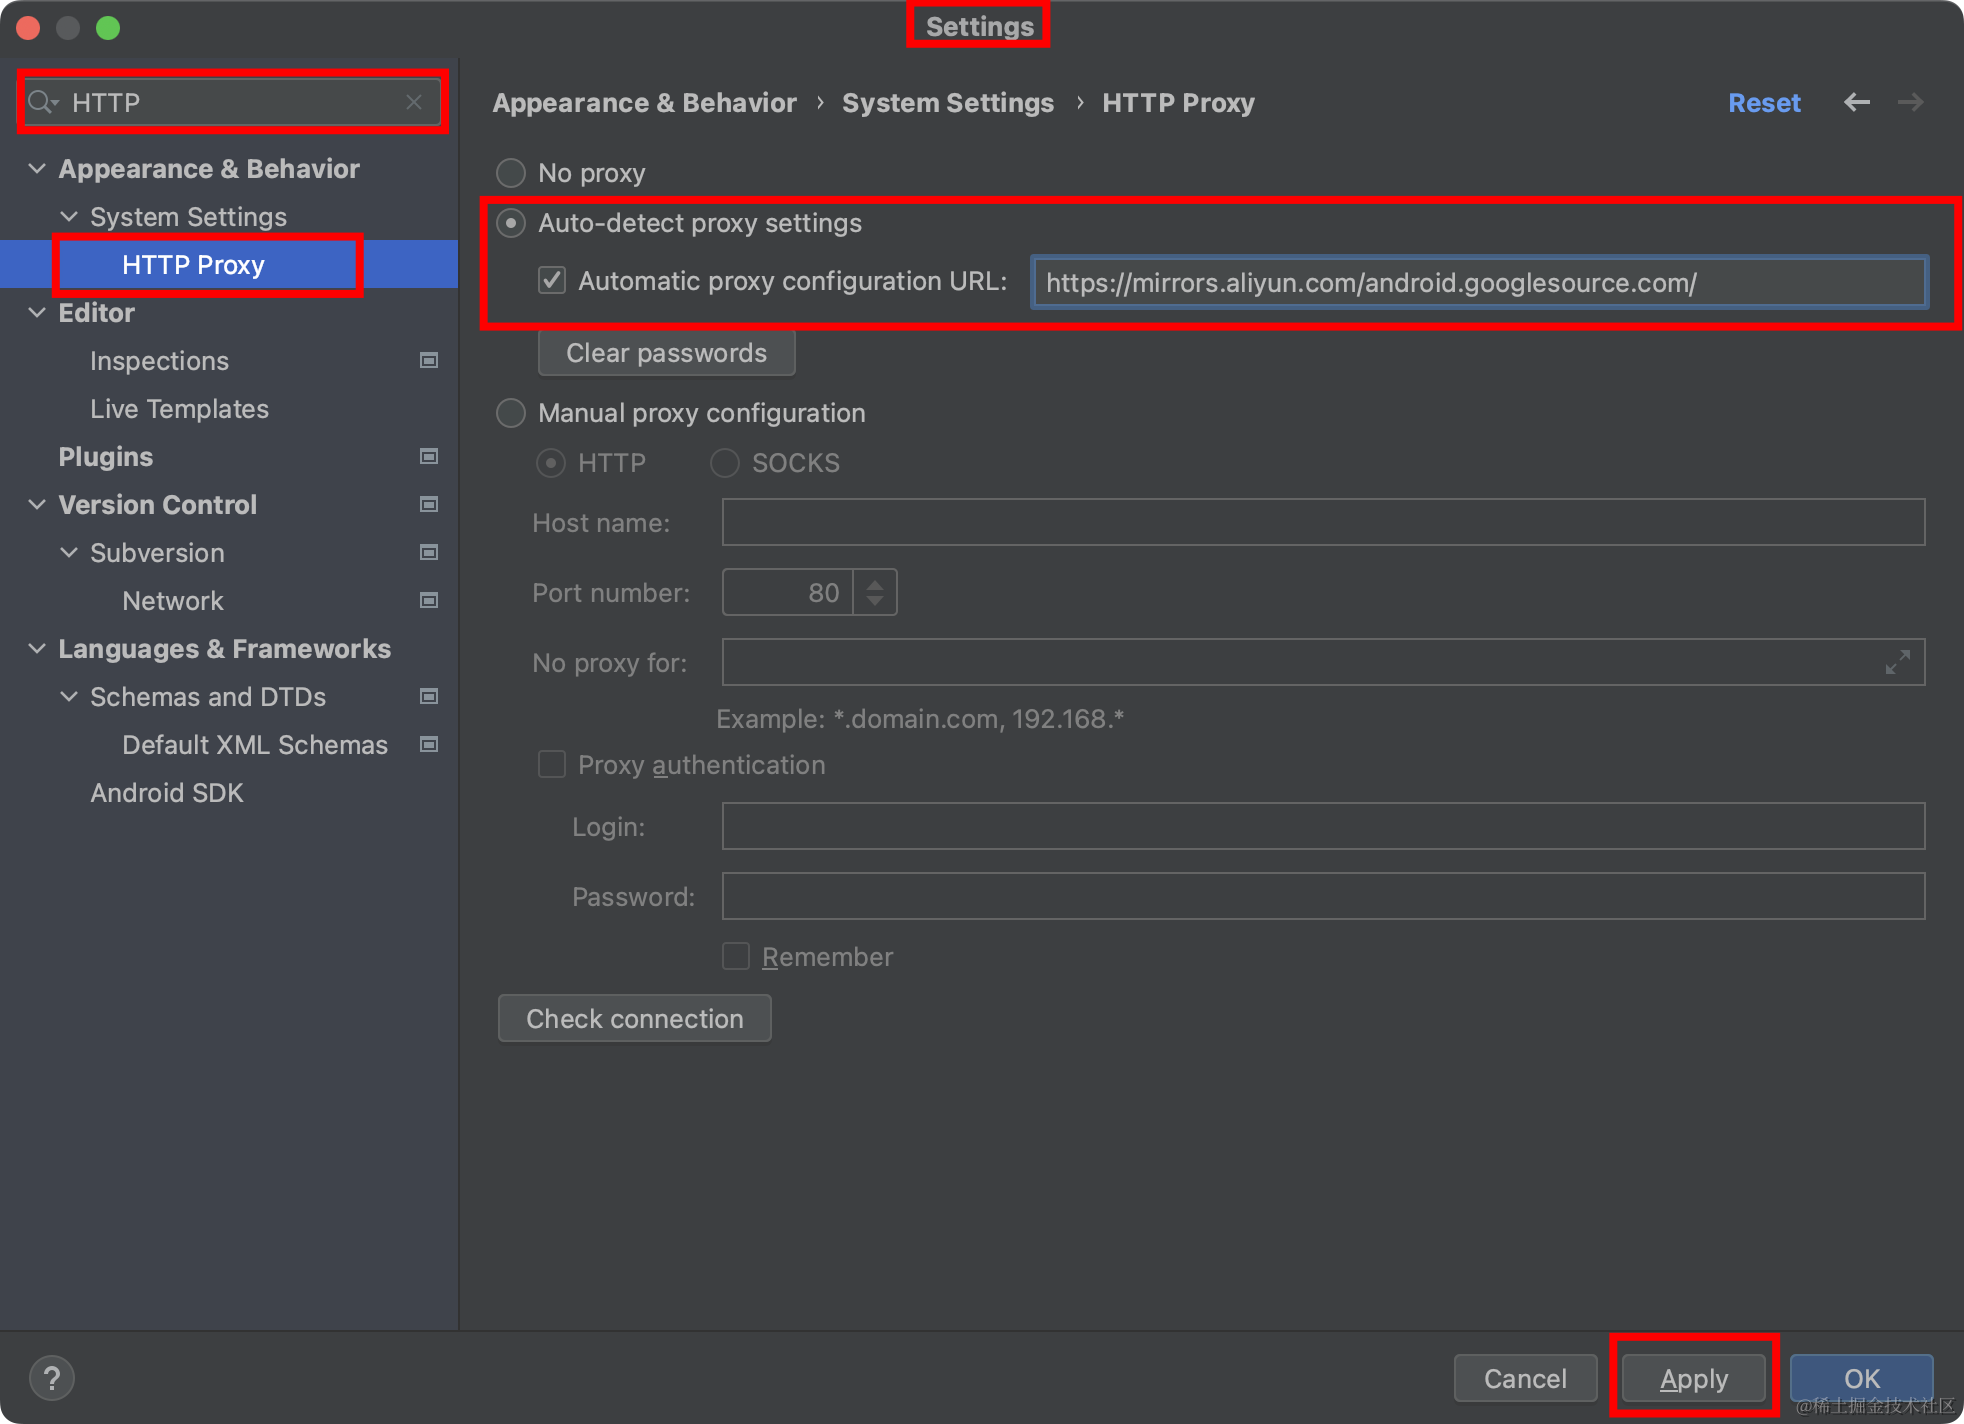
重新启动
android studio会弹出这个配置面板,可以填下面的常用代理服务器,任意选个。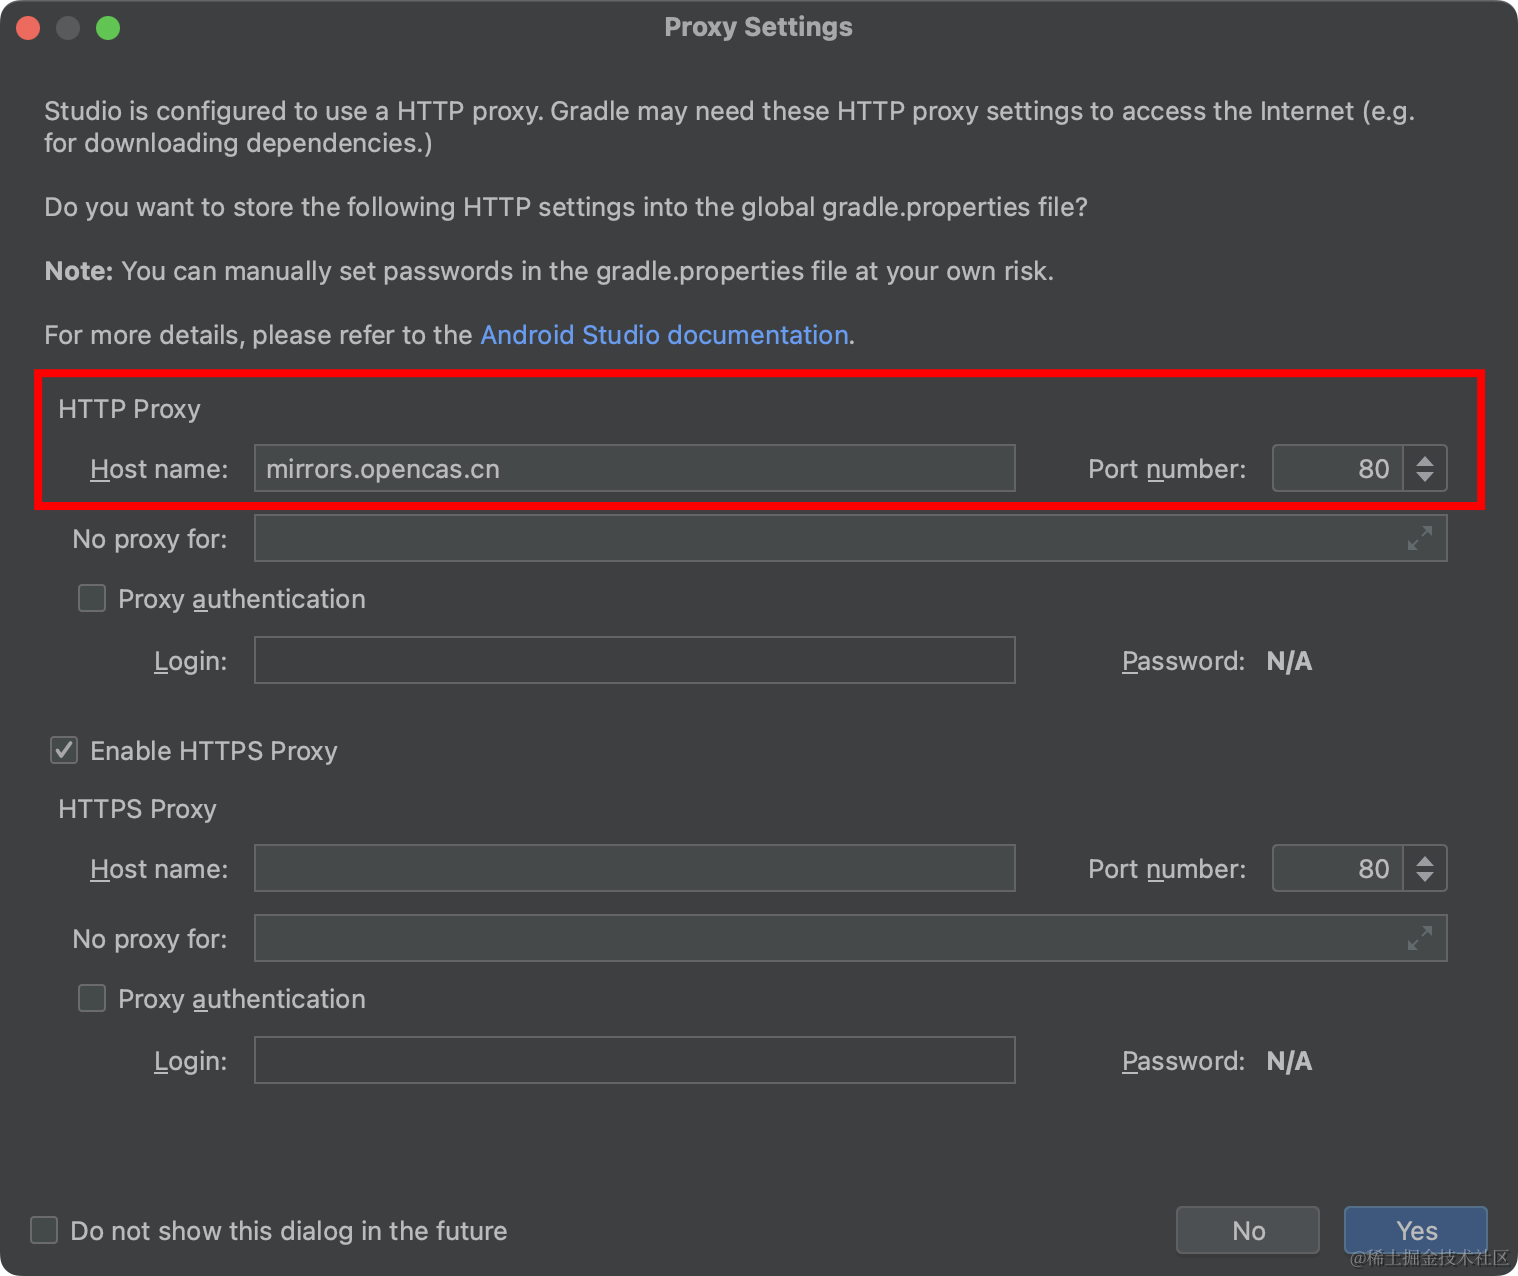
-
-
配置
http代理【方式二】-
打开
settings,搜索http proxy,然后填下面的常用代理服务器,任意选个,点击apply,在点击ok。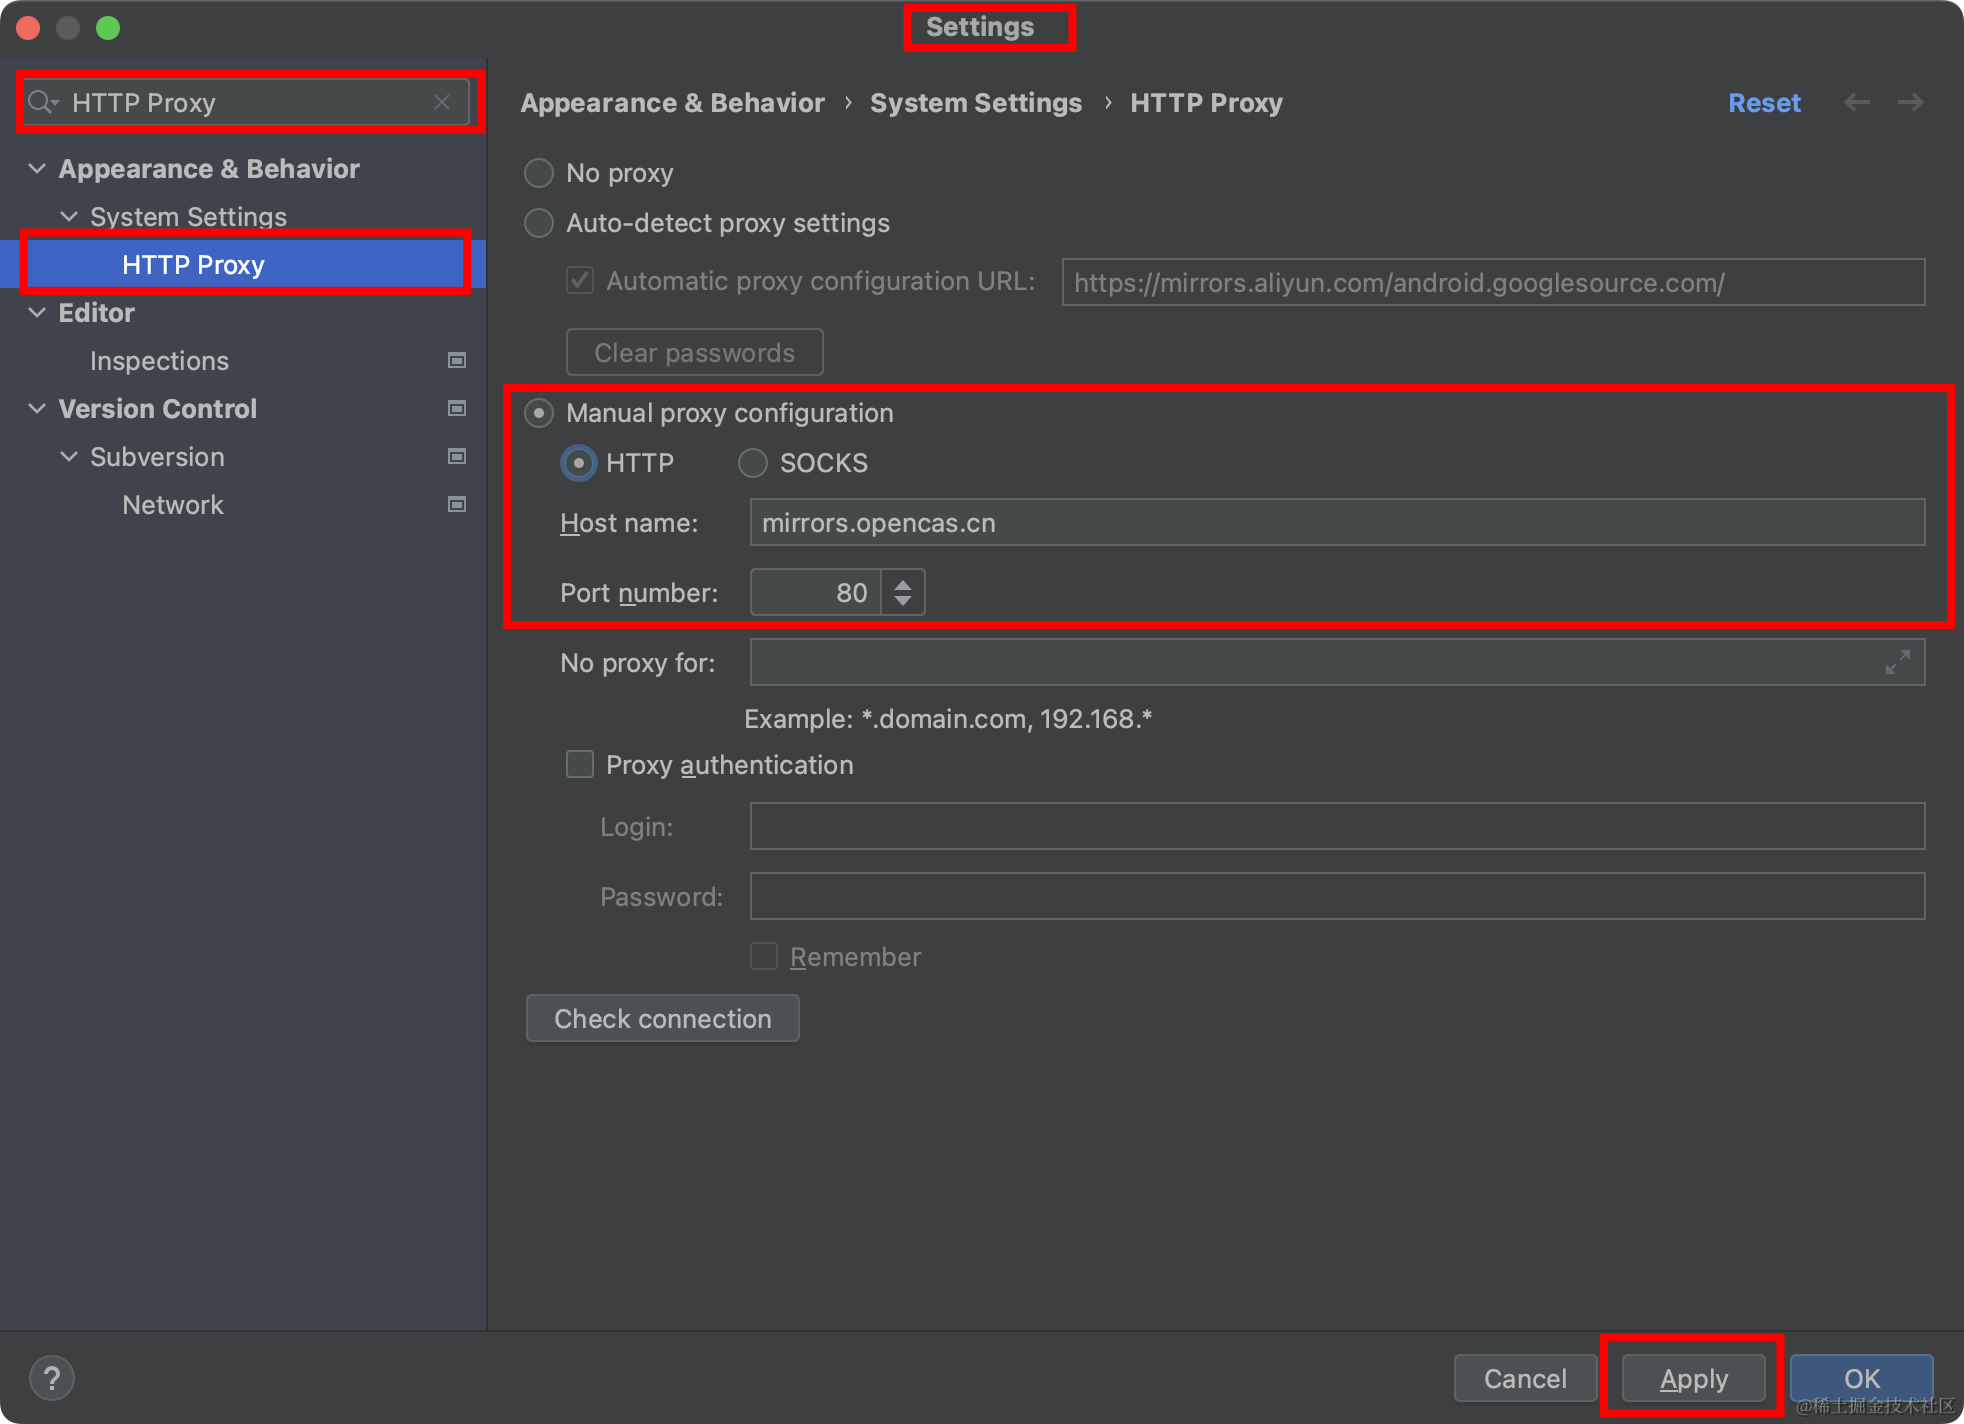
-
-
国内常用的代理服务器(注意:只需要域名即可)
1、东软信息学院
http://mirrors.neusoft.edu.cn 端口:802、北京化工大学
http://ubuntu.buct.edu.cn/ 端口:80
http://ubuntu.buct.cn/ 端口:80
http://ubuntu.buct6.edu.cn/ 端口:80
3、中国科学院开源协会
http://mirrors.opencas.cn 端口:80
http://mirrors.opencas.org 端口:80
http://mirrors.opencas.ac.cn 端口:80
4、上海gdg镜像服务器
http://sdk.gdgshanghai.com 端口:80005、电子科技大学
http://mirrors.dormforce.net 端口:806、腾讯
bugly镜像http://android-mirror.bugly.qq.com 端口:8080


发表评论