这里以python版本opencv演示如何查找颜色
import numpy as np
import cv2
font = cv2.font_hershey_simplex
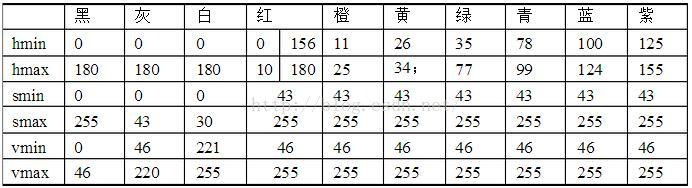
lower_red = np.array([0, 127, 128]) # 红色阈值下界
higher_red = np.array([10, 255, 255]) # 红色阈值上界
lower_yellow = np.array([15, 230, 230]) # 黄色阈值下界
higher_yellow = np.array([35, 255, 255]) # 黄色阈值上界
lower_blue = np.array([85,240,140])
higher_blue = np.array([100,255,165])
frame=cv2.imread("l3.png")
img_hsv = cv2.cvtcolor(frame, cv2.color_bgr2hsv)
mask_red = cv2.inrange(img_hsv, lower_red, higher_red) # 可以认为是过滤出红色部分,获得红色的掩膜
mask_yellow = cv2.inrange(img_hsv, lower_yellow, higher_yellow) # 获得绿色部分掩膜
mask_yellow = cv2.medianblur(mask_yellow, 7) # 中值滤波
mask_red = cv2.medianblur(mask_red, 7) # 中值滤波
mask_blue = cv2.inrange(img_hsv, lower_blue, higher_blue) # 获得绿色部分掩膜
mask_blue = cv2.medianblur(mask_blue, 7) # 中值滤波
#mask = cv2.bitwise_or(mask_green, mask_red) # 三部分掩膜进行按位或运算
print(mask_red)
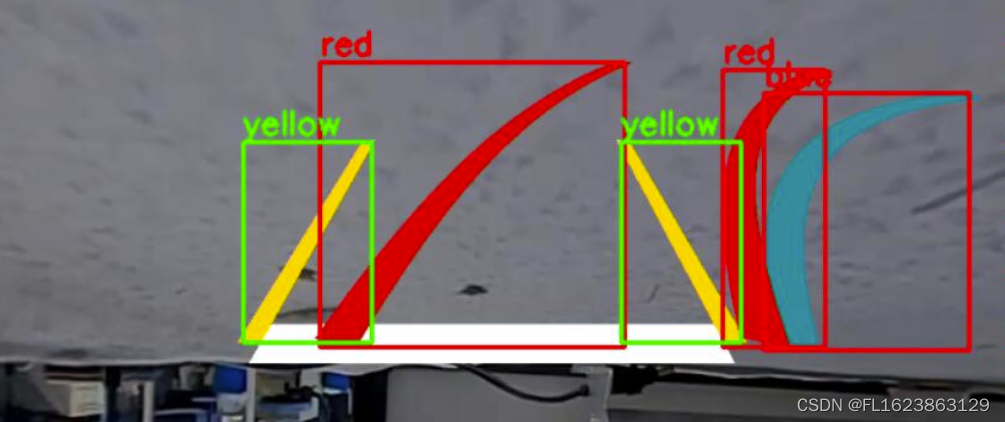
cnts1, hierarchy1 = cv2.findcontours(mask_red, cv2.retr_external, cv2.chain_approx_none) # 轮廓检测 #红色
cnts2, hierarchy2 = cv2.findcontours(mask_blue, cv2.retr_external, cv2.chain_approx_none) # 轮廓检测 #红色
cnts3, hierarchy3 = cv2.findcontours(mask_yellow, cv2.retr_external, cv2.chain_approx_none)
for cnt in cnts1:
(x, y, w, h) = cv2.boundingrect(cnt) # 该函数返回矩阵四个点
cv2.rectangle(frame, (x, y), (x + w, y + h), (0, 0, 255), 2) # 将检测到的颜色框起来
cv2.puttext(frame, 'red', (x, y - 5), font, 0.7, (0, 0, 255), 2)
for cnt in cnts2:
(x, y, w, h) = cv2.boundingrect(cnt) # 该函数返回矩阵四个点
cv2.rectangle(frame, (x, y), (x + w, y + h), (0, 0, 255), 2) # 将检测到的颜色框起来
cv2.puttext(frame, 'blue', (x, y - 5), font, 0.7, (0, 0, 255), 2)
for cnt in cnts3:
(x, y, w, h) = cv2.boundingrect(cnt) # 该函数返回矩阵四个点
cv2.rectangle(frame, (x, y), (x + w, y + h), (0, 255, 0), 2) # 将检测到的颜色框起来
cv2.puttext(frame, 'yellow', (x, y - 5), font, 0.7, (0, 255, 0), 2)
cv2.imshow('frame', frame)
cv2.waitkey(0)
cv2.destroyallwindows()效果
用鼠标确定确定待检测目标的hsv值
import cv2

img = cv2.imread('l3.png')
gray = cv2.cvtcolor(img, cv2.color_bgr2gray)
hsv = cv2.cvtcolor(img, cv2.color_bgr2hsv)


def mouse_click(event, x, y, flags, para):
 if event == cv2.event_lbuttondown: # 左边鼠标点击
  print('pix:', x, y)
  print("bgr:", img[y, x])
  print("gray:", gray[y, x])
  print("hsv:", hsv[y, x])


if __name__ == '__main__':
 cv2.namedwindow("img")
 cv2.setmousecallback("img", mouse_click)
 while true:
  cv2.imshow('img', img)
  if cv2.waitkey() == ord('q'):
   break
 cv2.destroyallwindows()


发表评论