人脸检测研究现状
这里直接引用了吴伟硕士毕业论文
传统的人脸检测算法
传统的人脸检测算法缺点
深度学习人脸检测算法
人脸识别实战
现代人脸识别流程由 5 个常见阶段组成:检测、对齐、标准化、表示和验证
人脸检测
人脸检测的本质是目标检测,由于人脸检测的精度似乎已经满足了大部分日常使用的要求,目前项目的优化主要是在速度提升方面,项目由于性能的限制对计算速度要求较高,因此大多都是基于 linux 平台的,如 dlib ;
这里发现一个满足全平台运行的库包 deepface
在 deepface 中,进行人脸检测有许多的模型可以使用,['opencv', 'ssd', 'dlib', 'mtcnn', 'fastmtcnn', 'retinaface', 'mediapipe', 'yolov8', 'yunet', 'centerface']
不同模型效果判断代码使用如下
import os
import time
import cv2 as cv
from deepface import deepface
import matplotlib.pyplot as plt

## 需要检测的图片
img_filename = 'demo.jpg'
## 检查模型方法
detectors = ['opencv', 'ssd', 'dlib', 'mtcnn', 'fastmtcnn', 'retinaface', 'mediapipe', 'yolov8', 'yunet', 'centerface']

os.makedirs('./demoface/', exist_ok=true)
for detector in detectors:
    try:
        start_time = time.time()
        resp = deepface.extract_faces(img_filename, detector_backend=detector, enforce_detection=false)
        facial_area = [item['facial_area'] for item in resp]
        nums = len(facial_area)
        img = cv.imread(img_filename)
        for item in facial_area:
            x = item['x']
            y = item['y']
            w = item['w']
            h = item['h']
            cv.rectangle(img, pt1=(x, y), pt2=(x + w, y + h), color=(0, 0, 255), thickness=2)
        end_time = time.time()
        print(f'{detector.center(20, " ")} ------- {str(nums).center(20, " ")} ------- {end_time - start_time}')
        cv.imwrite(f'./demoface/{detector}-{nums}.jpg', img)
    except exception as e:
        print(f'./demoface/{detector} ------- {e}')
图片保存在当前目录的 demoface 文件夹下,进行可视化如下
## 可视化代码
img_paths = [filename for filename in os.listdir('./demoface/') if filename.endswith('.jpg')]

fig = plt.figure(figsize=(20, 7))
for ix, img_path in enumerate(img_paths):
    img = cv.imread('./demoface/' + img_path)
    plt.subplot(2,4,ix+1)
    plt.imshow(img[:,:,::-1])
    plt.axis('off')
    plt.title(img_path)
    plt.tight_layout()

plt.savefig('final.jpg')
这里由于 dlib 需要在 linux 上运行, mediapipe 和 现有的 tensorflow==2.10 版本冲突,缺失这两个模型的效果图片,但是好在这两个模型并不是效果最好的模型。
![![[final.jpg]]](https://images.3wcode.com/3wcode/20240804/b_0_202408041958045627.jpg)
原项目中各个模型的效果如下所示:
![![[pasted image 20240602140940.png]]](https://images.3wcode.com/3wcode/20240804/b_0_202408041958102409.jpg)
人脸对齐
这里以卖瓜哥为例子,提取出来的人脸是歪着的,对了更好的进行人脸识别,最好是将人脸给弄正;这里可以利用眼睛连线水平的关系来扶正人脸,如图所示;
![![[pasted image 20240602233732.png]]](https://images.3wcode.com/3wcode/20240804/b_0_202408041958123479.jpg)
我们只需要将人脸旋转一定角度就可以,角度计算如下: θ = arctan ∣ y 1 − y 2 ∣ ∣ x 1 − x 2 ∣ \theta = \arctan \frac{|y_1 - y_2|}{|x_1-x_2|} θ=arctan∣x1−x2∣∣y1−y2∣
执行代码如下:
import math
from pil import image
import cv2 as cv
import numpy as np
from deepface import deepface
import matplotlib.pyplot as plt
import matplotlib.gridspec as gridspec

# 原图
img_origin = np.asarray(image.open('./buy watermelon.jpg'))

# 提取图
resp = deepface.extract_faces('./buy watermelon.jpg', align=false)
extract_face = resp[0]['face']

# 旋转图
## 计算 degree
x1, y1 = resp[0]['facial_area']['left_eye']
x2, y2 = resp[0]['facial_area']['right_eye']
degree = math.atan(abs(y1-y2)/abs(x1-x2)) / math.pi * 180

## 旋转图像并进行检测
img = image.open('./buy watermelon.jpg')
img = np.asarray(img.rotate(degree))
resp = deepface.extract_faces(img, align=false)
extract_face_aligned = resp[0]['face'][:,:,::-1]

# 提取align图,这里其实默认align为true
resp = deepface.extract_faces('./buy watermelon.jpg', align=true)
extract_face_align_true = resp[0]['face']

# 可视化
fig = plt.figure(figsize=(10, 12))
gs = gridspec.gridspec(2, 3, height_ratios=[3, 1], hspace=0)

plt.subplot(gs[0,:])
plt.imshow(img_origin)
plt.axis('off')
plt.title('origin')
plt.subplot(gs[1,0])
plt.imshow(extract_face)
plt.axis('off')
plt.title('align=false')
plt.subplot(gs[1,1])
plt.imshow(extract_face_aligned)
plt.axis('off')
plt.title('align=false and fixed')
plt.subplot(gs[1,2])
plt.imshow(extract_face_align_true)
plt.axis('off')
plt.title('align=true')
plt.tight_layout()
得到结果如下
![![[pasted image 20240602233028.png]]](https://images.3wcode.com/3wcode/20240804/b_0_202408041958154333.jpg)
人脸标准化
检测和对齐是现代面部识别流程的重要早期强制性阶段。然而,人脸检测依赖于将人脸提取为矩形。因此,即使检测到并对齐的面部图像也会在背景中出现一些噪点。标准化是现代面部识别管道的一个可选阶段,它计划减少输入中的噪声并提高面部识别管道的准确性。人脸标准化阶段主要基于面部椭圆形的面部标志检测。
![![[pasted image 20240603010744.png]]](https://images.3wcode.com/3wcode/20240804/b_0_202408041958171890.jpg)
这里由于 dlib 需要在 linux 上运行,而 mediapipe 和 现有的 tensorflow==2.10 版本冲突,因此在这里展示不进行人脸标准化操作,具体操作可以看下面两篇内容;
- facial landmarks for face recognition with dlib - sefik ilkin serengil (sefiks.com)
- deep face detection with mediapipe - sefik ilkin serengil (sefiks.com)
- normalization for facial recognition with mediapipe - sefik ilkin serengil (sefiks.com)
人脸表示
书中采取了一个简单的卷积网络对检测出来的人脸进行分类,但是数据量太少,模型层数太低,这就会导致提取的特征不充分,容易出现欠拟合情况,这里采用 siamese networks 进行人脸表示;
可以采用的模型有:vgg-face, facenet, facenet512, openface, deepface, deepid, dlib, arcface, sface, ghostfacenet,模型性能的对比如下:
| model | measured score | declared score |
|---|---|---|
| facenet512 | 98.4% | 99.6% |
| human-beings | 97.5% | 97.5% |
| facenet | 97.4% | 99.2% |
| dlib | 96.8% | 99.3 % |
| vgg-face | 96.7% | 98.9% |
| arcface | 96.7% | 99.5% |
| ghostfacenet | 93.3% | 99.7% |
| sface | 93.0% | 99.5% |
| openface | 78.7% | 92.9% |
| deepface | 69.0% | 97.3% |
| deepid | 66.5% | 97.4% |
vgg-face:vgg 代表 视觉几何组。vgg 神经网络(vggnet)是基于深度卷积神经网络最常用的图像识别模型类型之一。vgg 人脸识别模型在流行的野外标记人脸 (lfw) 数据集上实现了97.78%的准确率。facenet:该模型由谷歌的研究人员开发。facenet 被认为是通过深度学习进行人脸检测和识别的最先进的模型。facenet 的主要优点是其高效率和高性能,据报道,它在 lfw 数据集上达到了99.63%的准确率。openface:这个人脸识别模型是由卡内基梅隆大学的研究人员建立的。因此,openface 在很大程度上受到 facenet 项目的启发,但这更轻量级,其许可证类型更灵活,openface 在 lfw 数据集上实现了93.80%的准确率。deepface: 这种人脸识别模型是由 facebook 的研究人员开发的。facebook deepface 算法是在属于 4000 万张面孔的标记数据集上进行训练的,这是发布时最大的面部数据集。该方法基于具有九层的深度神经网络。facebook 模型在 lfw 数据集基准测试上实现了97.35%(+/- 0.25%)的准确率。deepid: deepid 人脸验证算法基于深度学习进行人脸识别。它是首批使用卷积神经网络并在人脸识别任务上实现优于人类性能的模型之一。deep-id 是由香港中文大学的研究人员引入的。基于 deepid 人脸识别的系统是第一批在这项任务中超越人类表现的系统。例如,deepid2 在野外标记面孔(lfw)数据集上实现了99.15%。dlib: dlib 人脸识别模型将自己命名为“世界上最简单的 python 面部识别 api”。dlib 的人脸识别工具将人脸图像映射到 128 维矢量空间,其中同一个人的图像彼此靠近,而不同人的图像相距甚远。因此,dlib 通过将人脸映射到 128d 空间,然后检查它们的欧几里得距离是否足够小来执行人脸识别。dlib 模型的距离阈值为 0.6,在标准 lfw 人脸识别基准上实现了99.38%的准确率。arcface: 这是模型组合中的最新型号。它的联合设计师是伦敦帝国理工学院和 insightface 的研究人员。arcface 模型在 lfw 数据集上的准确度达到99.40%。sface: 是一种人脸识别的预训练模型,它是基于深度神经网络的人脸识别模型。sface 模型是由中国科学院自动化研究所的研究人员开发的,它在多个人脸识别竞赛中表现出色。sface 模型采用了一种名为“中心损失”的训练方法,可以使得模型在人脸识别任务中更加准确。
这些人脸识别模型之前是为了在大规模数据集上对人脸图像的身份进行分类而构建的。考虑一个包含 1000 个不同人物的 100 万张图像的数据集。在这种情况下,cnn 模型的输出层将为 1000,并且该模型经过训练以查找输入图像的身份。当训练结束时,输出层被丢弃,输出层的早期层将成为新的输出层。现在,新模型不会对身份进行分类,而是返回面部的表示。我们现在可以提供训练数据集中未出现的新图像。该模型仍然可以找到表征。
![![[pasted image 20240603013332.png]]](https://images.3wcode.com/3wcode/20240804/b_0_202408041958205188.jpg)
因此,将任何一张人脸图片带入模型得到的特征表示其实质都是这1000个不同人物的变异导致的特征实现的,是基于这些人物进行特征编码;
在 deepface 中,这一任务实现变得非常简单,只需要将原图带入 api 中计算就可以得到表征,其会自动进行人脸检测,人脸对齐以及图片尺寸缩放等等任务;
这里使用 deepface 模型对卖瓜哥进行特征表示计算,代码如下:
import cv2 as cv
import numpy as np
from deepface import deepface
import matplotlib.pyplot as plt

# 获取 represent 结果中的 embedding 和 facial_area
resp = deepface.represent('./buy watermelon.jpg', model_name='deepface')

# 利用 facial_area 画方框
img = cv.imread('./buy watermelon.jpg')
item = resp[0]['facial_area']
x, y, w, h = item['x'], item['y'], item['w'], item['h']
cv.rectangle(img, pt1=(x, y), pt2=(x + w, y + h), color=(0, 0, 255), thickness=2)

# 可视化表示
fig = plt.figure(figsize=(12, 4))
plt.subplot(1,2,1)
plt.imshow(img[:,:,::-1])
plt.axis('off')
plt.subplot(1,2,2)
plt.imshow(np.tile(np.array(resp[0]['embedding']), [800, 1]), interpolation='nearest', cmap=plt.cm.ocean)
plt.axis('off')
plt.colorbar()

plt.show()
得到结果如下:
![![[pasted image 20240603015132.png]]](https://images.3wcode.com/3wcode/20240804/b_0_202408041958224285.jpg)
如要进行分类,我们可以利用模型输出的特征向量,在后面链接 dense 层最后再进行分类操作;操作较为简单,这里不进行处理;
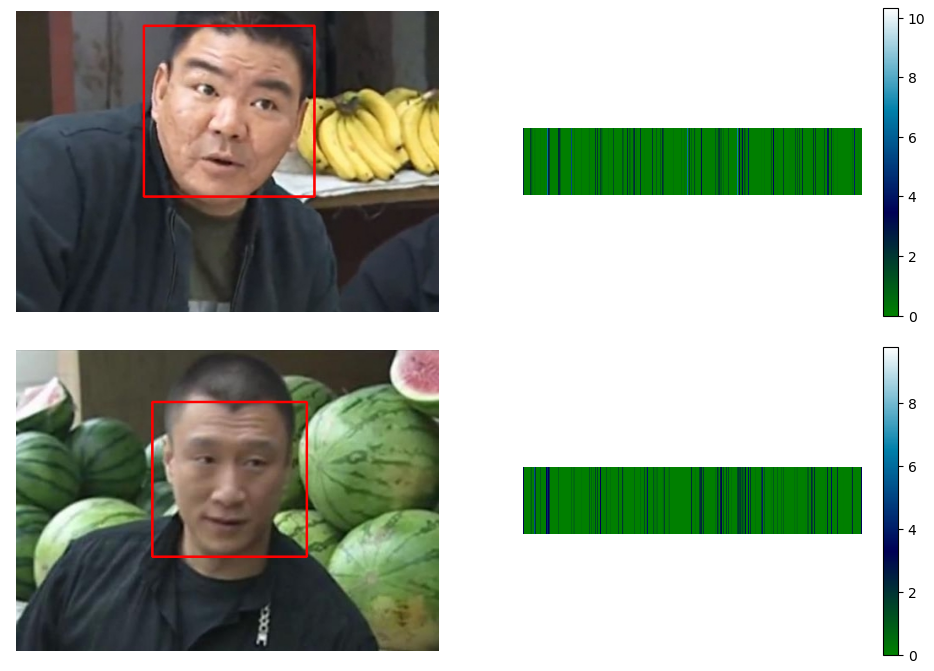
人脸验证
人脸验证是绕过分类的形式对两张或者多张图片进行判断,这种方法适用于图片较少,无法进行分类训练的情况,由于通常任务来说目标人脸的图片较少,因此该方法要比分类更为常用;
其核心是通过比较两张图片的人脸表示特征向量的相似度,相似度有很多的计量方法,比较常用的有:cosine,euclidean 和 euclidean_l2
使用 euclidean 的经验阈值有:
| model | euclidean threshold |
|---|---|
| vgg-face | 0.55 |
| openface | 0.55 |
| facenet | 10 |
| deepface | 64 |
使用代码实现如下
import cv2 as cv
import numpy as np
from deepface import deepface
import matplotlib.pyplot as plt

# 获取 represent 结果中的 embedding 和 facial_area
resp = deepface.represent('./buy watermelon.jpg', model_name='deepface')

# > embedding_1
embedding_1 = np.array(resp[0]['embedding'])

# 利用 facial_area 画方框
img = cv.imread('./buy watermelon.jpg')
item = resp[0]['facial_area']
x, y, w, h = item['x'], item['y'], item['w'], item['h']
cv.rectangle(img, pt1=(x, y), pt2=(x + w, y + h), color=(0, 0, 255), thickness=2)

# 可视化表示
fig = plt.figure(figsize=(12, 4))
plt.subplot(1,2,1)
plt.imshow(img[:,:,::-1])
plt.axis('off')
plt.subplot(1,2,2)
plt.imshow(np.tile(np.array(resp[0]['embedding']), [800, 1]), interpolation='nearest', cmap=plt.cm.ocean)
plt.axis('off')
plt.colorbar()
plt.show()


# 获取 represent 结果中的 embedding 和 facial_area
resp = deepface.represent('./sell watermelon.jpg', model_name='deepface')

# > embedding_2
embedding_2 = np.array(resp[0]['embedding'])

# 利用 facial_area 画方框
img = cv.imread('./sell watermelon.jpg')
item = resp[0]['facial_area']
x, y, w, h = item['x'], item['y'], item['w'], item['h']
cv.rectangle(img, pt1=(x, y), pt2=(x + w, y + h), color=(0, 0, 255), thickness=2)

# 可视化表示
fig = plt.figure(figsize=(12, 4))
plt.subplot(1,2,1)
plt.imshow(img[:,:,::-1])
plt.axis('off')
plt.subplot(1,2,2)
plt.imshow(np.tile(np.array(resp[0]['embedding']), [800, 1]), interpolation='nearest', cmap=plt.cm.ocean)
plt.axis('off')
plt.colorbar()
plt.show()


## 计算分数
euclidean = np.sqrt(np.sum(np.abs(embedding_1 - embedding_2)))
# euclidean: 41.536550691276716
很显然,euclidean 是越小越相似,这里
41
<
64
41 < 64
41<64,如果按照经验阈值判断应该是同一个人,但是显然不是;这里有一种更为简单的方法
deepface.verify(img1_path='./buy watermelon.jpg', img2_path='./sell watermelon.jpg', model_name='deepface', distance_metric='euclidean')
得到输出结果
{'detector_backend': 'opencv',
 'distance': 59.595589732220056,
 'facial_areas': {'img1': {'h': 202,
                           'left_eye': (295, 110),
                           'right_eye': (221, 91),
                           'w': 202,
                           'x': 151,
                           'y': 17},
                  'img2': {'h': 183,
                           'left_eye': (282, 130),
                           'right_eye': (225, 128),
                           'w': 183,
                           'x': 161,
                           'y': 61}},
 'model': 'deepface',
 'similarity_metric': 'euclidean',
 'threshold': 64,
 'time': 3.27,
 'verified': true}
这里分数不同的原因是,deepface.verify 自动启用了 normalization=base,无法关闭;
参考资料
- ageitgey/face_recognition: the world’s simplest facial recognition api for python and the command line (github.com)
- shiqiyu/libfacedetection:一个用于图像中人脸检测的开源库。人脸检测速度可达1000fps。 — shiqiyu/libfacedetection: an open source library for face detection in images. the face detection speed can reach 1000fps. (github.com)
- serengil/retinaface:retinaface:python 的深度人脸检测库 — serengil/retinaface: retinaface: deep face detection library for python (github.com)
- virtual background with mediapipe - sefik ilkin serengil (sefiks.com)
- 用于深度学习的大规模人脸识别 - sefik ilkin serengil — large scale face recognition for deep learning - sefik ilkin serengil (sefiks.com)


发表评论