部署 eck [2.12]
安装说明
基于operator 模式的elastic cloud on kubernetes,是 elastic 推荐的在 kubernetes 上部署 elasticsearch、kibana 和 apm server 的方法。 eck 有一个专用的 helm 图表,可以 在 eck 存储库(文档)中找到。
eck中集成了大量es的运维工作:
- 管理和监测多个集群
- 轻松升级至新的版本
- 扩大或缩小集群容量
- 更改集群配置
- 动态调整本地存储的规模(包括 elastic local volume(一款本地存储驱动器))
- 备份
支持版本
- kubernetes 1.25-1.29
- openshift 4.11-4.14
- google kubernetes engine (gke), azure kubernetes service (aks), and amazon elastic - kubernetes service (eks)
- helm: 3.2.0+
- elasticsearch, kibana, apm server: 6.8+, 7.1+, 8+
- enterprise search: 7.7+, 8+
- beats: 7.0+, 8+
- elastic agent: 7.10+ (standalone), 7.14+ (fleet), 8+
- elastic maps server: 7.11+, 8+
- logstash: 8.7+
helm repoadd elastic https://helm.elastic.co
helm repo update
# 查看图表的所有可用版本
helm search repo elastic/eck-operator --versions
helm 支持的最低版本是 3.2.0。
限制安装
安装crd
此模式避免安装任何集群范围的资源,并限制操作员仅管理一组预定义的命名空间。
由于 crd 是全局资源,因此它们仍然需要由管理员安装。这可以通过以下方式实现:
# 创建命名空间
kubectl create ns apm

# 指定版本安装
helm install --create-namespace -n apm elastic-operator-crds elastic/eck-operator-crds --version 2.12.1
这个操作可以由对他们希望管理的命名空间集具有完全访问权限的任何用户安装。
安装operator
以下示例将运算符安装到 elastic-system 命名空间,并将其配置为仅管理 elastic-system 和 apm:
# 下载指定版本图表
# 下载指定版本图表
helm pull elastic/eck-operator --version 2.12.1
tar zxvf eck-operator-2.12.1.tgz
helm upgrade--install elastic-operator elastic/eck-operator \
  -n apm --create-namespace \
  --values="eck-operator/values.yaml" \
  --set=installcrds=false \
  --set=managednamespaces='{apm,}' \
  --set=createclusterscopedresources=false \
  --set=webhook.enabled=false \
  --set=config.validatestorageclass=false
查看可用的配置选项
您可以通过运行以下命令来查看所有可配置值:
helm show values elastic/eck-operator-n apm
验证服务
验证一下是否安装成功
[root@node1 ~]# kubectl get pods -n apm
name                 ready   status    restarts   age
elastic-operator-0   1/1     running   0          5m29s
监控 operator 日志:
kubectl-n apm logs -f statefulset.apps/elastic-operator
这个时候会安装上若干个 crd 对象,当然这些 crd 资源的控制器就在上面的 elastic-operator-0 这个 pod 中:
$ kubectl get crd| grep elastic
agents.agent.k8s.elastic.co                                 2024-05-08t03:26:15z
apmservers.apm.k8s.elastic.co                               2024-05-08t03:26:15z
beats.beat.k8s.elastic.co                                   2024-05-08t03:26:15z
elasticmapsservers.maps.k8s.elastic.co                      2024-05-08t03:26:15z
elasticsearchautoscalers.autoscaling.k8s.elastic.co         2024-05-08t03:26:15z
elasticsearches.elasticsearch.k8s.elastic.co                2024-05-08t03:26:15z
enterprisesearches.enterprisesearch.k8s.elastic.co          2024-05-08t03:26:15z
kibanas.kibana.k8s.elastic.co                               2024-05-08t03:26:15z
logstashes.logstash.k8s.elastic.co                          2024-05-08t03:26:15z
stackconfigpolicies.stackconfigpolicy.k8s.elastic.co        2024-05-08t03:26:15z
然后我们可以利用 crd 对象来创建一个非常简单的单个 elasticsearch 集群
创建es存储
创建存储类
创建华为云sfs存储类
创建文件 sfsturbo-es-sc.yaml
---
apiversion: storage.k8s.io/v1
allowvolumeexpansion: true
kind: storageclass
metadata:
  name: sfsturbo-es-sc
mountoptions:
- vers=3
- nolock
- timeo=600
- hard
parameters:
  csi.storage.k8s.io/csi-driver-name: sfsturbo.csi.everest.io
  csi.storage.k8s.io/fstype: nfs
  everest.io/archive-on-delete: "true"
  everest.io/share-access-to: 4f9789b0-xxxx-xxxx-xxxx-cxxxx75dxxxx # subpath模式下,填写sfs turbo资源的所在vpc的id。
  everest.io/share-export-location: 3967e677-xxxx-xxxx-xxxx-xxxxxxx8xxxx.sfsturbo.internal:/apm/elasticsearch
  everest.io/share-source: sfs-turbo
  everest.io/volume-as: subpath # 该参数需设置为“subpath”来使用subpath模式。
  everest.io/volume-id: 3967e677-xxxx-xxxx-xxxx-xxxx3xxxxxxx # sfs turbo资源的卷id
provisioner: everest-csi-provisioner
allowvolumeexpansion: true
volumebindingmode: immediate
reclaimpolicy: retain
创建nfs存储类
1. 安装配置nfs
# 所有节点安装nfs客户端
# 本文k8s节点系统版本为 rockylinux 9.2
yum install -y nfs-utils
2. 为nfs创建rabc
创建文件nfs-rbac.yaml
kind: clusterrole
apiversion: rbac.authorization.k8s.io/v1
metadata:
  name: nfs-provisioner-runner
rules:
  - apigroups:[""]
    resources: ["persistentvolumes"]
    verbs: ["get", "list", "watch", "create", "delete"]
  - apigroups: [""]
    resources: ["persistentvolumeclaims"]
    verbs: ["get", "list", "watch", "update"]
  - apigroups: ["storage.k8s.io"]
    resources: ["storageclasses"]
    verbs: ["get", "list", "watch"]
  - apigroups: [""]
    resources: ["events"]
    verbs: ["create", "update", "patch"]
  - apigroups: [""]
    resources: ["services", "endpoints"]
    verbs: ["get"]
  - apigroups: ["extensions"]
    resources: ["podsecuritypolicies"]
    resourcenames: ["nfs-provisioner"]
    verbs: ["use"]
---
kind: clusterrolebinding
apiversion: rbac.authorization.k8s.io/v1
metadata:
  name: run-nfs-provisioner
subjects:
  - kind: serviceaccount
    name: nfs-provisioner
     # replace with namespace where provisioner is deployed
    namespace: default
roleref:
  kind: clusterrole
  name: nfs-provisioner-runner
  apigroup: rbac.authorization.k8s.io
---
kind: role
apiversion: rbac.authorization.k8s.io/v1
metadata:
  name: leader-locking-nfs-provisioner
rules:
  - apigroups: [""]
    resources: ["endpoints"]
    verbs: ["get", "list", "watch", "create", "update", "patch"]
---
kind: rolebinding
apiversion: rbac.authorization.k8s.io/v1
metadata:
  name: leader-locking-nfs-provisioner
subjects:
  - kind: serviceaccount
    name: nfs-provisioner
    # replace with namespace where provisioner is deployed
    namespace: default
roleref:
  kind: role
  name: leader-locking-nfs-provisioner
  apigroup: rbac.authorization.k8s.io
kubectl apply-f nfs-rbac.yaml
3. 创建nfs provisioner
创建文件nfs-provisioner.yaml
apiversion: v1
kind: serviceaccount
metadata:
  name: nfs-provisioner
---
kind: service
apiversion: v1
metadata:
  name: nfs-provisioner
  labels:
    app: nfs-provisioner
spec:
  ports:
    - name: nfs
      port:2049
    - name: nfs-udp
      port: 2049
      protocol: udp
    - name: nlockmgr
      port: 32803
    - name: nlockmgr-udp
      port: 32803
      protocol: udp
    - name: mountd
      port: 20048
    - name: mountd-udp
      port: 20048
      protocol: udp
    - name: rquotad
      port: 875
    - name: rquotad-udp
      port: 875
      protocol: udp
    - name: rpcbind
      port: 111
    - name: rpcbind-udp
      port: 111
      protocol: udp
    - name: statd
      port: 662
    - name: statd-udp
      port: 662
      protocol: udp
  selector:
    app: nfs-provisioner
---
kind: deployment
apiversion: apps/v1
metadata:
  name: nfs-provisioner
spec:
  selector:
    matchlabels:
      app: nfs-provisioner
  replicas: 1
  strategy:
    type: recreate
  template:
    metadata:
      labels:
        app: nfs-provisioner
    spec:
      serviceaccount: nfs-provisioner
      containers:
        - name: nfs-provisioner
          # image: registry.k8s.io/sig-storage/nfs-provisioner:v4.0.8
          image: k8s.dockerproxy.com/sig-storage/nfs-provisioner:v4.0.8
          ports:
            - name: nfs
              containerport: 2049
            - name: nfs-udp
              containerport: 2049
              protocol: udp
            - name: nlockmgr
              containerport: 32803
            - name: nlockmgr-udp
              containerport: 32803
              protocol: udp
            - name: mountd
              containerport: 20048
            - name: mountd-udp
              containerport: 20048
              protocol: udp
            - name: rquotad
              containerport: 875
            - name: rquotad-udp
              containerport: 875
              protocol: udp
            - name: rpcbind
              containerport: 111
            - name: rpcbind-udp
              containerport: 111
              protocol: udp
            - name: statd
              containerport: 662
            - name: statd-udp
              containerport: 662
              protocol: udp
          securitycontext:
            capabilities:
              add:
                - dac_read_search
                - sys_resource
          args:
            - "-provisioner=tiga.cc/nfs"
          env:
            - name: pod_ip
              valuefrom:
                fieldref:
                  fieldpath: status.podip
            - name: service_name
              value: nfs-provisioner
            - name: pod_namespace
              valuefrom:
                fieldref:
                  fieldpath: metadata.namespace
          imagepullpolicy: "ifnotpresent"
          volumemounts:
            - name: export-volume
              mountpath: /export
      volumes:
        - name: export-volume
          hostpath:
            path: /data/nfs
创建nfs-provisioner
kubectl apply-f nfs-provisioner.yaml
**
查看nfs provisioner状态**
kubectl get pods--selector='app=nfs-provisioner'
输出
name                               ready   status    restarts   age
nfs-provisioner-7d997c56c5-jhl2x1/1     running   0          15h
4. 创建storageclass
创建文件nfs-class.yaml
kind: storageclass
apiversion: storage.k8s.io/v1
metadata:
  name: tiga-nfs
provisioner: tiga.cc/nfs
mountoptions:
  -vers=4.1
创建nfs stroage class
kubectl apply-f nfs-class.yaml
创建pvc 动态绑定
手动创建以下pvc
- elasticsearch-data-es-quickstart-es-default-0
- elasticsearch-data-es-quickstart-es-default-1
- elasticsearch-data-es-quickstart-es-default-2
pvc 配置如下:
---
kind: persistentvolumeclaim
apiversion: v1
metadata:
  name: elasticsearch-data-es-quickstart-es-default-0
  namespace: apm
spec:
  accessmodes:
    - readwritemany
  resources:
    requests:
      storage: 50gi
  storageclassname: sfsturbo-es-sc
  volumemode: filesystem
---
kind: persistentvolumeclaim
apiversion: v1
metadata:
  name: elasticsearch-data-es-quickstart-es-default-1
  namespace: apm
spec:
  accessmodes:
    - readwritemany
  resources:
    requests:
      storage: 50gi
  storageclassname: sfsturbo-es-sc
  volumemode: filesystem
---
kind: persistentvolumeclaim
apiversion: v1
metadata:
  name: elasticsearch-data-es-quickstart-es-default-2
  namespace: apm
spec:
  accessmodes:
    - readwritemany
  resources:
    requests:
      storage: 50gi
  storageclassname: sfsturbo-es-sc
  volumemode: filesystem
手动创建pvc
部署elasticsearch集群 [7.17.3]
api接口文档参考: https://www.elastic.co/guide/en/cloud-on-k8s/1.0/k8s-elasticsearch-k8s-elastic-co-v1.html
利用 crd 对象来创建 elasticsearch 集群:
声明了要创建一个 7.17.3 版本的 elasticsearch 资源对象:
---
apiversion: elasticsearch.k8s.elastic.co/v1
kind: elasticsearch
metadata:
  name: es-quickstart
  namespace:"apm"
spec:
  version: 7.17.3
  updatestrategy:
    changebudget:
      maxsurge: 1
      maxunavailable: 0
  nodesets:
  - name: default
    count: 3
    config:
      node.master: true
      node.data: true
      node.ingest: true
      node.store.allow_mmap: false
      node.attr.attr_name: attr_value
      #开启跨域访问支持,默认为false
      http.cors.enabled: true
      #跨域访问允许的域名地址,(允许所有域名)以上使用正则
      http.cors.allow-origin: /.*/
      http.cors.allow-headers: authorization,x-requested-with,content-length,content-type
    podtemplate:
      metadata:
        labels:
          app: elasticsearch
      spec:
        containers:
        - name: elasticsearch
          resources:
            requests:
              # eck operator默认申请4g内存
              memory: 1gi
              cpu: 1
            limits:
              memory: 8gi
              cpu: 4
    volumeclaimtemplates:
    - metadata:
        name: elasticsearch-data
      spec:
        accessmodes:
        - readwriteonce
        resources:
          requests:
            storage: 30gi
        storageclassname: sfsturbo-es-sc
---
##https://www.elastic.co/guide/en/cloud-on-k8s/1.0/k8s-elasticsearch-k8s-elastic-co-v1.html
apiversion: elasticsearch.k8s.elastic.co/v1
kind: elasticsearch
metadata:
  name: es-quickstart
  namespace: "apm"
spec:
  version: 7.17.3
  updatestrategy:
    changebudget:
      maxsurge: 1
      maxunavailable: 0
  nodesets:
  - name: default
    count: 3
    config:
      node.master: true
      node.data: true
      node.ingest: true
      node.store.allow_mmap: false
      node.attr.attr_name: attr_value
      #开启跨域访问支持,默认为false
      http.cors.enabled: true
      #跨域访问允许的域名地址,(允许所有域名)以上使用正则
      http.cors.allow-origin: /.*/
      http.cors.allow-headers: authorization,x-requested-with,content-length,content-type
      #禁用,确保 http 在非加密端口上可用
      xpack.security.http.ssl.enabled: false
    podtemplate:
      metadata:
        labels:
          app: elasticsearch
      spec:
        containers:
        - name: elasticsearch
          env:
          # 健康检测协议
          - name: readiness_probe_protocol
            value: "http"
          resources:
            requests:
              # eck operator默认申请4g内存
              memory: 1gi
              cpu: 1
            limits:
              memory: 8gi
              cpu: 4
    volumeclaimtemplates:
    - metadata:
        name: elasticsearch-data
      spec:
        accessmodes:
        - readwriteonce
        resources:
          requests:
            storage: 30gi
        storageclassname: sfsturbo-es-sc
部署elasticsearch 应用
kubectl apply-f elastic.yaml
验证服务
查看es集群信息
[root@node1 ~]# kubectl get elasticsearch -n apm
name            health   nodes   version   phase   age
es-quickstart   green    3       7.17.3    ready   6m54s

[root@node1 ~]# kubectl get pods --selector='elasticsearch.k8s.elastic.co/cluster-name=es-quickstart' -n apm
name                         ready   status    restarts   age
es-quickstart-es-default-0   1/1     running   0          7m44s
es-quickstart-es-default-1   1/1     running   0          7m44s
es-quickstart-es-default-2   1/1     running   0          7m44s

[root@node1 ~]# kubectl get secret -n apm
name                                          type                             data   age
default-secret                                kubernetes.io/dockerconfigjson   1      7h32m
es-quickstart-es-default-es-config            opaque                           1      52m
es-quickstart-es-default-es-transport-certs   opaque                           7      52m
es-quickstart-es-elastic-user                 opaque                           1      52m
es-quickstart-es-http-ca-internal             opaque                           2      52m
es-quickstart-es-http-certs-internal          opaque                           3      52m
es-quickstart-es-http-certs-public            opaque                           2      52m
es-quickstart-es-internal-users               opaque                           4      52m
es-quickstart-es-remote-ca                    opaque                           1      52m
es-quickstart-es-transport-ca-internal        opaque                           2      52m
es-quickstart-es-transport-certs-public       opaque                           1      52m
es-quickstart-es-xpack-file-realm             opaque                           4      52m
paas.elb                                      cfe/secure-opaque                1      7h32m
sh.helm.release.v1.elastic-operator-crds.v1   helm.sh/release.v1               1      6h35m
sh.helm.release.v1.elastic-operator.v1        helm.sh/release.v1               1      6h24m
sh.helm.release.v1.elastic-operator.v2        helm.sh/release.v1               1      6h22m
查看pvc
[root@node1 ~]# kubectl get pvc -n apm

name                                            status   volume                                     capacity   access modes   storageclass     age
elasticsearch-data-es-quickstart-es-default-0   bound    pvc-1ac4866b-8b09-4a65-ac66-a979197588b6   50gi       rwo            sfsturbo-es-sc   75m
elasticsearch-data-es-quickstart-es-default-1   bound    pvc-8bfc5118-2eba-403d-a705-4d3d179dbe79   50gi       rwo            sfsturbo-es-sc   75m
elasticsearch-data-es-quickstart-es-default-2   bound    pvc-7f4b715b-a8da-4a03-80e7-9ad202d5882c   50gi       rwo            sfsturbo-es-sc   75m
请求 elasticsearch 访问权限
[root@node1 ~]# kubectl get service es-quickstart-es-http -n apm

name                    type        cluster-ip     external-ip   port(s)    age
es-quickstart-es-http   clusterip   10.247.80.98   <none>        9200/tcp   11m
# 获取elastic用户密码(根据实际用户执行)
password=$(kubectl get secret es-quickstart-es-elastic-user -n apm -o go-template='{{ index .data "elastic" | base64decode }}')
验证集群健康状态
kubectlexec es-quickstart-es-default-0 -n apm -- curl -s -u "elastic:$password" -k "https://es-quickstart-es-http:9200/_cluster/health?pretty"
输出
defaulted container "elasticsearch" out of: elasticsearch, elastic-internal-init-filesystem (init), elastic-internal-suspend (init)
1715163850 10:24:10 es-quickstart green 3 3 2 1 0 0 0 0 - 100.0%
部署kibana [7.17.3]
部署kibana 指定命名空间与镜像版本
cat << eof > kibana.yaml
---
apiversion: kibana.k8s.elastic.co/v1
kind: kibana
metadata:
  name: quickstart
  namespace: apm
spec:
  version: 7.17.3
  count: 1
  http:
    tls:
      selfsignedcertificate:
        disabled: true
  config:
     #中文汉化
     i18n.locale: "zh-cn"
  # elasticsearchref 是对在同一 kubernetes 集群中运行的 elasticsearch 集群的引用。
  elasticsearchref:
    # 与eck管理的弹性资源对应的现有kubernetes对象的名称。
    name: es-quickstart
eof
---
apiversion: kibana.k8s.elastic.co/v1
kind: kibana
metadata:
  name: quickstart
  namespace: apm
spec:
  version: 7.17.3
  count: 1
  http:
    tls:
      selfsignedcertificate:
        disabled: true
  config:
     #中文汉化
     i18n.locale: "zh-cn"
     server.publicbaseurl: "http://kibana.qshtest.com"
     elasticsearch.hosts:
       - http://es-quickstart-es-http.apm.svc:9200
     elasticsearch.username: elastic
     elasticsearch.password: "q8yg6903qoa7bnmo7199yjs2"
     elasticsearch.requestheaderswhitelist:
     - authorization
  podtemplate:
    spec:
      containers:
      - name: kibana
        env:
          - name: node_options
            value: "--max-old-space-size=4096"
        resources:
          requests:
            memory: 1gi
            cpu: 0.5
          limits:
            memory: 4gi
            cpu: 2
      nodeselector:
        role: apm
部署应用
kubectl apply-f kibana.yaml
如果 elasticsearch 集群与 kibana 运行在同一个命名空间中,则命名空间的使用是可选的。可以指定一个额外的 servicename 属性来面向自定义 kubernetes 服务。有关详细信息,请参阅 traffic splitting 。
监控日志
日志打印如下,表示部署成功。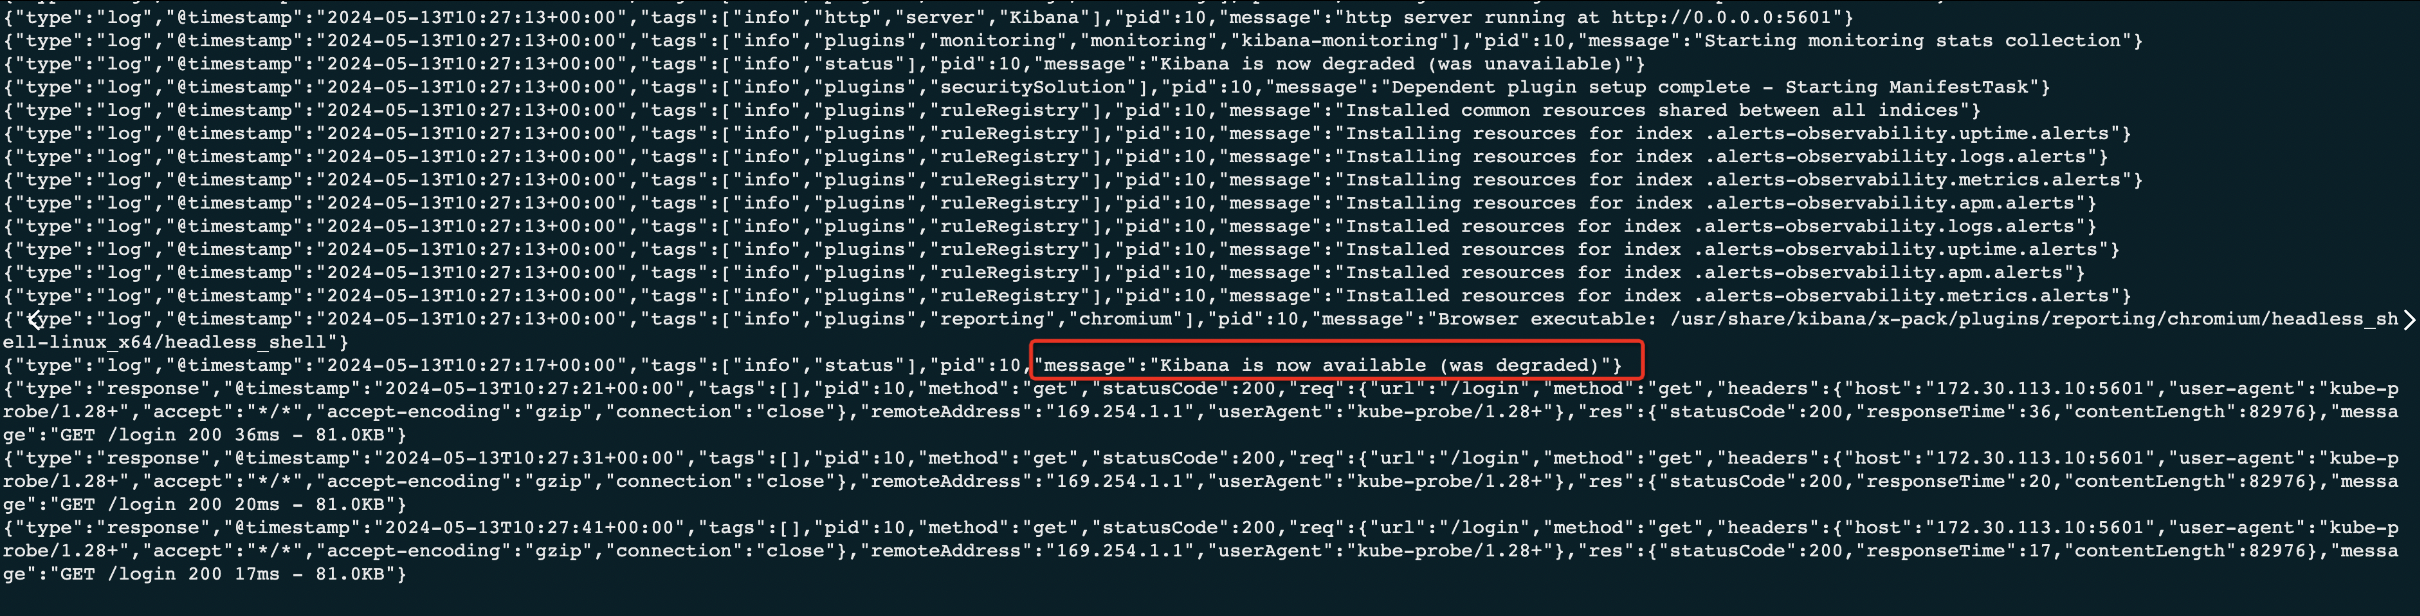
监控 kibana 健康状况和创建进度。
与 elasticsearch 类似,您可以检索有关 kibana 实例的详细信息:
kubectl get kibana-n apm
以及相关的 pod:
kubectl get pod-n apm --selector='kibana.k8s.elastic.co/name=quickstart'
访问 kibana
clusterip系统会自动为 kibana 创建一个service:
kubectl getservice quickstart-kb-http -n apm
用kubectl port-forward从本地工作站访问 kibana:
kubectl port-forward service/quickstart-kb-http5601
https://localhost:5601在浏览器中打开。您的浏览器将显示警告,因为默认配置的自签名证书未经过已知证书颁发机构的验证,并且不受您的浏览器信任。出于本快速入门的目的,您可以暂时确认该警告,但强烈建议您为任何生产部署 配置有效的证书。以elastic用户身份登录。可以通过以下命令获取密码:
kubectl get secret es-quickstart-es-elastic-user-n apm -o=jsonpath='{.data.elastic}' | base64 --decode; echo
api接口调试
es7 集群状态信息 api
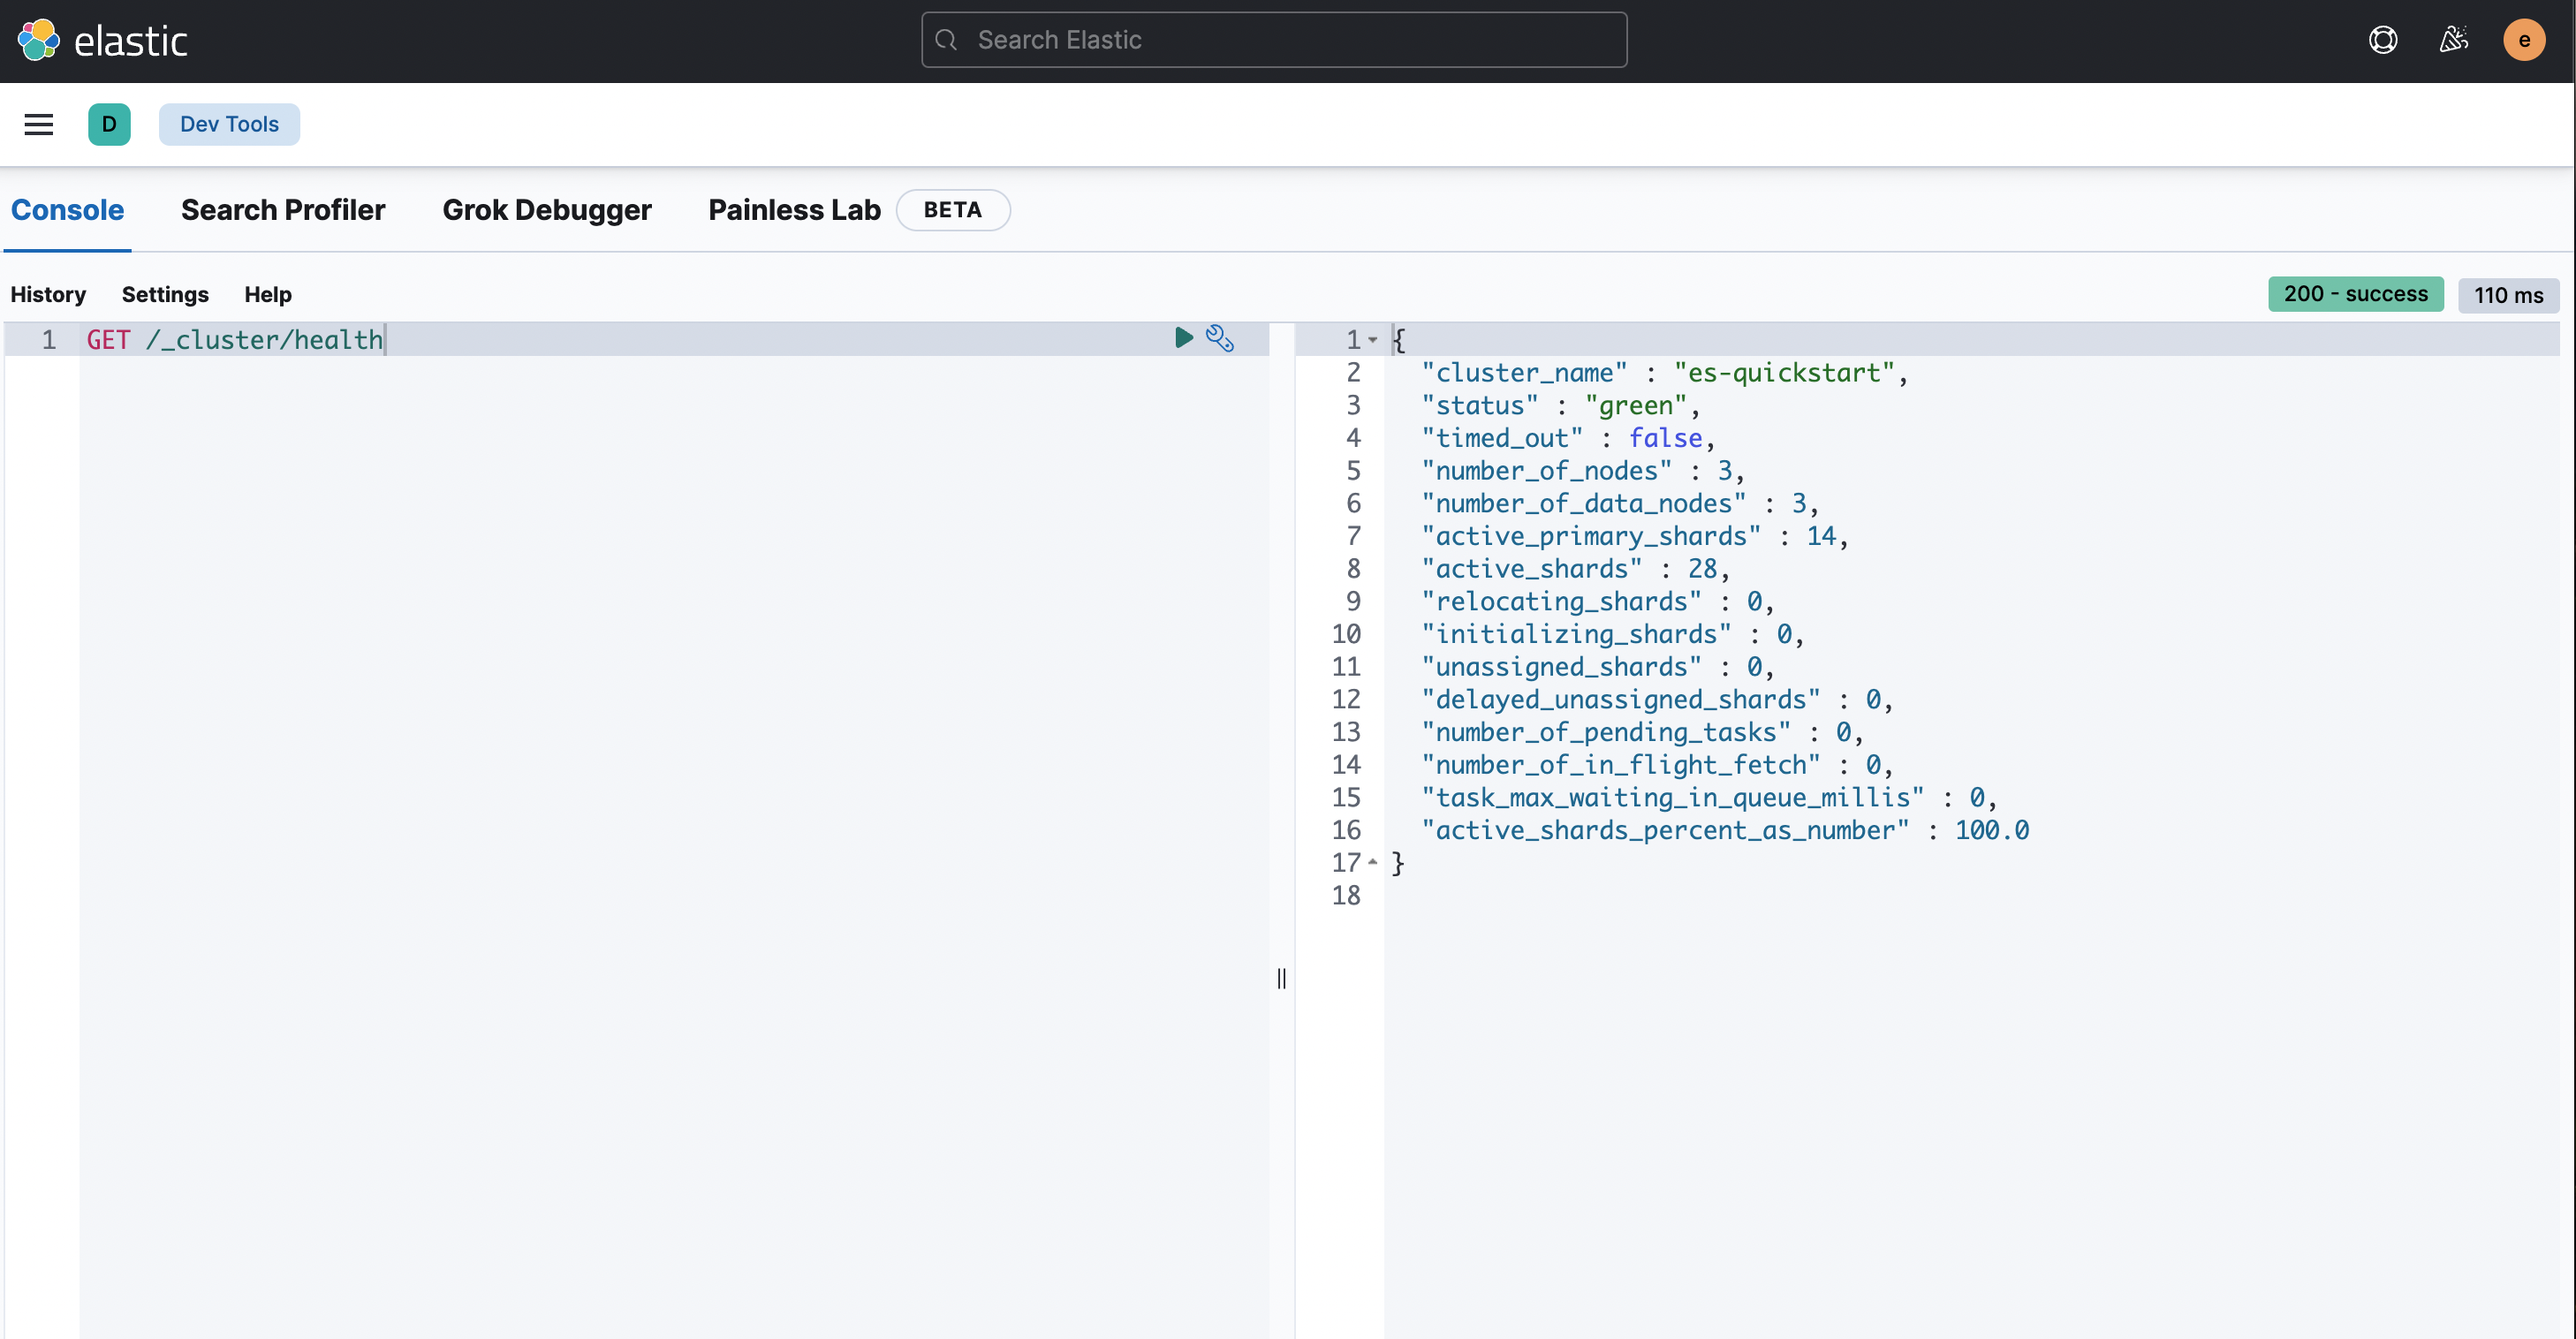
获取集群健康状态
get /_cluster/health使用 get 请求来获取集群的健康状态。以下是一个示例:
kubectlexec es-quickstart-es-default-0 -n apm -- curl -s -u "elastic:$password" -k "https://es-quickstart-es-http:9200/_cluster/health?pretty"
获取索引信息
使用 get 请求来获取有关集群中索引的信息。以下是一个示例:
get /_cat/indices?v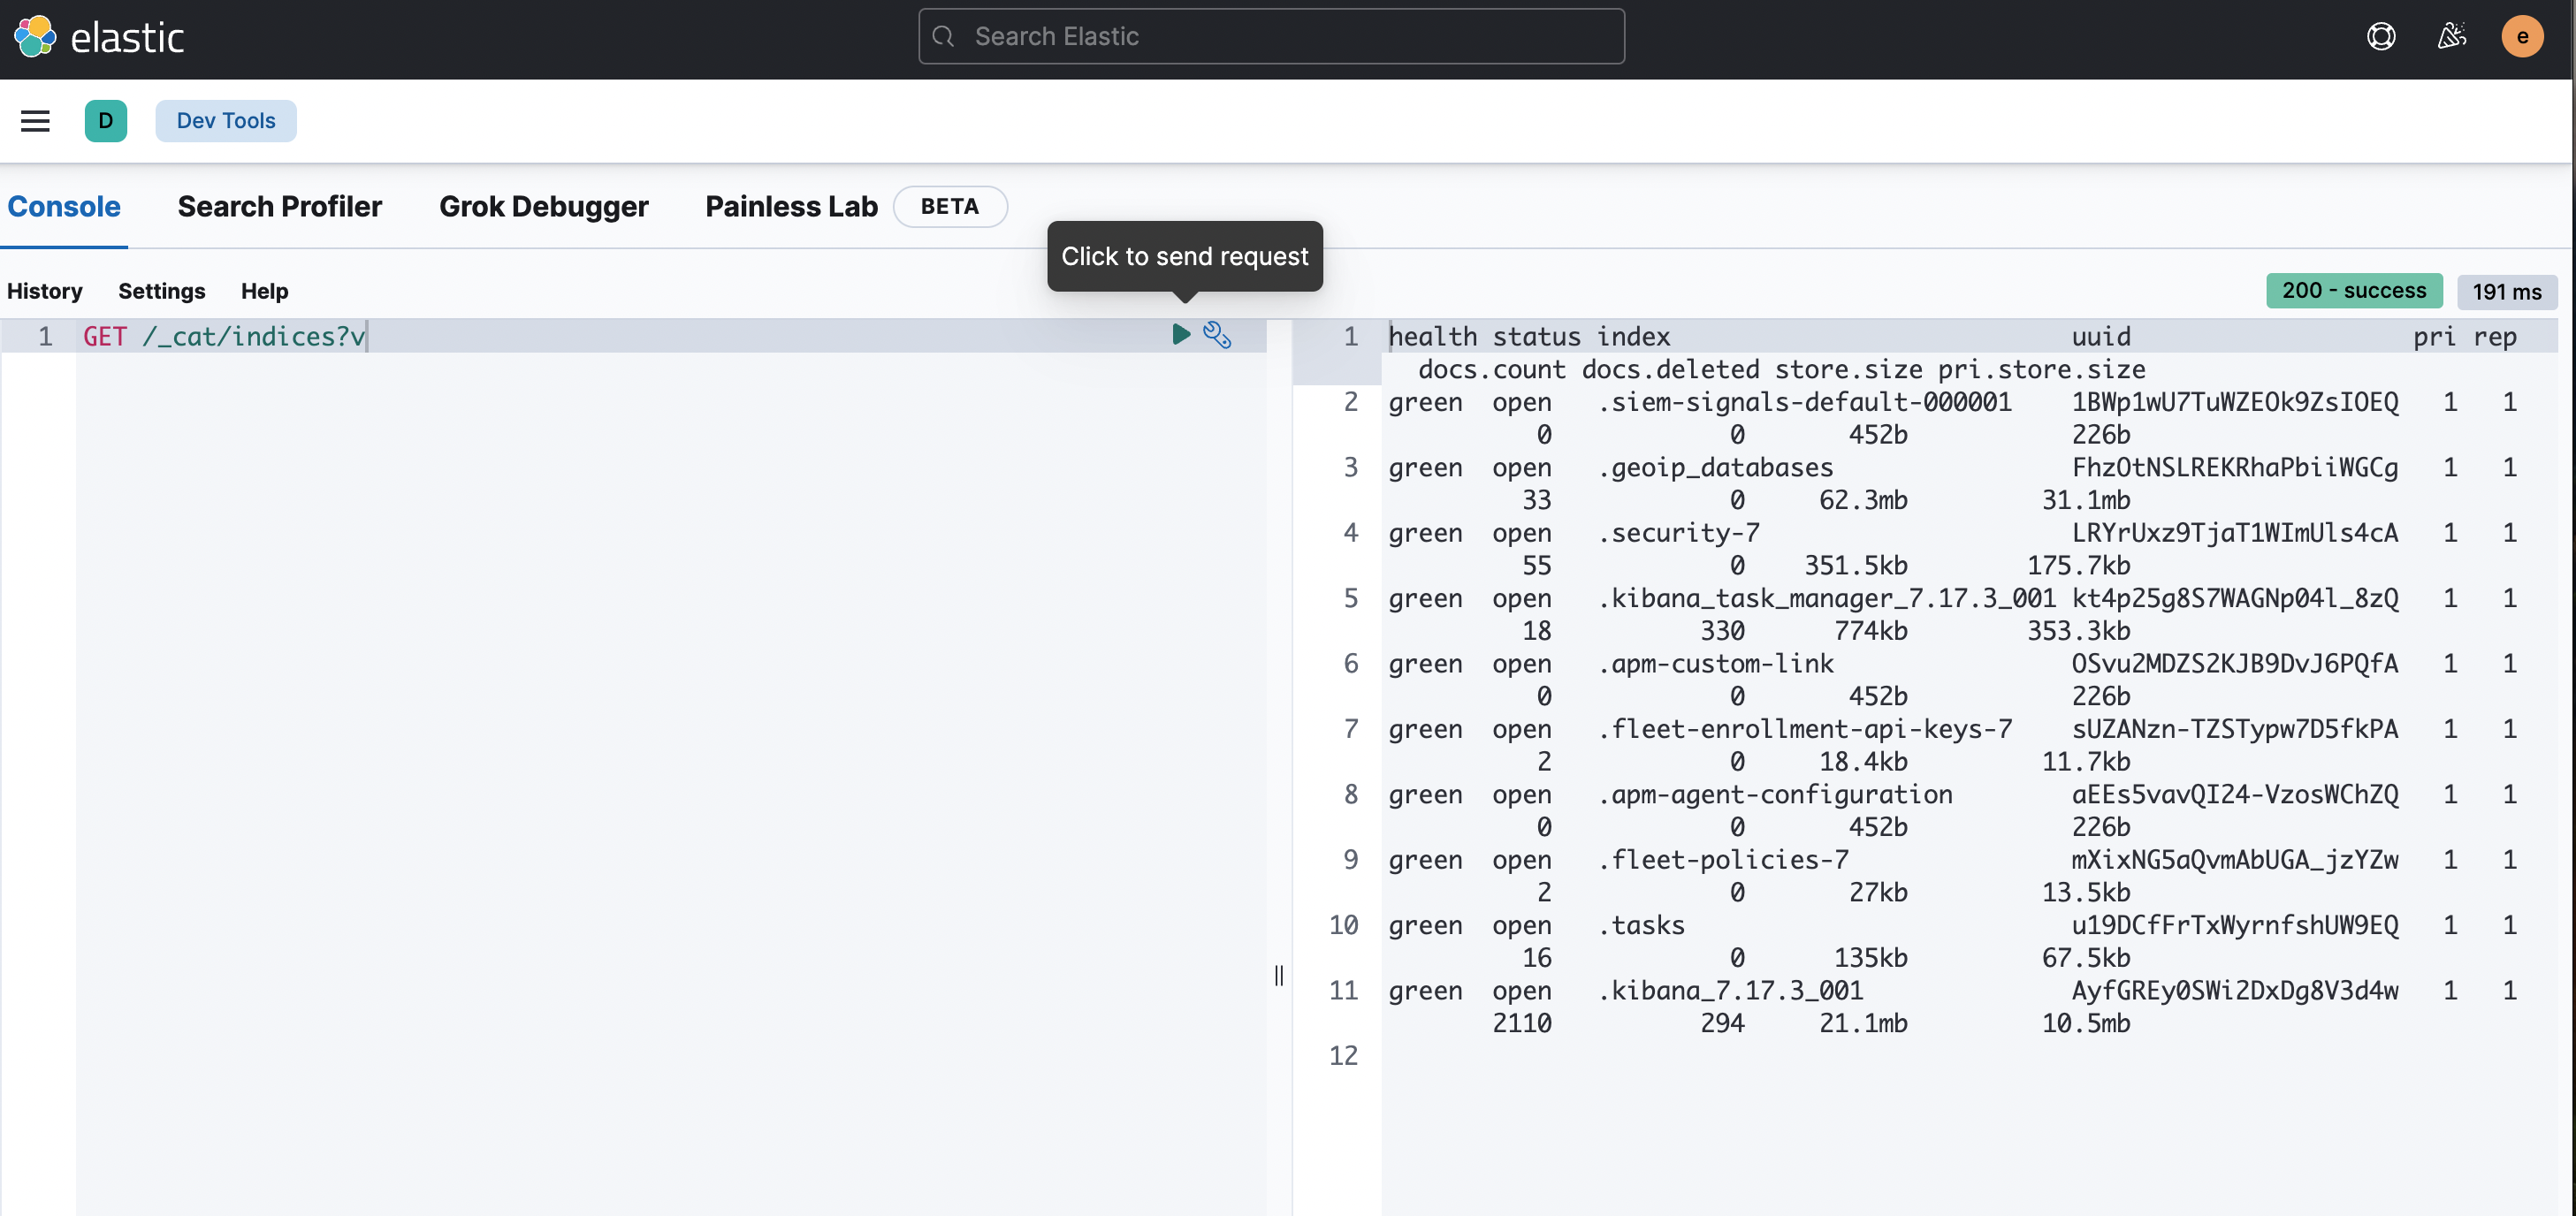
更多api接口文档: https://www.elastic.co/guide/en/elasticsearch/reference/7.17/rest-apis.html
安装elasticsearch-head插件
下载es-head插件
mkdir files
# 下载源码包
wget -o files/elasticsearch-head-master.zip https://github.com/mobz/elasticsearch-head/archive/refs/heads/master.zip
dockerfile 编写
from node:alpine

workdir /opt/
copy files/elasticsearch-head-master.zip .

run apk -u add zip unzip && \
    rm -rf /var/cache/apk/*

run unzip elasticsearch-head-master.zip \
    && rm -rf elasticsearch-head-master.zip

workdir /opt/elasticsearch-head-master

run npm install grunt-cli

expose 9100

cmd [ "/bin/sh", "-c", "npm run start" ]
build 构建
docker build -t elasticsearch-head:latest .
sudo docker tag elasticsearch-head:latest swr.cn-north-4.myhuaweicloud.com/ops-tools/elasticsearch-head:latest
sudo docker push swr.cn-north-4.myhuaweicloud.com/ops-tools/elasticsearch-head:latest
deployment 编写
cat << eof > elasticsearch-head.yaml
---
apiversion: apps/v1
kind: deployment
metadata:
  name: elasticsearch-head
  namespace: apm
spec:
  replicas: 1
  selector:
    matchlabels:
      app: elasticsearch-head
  template:
    metadata:
      labels:
        app: elasticsearch-head
    spec:
      containers:
        - name: elasticsearch-head
          image: swr.cn-north-4.myhuaweicloud.com/ops-tools/elasticsearch-head:latest
      imagepullsecrets:
        - name: default-registry-secret
---
apiversion: v1  # 资源版本
kind: service  # 资源类型
metadata: # 元数据
  name: elasticsearch-head # 资源名称
  namespace: apm # 命名空间
spec: # 描述
  selector: # 标签选择器,用于确定当前service代理哪些pod
    app: elasticsearch-head
  type: nodeport # service类型
  ports: # 端口信息
    - protocol: tcp
      name: elasticsearch-head
      port: 9100  # service端口
      targetport: 9100 # pod端口
---
apiversion: networking.k8s.io/v1
kind: ingress
metadata:
  name: ingress-es-head
  namespace: apm
spec:
  ingressclassname: nginx-ingress
  rules:
    - host: es-head.qsh.cn
      http:
        paths:
          - path: /
            pathtype: implementationspecific
            backend:
              service:
                name: elasticsearch-head
                port:
                  number: 9100
eof
部署应用
kubectl apply -f elasticsearch-head.yaml部署后,浏览器访问 http://es-head.qsh.cn

发表评论