- micro-oauth2-gateway:网关服务,负责请求转发和鉴权功能,整合spring security+oauth2;
- micro-oauth2-auth:oauth2认证服务,负责对登录用户进行认证,整合spring security+oauth2;
- micro-oauth2-api:受保护的api服务,用户鉴权通过后可以访问该服务,不整合spring security+oauth2。
一、micro-oauth2-auth
我们首先来搭建认证服务,它将作为oauth2的认证服务使用,并且网关服务的鉴权功能也需要依赖它。
1.配置
- 在
pom.xml中添加相关依赖,主要是spring security、oauth2、jwt、redis相关依赖;
<dependencies>
    <dependency>
        <groupid>org.springframework.boot</groupid>
        <artifactid>spring-boot-starter-web</artifactid>
    </dependency>
    <dependency>
        <groupid>org.springframework.boot</groupid>
        <artifactid>spring-boot-starter-security</artifactid>
    </dependency>
    <dependency>
        <groupid>org.springframework.cloud</groupid>
        <artifactid>spring-cloud-starter-oauth2</artifactid>
    </dependency>
    <dependency>
        <groupid>com.nimbusds</groupid>
        <artifactid>nimbus-jose-jwt</artifactid>
        <version>8.16</version>
    </dependency>
    <!-- redis -->
    <dependency>
        <groupid>org.springframework.boot</groupid>
        <artifactid>spring-boot-starter-data-redis</artifactid>
    </dependency>
</dependencies>
- 在
application.yml中添加相关配置,主要是nacos和redis相关配置;
server:
  port: 9401
spring:
  profiles:
    active: dev
  application:
    name: micro-oauth2-auth
  cloud:
    nacos:
      discovery:
        server-addr: localhost:8848
  jackson:
    date-format: yyyy-mm-dd hh:mm:ss
  redis:
    database: 0
    port: 6379
    host: localhost
    password:
management:
  endpoints:
    web:
      exposure:
include: "*"- 使用
keytool生成rsa证书jwt.jks,复制到resource目录下,在jdk的bin目录下使用如下命令即可;
keytool -genkey -alias jwt -keyalg rsa -keystore jwt.jks
2.配置完成,开始代码环节
- 创建
userserviceimpl类实现spring security的userdetailsservice接口,用于加载用户信息;
/**
 * 用户管理业务类
 * created by macro on 2020/6/19.
 */
@service
public class userserviceimpl implements userdetailsservice {

    private list<userdto> userlist;
    @autowired
    private passwordencoder passwordencoder;

    @postconstruct
    public void initdata() {
        string password = passwordencoder.encode("123456");
        userlist = new arraylist<>();
        userlist.add(new userdto(1l,"macro", password,1, collutil.tolist("admin")));
        userlist.add(new userdto(2l,"andy", password,1, collutil.tolist("test")));
    }

    @override
    public userdetails loaduserbyusername(string username) throws usernamenotfoundexception {
        list<userdto> finduserlist = userlist.stream().filter(item -> item.getusername().equals(username)).collect(collectors.tolist());
        if (collutil.isempty(finduserlist)) {
            throw new usernamenotfoundexception(messageconstant.username_password_error);
        }
        securityuser securityuser = new securityuser(finduserlist.get(0));
        if (!securityuser.isenabled()) {
            throw new disabledexception(messageconstant.account_disabled);
        } else if (!securityuser.isaccountnonlocked()) {
            throw new lockedexception(messageconstant.account_locked);
        } else if (!securityuser.isaccountnonexpired()) {
            throw new accountexpiredexception(messageconstant.account_expired);
        } else if (!securityuser.iscredentialsnonexpired()) {
            throw new credentialsexpiredexception(messageconstant.credentials_expired);
        }
        return securityuser;
    }

}- 添加认证服务相关配置
oauth2serverconfig,需要配置加载用户信息的服务userserviceimpl及rsa的钥匙对keypair;
/**
 * 认证服务器配置
 * created by macro on 2020/6/19.
 */
@allargsconstructor
@configuration
@enableauthorizationserver
public class oauth2serverconfig extends authorizationserverconfigureradapter {

    private final passwordencoder passwordencoder;
    private final userserviceimpl userdetailsservice;
    private final authenticationmanager authenticationmanager;
    private final jwttokenenhancer jwttokenenhancer;

    @override
    public void configure(clientdetailsserviceconfigurer clients) throws exception {
        clients.inmemory()
                .withclient("client-app")
                .secret(passwordencoder.encode("123456"))
                .scopes("all")
                .authorizedgranttypes("password", "refresh_token")
                .accesstokenvalidityseconds(3600)
                .refreshtokenvalidityseconds(86400);
    }

    @override
    public void configure(authorizationserverendpointsconfigurer endpoints) throws exception {
        tokenenhancerchain enhancerchain = new tokenenhancerchain();
        list<tokenenhancer> delegates = new arraylist<>();
        delegates.add(jwttokenenhancer);
        delegates.add(accesstokenconverter());
        enhancerchain.settokenenhancers(delegates); //配置jwt的内容增强器
        endpoints.authenticationmanager(authenticationmanager)
                .userdetailsservice(userdetailsservice) //配置加载用户信息的服务
                .accesstokenconverter(accesstokenconverter())
                .tokenenhancer(enhancerchain);
    }

    @override
    public void configure(authorizationserversecurityconfigurer security) throws exception {
        security.allowformauthenticationforclients();
    }

    @bean
    public jwtaccesstokenconverter accesstokenconverter() {
        jwtaccesstokenconverter jwtaccesstokenconverter = new jwtaccesstokenconverter();
        jwtaccesstokenconverter.setkeypair(keypair());
        return jwtaccesstokenconverter;
    }

    @bean
    public keypair keypair() {
        //从classpath下的证书中获取秘钥对
        keystorekeyfactory keystorekeyfactory = new keystorekeyfactory(new classpathresource("jwt.jks"), "123456".tochararray());
        return keystorekeyfactory.getkeypair("jwt", "123456".tochararray());
    }

}- 如果你想往jwt中添加自定义信息的话,比如说
登录用户的id,可以自己实现tokenenhancer接口;
/**
 * jwt内容增强器
 * created by macro on 2020/6/19.
 */
@component
public class jwttokenenhancer implements tokenenhancer {
    @override
    public oauth2accesstoken enhance(oauth2accesstoken accesstoken, oauth2authentication authentication) {
        securityuser securityuser = (securityuser) authentication.getprincipal();
        map<string, object> info = new hashmap<>();
        //把用户id设置到jwt中
        info.put("id", securityuser.getid());
        ((defaultoauth2accesstoken) accesstoken).setadditionalinformation(info);
        return accesstoken;
    }
}- 由于我们的网关服务需要rsa的公钥来验证签名是否合法,所以认证服务需要有个接口把公钥暴露出来;
/**
 * 获取rsa公钥接口
 * created by macro on 2020/6/19.
 */
@restcontroller
public class keypaircontroller {

    @autowired
    private keypair keypair;

    @getmapping("/rsa/publickey")
    public map<string, object> getkey() {
        rsapublickey publickey = (rsapublickey) keypair.getpublic();
        rsakey key = new rsakey.builder(publickey).build();
        return new jwkset(key).tojsonobject();
    }

}- 不要忘了还需要配置spring security,允许获取公钥接口的访问;
/**
 * springsecurity配置
 * created by macro on 2020/6/19.
 */
@configuration
@enablewebsecurity
public class websecurityconfig extends websecurityconfigureradapter {

    @override
    protected void configure(httpsecurity http) throws exception {
        http.authorizerequests()
                .requestmatchers(endpointrequest.toanyendpoint()).permitall()
                .antmatchers("/rsa/publickey").permitall()
                .anyrequest().authenticated();
    }

    @bean
    @override
    public authenticationmanager authenticationmanagerbean() throws exception {
        return super.authenticationmanagerbean();
    }

    @bean
    public passwordencoder passwordencoder() {
        return new bcryptpasswordencoder();
    }

}- 创建一个资源服务
resourceserviceimpl,初始化的时候把资源与角色匹配关系缓存到redis中,方便网关服务进行鉴权的时候获取。
/**
 * 资源与角色匹配关系管理业务类
 * created by macro on 2020/6/19.
 */
@service
public class resourceserviceimpl {

    private map<string, list<string>> resourcerolesmap;
    @autowired
    private redistemplate<string,object> redistemplate;

    @postconstruct
    public void initdata() {
        resourcerolesmap = new treemap<>();
        resourcerolesmap.put("/api/hello", collutil.tolist("admin"));
        resourcerolesmap.put("/api/user/currentuser", collutil.tolist("admin", "test"));
        redistemplate.opsforhash().putall(redisconstant.resource_roles_map, resourcerolesmap);
    }
}
二、micro-oauth2-gateway
接下来我们就可以搭建网关服务了,它将作为oauth2的资源服务、客户端服务使用,对访问微服务的请求进行统一的校验认证和鉴权操作。
1.配置
- 在
pom.xml中添加相关依赖,主要是gateway、oauth2和jwt相关依赖;
<dependencies>
    <dependency>
        <groupid>org.springframework.boot</groupid>
        <artifactid>spring-boot-starter-webflux</artifactid>
    </dependency>
    <dependency>
        <groupid>org.springframework.cloud</groupid>
        <artifactid>spring-cloud-starter-gateway</artifactid>
    </dependency>
    <dependency>
        <groupid>org.springframework.security</groupid>
        <artifactid>spring-security-config</artifactid>
    </dependency>
    <dependency>
        <groupid>org.springframework.security</groupid>
        <artifactid>spring-security-oauth2-resource-server</artifactid>
    </dependency>
    <dependency>
        <groupid>org.springframework.security</groupid>
        <artifactid>spring-security-oauth2-client</artifactid>
    </dependency>
    <dependency>
        <groupid>org.springframework.security</groupid>
        <artifactid>spring-security-oauth2-jose</artifactid>
    </dependency>
    <dependency>
        <groupid>com.nimbusds</groupid>
        <artifactid>nimbus-jose-jwt</artifactid>
        <version>8.16</version>
    </dependency>
</dependencies>
- 在
application.yml中添加相关配置,主要是路由规则的配置、oauth2中rsa公钥的配置及路由白名单的配置;
server:
  port: 9201
spring:
  profiles:
    active: dev
  application:
    name: micro-oauth2-gateway
  cloud:
    nacos:
      discovery:
        server-addr: localhost:8848
    gateway:
      routes: #配置路由规则
        - id: oauth2-api-route
          uri: lb://micro-oauth2-api
          predicates:
            - path=/api/**
          filters:
            - stripprefix=1
        - id: oauth2-auth-route
          uri: lb://micro-oauth2-auth
          predicates:
            - path=/auth/**
          filters:
            - stripprefix=1
      discovery:
        locator:
          enabled: true #开启从注册中心动态创建路由的功能
          lower-case-service-id: true #使用小写服务名,默认是大写
  security:
    oauth2:
      resourceserver:
        jwt:
          jwk-set-uri: 'http://localhost:9401/rsa/publickey' #配置rsa的公钥访问地址
  redis:
    database: 0
    port: 6379
    host: localhost
    password:
secure:
  ignore:
    urls: #配置白名单路径
      - "/actuator/**"
      - "/auth/oauth/token"
2.配置完成,开始代码环节
- 对网关服务进行配置安全配置,由于gateway使用的是
webflux,所以需要使用@enablewebfluxsecurity注解开启;
/**
 * 资源服务器配置
 * created by macro on 2020/6/19.
 */
@allargsconstructor
@configuration
@enablewebfluxsecurity
public class resourceserverconfig {
    private final authorizationmanager authorizationmanager;
    private final ignoreurlsconfig ignoreurlsconfig;
    private final restfulaccessdeniedhandler restfulaccessdeniedhandler;
    private final restauthenticationentrypoint restauthenticationentrypoint;

    @bean
    public securitywebfilterchain springsecurityfilterchain(serverhttpsecurity http) {
        http.oauth2resourceserver().jwt()
                .jwtauthenticationconverter(jwtauthenticationconverter());
        http.authorizeexchange()
                .pathmatchers(arrayutil.toarray(ignoreurlsconfig.geturls(),string.class)).permitall()//白名单配置
                .anyexchange().access(authorizationmanager)//鉴权管理器配置
                .and().exceptionhandling()
                .accessdeniedhandler(restfulaccessdeniedhandler)//处理未授权
                .authenticationentrypoint(restauthenticationentrypoint)//处理未认证
                .and().csrf().disable();
        return http.build();
    }

    @bean
    public converter<jwt, ? extends mono<? extends abstractauthenticationtoken>> jwtauthenticationconverter() {
        jwtgrantedauthoritiesconverter jwtgrantedauthoritiesconverter = new jwtgrantedauthoritiesconverter();
        jwtgrantedauthoritiesconverter.setauthorityprefix(authconstant.authority_prefix);
        jwtgrantedauthoritiesconverter.setauthoritiesclaimname(authconstant.authority_claim_name);
        jwtauthenticationconverter jwtauthenticationconverter = new jwtauthenticationconverter();
        jwtauthenticationconverter.setjwtgrantedauthoritiesconverter(jwtgrantedauthoritiesconverter);
        return new reactivejwtauthenticationconverteradapter(jwtauthenticationconverter);
    }

}- 在
webfluxsecurity中自定义鉴权操作需要实现reactiveauthorizationmanager接口;
/**
 * 鉴权管理器,用于判断是否有资源的访问权限
 * created by macro on 2020/6/19.
 */
@component
public class authorizationmanager implements reactiveauthorizationmanager<authorizationcontext> {
    @autowired
    private redistemplate<string,object> redistemplate;

    @override
    public mono<authorizationdecision> check(mono<authentication> mono, authorizationcontext authorizationcontext) {
        //从redis中获取当前路径可访问角色列表
        uri uri = authorizationcontext.getexchange().getrequest().geturi();
        object obj = redistemplate.opsforhash().get(redisconstant.resource_roles_map, uri.getpath());
        list<string> authorities = convert.tolist(string.class,obj);
        authorities = authorities.stream().map(i -> i = authconstant.authority_prefix + i).collect(collectors.tolist());
        //认证通过且角色匹配的用户可访问当前路径
        return mono
                .filter(authentication::isauthenticated)
                .flatmapiterable(authentication::getauthorities)
                .map(grantedauthority::getauthority)
                .any(authorities::contains)
                .map(authorizationdecision::new)
                .defaultifempty(new authorizationdecision(false));
    }

}- 这里我们还需要实现一个全局过滤器
authglobalfilter,当鉴权通过后将jwt令牌中的用户信息解析出来,然后存入请求的header中,这样后续服务就不需要解析jwt令牌了,可以直接从请求的header中获取到用户信息。
/**
 * 将登录用户的jwt转化成用户信息的全局过滤器
 * created by macro on 2020/6/17.
 */
@component
public class authglobalfilter implements globalfilter, ordered {

    private static logger logger = loggerfactory.getlogger(authglobalfilter.class);

    @override
    public mono<void> filter(serverwebexchange exchange, gatewayfilterchain chain) {
        string token = exchange.getrequest().getheaders().getfirst("authorization");
        if (strutil.isempty(token)) {
            return chain.filter(exchange);
        }
        try {
            //从token中解析用户信息并设置到header中去
            string realtoken = token.replace("bearer ", "");
            jwsobject jwsobject = jwsobject.parse(realtoken);
            string userstr = jwsobject.getpayload().tostring();
            logger.info("authglobalfilter.filter() user:{}",userstr);
            serverhttprequest request = exchange.getrequest().mutate().header("user", userstr).build();
            exchange = exchange.mutate().request(request).build();
        } catch (parseexception e) {
            e.printstacktrace();
        }
        return chain.filter(exchange);
    }

    @override
    public int getorder() {
        return 0;
    }
}
三、micro-oauth2-api
最后我们搭建一个api服务,它不会集成和实现任何安全相关逻辑,全靠网关来保护它。
1.配置
- 在
pom.xml中添加相关依赖,就添加了一个web依赖;
<dependencies>
    <dependency>
        <groupid>org.springframework.boot</groupid>
        <artifactid>spring-boot-starter-web</artifactid>
    </dependency>
</dependencies>- 在
application.yml添加相关配置,很常规的配置; -
server: port: 9501 spring: profiles: active: dev application: name: micro-oauth2-api cloud: nacos: discovery: server-addr: localhost:8848 management: endpoints: web: exposure: include: "*" - 创建一个测试接口,网关验证通过即可访问;
/**
 * 测试接口
 * created by macro on 2020/6/19.
 */
@restcontroller
public class hellocontroller {

    @getmapping("/hello")
    public string hello() {
        return "hello world.";
    }

}- 创建一个
loginuserholder组件,用于从请求的header中直接获取登录用户信息;
/**
 * 获取登录用户信息
 * created by macro on 2020/6/17.
 */
@component
public class loginuserholder {

    public userdto getcurrentuser(){
        //从header中获取用户信息
        servletrequestattributes servletrequestattributes = (servletrequestattributes) requestcontextholder.getrequestattributes();
        httpservletrequest request = servletrequestattributes.getrequest();
        string userstr = request.getheader("user");
        jsonobject userjsonobject = new jsonobject(userstr);
        userdto userdto = new userdto();
        userdto.setusername(userjsonobject.getstr("user_name"));
        userdto.setid(convert.tolong(userjsonobject.get("id")));
        userdto.setroles(convert.tolist(string.class,userjsonobject.get("authorities")));
        return userdto;
    }
}- 创建一个获取当前用户信息的接口。
/**
 * 获取登录用户信息接口
 * created by macro on 2020/6/19.
 */
@restcontroller
@requestmapping("/user")
public class usercontroller{

    @autowired
    private loginuserholder loginuserholder;

    @getmapping("/currentuser")
    public userdto currentuser() {
        return loginuserholder.getcurrentuser();
    }

}
功能演示
- 在此之前先启动我们的nacos和redis服务,然后依次启动
micro-oauth2-auth、micro-oauth2-gateway及micro-oauth2-api服务;

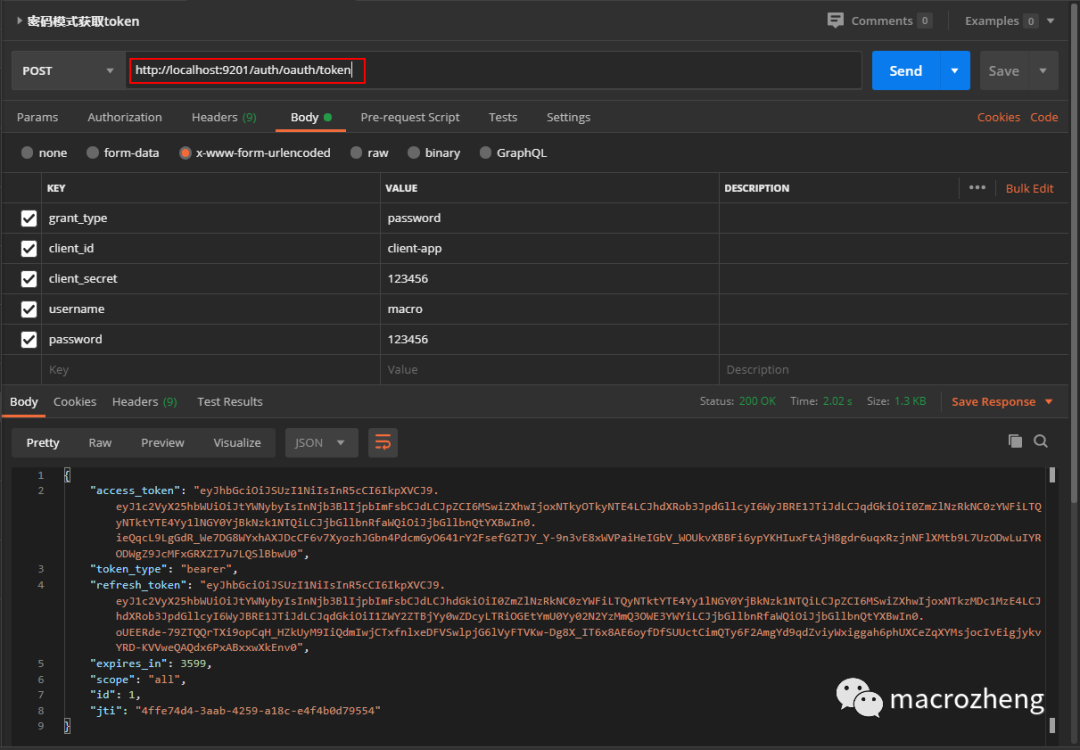
- 使用密码模式获取jwt令牌,访问地址:http://localhost:9201/auth/oauth/token
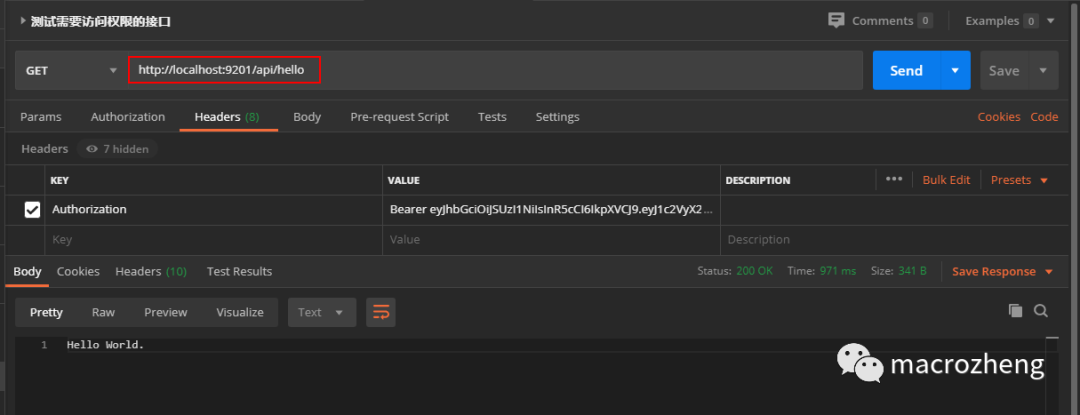
- 使用获取到的jwt令牌访问需要权限的接口,访问地址:http://localhost:9201/api/hello
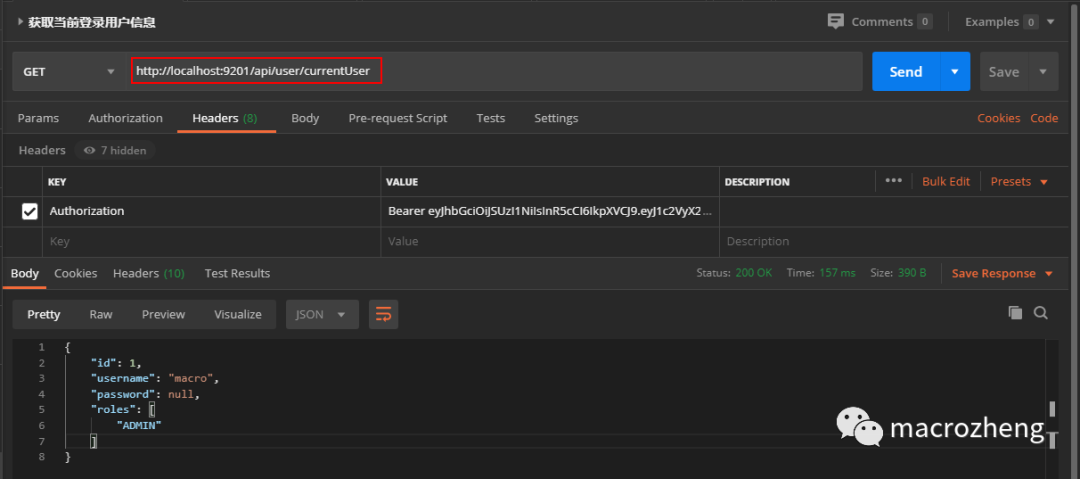
- 使用获取到的jwt令牌访问获取当前登录用户信息的接口,访问地址:http://localhost:9201/api/user/currentuser
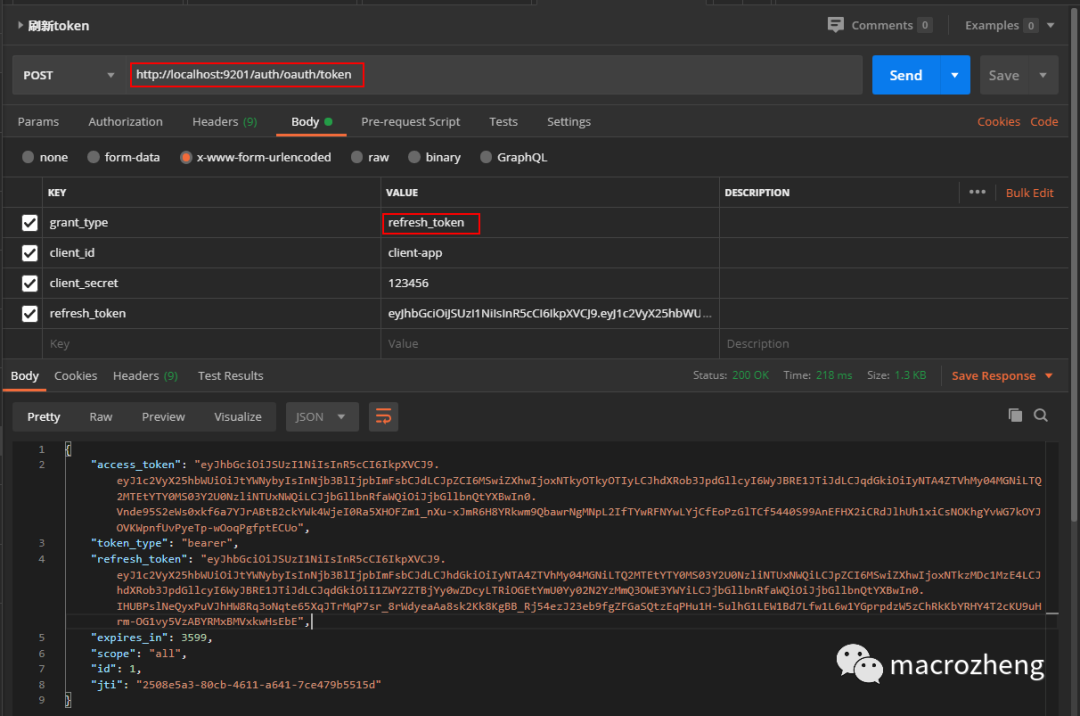
- 当jwt令牌过期时,使用refresh_token获取新的jwt令牌,访问地址:http://localhost:9201/auth/oauth/token
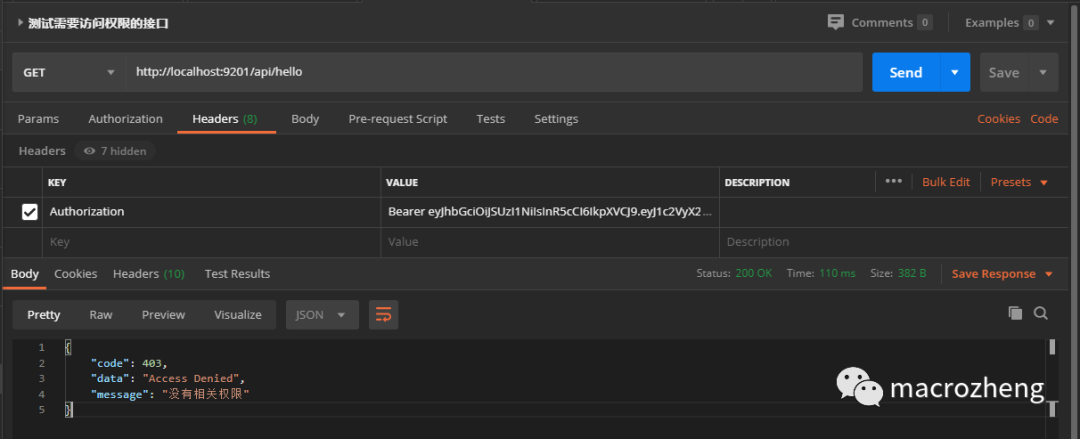
- 使用没有访问权限的
andy账号登录,访问接口时会返回如下信息,访问地址:http://localhost:9201/api/hello
项目源码地址
https://github.com/macrozheng/springcloud-learning/tree/master/micro-oauth2

![[ 云计算 | AWS 实践 ] Java 如何重命名 Amazon S3 中的文件和文件夹](https://images.3wcode.com/3wcode/20240802/s_0_202408020028483641.png)
发表评论