
目录
3.3.2 方案二:ffmpeg-python库使用ffmpeg
一、引言
上一篇对whisper原理和实战进行了讲解,第7次拿到了热榜第一🏆。今天,我们在whisper的基础上,引入ffmpeg工具对视频的音频进行抽取,再使用whisper将音频转为文本,通过二阶段法实现视频内容的理解。
二、ffmpeg工具介绍
2.1 什么是ffmpeg
ffmpeg是一个开源的跨平台多媒体处理工具,它可以处理音频/视频数据,包括转码、转换格式、分割、合并等操作。
2.2 ffmpeg核心原理
2.3 ffmpeg使用示例
ffmpeg -i input.mp4 -vn -ar 44100 -ac 2 -ab 192k -f mp3 output.mp3三、ffmpeg+whisper二阶段法视频理解实战
3.1 ffmpeg安装
由于ffmpeg不支持pip安装,所以需要使用apt-get
sudo apt-get update && apt-get install ffmpeg3.2 whisper模型下载
这里与上一篇一样,还是采用transformers的pipeline,首先创建conda环境以及安装transformers
创建并激活conda环境:
conda create -n video2text python=3.11
conda activate video2text
安装transformers库:
pip install transformers -i https://mirrors.cloud.tencent.com/pypi/simple基于transformers的pipeline会自动进行模型下载,当然,如果您的网速不行,请替换hf_endpoint为国内镜像。
os.environ["hf_endpoint"] = "https://hf-mirror.com"
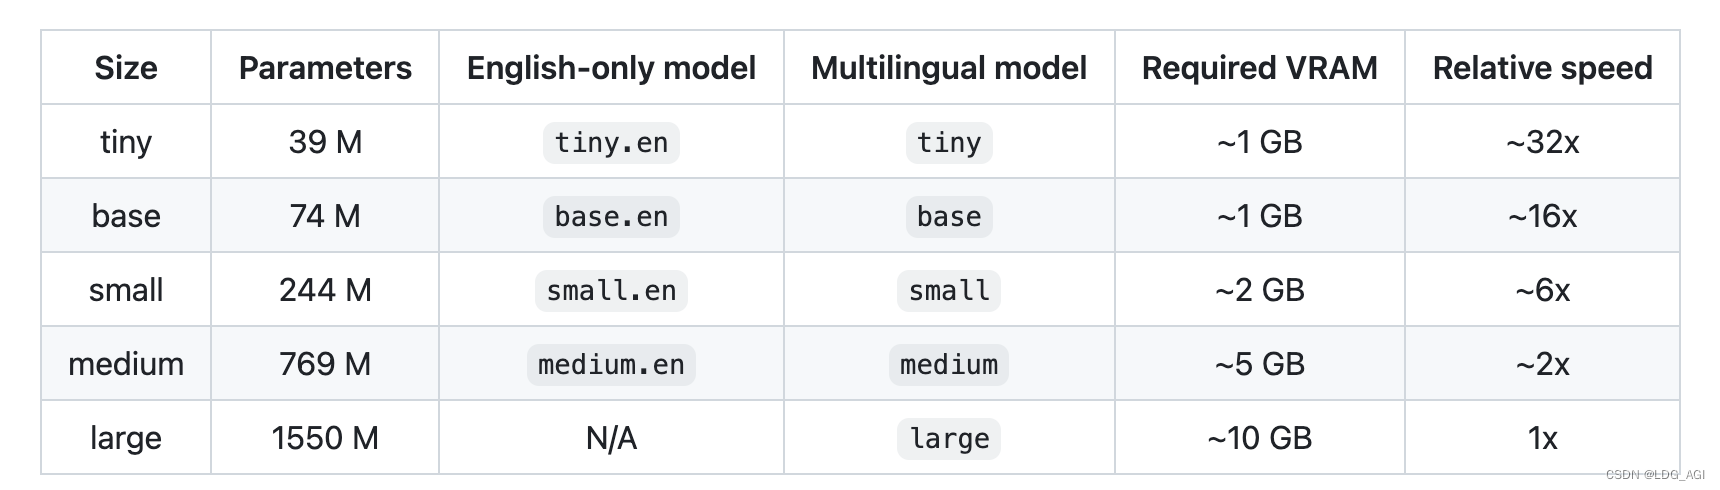
transcriber = pipeline(task="automatic-speech-recognition", model="openai/whisper-medium")不同尺寸模型参数量、多语言支持情况、需要现存大小以及推理速度如下
3.3 ffmpeg抽取视频的音频
3.3.1 方案一:命令行方式使用ffmpeg
首先将ffmpeg命令放入ffmpeg_command,之后采用subprocess库的run方法执行ffmpeg_command内的命令。
输入的视频文件为input_file,输出的音频文件为output_file。
import subprocess
def extract_audio(input_file, output_file):
    """
    使用ffmpeg从mp4文件中提取音频并保存为mp3格式。

    :param input_file: 输入的mp4文件路径
    :param output_file: 输出的mp3文件路径
    """
    # 构建ffmpeg命令
    ffmpeg_command = [
        'ffmpeg', '-i', input_file, '-vn', '-acodec', 'libmp3lame', output_file
    ]

    try:
        # 执行命令
        subprocess.run(ffmpeg_command, check=true)
        print(f"音频已成功从 {input_file} 提取到 {output_file}")
    except subprocess.calledprocesserror as e:
        print(f"处理错误: {e}")
3.3.2 方案二:ffmpeg-python库使用ffmpeg
首先安装ffmpeg-python:
pip install ffmpeg-python -i https://mirrors.cloud.tencent.com/pypi/simple引入ffmpeg库,一行代码完成音频转文本
import ffmpeg
def extract_audio(input_file, output_file):
    """
    使用ffmpeg从mp4文件中提取音频并保存为mp3格式。

    :param input_file: 输入的mp4文件路径
    :param output_file: 输出的mp3文件路径
    """

    try:
        # 执行命令
        ffmpeg.input(input_file).output(output_file, acodec="libmp3lame", ac=2, ar="44100").run()
        print(f"音频已成功从 {input_file} 提取到 {output_file}")
    except subprocess.calledprocesserror as e:
        print(f"处理错误: {e}")
3.4 whisper将音频转为文本
from transformers import pipeline
def speech2text(speech_file):
    transcriber = pipeline(task="automatic-speech-recognition", model="openai/whisper-medium")
    text_dict = transcriber(speech_file)
    return text_dict
这里采用pipeline完成openai/whisper-medium的模型下载以及实例化,将音频文件输入实例化的transcriber对象即刻得到文本。
3.5 视频理解完整代码
import os
os.environ["hf_endpoint"] = "https://hf-mirror.com"
os.environ["cuda_visible_devices"] = "2"
os.environ["tf_enable_onednn_opts"] = "0"
from transformers import pipeline
import subprocess
def speech2text(speech_file):
transcriber = pipeline(task="automatic-speech-recognition", model="openai/whisper-medium")
text_dict = transcriber(speech_file)
return text_dict
def extract_audio(input_file, output_file):
"""
使用ffmpeg从mp4文件中提取音频并保存为mp3格式。
:param input_file: 输入的mp4文件路径
:param output_file: 输出的mp3文件路径
"""
# 构建ffmpeg命令
ffmpeg_command = [
'ffmpeg', '-i', input_file, '-vn', '-acodec', 'libmp3lame', output_file
]
try:
# 执行命令
subprocess.run(ffmpeg_command, check=true)
print(f"音频已成功从 {input_file} 提取到 {output_file}")
except subprocess.calledprocesserror as e:
print(f"处理错误: {e}")
import argparse
import json
def main():
parser = argparse.argumentparser(description="视频转文本")
parser.add_argument("--video","-v", type=str, help="输入视频文件路径")
parser.add_argument("--audio","-a", type=str, help="输出音频文件路径")
args = parser.parse_args()
print(args)
extract_audio(args.video, args.audio)
text_dict = speech2text(args.audio)
print("视频内的文本是:\n" + text_dict["text"])
#print("视频内的文本是:\n"+ json.dumps(text_dict,indent=4))
if __name__=="__main__":
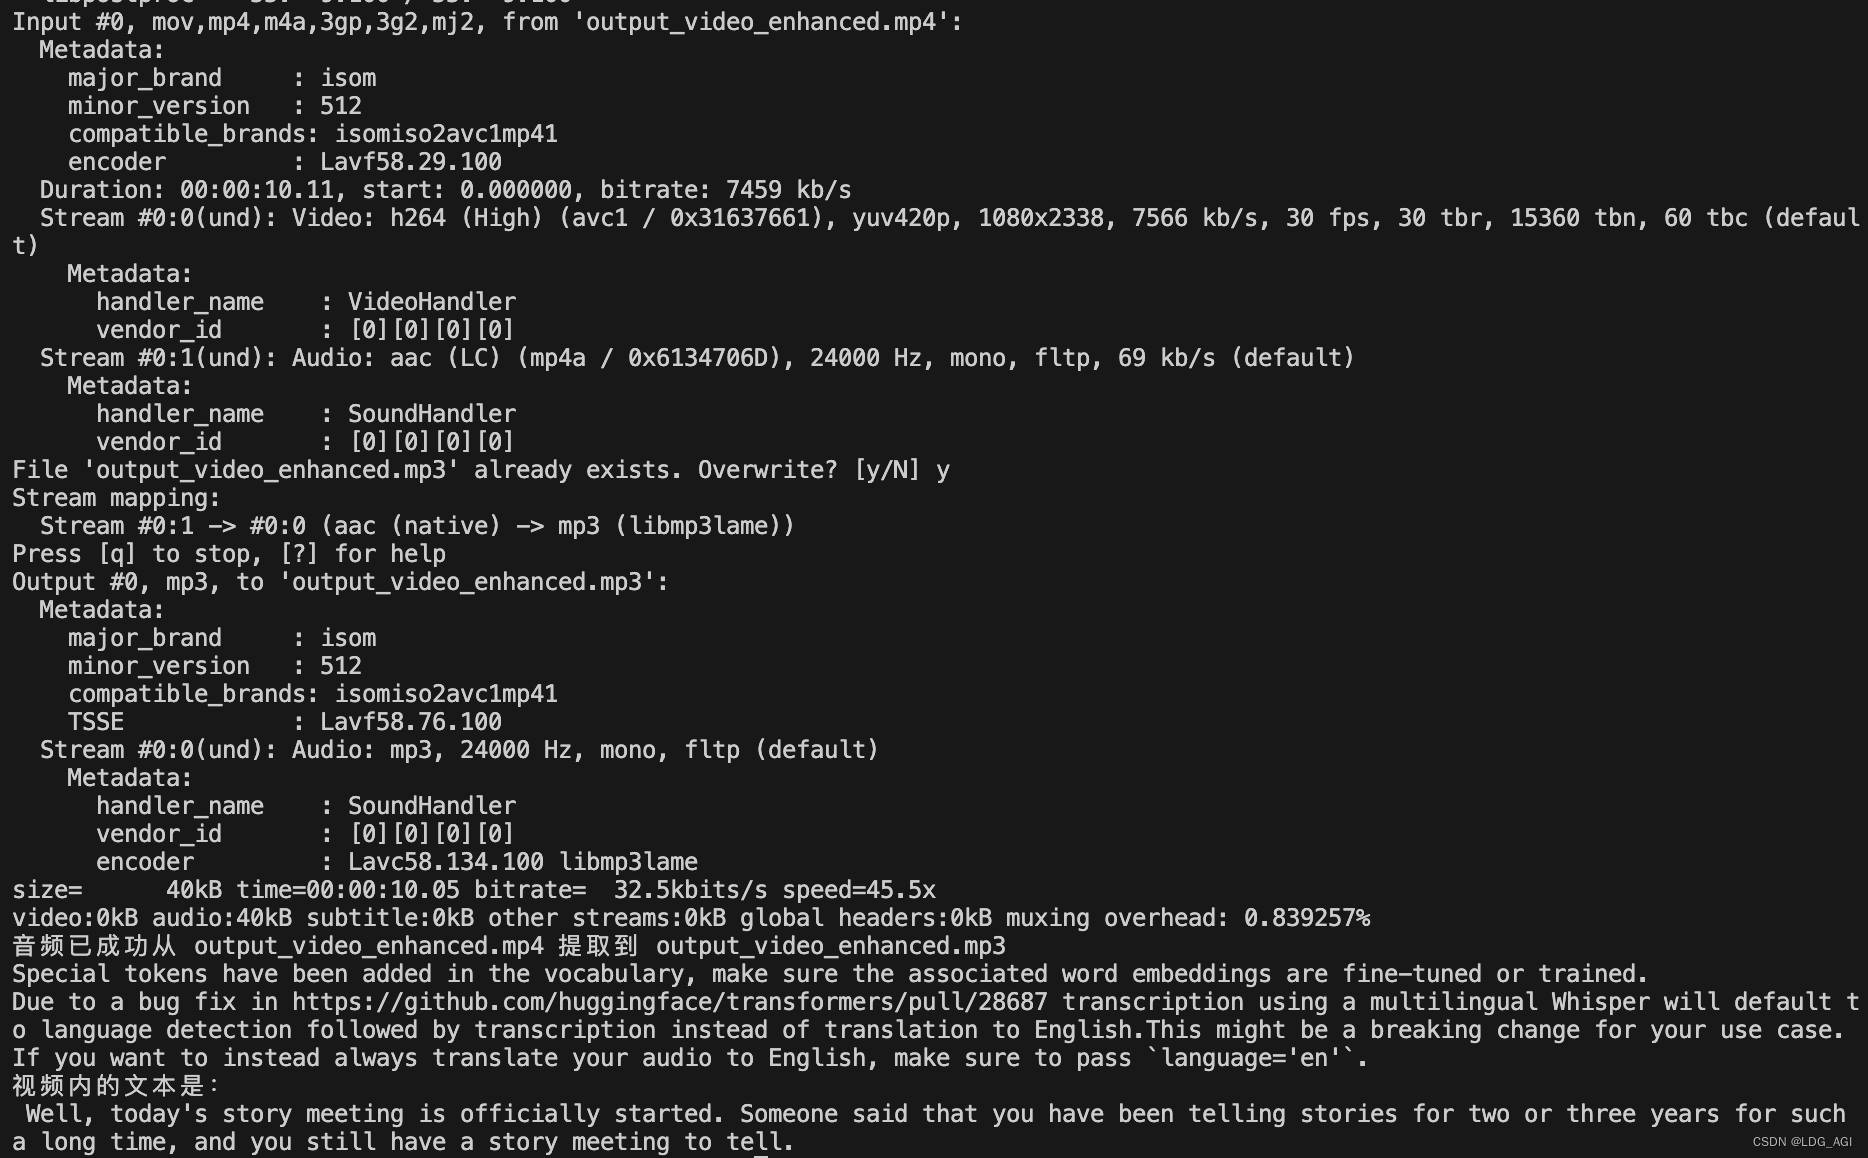
main()输出为:
3.6 视频理解模型部署
如果想将该服务部署成语音识别api服务,可以参考之前的fastapi相关文章。
四、总结
本文在上一篇音频转文本的基础上,引入了视频转音频,这样可以采用二阶段法:先提取音频,再音频转文字的方法完成视频内容理解。之后可以配上llm对视频内提取的文本进行一系列应用。
希望可以帮到您,如果觉得有帮助的话,期待您的三连+投票!
如果您还有时间,可以看看我的其他文章:
《ai—工程篇》
ai智能体研发之路-工程篇(一):docker助力ai智能体开发提效
ai智能体研发之路-工程篇(二):dify智能体开发平台一键部署
ai智能体研发之路-工程篇(三):大模型推理服务框架ollama一键部署
ai智能体研发之路-工程篇(四):大模型推理服务框架xinference一键部署
ai智能体研发之路-工程篇(五):大模型推理服务框架localai一键部署
《ai—模型篇》
ai智能体研发之路-模型篇(一):大模型训练框架llama-factory在国内网络环境下的安装、部署及使用
ai智能体研发之路-模型篇(二):deepseek-v2-chat 训练与推理实战
ai智能体研发之路-模型篇(四):一文入门pytorch开发
ai智能体研发之路-模型篇(五):pytorch vs tensorflow框架dnn网络结构源码级对比
ai智能体研发之路-模型篇(六):【机器学习】基于tensorflow实现你的第一个dnn网络
ai智能体研发之路-模型篇(七):【机器学习】基于yolov10实现你的第一个视觉ai大模型
ai智能体研发之路-模型篇(八):【机器学习】qwen1.5-14b-chat大模型训练与推理实战
ai智能体研发之路-模型篇(九):【机器学习】glm4-9b-chat大模型/glm-4v-9b多模态大模型概述、原理及推理实战
ai智能体研发之路-模型篇(十):【机器学习】qwen2大模型原理、训练及推理部署实战
《ai—transformers应用》
【ai大模型】transformers大模型库(一):tokenizer
【ai大模型】transformers大模型库(二):automodelforcausallm
【ai大模型】transformers大模型库(三):特殊标记(special tokens)
【ai大模型】transformers大模型库(四):autotokenizer
【ai大模型】transformers大模型库(五):automodel、model head及查看模型结构
【ai大模型】transformers大模型库(六):torch.cuda.outofmemoryerror: cuda out of memory解决


发表评论