
vscode (visual studio code) 是微软开发的一款免费、开源的代码编辑器。它基于 electron 框架构建,提供了丰富的开发者工具,支持多种编程语言,可以进行代码调试、版本控制、智能提示等功能,是很多开发者日常使用的工具。

理解 vscode,我们首先要谈的是 electron。
electron 的核心技术主要包括以下几个方面:
chromium: electron 使用了 chromium 浏览器作为其渲染引擎。chromium是 google chrome 的开源版本,负责处理和渲染应用程序的用户界面,包括 html、css 和 javascript。这使得开发者可以利用web开发技术来构建应用的界面。
node.js: electron 集成了 node.js,使得开发者可以在应用程序的主进程(后台)中运行 javascript 代码。node.js 提供了对文件系统、网络、进程等系统级 api 的访问,增强了应用程序的功能和交互性。
native api: electron 提供了一套 api,允许主进程和渲染进程之间进行通信,以及调用操作系统级别的功能。这些 api 包括 ipcrenderer 和 ipcmain(用于进程间通信)、webcontents(用于控制页面内容)等。

electron 还有一个很大特点就是多进程。主要的有以下两个进程:
主进程
electron 中运行 package.json 中的 main 脚本的进程被称为主进程,即 main.js 就是运行在主进程。
一个 electron 应用有且只有一个主进程。
只有主进程可以直接进行 gui 相关的原生 api 操作。
渲染进程
运行在 chromium 的 web 页面姑且叫渲染进程,即运行 index.html 的环境就是渲染进程。
一个 electron 应用可以有多个渲染进程。
渲染进程在引入 node.js 模块的前提下,可以在页面中和操作系统进行一些底层交互(如 fs 模块)。
综上来看:在 electron 应用中,web 页面可以通过渲染进程将消息转发到主进程中,进而调用操作系统的 native api。相比普通 web 应用,可开发扩展的能力更加灵活、丰富。
了解了 vscode 的底层设计,下面我们就以真实的需求(创建模板)来一步步探索 vscode 扩展开发。

需求分析
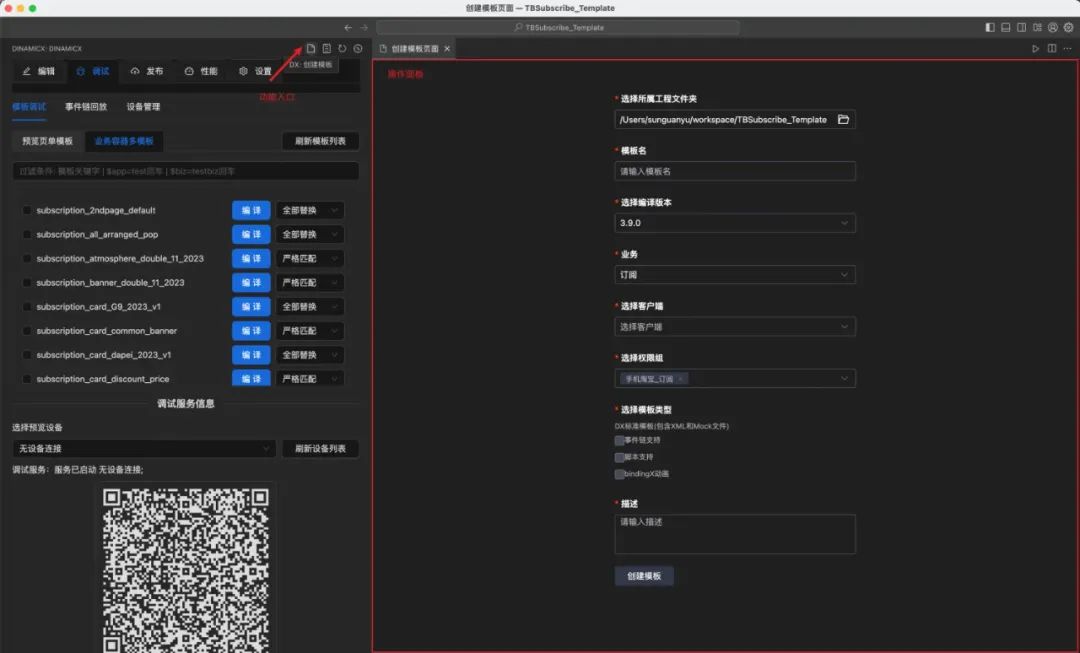
在 vscode 活动栏提供视图容器,透出创建模板入口,点击后打开可视化界面,进行简单配置后完成模板创建(注册模板信息到模板平台并生成对应的模板文件)。
要实现以上功能,需要先提炼出几个和 vscode 相关功能:
通过 vscode 指令系统,注册一个命令到菜单栏。
创建一个用于配置的 web 页面。
完成配置后上传配置信息并创建文件。
完成配置后关闭 web 页面。

逻辑实现
▐ 注册指令
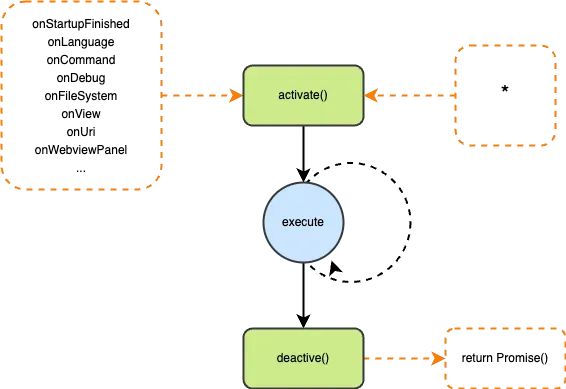
初始化一个插件项目后,暴露在最外面的文件中包含 activate 和 deactvate 两个方法,这俩方法属于 vscode 插件的生命周期,最终会被 export 出去给 vscode 主动调用。而 onxxx 等事件是声明在插件 package.json 文件中的 activation events。声明这些 activation events 后,vscode 就会在适当的时机回调插件中的 activate函数。vscode 之所以这么设计,是为了节省资源开销,只在必要的时候才激活你的插件。
// package.json"activationevents": ["oncommand:dinamicx.createtemplate",...],"commands": [{"command": "dinamicx.createtemplate","title": "dx: 创建模板"},...],"menus": {"view/title": [{"command": "dinamicx.createtemplate","group": "navigation@0","when": "view == dinamicx.views.main"}...]}
也可以在插件激活时注册命令:
import { createtemplate } from './commands/createtemplate';export function activate(context: vscode.extensioncontext) {// 注册命令vscode.commands.registercommand('dinamicx.createtemplate', (info: any) => {createtemplate(context, info.path);})...}
上面这段代码的含义是将dinamicx.createtemplate这个命令和函数绑定,具体的逻辑部分应该在createtemplate这个方法中实现。
▐ 创建webview
如果要创建一个页面,可以使用 vscode 提供的
api——vscode.window.createwebviewpanel:
export function createtemplate(context: vscode.extensioncontext,dirpath: string,) {const panel = vscode.window.createwebviewpanel('createtemplate', // viewtype'创建模板页面', // 视图标题vscode.viewcolumn.one, // 显示在编辑器的哪个部位// 启用js,默认禁用 // webview被隐藏时保持状态,避免被重置{ enablescripts: true, retaincontextwhenhidden: true },);...const htmlcontent = this.gethtmlcontent(panel.webview, htmlpath);panel.webview.html = htmlcontent;panel.reveal();return panel;}
具体渲染的页面可以通过 html 属性指定,但是 html 属性接收的参数是字符串!那么我们无法使用 vue/react 进行编码,只能写模板字符串了吗?
当然不是!我们可以先编写 react 代码,再打包成 js,套在 index.html 模板中 return 出来,问题就迎刃而解。处理这件事情的就是gethtmlcontent:
function gethtmlcontent(webview, htmlpath) {/*各种资源的绝对路径const gethtmldependencies = () => (`<!-- dependencies --><script src="${highlightjs}"></script><script src="${reactjs}"></script><script src="${reactdomjs}"></script><script src="${antdjs}"></script>`);*/const { gethtmllinks, gethtmldependencies } = usewebviewbasic(context);return `<!doctype html><html><head><meta charset="utf-8" />${gethtmllinks()}</head><style>body {background-color: transparent !important;}</style><body><div id="root"></div>${gethtmldependencies()}<!-- main --><script src="vscode-resource:${htmlpath}"></script>#{endofbody}</body></html>`;}
vscode-resource: 出于安全考虑,webview 默认无法直接访问本地资源,它在一个孤立的上下文中运行。它只允许通过绝对路径访问特定的本地文件。
由上面的代码可见,针对一个命令/函数,如果涉及到 webview,只关注渲染代码(即 spa 的 js 文件),不关心具体页面实现,所以可以将编写 ui 相关的逻辑,提炼到 node 主进程之外。
▐ react 和 webpack
对于 vscode 插件来讲,ui 是独立的,所以我们可以像创建 react 项目一样来完成页面部分的代码。
const template: react.fc = () => {const [loading, setloading] = usestate(false);...return (<spin spinning={loading} tip={loadingtext}><div classname="template">...</div></spin>);};reactdom.render(<template />, document.getelementbyid('root'));
在打包方面,刚才提到了我们要根据不同命令加载不同的页面组件,即不同的 js,所以打包的 entry 是多入口的;为了不重复引入公共库,将 react、antd 等库 external,选择通过 cdn 的方式引入。
const config = {mode: env.production ? 'production' : 'development',entry: {template: createpageentry('page-template'),layout: createpageentry('page-layout'),view: createpageentry('view-idl'),...},output: {filename: '[name].js',path: path.resolve(__dirname, '../dist/webview'),},...externals: {'react': 'root react','react-dom': 'root reactdom','antd': 'antd',},};
▐ 进程通信

vscode 在通信这里,只为我们提供了最简单粗糙的通信方法 —— acquirevscodeapi,这个对象里面有且仅有以下几个可以和插件通信的 api。
插件发送消息:
panel.webview.postmessage; // 支持发送任意被json化的数据
webview 接收消息:
window.addeventlistener('message', (event) => {const message = event.data;console.log(message);});
webview 给插件发消息:
export const vscode = acquirevscodeapi();vscode.postmessage('xxx');
插件接收消息:
panel.webview.ondidreceivemessage((message) => {console.log('插件收到的消息:', message);},undefined,context.subscriptions);

通信封装
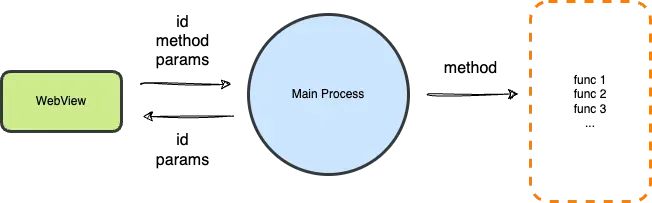
基于以上的进程通信方式,如果所有通信逻辑都通过 message 事件监听,那怎么知道某一处该接收哪些消息,该如何发送一个具有唯一标识的消息?
vscode 本身没有提供类似的功能,不过可以自己封装。
流程如图:
webview端:
export abstract class app<> {// private readonly _api: vscodeapi;// 单向通信protected sendcommand<tcommand extends ipccommandtype<any>>(command: tcommand,params: ipcmessageparams<tcommand>): void {const id = nextipcid();this.postmessage({ id: id, method: command.method, params: params });}// 双向通信protected async sendcommandwithcompletion<tcommand extends ipccommandtype<any>,tcompletion extends ipcnotificationtype<any>>(command: tcommand,params: ipcmessageparams<tcommand>,completion: tcompletion): promise<ipcmessageparams<tcompletion>> {const id = nextipcid();const promise = new promise<ipcmessageparams<tcompletion>>((resolve, reject) => {let timeout: returntype<typeof settimeout> | undefined;const disposables = [dom.on(window, 'message', (e: messageevent<ipcmessage>) => {onipc(completion, e.data, (params) => {if (e.data.completionid === id) {disposables.foreach((d) => d.dispose());queuemicrotask(() => resolve(params));}});}),{dispose: function () {if (timeout != null) {cleartimeout(timeout);timeout = undefined;}},},];timeout = settimeout(() => {timeout = undefined;disposables.foreach((d) => d.dispose());debugger;reject(new error(`timed out waiting for completion of ${completion.method}`));}, 600000);});this.postmessage({id: id,method: command.method,params: params,completionid: id,});return promise;}private postmessage(e: ipcmessage) {this._api.postmessage(e);}}
node端:
parent.webview.ondidreceivemessage(this.onmessagereceivedcore, this),onmessagereceivedcore(e: ipcmessage) {if (e == null) return;switch (e.method) {case executecommandtype.method:onipc(executecommandtype, e, params => {if (params.args != null) {void executecommand(params.command as commands, ...params.args);} else {void executecommand(params.command as commands);}});break;default:this.provider.onmessagereceived?.(e);break;}}// commands.tsimport { commands } from 'vscode';export function executecommand<u = any>(command: commands): thenable<u>;export function executecommand<t = unknown, u = any>(command: commands, arg: t): thenable<u>;export function executecommand<t extends [...unknown[]] = [], u = any>(command: commands, ...args: t): thenable<u>;export function executecommand<t extends [...unknown[]] = [], u = any>(command: commands, ...args: t): thenable<u> {return commands.executecommand<u>(command, ...args);}

基于以上,视图层、逻辑层、通信层的框架就大致完成了,接下来就是基于需求本身实现视图(react)和逻辑(node)的实现了。
希望此文能帮助大家快速对 vscode 插件开发有一定了解。后续会再介绍基于 vscode 的 dx 插件和使用建议、以及提高 vscode 开发效率的配置分享~

参考资料
introduction | electron (electronjs.org):
https://www.electronjs.org/docs/latest/?spm=ata.21736010.0.0.317e4797putld0
webview api | visual studio code extension api:
https://code.visualstudio.com/api/extension-guides/webview?spm=ata.21736010.0.0.317e4797putld0

团队介绍
我们是淘天集团 - 终端体验平台团队,立足于淘宝体验平台及集团移动中台定位,致力于无线端到端前沿技术探索,深入终端厂商到原生系统技术挖掘,打造集团先进且行业领先的终端基础设施及配套服务,涵盖多端性能体验、终端技术服务、原生技术研发、用户增长触达等关键领域的工作,为阿里巴巴数百款活跃app提供研发与性能支撑,即是集团终端技术生态的基石团队之一,也是淘天双11核心支撑团队之一!


发表评论