1.原生h5 video标签
<video id="mse" autoplay=true playsinline controls="controls">
   <source src="实机视频地址" type="video/mp4">
   你的浏览器不支持video标签
</video>
2.第三方插件video.js
_this.player = videojs(
    _this.videonode,
    {
        autoplay: true,
        bigplaybutton : false,
        controls: true,
        preload: 'auto',
        poster: poster,
        notsupportedmessage: '视频加载失败,请刷新再试试',
        sources: [
            {
                src: videourl,
                type: 'video/mp4',
            },
        ],
    },
    function onplayerready() {
        this.play();
    }
)

<video
  ref={(node) => (this.videonode = node)}
  classname="video-js vjs-big-play-centered"
  preload="auto"
  autoplay="autoplay"
  playsinline='true'
  webkit-playsinline='true'
  x5-video-player-type='h5'
  x5-video-player-fullscreen='false'
  x5-video-orientation='portraint'
></video>
2.1 支持原生h5 video标签的所有配置参数,并且更加丰富的配置。
2.2 多环境兼容性
3.业务开发中的场景
目前基本表现良好
3.1 自动播放实现
3.1.1 非微信端
目前主要方法是在videojs 的onplayerready回调中调用play方法,以及特殊环境下需要用户手动触发
3.1.2 微信端
微信端(特别是ios)为了能够实现自动播放功能,目前主要通过增加微信weixinjsbridgeready事件回调的方式来触发
document.addeventlistener("weixinjsbridgeready", function () {
    this.player.play();
}, false);
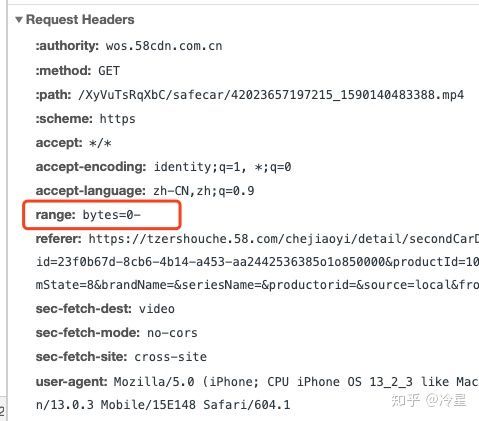
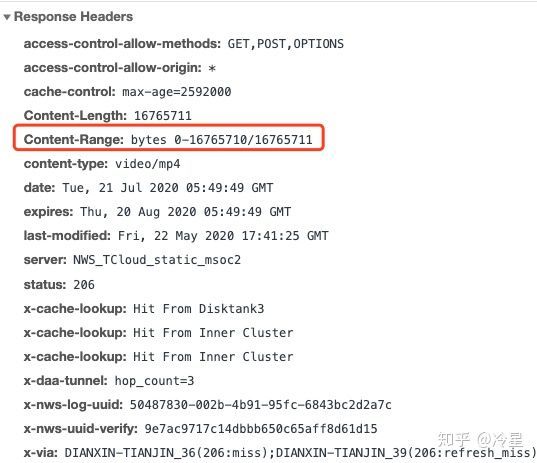
4.播放过程

一次播放三次请求
请求头信息
响应信息
range: bytes=0- 首部信息,该信息用于检测服务端是否支持 range 请求
accept-ranges 首部(并且它的值不为 “none”),那么表示该服务器支持范围请求
content-length 也是有效信息,因为它提供了要下载的视频的完整大小
content-range 响应首部则表示这一部分内容在整个资源中所处的位置
range - 可以分片段请求,此时的content-range则返回的对应请求区间的大小
5.其他场景
5.1 如何实现视频本地预览
视频本地预览的功能主要利用 url.createobjecturl() 方法来实现。url.createobjecturl() 静态方法会创建一个 domstring,其中包含一个表示参数中给出的对象的 url。这个 url 的生命周期和创建它的窗口中的 document 绑定。这个新的 url 对象表示指定的 file 对象或 blob 对象。
<!doctype html>
<html>
  <head>
    <meta charset="utf-8" />
    <meta name="viewport" content="width=device-width, initial-scale=1.0" />
    <title>视频本地预览示例</title>
  </head>
  <body>
    <input type="file" accept="video/*" onchange="loadfile(event)" />
    <video
      id="previewcontainer"
      controls
      width="480"
      height="270"
      style="display: none;"
    ></video>

    <script>
      const loadfile = function (event) {
        const reader = new filereader();
        reader.onload = function () {
          const output = document.queryselector("#previewcontainer");
          output.style.display = "block";
          output.src = url.createobjecturl(new blob([reader.result]));
        };
        reader.readasarraybuffer(event.target.files[0]);
      };
    </script>
  </body>
</html>
5.2 如何实现播放器截图
播放器截图功能主要利用 canvasrenderingcontext2d.drawimage() api 来实现。canvas 2d api 中的 canvasrenderingcontext2d.drawimage() 方法提供了多种方式在 canvas 上绘制图像。
drawimage api 的语法如下:
void ctx.drawimage(image, dx, dy);
void ctx.drawimage(image, dx, dy, dwidth, dheight);
void ctx.drawimage(image, sx, sy, swidth, sheight, dx, dy, dwidth, dheight);
<!doctype html>
<html lang="en">
  <head>
    <meta charset="utf-8" />
    <meta name="viewport" content="width=device-width, initial-scale=1.0" />
    <title>播放器截图示例</title>
  </head>
  <body>
    <video id="video" controls="controls" width="460" height="270" crossorigin="anonymous">
      <!-- 请替换为实际视频地址 -->
      <source src="请替换为实际视频地址" />
    </video>
    <button onclick="capturevideo()">截图</button>
    <script>
      let video = document.queryselector("#video");
      let canvas = document.createelement("canvas");
      let img = document.createelement("img");
      img.crossorigin = "";
      let ctx = canvas.getcontext("2d");

      function capturevideo() {
        canvas.width = video.videowidth;
        canvas.height = video.videoheight;
        ctx.drawimage(video, 0, 0, canvas.width, canvas.height);
        img.src = canvas.todataurl();
        document.body.append(img);
      }
    </script>
  </body>
</html>
5.3 如何实现 canvas 播放视频
使用 canvas 播放视频主要是利用 ctx.drawimage(video, x, y, width, height) 来对视频当前帧的图像进行绘制,其中 video 参数就是页面中的 video 对象。所以如果我们按照特定的频率不断获取 video 当前画面,并渲染到 canvas 画布上,就可以实现使用 canvas 播放视频的功能。
<!doctype html>
<html>
  <head>
    <meta charset="utf-8" />
    <meta name="viewport" content="width=device-width, initial-scale=1.0" />
    <title>使用 canvas 播放视频</title>
  </head>
  <body>
    <video id="video" controls="controls" style="display: none;">
      <!-- 请替换为实际视频地址 -->
      <source src="请替换为实际视频地址" />
    </video>
    <canvas
      id="mycanvas"
      width="460"
      height="270"
      style="border: 1px solid blue;"
    ></canvas>
    <div>
      <button id="playbtn">播放</button>
      <button id="pausebtn">暂停</button>
    </div>
    <script>
      const video = document.queryselector("#video");
      const canvas = document.queryselector("#mycanvas");
      const playbtn = document.queryselector("#playbtn");
      const pausebtn = document.queryselector("#pausebtn");
      const context = canvas.getcontext("2d");
      let timerid = null;

      function draw() {
        if (video.paused || video.ended) return;
        context.clearrect(0, 0, canvas.width, canvas.height);
        context.drawimage(video, 0, 0, canvas.width, canvas.height);
        timerid = settimeout(draw, 0);
      }

      playbtn.addeventlistener("click", () => {
        if (!video.paused) return;
        video.play();
        draw();
      });

      pausebtn.addeventlistener("click", () => {
        if (video.paused) return;
        video.pause();
        cleartimeout(timerid);
      });
    </script>
  </body>
</html>
以上就是前端h5 video常见使用场景简介的详细内容,更多关于前端h5 video常见场景的资料请关注代码网其它相关文章!


发表评论