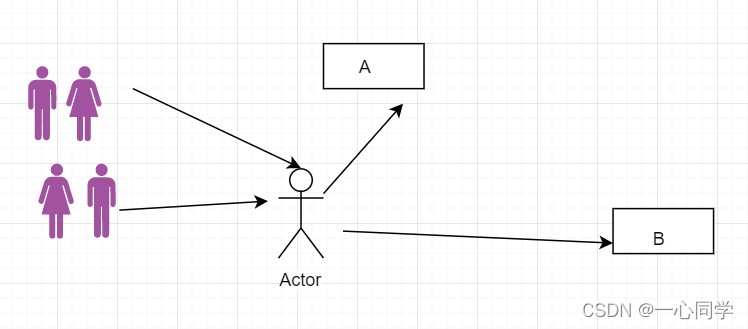
一、什么是负载均衡?
负载均衡(load balance),意思是将负载(工作任务,访问请求)进行平衡、分摊到多个操作单元(服务器,组件)上进行执行。是解决高性能,单点故障(高可用),扩展性(水平伸缩)的终极解决方案。
例子:
在早高峰乘地铁时候,紧挨小区的地铁口人特别多,一般会有限流,还会有个地铁工作人员y用那个大喇叭在喊“着急的人员请走b口,b口人少车空”。。。
而这个地铁工作人员y就是负责负载均衡的。为了提升网站的各方面能力,我们一般会把多台机器组成一个集群对外提供服务。然而,我们的网站对外提供的访问入口都是一个的,比如www.taobao.com。那么当用户在浏览器输入www.taobao.com的时候如何将用户的请求分发到集群中不同的机器上呢,这就是负载均衡在做的事情。
二、负载均衡分类
注:lb,即负载均衡 (loadbalancer)
2.1 集中式lb
即在服务的提供方和消费方之间使用独立的lb设施,如nginx(反向代理服务器),由该设施负责把访问请求通过某种策略转发至服务的提供方!
2.2 进程式 lb
将lb逻辑集成到消费方,消费方从服务注册中心获知有哪些地址可用,然后自己再从这些地址中选出一个合适的服务器。
ribbon 就属于进程式lb,它只是一个类库,集成于消费方进程,消费方通过它来获取到服务提供方的地址!
三、spring cloud ribbon是什么?
(1)ribbon负责实现客户端的负载均衡,负载均衡器提供很多对http和tcp的行为控制。
(2)ribbon默认提供了很多负载均衡算法,如:轮询、随机等,也可以实现自定义的负载均衡算法。
(3)在spring cloud中,当ribbon与eureka结合使用时,ribbon可以自动的从eureka server获取服务列表,基于负载均衡算法,进行服务调用。
(4)在spring cloud构建的微服务系统中,ribbon作为客户端负载均衡器,有两种使用方式,第一种是和resttemplate相结合,第二种是和feign相结合。
四、ribbon 的负载均衡算法
(1)roundrobinrule:轮询策略,默认策略。
(2)randomrule,随机,使用random对象从服务列表中随机选择一个服务。
(3)retryrule,轮询 + 重试。
(4)weightedresponsetimerule:优先选择响应时间快,此策略会根据平均响应时间计算所有服务的权重,响应时间越快,服务权重越重、被选中的概率越高。此类有个dynamicserverweighttask的定时任务,默认情况下每隔30秒会计算一次各个服务实例的权重。刚启动时,如果统计信息不足,则使用roundrobinrule策略,等统计信息足够,会切换回来。
(5)availabilityfilteringrul:,可用性过滤,会先过滤掉以下服务:由于多次访问故障而断路器处于打开的服务、并发的连接数量超过阈值,然后对剩余的服务列表按照roundrobinrule策略进行访问。
(6)bestavailablerule:优先选择并发请求最小的,刚启动时吗,如果统计信息不足,则使用roundrobinrule策略,等统计信息足够,才会切换回来。
(7)zoneavoidancerule:可以实现避免可能访问失效的区域(zone)
五、环境准备-搭建eureka
1、建立maven父工程
编写pom.xml
<dependencymanagement>
        <dependencies>
            <dependency>
                <groupid>org.springframework.cloud</groupid>
                <artifactid>spring-cloud-alibaba-dependencies</artifactid>
                <version>0.2.0.release</version>
                <type>pom</type>
                <scope>import</scope>
            </dependency>
            <!--springcloud的依赖-->
            <dependency>
                <groupid>org.springframework.cloud</groupid>
                <artifactid>spring-cloud-dependencies</artifactid>
                <version>hoxton.sr12</version>
                <type>pom</type>
                <scope>import</scope>
            </dependency>
            <!--springboot-->
            <dependency>
                <groupid>org.springframework.boot</groupid>
                <artifactid>spring-boot-dependencies</artifactid>
                <version>2.3.12.release</version>
                <type>pom</type>
                <scope>import</scope>
            </dependency>
        </dependencies>
    </dependencymanagement>
2、建立以下子工程
注:同样也是maven。
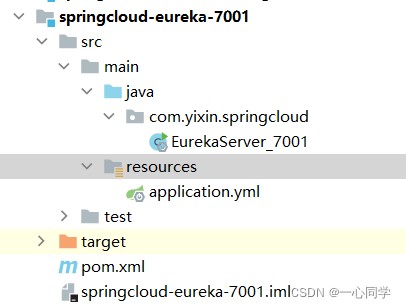
3、配置springcloud-eureka-7001
(1)目录如下
(2)导入依赖
<dependencies>
        <!-- https://mvnrepository.com/artifact/org.springframework.cloud/spring-cloud-starter-eureka-server -->
        <!--导入eureka server依赖-->
        <dependency>
            <groupid>org.springframework.cloud</groupid>
            <artifactid>spring-cloud-starter-eureka-server</artifactid>
            <version>1.4.6.release</version>
        </dependency>
        <!--热部署工具-->
        <dependency>
            <groupid>org.springframework.boot</groupid>
            <artifactid>spring-boot-devtools</artifactid>
        </dependency>
    </dependencies>
(3)编写配置文件
application.yml:
server:
  port: 7001
# eureka配置
eureka:
  instance:
    # eureka服务端的实例名字
    hostname: localhost
  client:
    # 表示是否向 eureka 注册中心注册自己(这个模块本身是服务器,所以不需要)
    register-with-eureka: false
    # fetch-registry如果为false,则表示自己为注册中心,客户端的化为 ture
    fetch-registry: false
    # eureka监控页面~
    service-url:
      defaultzone: http://${eureka.instance.hostname}:${server.port}/eureka/
(4)编写启动器
注意:要在主启动器上方添加 @enableeurekaserver表示 服务端的启动类,可以接受别人注册进来。
package com.yixin.springcloud;
import org.springframework.boot.springapplication;
import org.springframework.boot.autoconfigure.springbootapplication;
import org.springframework.cloud.netflix.eureka.server.enableeurekaserver;
@springbootapplication
@enableeurekaserver
public class eurekaserver_7001 {
public static void main(string[] args) {
springapplication.run(eurekaserver_7001.class,args);
}
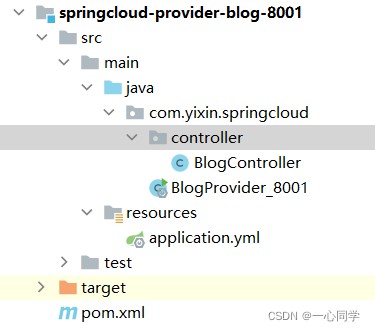
}4、配置springcloud-provider-blog-8001
(1)建立目录如下
(2)导入依赖
<!--导包~-->
<dependencies>
<!-- https://mvnrepository.com/artifact/org.springframework.cloud/spring-cloud-starter-eureka-server -->
<!--导入eureka server依赖-->
<dependency>
<groupid>org.springframework.cloud</groupid>
<artifactid>spring-cloud-starter-eureka</artifactid>
<version>1.4.6.release</version>
</dependency>
<!--spring boot-->
<dependency>
<groupid>org.springframework.boot</groupid>
<artifactid>spring-boot-test</artifactid>
<version>2.4.5</version>
</dependency>
<dependency>
<groupid>org.springframework.boot</groupid>
<artifactid>spring-boot-starter-web</artifactid>
<version>2.4.5</version>
</dependency>
<!--热部署工具-->
<dependency>
<groupid>org.springframework.boot</groupid>
<artifactid>spring-boot-devtools</artifactid>
</dependency>
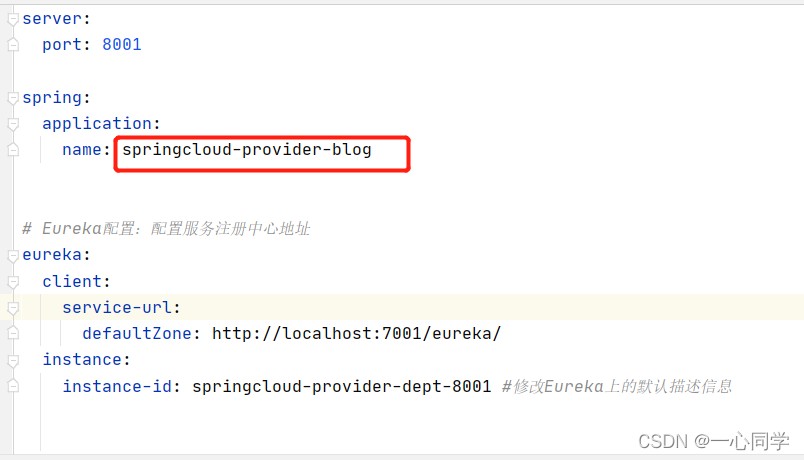
</dependencies>(3)编写配置文件
application.yml:
server:
  port: 8001
spring:
  application:
    name: springcloud-provider-blog
# eureka配置:配置服务注册中心地址
eureka:
  client:
    service-url:
      defaultzone: http://localhost:7001/eureka/
  instance:
    instance-id: springcloud-provider-dept-8001 #修改eureka上的默认描述信息
(4)编写blogcontroller
注:开发中,我们是需要连接到数据库的,但为了给大家演示清楚ribbon,这里我们用简单dbsource来表示我们这个微服务对应的数据库。
package com.yixin.springcloud.controller;

import org.springframework.beans.factory.annotation.value;
import org.springframework.web.bind.annotation.getmapping;
import org.springframework.web.bind.annotation.restcontroller;

@restcontroller
public class blogcontroller {
    //表示db01这个数据库
    @value("db01")
    private string dbsource;
    //注册进来的微服务,获取一些消息
    @getmapping("/blog/info")
    public string discovery(){
        return dbsource;
    }
}
(5)编写启动类blogprovider_8001
package com.yixin.springcloud;

import org.springframework.boot.springapplication;
import org.springframework.boot.autoconfigure.springbootapplication;
import org.springframework.cloud.client.discovery.enablediscoveryclient;
import org.springframework.cloud.netflix.eureka.enableeurekaclient;

@springbootapplication
@enableeurekaclient
public class blogprovider_8001 {
    public static void main(string[] args) {
        springapplication.run(blogprovider_8001.class,args);
    }
}
5、编写springcloud-provider-blog-8002和springcloud-provider-blog-8003
(1)导入的依赖和springcloud-provider-blog-8001一样
(2) 配置springcloud-provider-blog-8002
a、application.yml(其实就是改了端口号而已)
server:
  port: 8002
spring:
  application:
    name: springcloud-provider-blog
# eureka配置:配置服务注册中心地址
eureka:
  client:
    service-url:
      defaultzone: http://localhost:7001/eureka/
  instance:
    instance-id: springcloud-provider-dept-8002 #修改eureka上的默认描述信息
b、编写blogcontroller
更改数据库名:db02
package com.yixin.springcloud.controller;

import org.springframework.beans.factory.annotation.value;
import org.springframework.web.bind.annotation.getmapping;
import org.springframework.web.bind.annotation.restcontroller;

@restcontroller
public class blogcontroller {

    //表示db02这个数据库
    @value("db02")
    private string dbsource;
    //注册进来的微服务,获取一些消息
    @getmapping("/blog/info")
    public string discovery(){
        return dbsource;
    }
}
c、编写启动类,和springcloud-provider-blog-8001一样
(3) 配置springcloud-provider-blog-8003
a、application.yml(其实就是改了端口号而已)
server:
  port: 8003
spring:
  application:
    name: springcloud-provider-blog
# eureka配置:配置服务注册中心地址
eureka:
  client:
    service-url:
      defaultzone: http://localhost:7001/eureka/
  instance:
    instance-id: springcloud-provider-dept-8003 #修改eureka上的默认描述信息
b、blogcontroller
更改数据库名:db03
package com.yixin.springcloud.controller;

import org.springframework.beans.factory.annotation.value;
import org.springframework.web.bind.annotation.getmapping;
import org.springframework.web.bind.annotation.restcontroller;

@restcontroller
public class blogcontroller {

    //表示db03这个数据库
    @value("db03")
    private string dbsource;
    //注册进来的微服务,获取一些消息
    @getmapping("/blog/info")
    public string discovery(){
        return dbsource;
    }
}
c、编写启动类,和springcloud-provider-blog-8001一样。
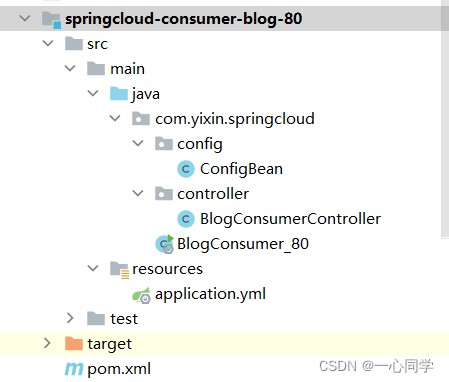
6、配置springcloud-consumer-blog-80
(1)目录如下
(2)导入依赖
 <!--导包~-->
    <dependencies>
        <!-- https://mvnrepository.com/artifact/org.springframework.cloud/spring-cloud-starter-eureka-server -->
        <!--导入eureka依赖-->
        <dependency>
            <groupid>org.springframework.cloud</groupid>
            <artifactid>spring-cloud-starter-eureka</artifactid>
            <version>1.4.6.release</version>
        </dependency>
        <!--spring boot-->
        <dependency>
            <groupid>org.springframework.boot</groupid>
            <artifactid>spring-boot-test</artifactid>
            <version>2.4.5</version>
        </dependency>
        <dependency>
            <groupid>org.springframework.boot</groupid>
            <artifactid>spring-boot-starter-web</artifactid>
            <version>2.4.5</version>
        </dependency>
        <!--热部署工具-->
        <dependency>
            <groupid>org.springframework.boot</groupid>
            <artifactid>spring-boot-devtools</artifactid>
        </dependency>
    </dependencies>
(3)编写configbean
package com.yixin.springcloud.config;

import org.springframework.context.annotation.bean;
import org.springframework.context.annotation.configuration;
import org.springframework.web.client.resttemplate;

@configuration
public class configbean {

    @bean
    public resttemplate getresttemplate(){
        return new resttemplate();
    }
}
(4)编写blogconsumercontroller
package com.yixin.springcloud.controller;

import org.springframework.beans.factory.annotation.autowired;
import org.springframework.web.bind.annotation.getmapping;
import org.springframework.web.bind.annotation.restcontroller;
import org.springframework.web.client.resttemplate;

@restcontroller
public class blogconsumercontroller {
    @autowired
    private resttemplate resttemplate;
    private static final string rest_url_prefix="http://localhost:8001";
    @getmapping("/consumer/blog")
    public string get(){
        return "消费端:"+resttemplate.getforobject(rest_url_prefix +"/blog/info", string.class);
    }
}
(5)测试
依次启动:
- springcloud-eureka-7001
- springcloud-provider-blog-8002
- springcloud-consumer-blog-80
访问:http://localhost:8000/consumer/blog
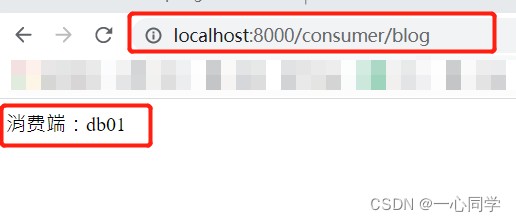
至此,eureka就搭建好了!
六、集成ribbon
6.1 搭建ribbon
由于ribbon属于进程式 lb(load balance),即将lb逻辑集成到消费方,消费方从服务注册中心获知有哪些地址可用,所以我们只需要在消费方这边进行配置即可。
eureka搭建好了,我们集成ribbon非常简单,只需三步:
配置springcloud-consumer-blog-80
(1)添加依赖:
   <!--ribbon-->
    <dependency>
        <groupid>org.springframework.cloud</groupid>
        <artifactid>spring-cloud-starter-ribbon</artifactid>
        <version>1.4.6.release</version>
    </dependency>
(2)在配置类增加注解@loadbalanced
package com.yixin.springcloud.config;

import org.springframework.cloud.client.loadbalancer.loadbalanced;
import org.springframework.context.annotation.bean;
import org.springframework.context.annotation.configuration;
import org.springframework.web.client.resttemplate;

@configuration
public class configbean {

    @loadbalanced //配置负载均衡实现resttemplate
    @bean
    public resttemplate getresttemplate(){
        return new resttemplate();
    }
}
(3)修改blogconsumercontroller获取路径
package com.yixin.springcloud.controller;

import org.springframework.beans.factory.annotation.autowired;
import org.springframework.web.bind.annotation.getmapping;
import org.springframework.web.bind.annotation.restcontroller;
import org.springframework.web.client.resttemplate;

@restcontroller
public class blogconsumercontroller {

    @autowired
    private resttemplate resttemplate;

    //private static final string rest_url_prefix="http://localhost:8001";

    private static final string rest_url_prefix="http://springcloud-provider-blog";

    @getmapping("/consumer/blog")
    public string get(){
        return "消费端:"+resttemplate.getforobject(rest_url_prefix +"/blog/info", string.class);
    }
}
注意:这里的springcloud-provider-blog指的就是我们服务注册中的服务名。
所以为了搭建服务产生方集群,我们刚刚在搭建springcloud-provider-blog-8001、springcloud-provider-blog-8002、springcloud-provider-blog-8003的时候,我们就已经将其服务名全部设置为一样的了。

至此,ribbon就搭建好了,ribbon的默认负载均衡算法是轮询算法,也就是说,请求结束后都会向下一个服务端发送请求,例如 我们的有服务生产方a8001,服务端生产方b8002,服务端生产方c8003,那么消费端请求三次,依次的顺序是a,b,c。
我们来进行测试下:
- 依次启动:
- springcloud-eureka-7001
- springcloud-provider-blog-8001
- springcloud-provider-blog-8002
- springcloud-provider-blog-8003
- springcloud-consumer-blog-80
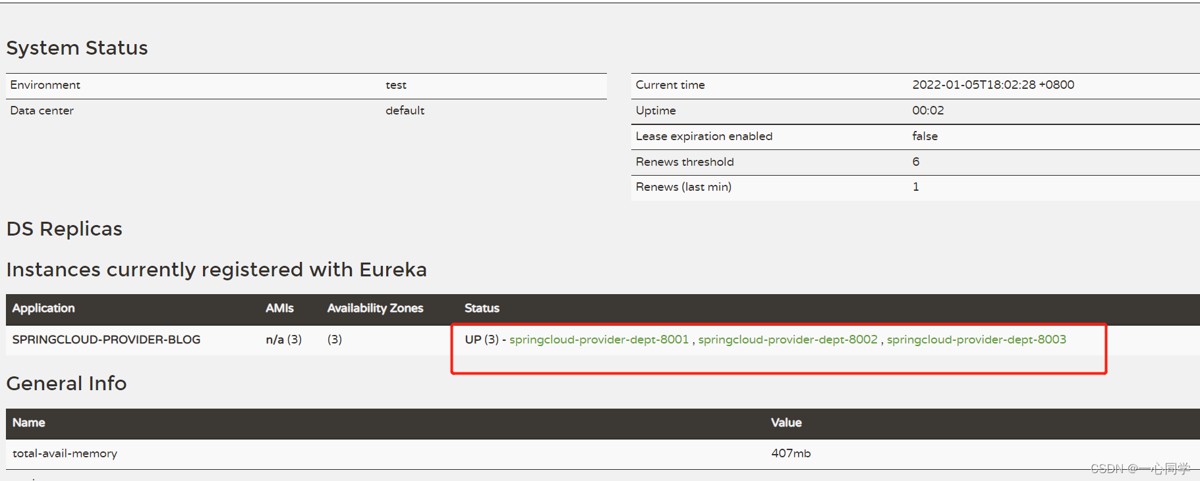
访问:http://localhost:7001/
可以发现,我们三个服务生产方已经成功绑定了。
接着重头戏来了!
进行测试:
访问:http://localhost:8000/consumer/blog
- 访问第一次:
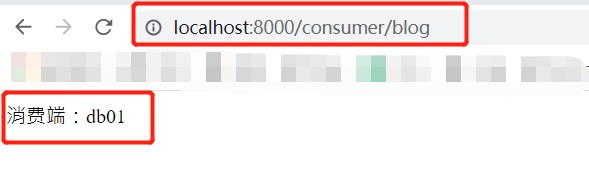
- 访问第二次:
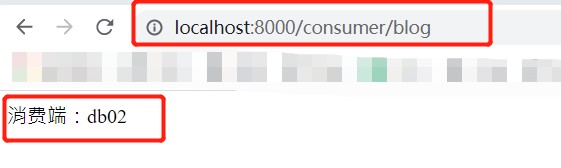
- 访问第三次:
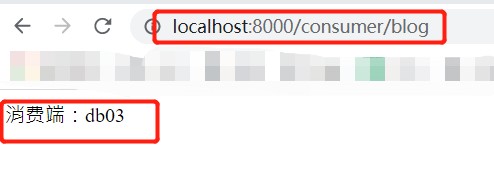
成功啦!!!
6.2 切换负载均衡的规则
修改springcloud-consumer-blog-80下的configbean
package com.yixin.springcloud.config;

import com.netflix.loadbalancer.irule;
import com.netflix.loadbalancer.randomrule;
import org.springframework.cloud.client.loadbalancer.loadbalanced;
import org.springframework.context.annotation.bean;
import org.springframework.context.annotation.configuration;
import org.springframework.web.client.resttemplate;

@configuration
public class configbean {

    @loadbalanced //配置负载均衡实现resttemplate
    @bean
    public resttemplate getresttemplate() {
        return new resttemplate();
    }

    /**
     * irule:
     * roundrobinrule 轮询策略
     * randomrule 随机策略
     * availabilityfilteringrule : 会先过滤掉,跳闸,访问故障的服务~,对剩下的进行轮询~
     * retryrule : 会先按照轮询获取服务~,如果服务获取失败,则会在指定的时间内进行,重试
     */
    @bean
    public irule myrule() {
        return new randomrule();//使用随机策略
        //return new roundrobinrule();//使用轮询策略
        //return new availabilityfilteringrule();//会先过滤掉,跳闸,访问故障的服务~,对剩下的进行轮询~
        //return new retryrule();//会先按照轮询获取服务~,如果服务获取失败,则会在指定的时间内进行,重试
    }
}
测试:
重启springcloud-consumer-blog-80
访问:http://localhost:8000/consumer/blog
- 访问第一次:
- 访问第二次:
- 访问第三次:
可以发现它是随机的!
6.3 自定义负载均衡的规则
在myrule包下自定义一个配置类myrule.java。
注意:myrule包不要和主启动类所在的包同级。
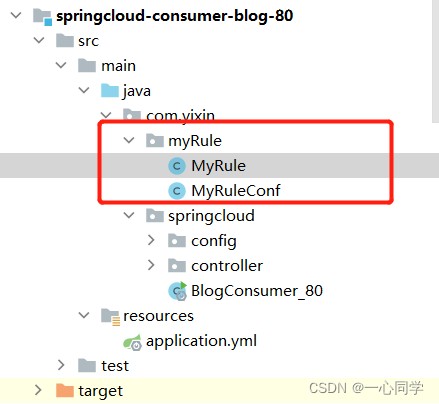
(1)编写自定义规则myrule
规则:每个服务访问5次,换下一个服务。
package com.yixin.myrule;

import com.netflix.client.config.iclientconfig;
import com.netflix.loadbalancer.abstractloadbalancerrule;
import com.netflix.loadbalancer.iloadbalancer;
import com.netflix.loadbalancer.server;
import org.springframework.context.annotation.configuration;

import java.util.list;
import java.util.concurrent.threadlocalrandom;

@configuration
public class myrule extends abstractloadbalancerrule {
    // 每个服务访问 5 次,换下一个服务
    // total=0 => 默认 0,如果等于 5 ,指向下一个服务节点
    // index=0 => 默认 0,如果 total 等于 5 ,index+1
    private int total = 0; //被调用的次数
    private int currentindex = 0; //当前谁在提供服务

    public server choose(iloadbalancer lb, object key) {
        if (lb == null) {
            return null;
        }
        server server = null;
        while (server == null) {
            if (thread.interrupted()) {
                return null;
            }
            list<server> uplist = lb.getreachableservers(); //获得存活的服务
            list<server> alllist = lb.getallservers();//获得全部服务
            int servercount = alllist.size();
            if (servercount == 0) {
                /*
                 * no servers. end regardless of pass, because subsequent passes
                 * only get more restrictive.
                 */
                return null;
            }
// int index = chooserandomint(servercount);//在区间内随机获得一个地址

// server = uplist.get(index);//从存活的列表中获得
            //=================================
            total++;
            if (total > 5) {
                total = 0;
                currentindex++;
            }
            if (currentindex >= uplist.size()) currentindex = 0;
            server = uplist.get(currentindex);
            //=================================
            if (server == null) {
                /*
                 * the only time this should happen is if the server list were
                 * somehow trimmed. this is a transient condition. retry after
                 * yielding.
                 */
                thread.yield();
                continue;
            }
            if (server.isalive()) {
                return (server);
            }
            // shouldn't actually happen.. but must be transient or a bug.
            server = null;
            thread.yield();
        }
        return server;
    }

    protected int chooserandomint(int servercount) {
        return threadlocalrandom.current().nextint(servercount);
    }

    @override
    public server choose(object key) {
        return choose(getloadbalancer(), key);
    }

    @override
    public void initwithniwsconfig(iclientconfig clientconfig) {
        // todo auto-generated method stub
    }
}
(2)编写配置类myruleconf
作用:将我们写的这个规则注入到spring中。
package com.yixin.myrule;

import com.netflix.loadbalancer.irule;
import com.netflix.loadbalancer.randomrule;
import org.springframework.context.annotation.bean;
import org.springframework.context.annotation.configuration;

@configuration
public class myruleconf {

    @bean
    public irule myrule(){
        return new myrule();//自定义规则
    }
}
(3)启动类增加注解@ribbonclient
package com.yixin.springcloud;

import com.yixin.myrule.myruleconf;
import org.springframework.boot.springapplication;
import org.springframework.boot.autoconfigure.springbootapplication;
import org.springframework.cloud.netflix.eureka.enableeurekaclient;
import org.springframework.cloud.netflix.ribbon.ribbonclient;

@springbootapplication
@enableeurekaclient
//在微服务启动的时候就能加载自定义的ribbon类(自定义的规则会覆盖原有默认的规则)
@ribbonclient(name = "springcloud-provider-blog",configuration = myruleconf.class)//开启负载均衡,并指定自定义的规则
public class blogconsumer_80 {

    public static void main(string[] args) {
        springapplication.run(blogconsumer_80.class,args);
    }

}
(4)测试
重启 springcloud-consumer-blog-80
访问:http://localhost:8000/consumer/blog
- 访问1-5次:
- 访问第6-10次:
- 访问第11-15次:
自定义规则测试成功!!!
总结
以上就是对基于spring cloud的负载均衡ribbon知识点和实操的讲解,实现负载均衡可以将我们的压力分摊到多个操作单元。
这些仅为个人经验,希望能给大家一个参考,也希望大家多多支持代码网。


发表评论