一,项目配置
我在 ip 为 192.168.31.177 的机器上使用 vue3 开发前端项目,项目中使用 axios 调用后端接口。
这是 axios 的配置:
import axios from 'axios';

const request = axios.create({
    baseurl: 'http://192.168.31.177:8001',
    // 设置请求头
    headers: {},
    // 设置超时时间
    timeout: 2000,
});


// 请求拦截器
request.interceptors.request.use(
    config => {
        // 在发送请求之前做些什么

        return config;
    },
    error => {
        // 对请求错误做些什么
        return promise.reject(error);
    }
);

// 响应拦截器
request.interceptors.response.use(
    response => {
        if (response) {
            // 响应数据为二进制流处理(数据导出)
            if (response.data.data instanceof blob) {
                return response
            }

            const {code, msg} = response.data
            if (code === 200) {
                return promise.resolve(response.data)
            } else {
                return promise.resolve(response)
            }
        } else {
            return promise.reject(new error('系统出错'))
        }
    },

    function (error) {
        // 对响应错误做点什么

        // 比如:根据响应状态码,做不同的响应处理
        console.log(error)
        return promise.reject(error)
    }
)

export default request
这是页面中的请求:
axios.get('/api/getnumbers')
        .then(res => {
            elmessage({
                message: res.msg,
                type: 'success'
            })
        }).catch(err => {
            elmessage({
                message: err,
                type: 'error'
            })
        })
这是 package.json 中的配置:
  "scripts": {
    "dev": "vite --host 192.168.31.177",
    "build": "vite build",
    "preview": "vite preview"
  }
然后在 ip 为 192.168.31.45 的机器上启动 expressjs 开发的后端项目 192.168.31.45:3000:
app.get('/api/getnumbers', (req, res) => {
    // 生成两个随机数
    const number1 = math.floor(math.random() * 100);
    const number2 = math.floor(math.random() * 100);
    res.json({
        code: 200,
        msg: '成功!',
        data: {
            "a": number1,
            "b": number2,
        }
    });
});
现在想使用 nginx 将前端的请求代理到后端,下面将介绍 nginx 需要怎样配置以及具体原理。
二,配置 nginx
前端项目运行在 192.168.31.177(开发机器),后端运行在 192.168.31.45:3000,nginx 需要配置为反向代理,将前端请求转发到后端。
在开发机器(192.168.31.177)上 nginx 的配置文件(nginx.conf):
http {
    server {
        listen 8001;                # nginx 监听的端口,前端 axios 中配置的 端口
        server_name 192.168.31.177; # 前端 axios 中配置的 ip

        location / {
            try_files $uri $uri/ /index.html; # 支持vue路由的history模式
        }

        # 代理后端api请求
        location /api {
            proxy_pass http://192.168.31.45:3000;	# 后端项目运行的地址

            # 可选:如果后端接口路径不包含/api,移除前缀
            # rewrite ^/api/(.*) /$1 break;

            # 添加必要的代理头信息
            proxy_set_header host $host;
            proxy_set_header x-real-ip $remote_addr;
            proxy_set_header x-forwarded-for $proxy_add_x_forwarded_for;
            proxy_set_header x-forwarded-proto $scheme;
        }
    }
}
配置完成后执行:
g:\nginx-1.24.0>nginx -t		 # 检查配置语法
nginx: the configuration file g:\nginx-1.24.0/conf/nginx.conf syntax is ok
nginx: configuration file g:\nginx-1.24.0/conf/nginx.conf test is successful

g:\nginx-1.24.0>start nginx		# 启动nginx

g:\nginx-1.24.0>nginx -s reload # 不停止,重新加载
- 打开【任务管理器——进程,搜索 nginx,可以看到两个进程,说明 nginx 正确启动。
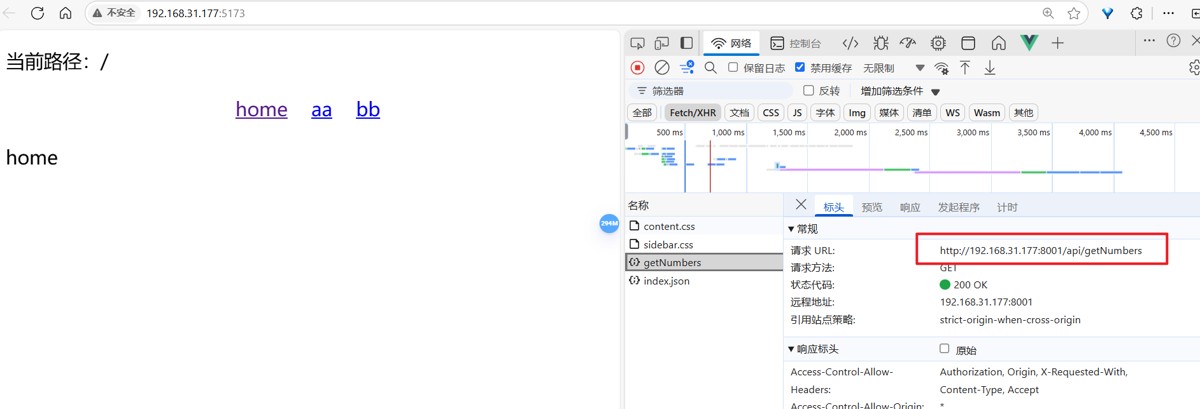
启动前端项目,访问 http://192.168.31.177:5173/。打开页面后调用接口,获取到接口数据。
三,nginx 代理原理

反向代理的作用:
请求转发:nginx 监听前端请求(如 http://192.168.31.177:8080/api/getnumbers),并将匹配 /api 的请求转发到后端服务器 http://192.163.109.134:3000。
隐藏后端细节:前端无需知道后端地址,只需与 nginx 通信。
解决跨域:浏览器认为请求是同源的(都是 http://192.168.31.177:8080),实际由 nginx 转发到不同域的后端。
关键配置解释
location /api:匹配所有以 /api 开头的请求路径。

proxy_pass:将匹配的请求转发到后端服务器。

proxy_set_header:设置请求头,确保后端能获取客户端的真实 ip 和协议信息。

add_header:添加 cors 响应头,显式允许跨域(可选,如果代理已解决跨域,可能不需要)。
为什么这样配置?
- 解决跨域问题:浏览器默认禁止跨域请求,但通过 nginx 代理:前端请求发送到 http://192.168.31.177:8080/api(同源)。nginx 将请求转发到 http://192.163.109.134:3000/api,后端响应通过 nginx 返回前端。浏览器认为请求是“同源”的,不会触发跨域限制。
- 灵活的路由控制:可以按路径(如 /api)或域名分发请求。
- 支持负载均衡、缓存等高级功能(开发阶段可能不需要)。
- 统一入口:前端和后端通过同一个端口(如 8080)通信,简化开发配置。
验证配置是否生效:
- 在浏览器中访问后端 api http://192.163.109.134:3000/api/getnumbers,确保后端正常返回数据。
- 通过 nginx 访问 api http://192.168.31.177:8080/api/getnumbers,检查是否返回相同数据。
- 检查看 nginx 的访问日志和错误日志,确认请求是否被正确转发。
- nginx 未启动或配置错误问题排查
status nginx 检查服务状态。
nginx -t 检查配置语法。
到此这篇关于nginx代理前端请求的实现示例的文章就介绍到这了,更多相关nginx代理前端请求内容请搜索代码网以前的文章或继续浏览下面的相关文章希望大家以后多多支持代码网!


发表评论