一、vts模块的核心功能
nginx virtual host traffic status module 实时监控 nginx 虚拟主机(或服务器块)的流量状态、请求指标、响应性能等数据,并提供可视化页面和 api 接口,方便运维人员排查问题、分析流量趋势
vts 模块能监控的指标覆盖 “请求 - 流量 - 响应” 全链路,且支持按虚拟主机、服务、位置(location)粒度拆分
| 功能分类 | 核心监控指标 |
|---|---|
| 请求指标 | 总请求数、成功请求数、各 http 状态码(2xx/3xx/4xx/5xx)请求数、每秒请求数(rps) |
| 流量指标 | 入站流量(接收字节数)、出站流量(发送字节数)、每秒流量(bps) |
| 响应性能指标 | 平均响应时间、响应时间分布(如 100ms 内、500ms 内的请求占比) |
| 连接指标 | 当前活跃连接数、空闲连接数、已关闭连接数 |
| 过滤与排序 | 支持按 “请求数、流量、响应时间” 等维度排序,也可过滤特定虚拟主机或状态码 |
| 数据输出方式 | 1. 内置 html 可视化页面(直观查看) 2. json/csv/prometheus 格式 api(集成监控系统) |
二、增加vts模块
首先需要上传vts模块包nginx-module-vts-master.zip到/root家目录
下载与当前 nginx 版本一致的源码和 vts 模块源码
执行./configure时,在复制的原有参数后追加--add-module=path/nginx-module-vts
[root@web-2 ~]# vim install_nginx.sh
#!/bin/bash
set -e

#下载nginx
mkdir  -p   /nginx9
cd  /nginx9
curl  -o  https://nginx.org/download/nginx-1.28.0.tar.gz
echo   "下载nginx成功"

#解压nginx源码包
tar  xf  nginx-1.28.0.tar.gz
cd  nginx-1.28.0

#解决nginx依赖的软件
yum  install gcc pcre-devel  openssl-devel zlib-devel  vim  net-tools unzip -y

#解压vts模块包 nginx-module-vts-master.zip
cp /root/nginx-module-vts-master.zip .
unzip nginx-module-vts-master.zip

#编译前的配置工作
./configure  --prefix=/usr/local/nginx9 --with-http_ssl_module
--with-http_v2_module --with-http_v3_module --with-http_stub_status_module
--with-stream --with-stream_ssl_module --with-threads
--add-module=/nginx9/nginx-1.28.0/nginx-module-vts-master

#编译
make  -j  2
#编译安装
make  install

#修改path环境变量
echo 'path=/usr/local/nginx9/sbin:$path' >> /etc/bashrc
echo "安装nginx成功,请使用nginx"

#考虑nginx开机自启
echo  '/usr/local/nginx9/sbin/nginx' >>/etc/rc.local
chmod +x /etc/rc.d/rc.local

su
执行脚本
[root@web2 ~]# bash install_nginx.sh
如需给原来的nginx增加则需替换二进制文件,且参数要–prefix要一致,用objs/nginx替换sbin/nginx
目前有多个版本的nginx了,如何启动指定版本的nginx?
-> 使用绝对路径去启动nginx
/usr/local/nginx1/sbin/nginx
/usr/local/nginx1/sbin/nginx -s stop
/usr/local/nginx1/sbin/nginx -s reload
直接输入nginx会启动最新版本的nginx,因为path变量里的最左边的路径是最新的nginx的安装路径
[root@web2 sbin]# /usr/local/nginx1/sbin/nginx -s stop
[root@web2 sbin]# which nginx
/usr/local/nginx9/sbin/nginx
启动新的nginx
[root@web2 sbin]# nginx
[root@web2 sbin]# ps aux|grep nginx
root        5435  0.0  0.0  12220  2464 ?        ss   16:35   0:00 nginx: master process nginx
sc          5436  0.0  0.1  16632  5536 ?        s    16:35   0:00 nginx: worker process
root        5438  0.0  0.0   6636  2176 pts/0    s+   16:35   0:00 grep --color=auto nginx
[root@web2 sbin]# nginx -v
nginx version: nginx/1.28.0
built by gcc 11.5.0 20240719 (red hat 11.5.0-5) (gcc)
built with openssl 3.2.2 4 jun 2024
tls sni support enabled
configure arguments: --prefix=/usr/local/nginx9 --user=sc --group=sc --with-http_ssl_module --with-http_v2_module --with-http_v3_module --with-http_stub_status_module --with-stream --with-stream_ssl_module --with-threads --add-module=/nginx9/nginx-1.28.0/nginx-module-vts-master
修改nginx.conf主配置文件,添加支持vts的功能
[root@web2 sbin]# cd /usr/local/nginx9/conf/
[root@web2 conf]# vim  nginx.conf
http {
    include       mime.types;
    default_type  application/octet-stream;

    log_format  main  '$remote_addr - $remote_user [$time_local] "$request" '
                      '$status $body_bytes_sent "$http_referer" '
                      '"$http_user_agent" "$http_x_forwarded_for"';

	#添加vts功能的配置
	vhost_traffic_status_zone;
	vhost_traffic_status_filter_by_host on;
	    access_log  logs/access.log  main;

    sendfile        on;
    #tcp_nopush     on;

    #keepalive_timeout  0;
    keepalive_timeout  65;

    #gzip  on;

    server {
        listen       80;
        server_name  www.feng.com;
        #charset koi8-r;
        access_log  logs/feng.com.access.log  main;
        location / {
            root   html;
            index  index.html index.htm;
        }
       #添加vts功能的配置
		location /status {
			vhost_traffic_status_display;
			vhost_traffic_status_display_format html;
		}
  }

..... 省略部分配置
刷新配置
[root@web2 conf]# nginx -t
nginx: the configuration file /usr/local/nginx9/conf/nginx.conf syntax is ok
nginx: configuration file /usr/local/nginx9/conf/nginx.conf test is successful
[root@web2 conf]# nginx -s reload
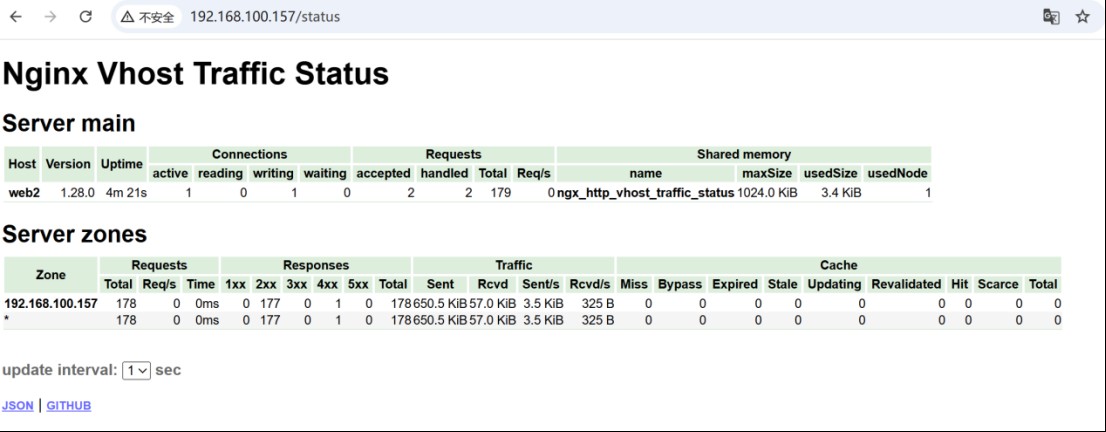
最后去访问web服务器
访问效果
到此这篇关于nginx增加vts模块的实现的文章就介绍到这了,更多相关nginx vts模块内容请搜索代码网以前的文章或继续浏览下面的相关文章希望大家以后多多支持代码网!


发表评论