项目概述
本项目是一个基于 wxpython 开发的桌面应用程序,用于将图片和文字描述组合生成精美的 pdf 小说。它解决了创作者需要将图文内容快速整理成电子书的需求,特别适合绘本、图文小说、摄影作品集等场景。
核心功能
- 批量导入和管理图片
- 为图片添加场景描述
- 支持一段文字对应多张图片
- 智能布局算法,将文字和配图显示在同一页
- 自动生成带封面的 pdf 文件
技术架构
依赖库分析
import wx                    # gui框架
import json                  # 数据持久化
import os                    # 文件系统操作
from pathlib import path     # 路径处理
from reportlab.lib.pagesizes import a4        # pdf页面尺寸
from reportlab.pdfgen import canvas           # pdf画布
from reportlab.lib.utils import imagereader   # 图片读取
from reportlab.pdfbase import pdfmetrics      # 字体管理
from reportlab.pdfbase.ttfonts import ttfont  # truetype字体
from pil import image        # 图片处理
import math                  # 数学计算
技术栈选择理由:
- wxpython:跨平台gui框架,原生界面风格,性能优秀
- reportlab:强大的pdf生成库,支持精确的页面控制
- pillow (pil):图片处理标准库,用于图片缩放和格式转换
- json:轻量级数据格式,便于项目保存和加载
核心数据结构
imageitem 类
class imageitem:
    """图片项数据类"""
    def __init__(self, path, description="", group_id=none):
        self.path = path              # 图片文件路径
        self.description = description # 场景描述文字
        self.group_id = group_id      # 分组id(相同id表示同一组)
设计思路:
- 使用
group_id实现多张图片共享同一段描述的功能 - 通过时间戳生成唯一id,避免冲突
- 简洁的数据结构便于序列化为json
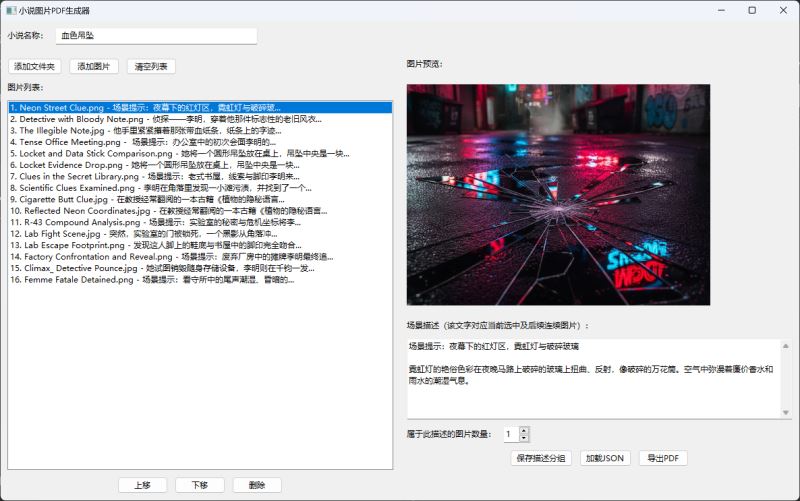
gui 界面设计
布局结构
程序采用左右分栏布局:
┌─────────────────────────────────────────┐
│           小说名称输入框                 │
├──────────────┬──────────────────────────┤
│  左侧区域    │      右侧区域             │
│  ┌────────┐ │  ┌──────────────────┐    │
│  │操作按钮│ │  │  图片预览区域    │    │
│  ├────────┤ │  └──────────────────┘    │
│  │图片列表│ │  ┌──────────────────┐    │
│  │        │ │  │  场景描述输入    │    │
│  │        │ │  └──────────────────┘    │
│  │        │ │  [图片数量] [操作按钮]   │
│  └────────┘ │                           │
└──────────────┴──────────────────────────┘
关键ui组件
1. 标题输入区
title_sizer = wx.boxsizer(wx.horizontal)
title_label = wx.statictext(panel, label='小说名称:')
self.title_text = wx.textctrl(panel, size=(300, -1))
用于输入小说标题,会显示在pdf封面页。
2. 图片列表框
self.image_listbox = wx.listbox(panel, style=wx.lb_single)
- 使用
wx.lb_single单选模式 - 动态显示文件名和描述预览
- 绑定点击事件触发图片预览
3. 图片预览区
self.image_preview = wx.staticbitmap(panel, size=(450, 350))
self.image_preview.setbackgroundcolour(wx.colour(240, 240, 240))
使用 staticbitmap 组件显示选中的图片,设置灰色背景便于识别。
4. 分组控制
self.group_spin = wx.spinctrl(panel, value='1', min=1, max=50, initial=1)
spinctrl 数字调节器,用户可以指定当前描述对应的图片数量(1-50张)。
核心功能实现
1. 图片管理
批量添加文件夹
def on_add_folder(self, event):
    """添加文件夹中的所有图片"""
    dlg = wx.dirdialog(self, "选择图片文件夹")
    if dlg.showmodal() == wx.id_ok:
        folder_path = dlg.getpath()
        image_extensions = ('.jpg', '.jpeg', '.png', '.bmp', '.gif')

        for file in sorted(os.listdir(folder_path)):
            if file.lower().endswith(image_extensions):
                full_path = os.path.join(folder_path, file)
                self.add_image_item(full_path)

        self.update_listbox()
    dlg.destroy()
关键点:
- 使用
sorted()确保文件按名称排序 lower().endswith()不区分大小写匹配扩展名- 必须调用
dlg.destroy()释放对话框资源
单张/多张添加
def on_add_image(self, event):
    """添加单张图片"""
    wildcard = "图片文件 (*.jpg;*.jpeg;*.png;*.bmp;*.gif)|*.jpg;*.jpeg;*.png;*.bmp;*.gif"
    dlg = wx.filedialog(self, "选择图片", wildcard=wildcard,
                       style=wx.fd_open | wx.fd_multiple)

    if dlg.showmodal() == wx.id_ok:
        paths = dlg.getpaths()  # 获取多个路径
        for path in paths:
            self.add_image_item(path)
        self.update_listbox()
    dlg.destroy()
使用 wx.fd_multiple 标志支持多选,getpaths() 返回路径列表。
2. 图片预览功能
def show_preview(self, image_path):
    """显示图片预览"""
    try:
        img = image.open(image_path)

        # 调整图片大小以适应预览区域
        preview_size = (450, 350)
        img.thumbnail(preview_size, image.resampling.lanczos)

        # 转换为wx.bitmap
        width, height = img.size
        wx_img = wx.image(width, height)
        wx_img.setdata(img.convert("rgb").tobytes())
        bitmap = wx.bitmap(wx_img)

        self.image_preview.setbitmap(bitmap)

    except exception as e:
        wx.messagebox(f"无法加载图片:{str(e)}", "错误", wx.ok | wx.icon_error)
技术细节:
thumbnail()方法保持宽高比缩放lanczos重采样算法提供最佳缩放质量- pil image → wx.image → wx.bitmap 的转换链
- 必须转换为rgb模式(去除alpha通道)
3. 图片顺序调整
上移实现
def on_move_up(self, event):
    """上移图片"""
    selection = self.image_listbox.getselection()
    if selection > 0:
        # python交换语法
        self.image_items[selection], self.image_items[selection-1] = \
            self.image_items[selection-1], self.image_items[selection]
        self.update_listbox()
        self.image_listbox.setselection(selection-1)
设计要点:
- 检查边界条件(不能上移第一项)
- 使用python优雅的元组解包交换
- 更新后保持选中状态
4. 描述分组功能
def on_save_description(self, event):
    """保存描述到当前及后续指定数量的图片"""
    selection = self.image_listbox.getselection()
    if selection != wx.not_found:
        description = self.description_text.getvalue()
        group_count = self.group_spin.getvalue()

        # 生成唯一的组id
        import time
        group_id = int(time.time() * 1000)  # 毫秒级时间戳

        # 为当前及后续图片设置相同的描述和组id
        for i in range(selection, min(selection + group_count, len(self.image_items))):
            self.image_items[i].description = description
            self.image_items[i].group_id = group_id

        self.update_listbox()
        self.save_to_json()
        wx.messagebox(f"描述已保存到 {group_count} 张图片!", "提示", wx.ok | wx.icon_information)
核心逻辑:
- 生成毫秒级时间戳作为唯一组id
- 从选中位置开始,连续设置指定数量的图片
- 使用
min()防止越界 - 相同
group_id的图片会在pdf中显示在同一页
5. 数据持久化
保存到json
def save_to_json(self):
    """保存所有数据到json"""
    data = {
        'novel_title': self.title_text.getvalue(),
        'images': []
    }

    for item in self.image_items:
        data['images'].append({
            'path': item.path,
            'description': item.description,
            'group_id': item.group_id
        })

    json_path = 'novel_data.json'
    with open(json_path, 'w', encoding='utf-8') as f:
        json.dump(data, f, ensure_ascii=false, indent=2)
json结构示例:
{
  "novel_title": "时光旅行者",
  "images": [
    {
      "path": "/path/to/image1.jpg",
      "description": "主角在未来城市中醒来",
      "group_id": 1696834567890
    },
    {
      "path": "/path/to/image2.jpg",
      "description": "主角在未来城市中醒来",
      "group_id": 1696834567890
    }
  ]
}
从json加载
def on_load_json(self, event):
    """从json加载数据"""
    wildcard = "json文件 (*.json)|*.json"
    dlg = wx.filedialog(self, "选择json文件", wildcard=wildcard, style=wx.fd_open)

    if dlg.showmodal() == wx.id_ok:
        json_path = dlg.getpath()
        try:
            with open(json_path, 'r', encoding='utf-8') as f:
                data = json.load(f)

            self.image_items.clear()

            if 'novel_title' in data:
                self.title_text.setvalue(data['novel_title'])

            for img_data in data.get('images', []):
                if os.path.exists(img_data['path']):  # 验证文件存在
                    item = imageitem(
                        img_data['path'],
                        img_data.get('description', ''),
                        img_data.get('group_id')
                    )
                    self.image_items.append(item)

            self.update_listbox()
            wx.messagebox("json文件加载成功!", "提示", wx.ok | wx.icon_information)

        except exception as e:
            wx.messagebox(f"加载json失败:{str(e)}", "错误", wx.ok | wx.icon_error)

    dlg.destroy()
安全性考虑:
- 检查文件路径是否存在
- 使用
get()方法提供默认值 - 完整的异常处理机制
pdf生成核心算法
1. pdf创建流程
def create_pdf(self, pdf_path):
    """创建pdf文件"""
    c = canvas.canvas(pdf_path, pagesize=a4)
    page_width, page_height = a4

    # 注册中文字体
    try:
        pdfmetrics.registerfont(ttfont('simsun', 'simsun.ttc'))
        font_name = 'simsun'
    except:
        try:
            pdfmetrics.registerfont(ttfont('simsun', '/system/library/fonts/stheiti light.ttc'))
            font_name = 'simsun'
        except:
            font_name = 'helvetica'

    # 创建封面页
    if self.novel_title:
        c.setfont(font_name, 36)
        title_width = c.stringwidth(self.novel_title, font_name, 36)
        c.drawstring((page_width - title_width) / 2, page_height / 2, self.novel_title)
        c.showpage()

    # 按组处理内容...
字体处理策略:
- 优先尝试windows字体(simsun.ttc)
- 其次尝试macos字体(stheiti)
- 最后回退到默认字体(helvetica)
- 使用
stringwidth()计算文字宽度实现居中
2. 图片分组处理
# 按组处理图片
processed_indices = set()

for i, item in enumerate(self.image_items):
    if i in processed_indices:
        continue

    # 收集同组的图片
    if item.group_id is not none:
        group_images = [img for j, img in enumerate(self.image_items)
                       if img.group_id == item.group_id]
        for j, img in enumerate(self.image_items):
            if img.group_id == item.group_id:
                processed_indices.add(j)
    else:
        group_images = [item]
        processed_indices.add(i)

    # 在一页中显示文字和所有配图
    self.draw_content_page(c, item.description, group_images,
                          page_width, page_height, font_name)
    c.showpage()
算法解析:
- 使用
set记录已处理的图片索引,避免重复处理 - 通过
group_id识别同组图片 - 列表推导式高效收集同组图片
- 每组内容调用
draw_content_page()渲染到一页
3. 智能布局算法
这是整个项目最复杂也最精彩的部分:
def draw_content_page(self, c, description, images, page_width, page_height, font_name):
    """在一页中绘制文字描述和配图"""
    margin = 40
    usable_width = page_width - 2 * margin
    usable_height = page_height - 2 * margin

    current_y = page_height - margin

    # 1. 绘制文字描述
    if description:
        c.setfont(font_name, 12)
        lines = self.wrap_text(description, usable_width - 10, c, font_name, 12)

        for line in lines:
            current_y -= 18
            c.drawstring(margin + 5, current_y, line)

        current_y -= 20  # 文字和图片之间的间距

    # 2. 计算剩余空间
    remaining_height = current_y - margin

    if len(images) == 0:
        return

    num_images = len(images)

    # 3. 根据图片数量选择布局策略
    if num_images == 1:
        # 单张图片:居中显示
        self.draw_single_image(c, images[0].path, margin, margin,
                              usable_width, remaining_height)

    elif num_images == 2:
        # 两张图片:并排显示
        img_width = (usable_width - 20) / 2
        for idx, img in enumerate(images):
            x = margin + idx * (img_width + 20)
            self.draw_single_image(c, img.path, x, margin,
                                  img_width, remaining_height)

    elif num_images == 3:
        # 三张图片:动态布局
        if remaining_height > usable_width * 0.8:
            # 空间充足:上1下2布局
            top_height = remaining_height * 0.5
            bottom_height = remaining_height * 0.45

            self.draw_single_image(c, images[0].path, margin,
                                  margin + bottom_height + 20,
                                  usable_width, top_height)

            img_width = (usable_width - 20) / 2
            for idx, img in enumerate(images[1:]):
                x = margin + idx * (img_width + 20)
                self.draw_single_image(c, img.path, x, margin,
                                      img_width, bottom_height)
        else:
            # 空间不足:三张并排
            img_width = (usable_width - 40) / 3
            for idx, img in enumerate(images):
                x = margin + idx * (img_width + 20)
                self.draw_single_image(c, img.path, x, margin,
                                      img_width, remaining_height)

    elif num_images == 4:
        # 四张图片:2x2网格
        img_width = (usable_width - 20) / 2
        img_height = (remaining_height - 20) / 2

        positions = [
            (0, 1), (1, 1),  # 上排
            (0, 0), (1, 0)   # 下排
        ]

        for idx, img in enumerate(images):
            col, row = positions[idx]
            x = margin + col * (img_width + 20)
            y = margin + row * (img_height + 20)
            self.draw_single_image(c, img.path, x, y, img_width, img_height)

    else:
        # 5张及以上:自动网格布局
        cols = min(3, num_images)
        rows = math.ceil(num_images / cols)

        img_width = (usable_width - (cols - 1) * 15) / cols
        img_height = (remaining_height - (rows - 1) * 15) / rows

        for idx, img in enumerate(images):
            row = idx // cols
            col = idx % cols
            x = margin + col * (img_width + 15)
            y = margin + (rows - 1 - row) * (img_height + 15)
            self.draw_single_image(c, img.path, x, y, img_width, img_height)
布局策略详解:
单图布局(1张)
┌─────────────────┐
│   文字描述      │
├─────────────────┤
│                 │
│   [单张大图]    │
│                 │
└─────────────────┘
充分利用剩余空间,图片居中显示。
双图布局(2张)
┌─────────────────┐
│   文字描述      │
├────────┬────────┤
│        │        │
│ [图1]  │ [图2]  │
│        │        │
└────────┴────────┘
左右并排,平分空间。
三图布局(3张)
根据剩余空间自适应:
空间充足时(高度 > 宽度 * 0.8):
┌─────────────────┐
│   文字描述      │
├─────────────────┤
│    [图片1]      │
├────────┬────────┤
│ [图2]  │ [图3]  │
└────────┴────────┘
空间不足时:
┌─────────────────┐
│   文字描述      │
├─────┬─────┬─────┤
│[图1]│[图2]│[图3]│
└─────┴─────┴─────┘
四图布局(4张)
┌─────────────────┐
│   文字描述      │
├────────┬────────┤
│ [图1]  │ [图2]  │
├────────┼────────┤
│ [图3]  │ [图4]  │
└────────┴────────┘
标准2x2网格。
多图布局(5+张)
┌──────────────────────┐
│     文字描述         │
├──────┬──────┬────────┤
│[图1] │[图2] │ [图3]  │
├──────┼──────┼────────┤
│[图4] │[图5] │ [图6]  │
└──────┴──────┴────────┘
自动计算网格(最多3列),向上取整行数。
4. 单图绘制函数
def draw_single_image(self, c, image_path, x, y, max_width, max_height):
    """在指定位置绘制单张图片"""
    try:
        img = image.open(image_path)
        img_width, img_height = img.size

        # 计算缩放比例(保持宽高比)
        scale = min(max_width / img_width, max_height / img_height)
        new_width = img_width * scale
        new_height = img_height * scale

        # 居中对齐
        x_centered = x + (max_width - new_width) / 2
        y_centered = y + (max_height - new_height) / 2

        c.drawimage(image_path, x_centered, y_centered,
                   width=new_width, height=new_height)

    except exception as e:
        print(f"绘制图片 {image_path} 时出错:{str(e)}")
关键算法:
scale = min(width_ratio, height_ratio)确保图片不超出边界- 居中算法:
centered = start + (available - actual) / 2 - 异常处理确保单张图片失败不影响整体生成
5. 文字换行算法
def wrap_text(self, text, max_width, canvas_obj, font_name, font_size):
    """文字换行"""
    lines = []
    paragraphs = text.split('\n')

    for para in paragraphs:
        if not para.strip():
            lines.append('')
            continue

        current_line = ""
        for char in para:
            test_line = current_line + char
            if canvas_obj.stringwidth(test_line, font_name, font_size) < max_width:
                current_line = test_line
            else:
                if current_line:
                    lines.append(current_line)
                current_line = char

        if current_line:
            lines.append(current_line)

    return lines
算法特点:
- 支持段落(
\n)保留 - 逐字符测量宽度,精确换行
- 使用
stringwidth()考虑不同字符宽度(中英文混排) - 空段落保留为空行
性能优化与最佳实践
1. 内存管理
# 使用 thumbnail 而非 resize
img.thumbnail(preview_size, image.resampling.lanczos)
thumbnail() 直接修改原对象,比 resize() 返回新对象更节省内存。
2. 资源释放
dlg = wx.filedialog(...)
if dlg.showmodal() == wx.id_ok:
    # 处理逻辑
dlg.destroy()  # 必须显式销毁
wxpython 对话框必须手动销毁,否则会内存泄漏。
3. 异常处理
所有文件操作和图片处理都包裹在 try-except 中,确保程序稳定性。
4. 用户体验优化
- 操作后立即提供反馈(messagebox)
- 保持选中状态(移动后重新选中)
- 列表显示描述预览(快速识别)
可能的扩展功能
1. 图片编辑
- 添加滤镜效果
- 裁剪和旋转
- 亮度、对比度调整
2. 文字排版
- 支持富文本(粗体、斜体)
- 自定义字体和字号
- 段落对齐方式
3. 模板系统
templates = {
    'simple': {'margin': 40, 'font_size': 12},
    'elegant': {'margin': 60, 'font_size': 14},
    'compact': {'margin': 20, 'font_size': 10}
}
4. 批量处理
- 支持多个项目
- 项目间快速切换
- 批量导出
5. 云端同步
- 项目保存到云端
- 多设备协同编辑
- 版本控制
常见问题与解决方案
问题1:中文字体不显示
原因: 系统缺少中文字体或路径错误
解决方案:
# 添加更多字体路径
font_paths = [
    'simsun.ttc',                           # windows
    '/system/library/fonts/stheiti light.ttc',  # macos
    '/usr/share/fonts/truetype/wqy/wqy-microhei.ttc'  # linux
]

for path in font_paths:
    try:
        pdfmetrics.registerfont(ttfont('simsun', path))
        font_name = 'simsun'
        break
    except:
        continue
问题2:图片过大导致内存溢出
解决方案: 在加载前预处理图片
def optimize_image(image_path, max_size=(2000, 2000)):
    img = image.open(image_path)
    img.thumbnail(max_size, image.resampling.lanczos)
    return img
问题3:pdf文件过大
解决方案: 压缩图片质量
# 保存为jpeg并降低质量
img.save(temp_path, 'jpeg', quality=85, optimize=true)
c.drawimage(temp_path, ...)
运行结果
pdf结果

以上就是基于python开发一个小说图片pdf生成器的详细内容,更多关于python小说图片pdf生成的资料请关注代码网其它相关文章!


发表评论