alloc&init 的源码流程图
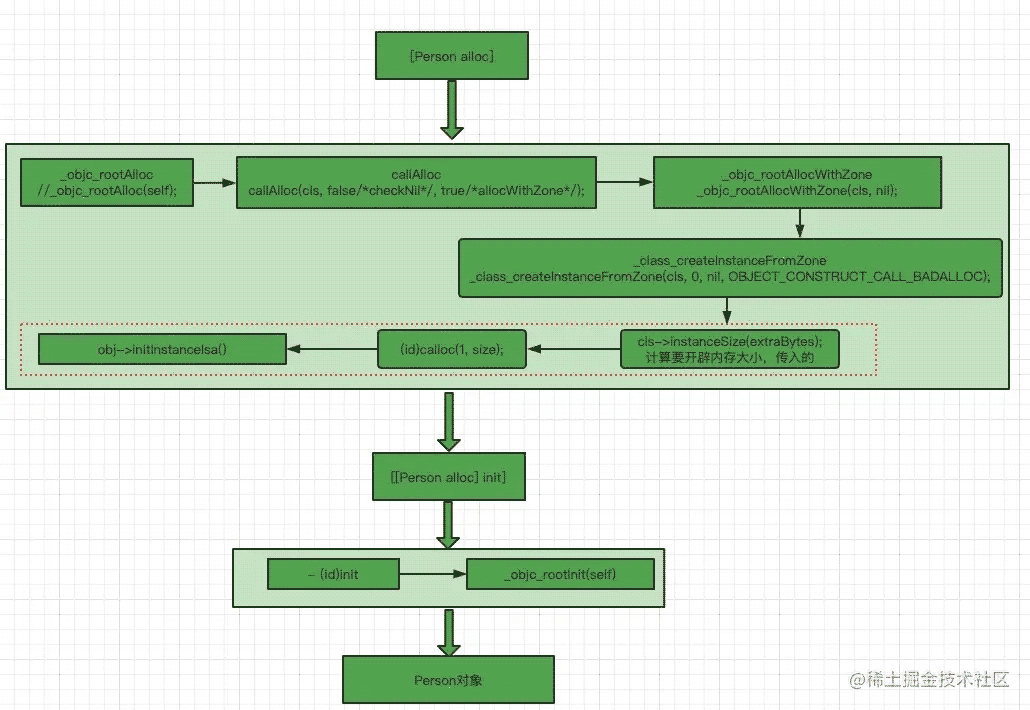
首先创建person 类, 在main函数创建person 实例 person *p = [person alloc]; 1.进入到alloc 方法的源码实现
+ (id)alloc {
return _objc_rootalloc(self);
}
2.跳转到_objc_rootalloc 源码实现
id
_objc_rootalloc(class cls)
{
    return callalloc(cls, false/*checknil*/, true/*allocwithzone*/);
}
3.跳转至 callalloc 的源码实现
static always_inline id
callalloc(class cls, bool checknil, bool allocwithzone=false)
{
#if __objc2__ //有可用的编译器优化
    if (slowpath(checknil && !cls)) return nil;
    //判断是否自定义实现了 +allocwithzone 方法
    if (fastpath(!cls->isa()->hascustomawz())) {
        return _objc_rootallocwithzone(cls, nil);
    }
    #endif
    // no shortcuts available.
    if (allocwithzone) {
        return ((id(*)(id, sel, struct _nszone *))objc_msgsend)(cls, @selector(allocwithzone:), nil);
    }
    return ((id(*)(id, sel))objc_msgsend)(cls, @selector(alloc));
该方法中有两个定义的宏
#define fastpath(x) (__builtin_expect(bool(x), 1))
#define slowpath(x) (__builtin_expect(bool(x), 0))
其中__builtin_expect指令由gcc 引入,目的:1. 编译器可以对代码进行优化,以减少指令跳转带来的性能下降,2.作用: 允许程序员将最有可能执行的分支告诉编译器;3.写法为: __builtin_expect(exp, n) , 表示 exp == n的概率很大;
fastpath 定义的__builtin_expect(bool(x), 1) 表示x 的值为真的可能性更大;
slowpath 定义的__builtin_expect(bool(x), 0) 表示x 的值为假的可能性更大;
日常开发中可以通过设置来优化编译器,达到性能优化的目的,设置路径: build settiing -> optimization level -> debug -> 将none 改为fastest/smallest 4.跳转至 _objc_rootallocwithzone 的源码实现
id
_objc_rootallocwithzone(class cls, objc_zone_t zone __unused)
{
    // allocwithzone under __objc2__ ignores the zone parameter
    return _class_createinstancefromzone(cls, 0, nil,
object_construct_call_badalloc);
}
5.跳转至 _class_createinstancefromzone 源码实现
static always_inline id
_class_createinstancefromzone(class cls, size_t extrabytes, void *zone,int construct_flags = object_construct_none,bool cxxconstruct = true,size_t *outallocatedsize = nil)
{
    assert(cls->isrealized());
    // read class's info bits all at once for performance
    // 一次性读取累的的信息以提高性能
    bool hascxxctor = cxxconstruct && cls->hascxxctor();
    bool hascxxdtor = cls->hascxxdtor();
    bool fast = cls->canallocnonpointer();
    size_t size;
    size = cls->instancesize(extrabytes);
    if (outallocatedsize) *outallocatedsize = size;
    id obj;
#if support_zones
    // 支持zone
    // 早期的内存是通过zone  申请的 ilo89i='
    if (zone) {
        obj = (id)malloc_zone_calloc((malloc_zone_t *)zone, 1, size);
    } else {
#endif
        obj = (id)calloc(1, size);
#if support_zones
    }
#endif
    if (slowpath(!obj)) {
        if (construct_flags & object_construct_call_badalloc) {
            return _objc_callbadallochandler(cls);
        }
        return nil;
    }
    if (!zone && fast) {
        obj->initinstanceisa(cls, hascxxdtor);
    } else {
        // use raw pointer isa on the assumption that they might be
        // doing something weird with the zone or rr.
        obj->initisa(cls);
    }
    if (fastpath(!hascxxctor)) {
        return obj;
    }
    construct_flags |= object_construct_free_onfailure;
    return object_cxxconstructfromclass(obj, cls, construct_flags);
}
该方法中有三个核心方法:
- cls->instancesize:计算所需内存大小, 源码实现
inline size_t instancesize(size_t extrabytes) const {
// 快速计算内存大小
        if (fastpath(cache.hasfastinstancesize(extrabytes))) {
            return cache.fastinstancesize(extrabytes);
        }
        size_t size = alignedinstancesize() + extrabytes;
        // cf requires all objects be at least 16 bytes.
        if (size < 16) size = 16;
        return size;
    }
fastinstancesize 的源码实现
size_t fastinstancesize(size_t extra) const
    {
        assert(hasfastinstancesize(extra));
        if (__builtin_constant_p(extra) && extra == 0) {
            return _flags & fast_cache_alloc_mask16;
        } else {
            size_t size = _flags & fast_cache_alloc_mask;
            // remove the fast_cache_alloc_delta16 that was added
            // by setfastinstancesize
            return align16(size + extra - fast_cache_alloc_delta16);
        }
    }
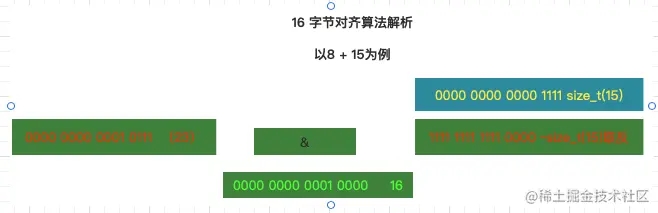
align16的源码实现
static inline size_t align16(size_t x) {
    return (x + size_t(15)) & ~size_t(15);
}
断点调试此处的参数x 为8 即: align16(8)
2.calloc 申请内存,返回地址指针 向内存中申请大小为 instancesize计算的内存, 并将内存地址的指针返回,赋值给obj,obj = (id)calloc(1, size);
3.obj->initinstanceisa(cls, hascxxdtor); : 初始化isa 指针 并将类与isa 关联
init 源码探索
通过查看 init 源码
- (id)init {
    return _objc_rootinit(self);
}
id
_objc_rootinit(id obj)
{
    // in practice, it will be hard to rely on this function.
    // many classes do not properly chain -init calls.
    return obj;
}
通过源码实现可以看到 init 就是将传入的对象 直接返回
new 的源码探索
日常开发中,对象的创建 有 alloc init 和new , 现在看下new的源码实现
+ (id)new {
    return [callalloc(self, false/*checknil*/) init];
}
通过源码可以看出 new 相当于alloc init 过程,但是二者有何区别 以下是其他博主总结的, 引用一下

以上就是ios 底层alloc init new 源码流程示例分析的详细内容,更多关于ios 底层alloc init new分析的资料请关注代码网其它相关文章!


发表评论