一、回顾@value注解
springboot中我们该如何将applicaton.properties中的数据绑定到bean中呢?在之间我们是可以通过@value注解,在springboot自动启动后,会自动的去相应的路径中去寻找applicaton.properties配置文件,然后将相应的值赋值上。回顾如下:
spring.application.name=properties-location
myapp.name=classpath:/config
//纳入ioc容器管理
@component
public class appconfig {
    @value("${myapp.name}")
    private string apppath;
    public void printinfo(){
        system.out.println("app path: " + apppath);
    }
}
如上的方式就可以很好的将配置文件中的信息注入到bean对象中,但是一但配置文件中的要注入bean对象的信息过多的话,那我们就需要写非常多个@value的注解,这样就会非常的麻烦。
二、将配置绑定到简单bean
使用注解@configurationproperties(prefix="myapp")就可以把后面都依次注入,示例如下。
applicaton.properties中的配置内容如下:
spring.application.name=demo4
myapp.configname=test
myapp.configid=1234
myapp.configvalue=value
myapp.configkey=1234
想将applicaton.properties中的配置内容赋值到cogfig这个bean对象中。通过@configurationproperties(prefix="myapp")来实现,且需要注意的是,要写上每个要被赋值属性的setter方法,因为其在被赋值的时候是通过setter方法进行赋值的。同时需要注意属性名要和applicaton.properties中的配置一致。
package com.example.demo4;
import org.springframework.boot.context.properties.configurationproperties;
import org.springframework.stereotype.component;
@component
@configurationproperties(prefix = "myapp")
public class config {
    private string configname;
    private string configid;
    private string configvalue;
    private string configkey;
    public void setconfigname(string configname) {
        this.configname = configname;
    }
    public void setconfigid(string configid) {
        this.configid = configid;
    }
    public void setconfigvalue(string configvalue) {
        this.configvalue = configvalue;
    }
    public void setconfigkey(string configkey) {
        this.configkey = configkey;
    }
    @override
    public string tostring() {
        return "config{" +
                "configname='" + configname + '\'' +
                ", configid='" + configid + '\'' +
                ", configvalue='" + configvalue + '\'' +
                ", configkey='" + configkey + '\'' +
                '}';
    }
}
测试结果如下:
package com.example.demo4;
import org.junit.jupiter.api.test;
import org.springframework.beans.factory.annotation.autowired;
import org.springframework.boot.test.context.springboottest;
@springboottest
class demo4applicationtests {
    @autowired
    config config;
    @test
    void test0() {
        system.out.println(config.tostring());
    }
}
输出:config{configname='test', configid='1234', configvalue='value', configkey='1234'}
三、将配置绑定到嵌套bean
就是其实有时候绑定的bean并不是单一的,是复杂的。
private string configname;
private string configid;
private string configvalue;
private string configkey;
private configlocation configlocation;
例如在其中有些bean对象中,其属性可能就不是单一的属性,也可能如private configlocation configlocation;一样,本身也是一个对象,那么像这种嵌套的bean对象又如何注入呢?其实方式是一样的, 也是通过注解@configurationproperties来实现配置到bean的注入。
其configlocation如下。
package com.example.demo4;
public class configlocation {
    private string configcountry;
    private string configstate;
    public void setconfigcountry(string configcountry) {
        this.configcountry = configcountry;
    }
    public void setconfigstate(string configstate) {
        this.configstate = configstate;
    }
    @override
    public string tostring() {
        return "configlocation{" +
                "configcountry='" + configcountry + '\'' +
                ", configstate='" + configstate + '\'' +
                '}';
    }
}
只需要其applicaton.properties的格式改一下就可以实现。
spring.application.name=demo4
myapp.configname=test
myapp.configid=1234
myapp.configvalue=value
myapp.configkey=1234
myapp.configlocation.configcountry=china
myapp.configlocation.configstate=liaoning
测试结果如下:
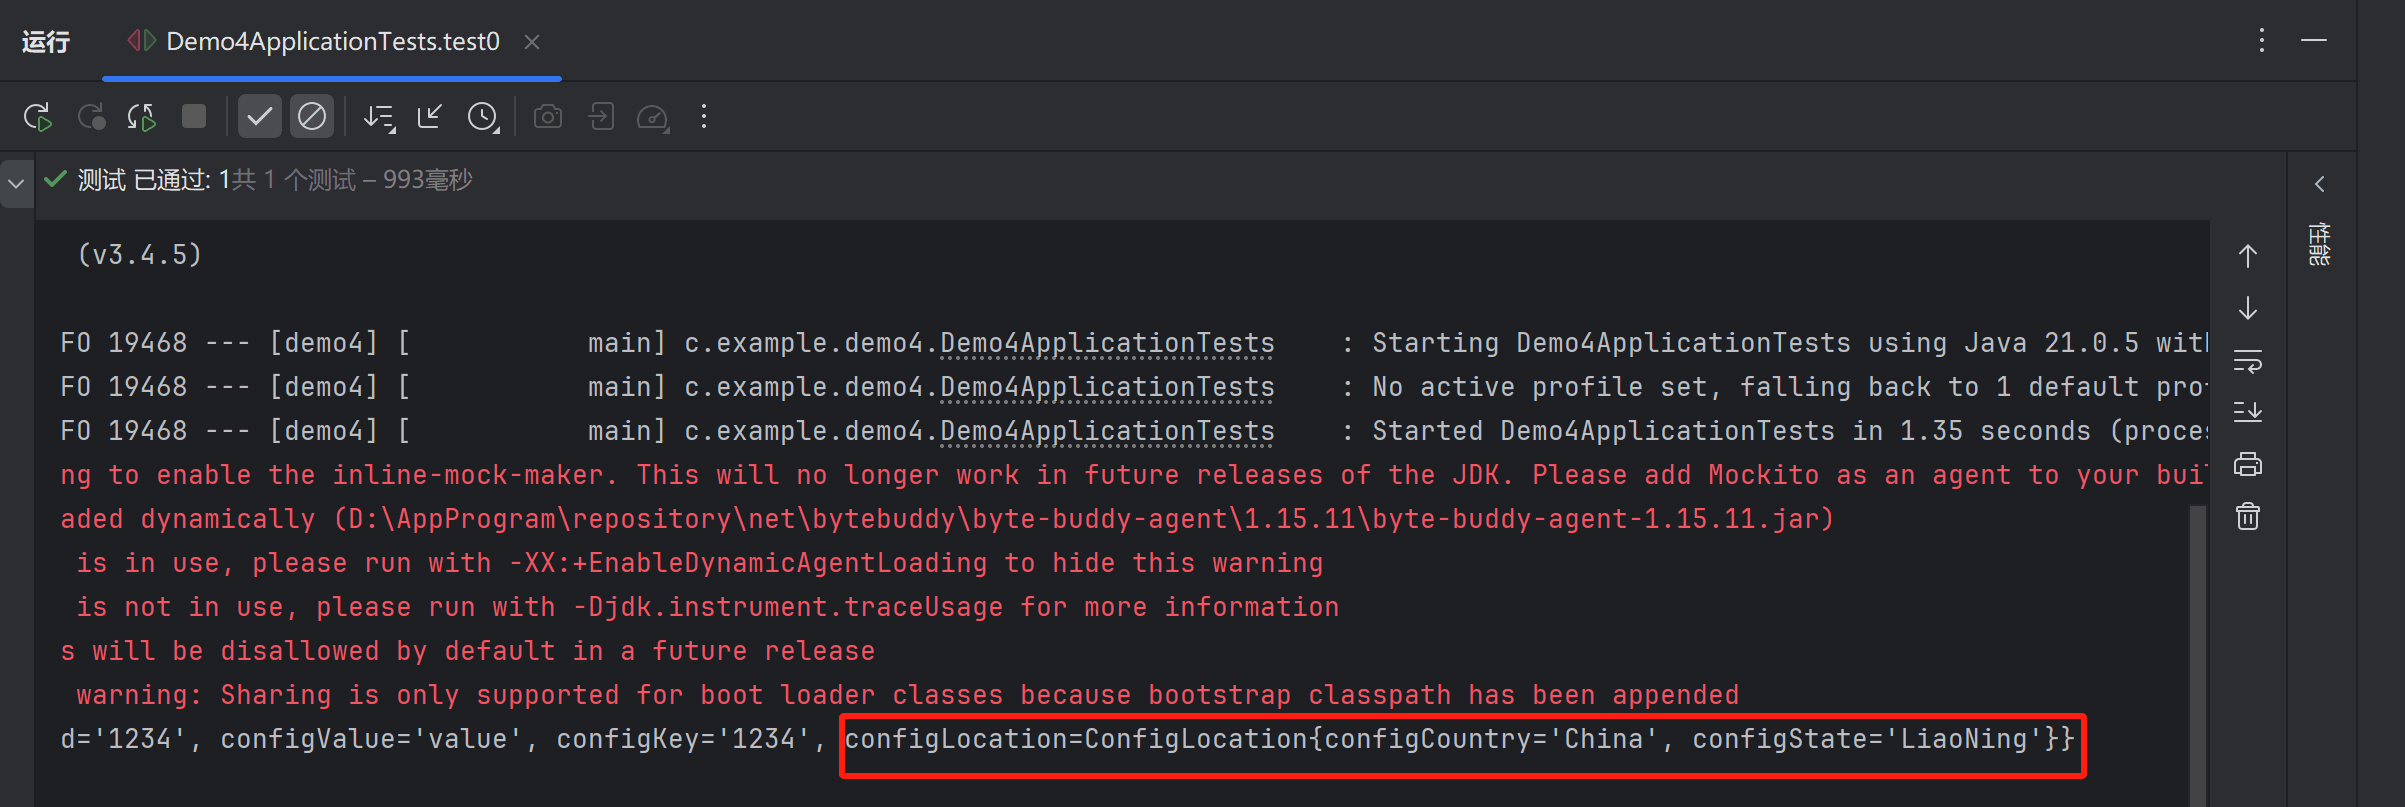
也是绑定成功了。
四、@enableconfigurationproperties
@enableconfigurationproperties的使用方法是在其主入口类上添加该注解,并将启动的配置信息绑定到config的bean对象上去。
package com.example.demo4;
import org.springframework.boot.springapplication;
import org.springframework.boot.autoconfigure.springbootapplication;
import org.springframework.boot.context.properties.enableconfigurationproperties;
@springbootapplication
@enableconfigurationproperties(config.class)
public class demo4application {
public static void main(string[] args) {
springapplication.run(demo4application.class, args);
}
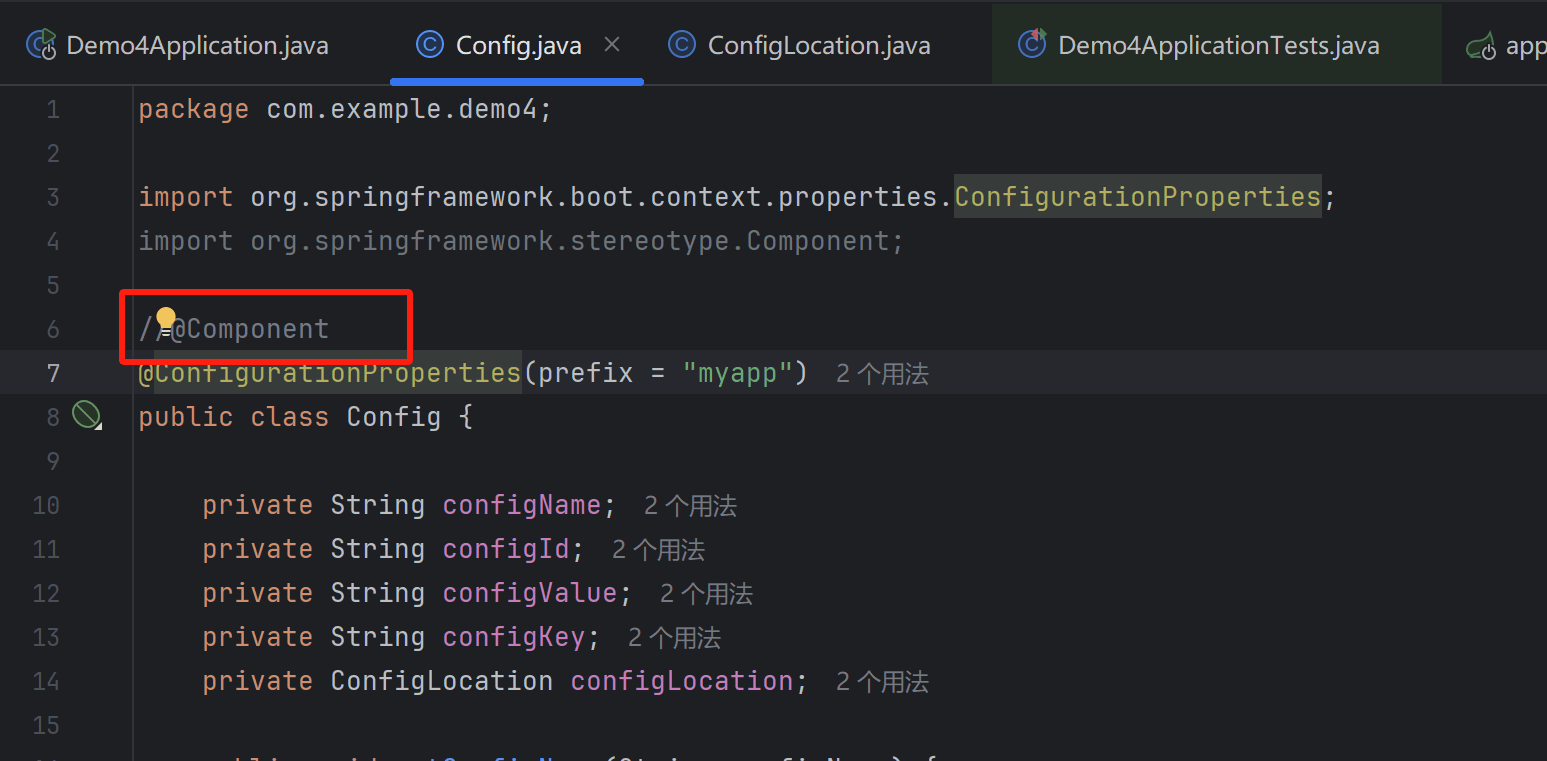
}同时config这个bean对象上不用在使用@component注解了。
测试:
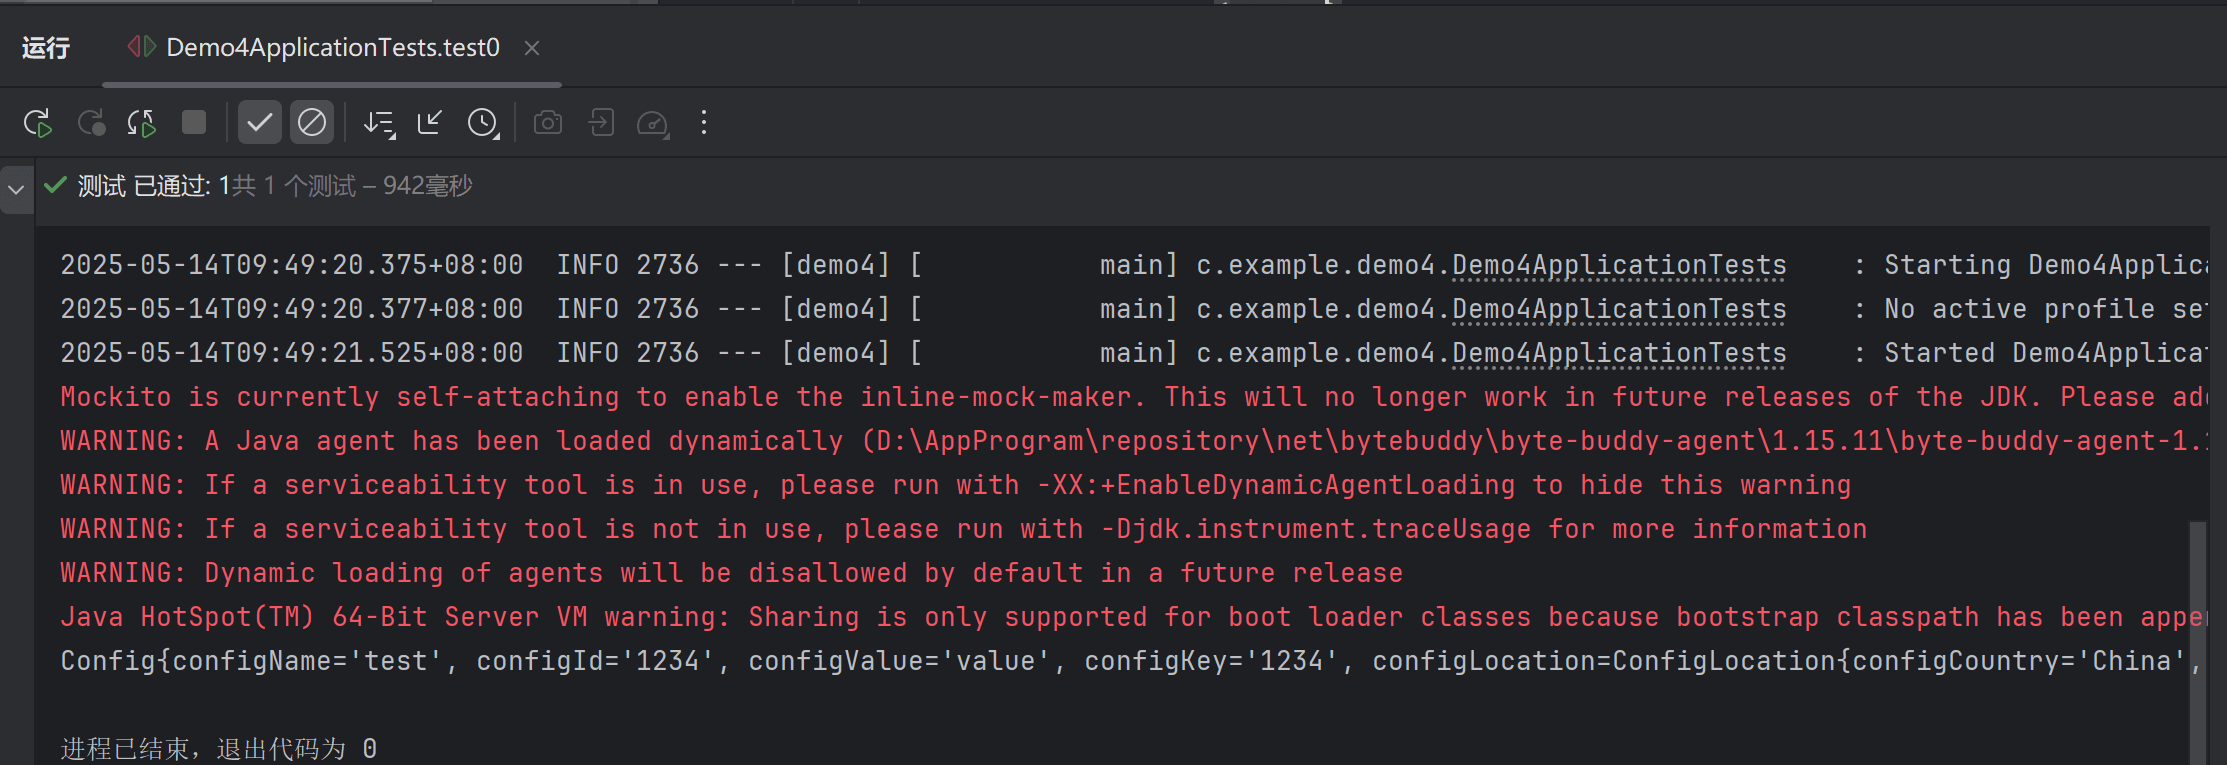
通过测试,并输出结果正确。
到此这篇关于springboot中配置绑定到bean中的文章就介绍到这了,更多相关springboot配置绑定bean内容请搜索代码网以前的文章或继续浏览下面的相关文章希望大家以后多多支持代码网!


发表评论