1、图形验证码的作用
图形验证码(captcha,completely automated public turing test to tell computers and humans apart)是一种用于区分用户是人类还是计算机程序的自动化测试。它通常用于防止自动化软件(如机器人或爬虫程序)进行恶意操作,如滥用在线服务、暴力破 解密码或进行垃圾邮件发送等。
图形验证码的工作原理基于一个假设:计算机程序难以自动识别和处理复杂的图像或模式,而人类则相对容易。因此,图形验证码通常包含扭曲的文字、数字、图像或它们的组合,这些元素对人类来说相对容易辨认,但对计算机程序来说则非常困难。
下面将介绍 spring boot 整合 spring security 实现图形验证码功能,执行结果如下如:
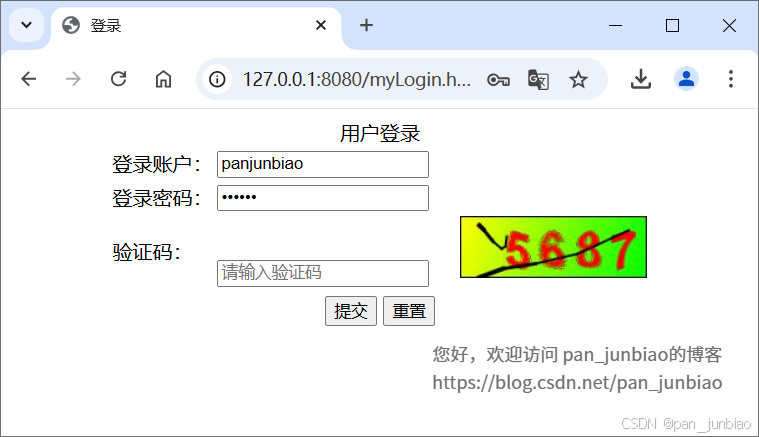
(1)登录页面

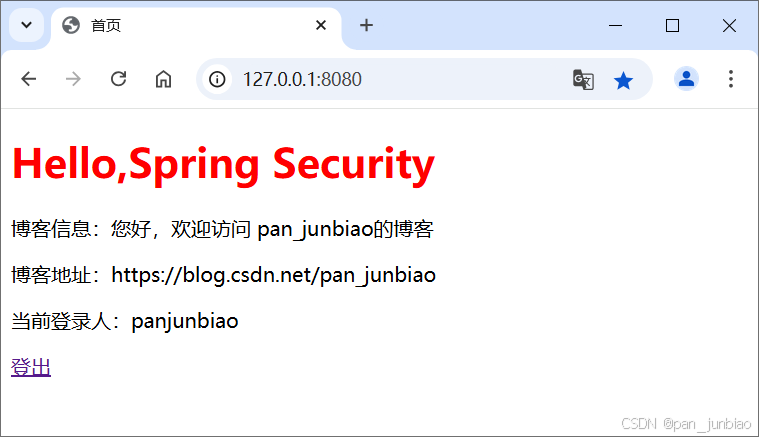
(2)登录成功后,跳转至首页
2、创建项目
【示例】springboot 整合 springsecurity 使用过滤器实现图形验证码功能。
2.1 创建 spring boot 项目
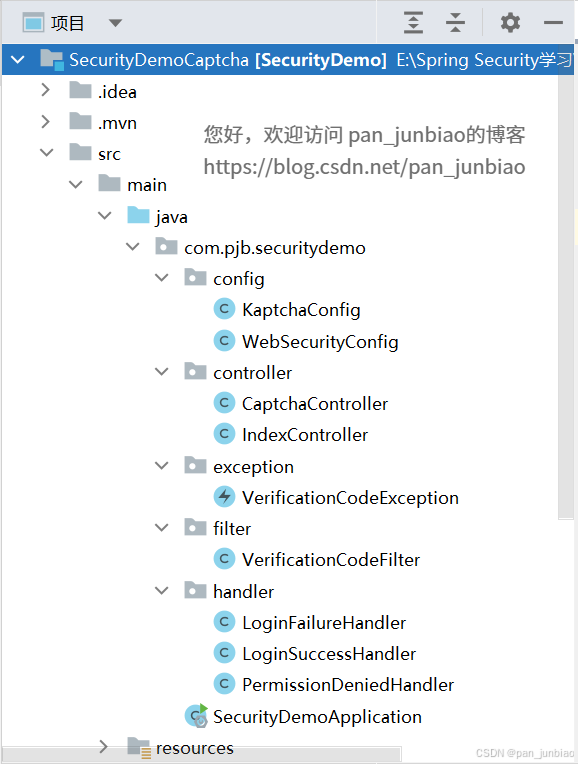
创建 springboot 项目,项目结构如下图:
2.2 添加 maven 依赖
在 pom.xml 配置文件中添加 spring security、谷歌 kaptcha 图形验证码。
<!-- spring security 依赖 -->
<dependency>
    <groupid>org.springframework.boot</groupid>
    <artifactid>spring-boot-starter-security</artifactid>
    <version>2.7.18</version>
</dependency>

<!-- 谷歌 kaptcha 图形验证码 -->
<dependency>
    <groupid>com.github.penggle</groupid>
    <artifactid>kaptcha</artifactid>
    <version>2.3.2</version>
</dependency>
3、整合 spring security 框架实现认证与授权
3.1 配置类(config 层)
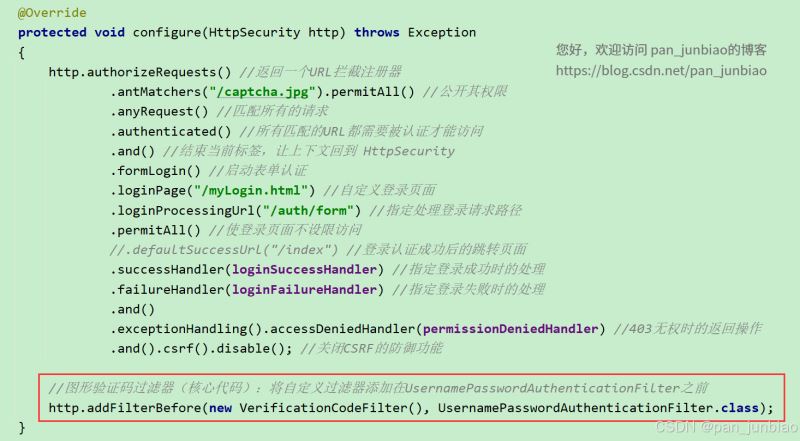
创建 websecurityconfig 类(spring security 配置类),并添加 @enablewebsecurity 注解和继承 websecurityconfigureradapter 类。
package com.pjb.securitydemo.config;

import com.pjb.securitydemo.filter.verificationcodefilter;
import com.pjb.securitydemo.handler.loginfailurehandler;
import com.pjb.securitydemo.handler.loginsuccesshandler;
import com.pjb.securitydemo.handler.permissiondeniedhandler;
import org.springframework.beans.factory.annotation.autowired;
import org.springframework.context.annotation.bean;
import org.springframework.security.config.annotation.web.builders.httpsecurity;
import org.springframework.security.config.annotation.web.configuration.enablewebsecurity;
import org.springframework.security.config.annotation.web.configuration.websecurityconfigureradapter;
import org.springframework.security.core.userdetails.user;
import org.springframework.security.core.userdetails.userdetailsservice;
import org.springframework.security.crypto.password.nooppasswordencoder;
import org.springframework.security.crypto.password.passwordencoder;
import org.springframework.security.provisioning.inmemoryuserdetailsmanager;
import org.springframework.security.web.authentication.usernamepasswordauthenticationfilter;

/**
 * spring security 配置类
 * @author pan_junbiao
 **/
@enablewebsecurity
public class websecurityconfig extends websecurityconfigureradapter
{
    @autowired
    private loginsuccesshandler loginsuccesshandler;

    @autowired
    private loginfailurehandler loginfailurehandler;

    @autowired
    private permissiondeniedhandler permissiondeniedhandler;

    @override
    protected void configure(httpsecurity http) throws exception
    {
        http.authorizerequests() //返回一个url拦截注册器
                .antmatchers("/captcha.jpg").permitall() //公开其权限
                .anyrequest() //匹配所有的请求
                .authenticated() //所有匹配的url都需要被认证才能访问
                .and() //结束当前标签,让上下文回到 httpsecurity
                .formlogin() //启动表单认证
                .loginpage("/mylogin.html") //自定义登录页面
                .loginprocessingurl("/auth/form") //指定处理登录请求路径
                .permitall() //使登录页面不设限访问
                //.defaultsuccessurl("/index") //登录认证成功后的跳转页面
                .successhandler(loginsuccesshandler) //指定登录成功时的处理
                .failurehandler(loginfailurehandler) //指定登录失败时的处理
                .and()
                .exceptionhandling().accessdeniedhandler(permissiondeniedhandler) //403无权时的返回操作
                .and().csrf().disable(); //关闭csrf的防御功能

        //图形验证码过滤器(核心代码):将自定义过滤器添加在usernamepasswordauthenticationfilter之前
        http.addfilterbefore(new verificationcodefilter(), usernamepasswordauthenticationfilter.class);
    }

    /**
     * 内存中添加登录账号
     */
    @bean
    public userdetailsservice userdetailsservice()
    {
        inmemoryuserdetailsmanager manager = new inmemoryuserdetailsmanager();
        manager.createuser(user.withusername("admin").password("123456").roles("admin").build());
        manager.createuser(user.withusername("user").password("123456").roles("user").build());
        manager.createuser(user.withusername("panjunbiao").password("123456").roles("user").build());
        return manager;
    }

    /**
     * 密码编译器
     * 由于5.x版本之后默认启用了委派密码编译器,
     * 因而按照以往的方式设置内存密码将会读取异常,
     * 所以需要暂时将密码编码器设置为 nooppasswordencoder
     */
    @bean
    public passwordencoder passwordencoder()
    {
        return nooppasswordencoder.getinstance();
    }
}
3.2 处理类(handler 层)
(1)登录成功处理类
package com.pjb.securitydemo.handler;

import org.springframework.security.core.authentication;
import org.springframework.security.web.authentication.authenticationsuccesshandler;
import org.springframework.stereotype.component;

import javax.servlet.servletexception;
import javax.servlet.http.httpservletrequest;
import javax.servlet.http.httpservletresponse;
import java.io.ioexception;

/**
 * 登录成功处理类
 */
@component
public class loginsuccesshandler implements authenticationsuccesshandler
{
    @override
    public void onauthenticationsuccess(httpservletrequest httpservletrequest, httpservletresponse httpservletresponse, authentication authentication) throws ioexception, servletexception
    {
        //重定向至首页
        httpservletresponse.sendredirect("/");
    }
}
(2)登录失败处理类
package com.pjb.securitydemo.handler;

import com.pjb.securitydemo.exception.verificationcodeexception;
import org.springframework.security.authentication.badcredentialsexception;
import org.springframework.security.authentication.credentialsexpiredexception;
import org.springframework.security.authentication.disabledexception;
import org.springframework.security.authentication.lockedexception;
import org.springframework.security.core.authenticationexception;
import org.springframework.security.core.userdetails.usernamenotfoundexception;
import org.springframework.security.web.authentication.authenticationfailurehandler;
import org.springframework.stereotype.component;

import javax.servlet.servletexception;
import javax.servlet.http.httpservletrequest;
import javax.servlet.http.httpservletresponse;
import java.io.ioexception;
import java.io.printwriter;

/**
 * 登录失败处理类
 */
@component
public class loginfailurehandler implements authenticationfailurehandler
{
    @override
    public void onauthenticationfailure(httpservletrequest httpservletrequest, httpservletresponse httpservletresponse, authenticationexception authenticationexception) throws ioexception, servletexception
    {
        //获取登录失败原因
        string errormessage = "";
        if(authenticationexception instanceof badcredentialsexception){
            errormessage = "用户名或密码不正确";
        }else if(authenticationexception instanceof disabledexception){
            errormessage = "账号被禁用";
        }else if(authenticationexception instanceof usernamenotfoundexception){
            errormessage = "用户名不存在";
        }else if(authenticationexception instanceof credentialsexpiredexception){
            errormessage = "密码已过期";
        }else if(authenticationexception instanceof lockedexception) {
            errormessage = "账号被锁定";
        }else if(authenticationexception instanceof verificationcodeexception){
            errormessage = "无效的图形验证码";
        }else{
            errormessage = "未知异常";
        }

        //设置响应编码
        httpservletresponse.setcontenttype("application/json;charset=utf-8");
        printwriter out = httpservletresponse.getwriter();
        out.write(errormessage);
    }
}
(3)403无权限处理类
package com.pjb.securitydemo.handler;

import org.springframework.security.access.accessdeniedexception;
import org.springframework.security.web.access.accessdeniedhandler;
import org.springframework.stereotype.component;

import javax.servlet.servletexception;
import javax.servlet.http.httpservletrequest;
import javax.servlet.http.httpservletresponse;
import java.io.ioexception;
import java.io.printwriter;

/**
 * 403无权限处理类
 */
@component
public class permissiondeniedhandler implements accessdeniedhandler
{
    @override
    public void handle(httpservletrequest httpservletrequest, httpservletresponse httpservletresponse, accessdeniedexception e) throws ioexception, servletexception
    {
        httpservletresponse.setcontenttype("application/json;charset=utf-8");
        printwriter out = httpservletresponse.getwriter();
        out.write("403无权限");
    }
}
4、整合 kaptcha 框架实现图形验证码
4.1 配置类(config 层)
创建 kaptchaconfig 类(kaptcha 图形验证码配置类),设置图形验证码相关属性。
package com.pjb.securitydemo.config;

import com.google.code.kaptcha.producer;
import com.google.code.kaptcha.impl.defaultkaptcha;
import com.google.code.kaptcha.util.config;
import org.springframework.context.annotation.bean;
import org.springframework.context.annotation.configuration;

import java.util.properties;

/**
 * 谷歌kaptcha图形验证码配置类
 */
@configuration
public class kaptchaconfig
{
    @bean
    public producer captcha()
    {
        //配置图形验证码的基本参数
        properties properties = new properties();
        //图片宽度
        properties.setproperty("kaptcha.image.width","150");
        //图片长度
        properties.setproperty("kaptcha.image.height","50");
        //字符集(从哪些字符中产生)
        properties.setproperty("kaptcha.textproducer.char.string", "0123456789");
        //字符长度
        properties.setproperty("kaptcha.textproducer.char.length", "4");
        //字体颜色
        properties.put("kaptcha.textproducer.font.color", "red");
        // 文字间隔,这里设置为10px
        properties.put("kaptcha.textproducer.char.space", "10");

        // 背景颜色渐变开始
        properties.put("kaptcha.background.clear.from", "yellow");
        // 背景颜色渐变结束
        properties.put("kaptcha.background.clear.to", "green");

        //初始化配置
        config config = new config(properties);

        //使用默认的图形验证码实现,当然也可以自定义实现
        defaultkaptcha defaultkaptcha = new defaultkaptcha();
        defaultkaptcha.setconfig(config);
        return defaultkaptcha;
    }
}
图形验证码配置属性表
| 属性名 | 属性作用 | 默认值 |
|---|---|---|
| kaptcha.border | 图片边框,合法值:yes , no | yes |
| kaptcha.border.color | 边框颜色,合法值: r,g,b (and optional alpha) 或者 white,black,blue. | black |
| kaptcha.image.width | 图片宽 | 200 |
| kaptcha.image.height | 图片高 | 50 |
| kaptcha.producer.impl | 图片实现类 | com.google.code.kaptcha.impl.defaultkaptcha |
| kaptcha.textproducer.impl | 文本实现类 | com.google.code.kaptcha.text.impl.defaulttextcreator |
| kaptcha.textproducer.char.string | 文本集合,验证码值从此集合中获取 | abcde2345678gfynmnpwx |
| kaptcha.textproducer.char.length | 验证码长度 | 5 |
| kaptcha.textproducer.font.names | 字体 | arial, courier |
| kaptcha.textproducer.font.size | 字体大小 | 40px. |
| kaptcha.textproducer.font.color | 字体颜色,合法值: r,g,b 或者 white,black,blue. | black |
| kaptcha.textproducer.char.space | 文字间隔 | 2 |
| kaptcha.noise.impl | 干扰实现类 | com.google.code.kaptcha.impl.defaultnoise |
| kaptcha.noise.color | 干扰 颜色,合法值: r,g,b 或者 white,black,blue. | black |
| kaptcha.obscurificator.impl | 图片样式:<br />水纹 com.google.code.kaptcha.impl.waterripple <br /> 鱼眼 com.google.code.kaptcha.impl.fisheyegimpy <br /> 阴影 com.google.code.kaptcha.impl.shadowgimpy | com.google.code.kaptcha.impl.waterripple |
| kaptcha.background.impl | 背景实现类 | com.google.code.kaptcha.impl.defaultbackground |
| kaptcha.background.clear.from | 背景颜色渐变,开始颜色 | light grey |
| kaptcha.background.clear.to | 背景颜色渐变, 结束颜色 | white |
| kaptcha.word.impl | 文字渲染器 | com.google.code.kaptcha.text.impl.defaultwordrenderer |
| kaptcha.session.key | session key | kaptcha_session_key |
| kaptcha.session.date | session date |
4.2 控制器层(controller 层)
创建 captchacontroller 类(验证码控制器),实现生成验证码图片方法。
package com.pjb.securitydemo.controller;

import com.google.code.kaptcha.producer;
import org.springframework.beans.factory.annotation.autowired;
import org.springframework.stereotype.controller;
import org.springframework.web.bind.annotation.getmapping;

import javax.imageio.imageio;
import javax.servlet.servletoutputstream;
import javax.servlet.http.httpservletrequest;
import javax.servlet.http.httpservletresponse;
import java.awt.image.bufferedimage;
import java.io.ioexception;

/**
 * 验证码控制器
 */
@controller
public class captchacontroller
{
    @autowired
    private producer captchaproducer;

    @getmapping("/captcha.jpg")
    public void getcaptcha(httpservletrequest request, httpservletresponse response) throws ioexception
    {
        //设置内容类型
        response.setcontenttype("image/jpeg");
        //创建验证码文本
        string captext = captchaproducer.createtext();

        //将验证码文本保存到session中
        request.getsession().setattribute("captcha", captext);
        //创建验证码图片
        bufferedimage bufferedimage = captchaproducer.createimage(captext);
        //获取响应输出流
        servletoutputstream out = response.getoutputstream();
        //将图片验证码数据写入响应输出流
        imageio.write(bufferedimage,"jpg",out);
        //推送并关闭响应输出流
        try
        {
            out.flush();
        }
        finally
        {
            out.close();
        }
    }
}
4.3 自定义异常类(exception 层)
自定义异常类 verificationcodeexception(验证码校验失败的异常类),继承 authenticationexception 类。
package com.pjb.securitydemo.exception;

import org.springframework.security.core.authenticationexception;

/**
 * 验证码校验失败的异常类
 */
public class verificationcodeexception extends authenticationexception
{
    public verificationcodeexception()
    {
        super("图形验证码校验失败");
    }
}
4.4 自定义过滤器(filter 层)
自定义过滤器类 verificationcodefilter (验证码校验过滤器),继承 onceperrequestfilter 类。
有了图形验证码的 api 之后,就可以自定义验证码校验过滤器了。虽然 spring security 的过滤器链对过滤器没有特殊要求,只要继承 filter 接口即可,但是在 spring 体系中,推荐使用 onceperrequestfilter 类来实现,它可以确保一次请求只会通过一次该过滤器(filter 实际上并不能保证这一点)。
package com.pjb.securitydemo.filter;

import com.pjb.securitydemo.exception.verificationcodeexception;
import com.pjb.securitydemo.handler.loginfailurehandler;
import org.springframework.security.web.authentication.authenticationfailurehandler;
import org.springframework.util.stringutils;
import org.springframework.web.filter.onceperrequestfilter;

import javax.servlet.filterchain;
import javax.servlet.servletexception;
import javax.servlet.http.httpservletrequest;
import javax.servlet.http.httpservletresponse;
import javax.servlet.http.httpsession;
import java.io.ioexception;

/**
 * 验证码校验过滤器
 */
public class verificationcodefilter extends onceperrequestfilter
{
    private authenticationfailurehandler authenticationfailurehandler = new loginfailurehandler();

    @override
    protected void dofilterinternal(httpservletrequest httpservletrequest, httpservletresponse httpservletresponse, filterchain filterchain) throws servletexception, ioexception
    {
        //非登录请求不校验验证码
        string requesturi = httpservletrequest.getrequesturi();
        if(!"/auth/form".equals(requesturi))
        {
            filterchain.dofilter(httpservletrequest,httpservletresponse);
        }
        else
        {
            try
            {
                //验证码校验
                verificationcode(httpservletrequest);

                //验证成功
                filterchain.dofilter(httpservletrequest,httpservletresponse);
            }
            catch (verificationcodeexception ex)
            {
                //验证失败
                authenticationfailurehandler.onauthenticationfailure(httpservletrequest, httpservletresponse, ex);
            }
        }
    }

    /**
     * 验证码校验
     */
    public void verificationcode(httpservletrequest httpservletrequest) throws verificationcodeexception
    {
        string requestcode = httpservletrequest.getparameter("captcha");
        httpsession session = httpservletrequest.getsession();
        string savedcode = (string)session.getattribute("captcha");
        if(!stringutils.isempty(savedcode))
        {
            //随手清除验证码,无论是失败,还是成功。客户端应在登录失败时刷新验证码
            session.removeattribute("captcha");
        }

        //验证不通过,抛出异常
        if(stringutils.isempty(requestcode) || stringutils.isempty(savedcode) || !requestcode.equals(savedcode))
        {
            throw new verificationcodeexception();
        }
    }
}
至此整合 kaptcha 框架实现图形验证码已完成,最后注意,一定要把自定义过滤器类 verificationcodefilter 添加到 spring security 的过滤器链中。
打开 websecurityconfig 类(spring security 配置类),将自定义过滤器类 verificationcodefilter 添加到过滤器链中,如下:
5、前端页面
5.1 控制器层(controller 层)
创建 indexcontroller 类(首页控制器),实现获取当前登录用户名并跳转至首页。
package com.pjb.securitydemo.controller;

import org.springframework.stereotype.controller;
import org.springframework.web.bind.annotation.requestmapping;

import javax.servlet.http.httpservletrequest;
import java.security.principal;

/**
 * 首页控制器
 * @author pan_junbiao
 **/
@controller
public class indexcontroller
{
    /**
     * 首页
     */
    @requestmapping("/")
    public string index(httpservletrequest request)
    {
        //获取当前登录人
        string username = "未登录";
        principal principal = request.getuserprincipal();
        if(principal!=null)
        {
            username = principal.getname();
        }

        //返回页面
        request.setattribute("username",username);
        return "/index.html";
    }

}
5.2 编写登录页面
在 resources\static 静态资源目录下,创建 mylogin.html 页面。
注意:mylogin.html 页面必须放在 resources\static 静态资源目录下,否则页面无法加载。
<!doctype html>
<html lang="en">
<head>
    <meta charset="utf-8">
    <title>登录</title>
    <meta name="author" content="pan_junbiao的博客">
</head>
<body>
<form name="myform" action="/auth/form" method="post">
    <table align="center">
        <caption>用户登录</caption>
        <tr>
            <td>登录账户:</td>
            <td>
                <input type="text" name="username" placeholder="请输入登录账户" value="panjunbiao" />
            </td>
        </tr>
        <tr>
            <td>登录密码:</td>
            <td>
                <input type="password" name="password" placeholder="请输入登录密码" value="123456" />
            </td>
        </tr>
        <tr>
            <td>验证码:</td>
            <td>
                <!-- 新增图形验证码的输入框 -->
                <input type="text" name="captcha" placeholder="请输入验证码" />

                <!-- 图片指向图形验证码api -->
                <img src="/captcha.jpg" alt="captch" height="50px" width="150px" style="margin-left:20px;" >
            </td>
        </tr>
        <!-- 以下是提交、取消按钮 -->
        <tr>
            <td colspan="2" style="text-align: center; padding: 5px;">
                <input type="submit" value="提交" />
                <input type="reset" value="重置" />
            </td>
        </tr>
    </table>
</form>
</body>
</html>
5.3 编写首页
在 resources\templates 资源目录下,创建 index.html 页面。
注意:首页 index.html 页面中使用 thymeleaf 模板 。
<!doctype html>
<html lang="en" xmlns:th="http://www.thymeleaf.org">
<head>
    <meta charset="utf-8">
    <title>首页</title>
    <meta name="author" content="pan_junbiao的博客">
</head>
<body>
    <h1 style="color: red">hello,spring security</h1>
    <p>博客信息:您好,欢迎访问 pan_junbiao的博客</p>
    <p>博客地址:https://blog.csdn.net/pan_junbiao</p>
    <p th:text="'当前登录人:' + ${username}"></p>
    <a href="/logout" rel="external nofollow"  onclick="return confirm('确认注销吗?');">登出</a>
</body>
</html>
6、运行项目
6.1 登录页面
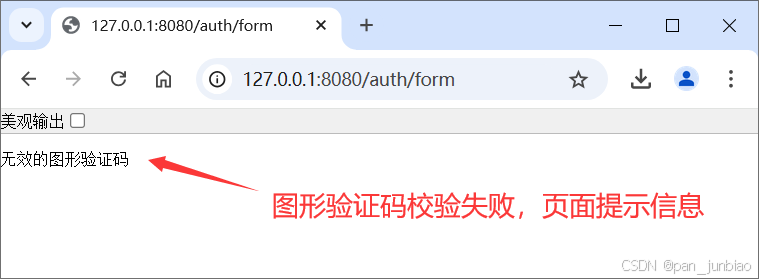
6.2 图形验证码校验失败
6.3 登录成功后,跳转至首页

以上就是springboot整合springsecurity实现图形验证码功能的详细内容,更多关于springboot springsecurity图形验证码的资料请关注代码网其它相关文章!


发表评论