config与bus整合自动刷新
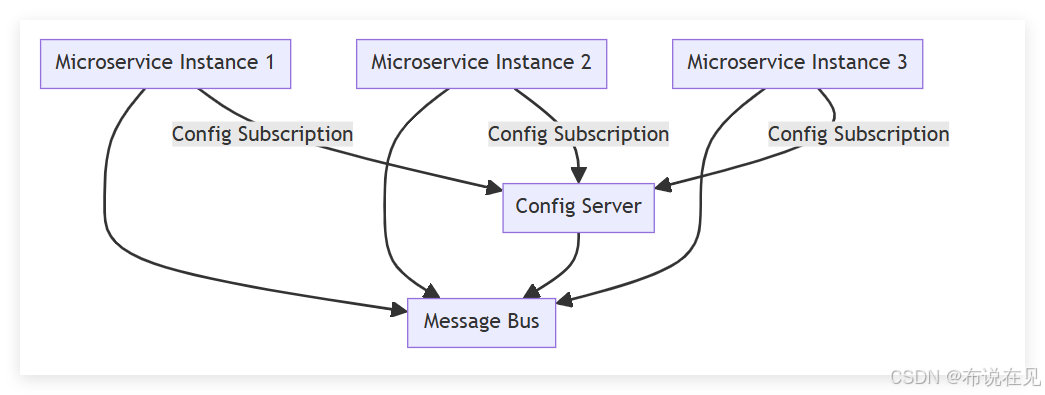
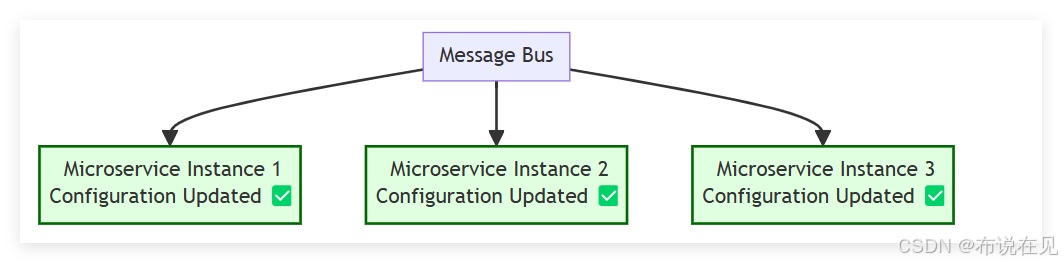
微服务a的所有实例都通过spring cloud bus消息总线连接到了一起,每个实例都会从config server订阅配置更新事件并获取配置信息。当其中一个微服务节点的/ous/refresh端点被请求时,该实例就会向spring cloud bus消息总线发送一个配置更新事件,其他实例通过spring cloud bus消息总线获得该事件后也会从config server获取最新的配置信息并更新配置。
步骤:
1.安装rabbitmq并启动
2.添加依赖
3.修改配置文件
4.改造config client
5.测试运行
步骤1:安装rabbitmq并启动 rabbitmq的安装
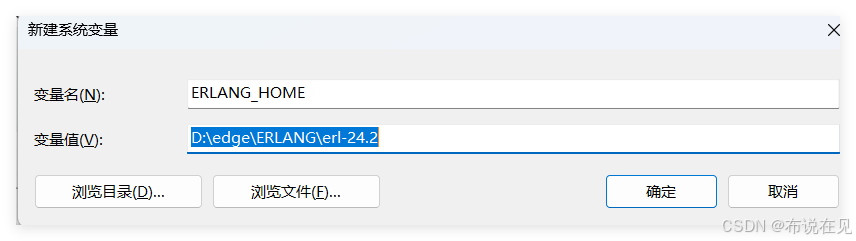
1.下载erlang,原因在于rabbitmq服务端代码是使用并发式语言erlang编写的,下载地址:erlang,双击.eerlangxe文件进行安装就好,安装完成之后创建一个名为erlang_home的环境变量,其值指向erlang的安装目录,同时将%erlang_home%\bin加入到path中。
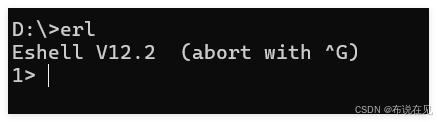
最后打开cmd命令行,输入erl,如果出现erlang的版本信息就表示erlang语言环境安装成功
2.下载rabbitmq,下载地址:rabbitmq,同样双击.exe进行安装就好(注意:默认的安装目录是c:/program files/…,这个目录中是存在空格符的,我们需要改变安装目录,貌似rabbitmq安装目录中是不允许有空格的)。
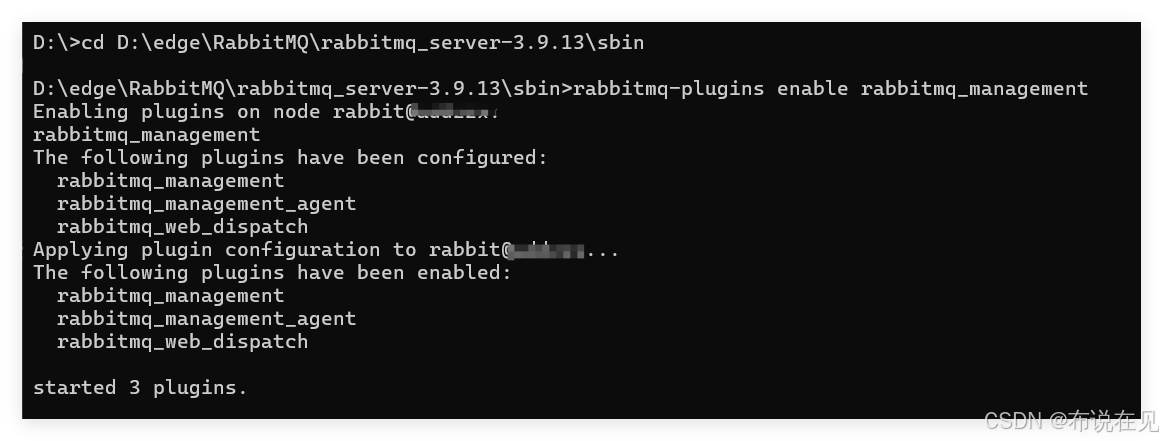
3.安装rabbitmq-plugins,这个相当于是一个管理界面,方便我们在浏览器界面查看rabbitmq各个消息队列以及exchange的工作情况,安装方法是:打开命令行cd进入rabbitmq的sbin目录,输入:rabbitmq-plugins enable rabbitmq_management命令,稍等会会发现出现plugins安装成功的提示,默认是安装6个插件。
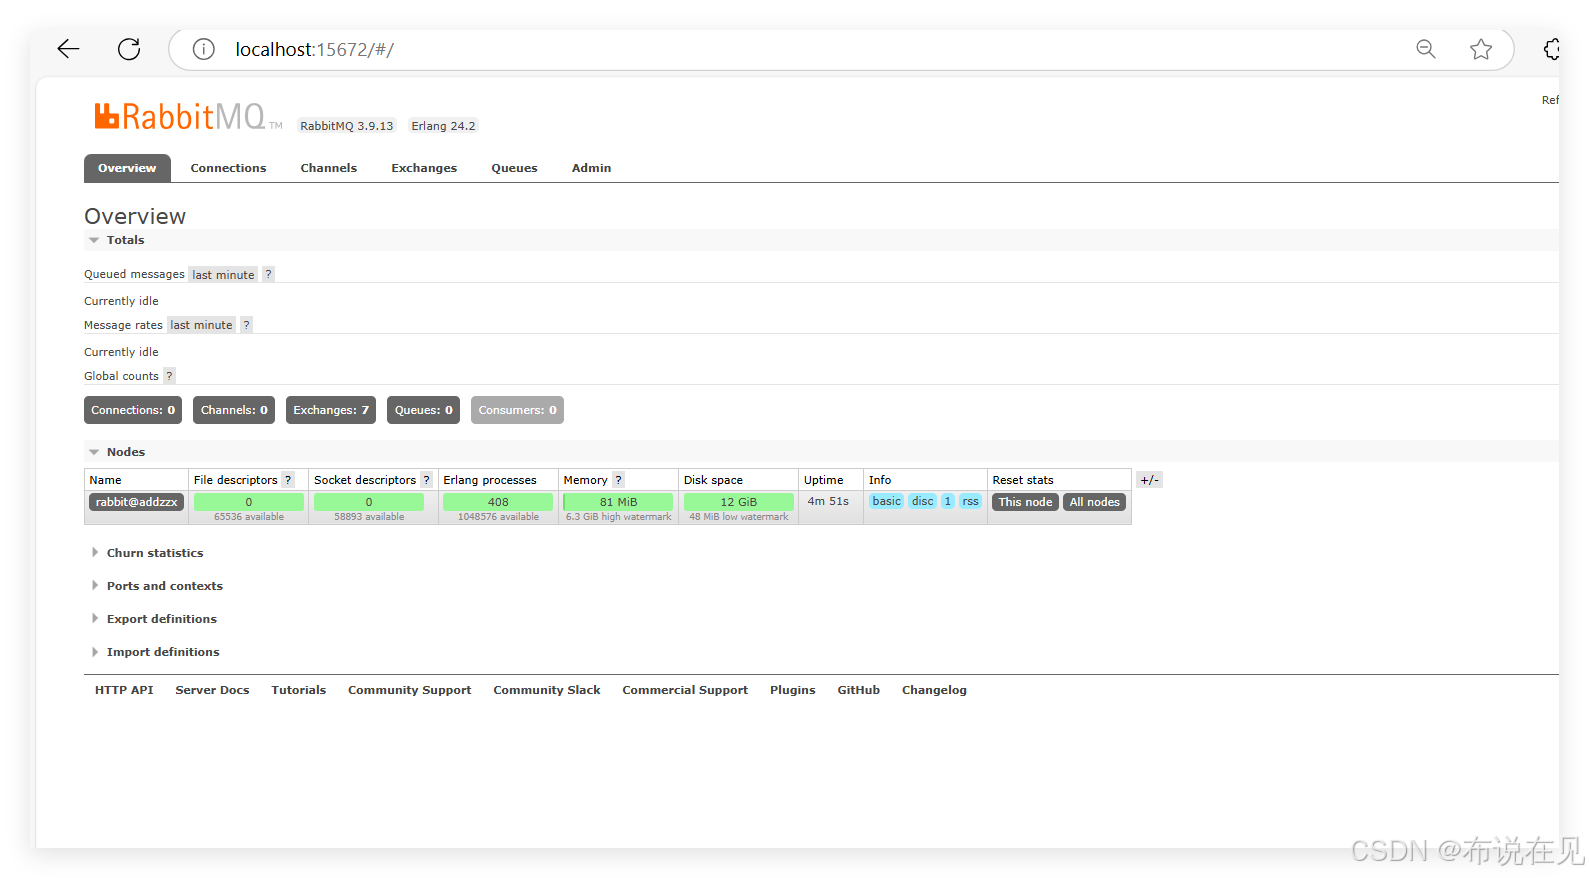
4.插件安装完之后,在浏览器输入http://localhost:15672进行验证,你会看到下面界面,输入用户名:guest,密码:guest 就可以进入管理界面。

步骤2:创建项目
eureka server,config-server,config-client
创建eureka server
1)使用spring initializr方式创建一个名称为eureka-server的spring boot项目,将artifact命名为eureka-server,在pom.xml文件中添加eureka server依赖。
方便测试效果,新建一个eureka-server项目作为config server的注册中心,
将eureka-server端口号设置为8761。

在加载不出来添加,要与springboot版本相符
<?xml version="1.0" encoding="utf-8"?>
<project xmlns="http://maven.apache.org/pom/4.0.0" xmlns:xsi="http://www.w3.org/2001/xmlschema-instance"
xsi:schemalocation="http://maven.apache.org/pom/4.0.0 https://maven.apache.org/xsd/maven-4.0.0.xsd">
<modelversion>4.0.0</modelversion>
<parent>
<groupid>org.springframework.boot</groupid>
<artifactid>spring-boot-starter-parent</artifactid>
<version>2.0.6.release</version>
<relativepath/> <!-- lookup parent from repository -->
</parent>
<groupid>com.bushuo</groupid>
<artifactid>eureka-server</artifactid>
<version>0.0.1-snapshot</version>
<name>eureka-server</name>
<description>demo project for spring boot</description>
<url/>
<licenses>
<license/>
</licenses>
<developers>
<developer/>
</developers>
<scm>
<connection/>
<developerconnection/>
<tag/>
<url/>
</scm>
<properties>
<java.version>1.8</java.version>
</properties>
<dependencies>
<dependency>
<groupid>org.springframework.cloud</groupid>
<artifactid>
spring-cloud-starter-netflix-eureka-server
</artifactid>
</dependency>
<dependency>
<groupid>org.springframework.boot</groupid>
<artifactid>spring-boot-starter-web</artifactid>
</dependency>
<dependency>
<groupid>org.springframework.boot</groupid>
<artifactid>spring-boot-starter-test</artifactid>
<scope>test</scope>
</dependency>
</dependencies>
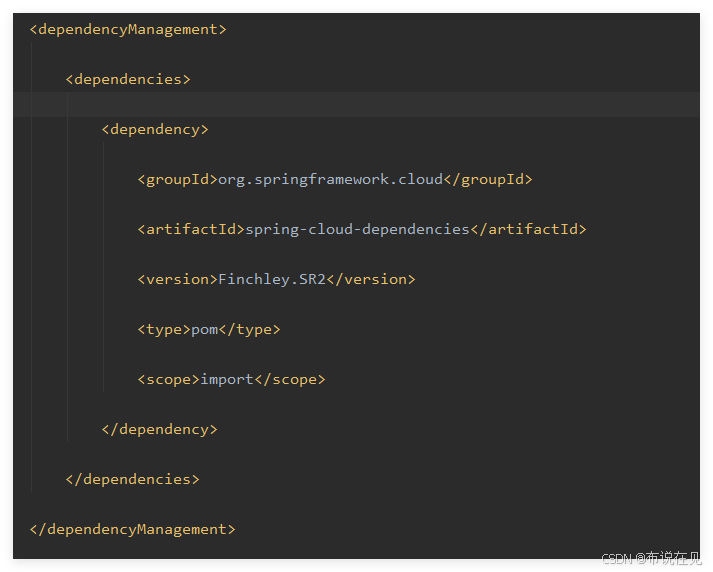
<dependencymanagement>
<dependencies>
<dependency>
<groupid>org.springframework.cloud</groupid>
<artifactid>spring-cloud-dependencies</artifactid>
<version>finchley.sr2</version>
<type>pom</type>
<scope>import</scope>
</dependency>
</dependencies>
</dependencymanagement>
<build>
<plugins>
<plugin>
<groupid>org.springframework.boot</groupid>
<artifactid>spring-boot-maven-plugin</artifactid>
</plugin>
</plugins>
</build>
</project>2):添加eureka的相关配置
在全局配置文件application.yml中添加eureka的相关配置信息。
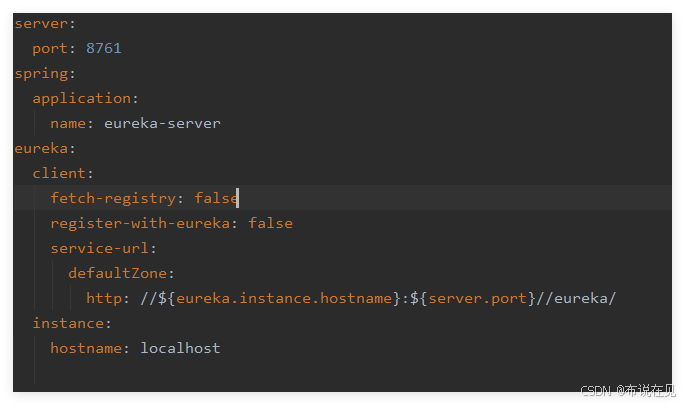
fetch-registry:
设置false 时,该eureka客户端不会从eureka server获取服务注册表的信息。这意味着它不会尝试拉取其他服务的信息,通常这在自身就是server的情况下使用。register-with-eureka:
设置为 false 时,eureka 客户端不注册到 eureka server。即不将自身信息注册到服务注册表。在 eureka server 节点配置中常用,因 eureka server 本身无需注册到其他 eureka server,单实例时是。
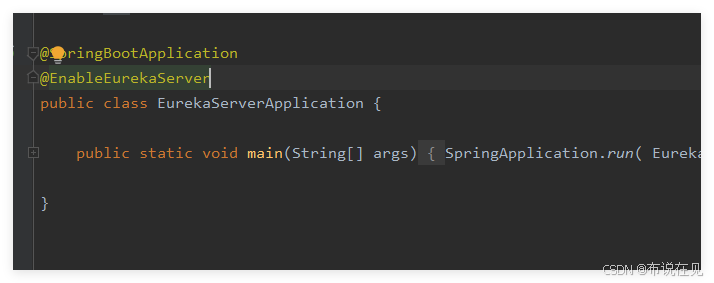
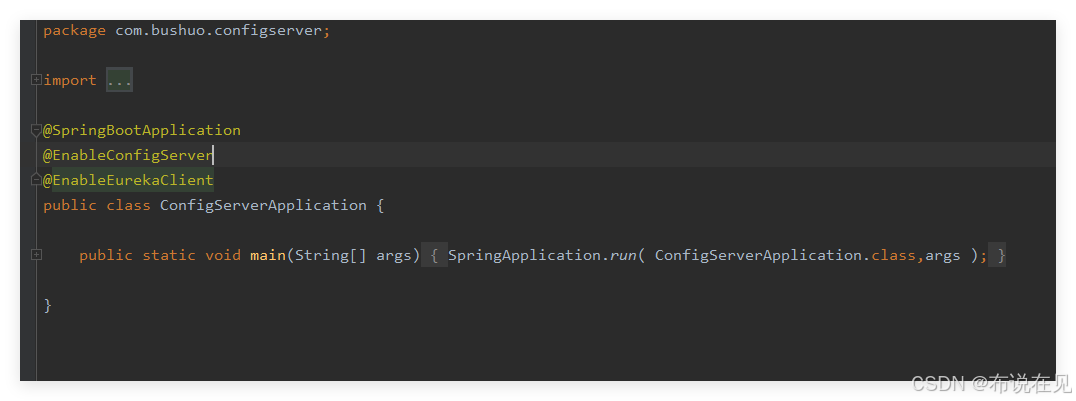
3):在项目启动类添加@enableeurekaserver注解
在项目启动类eurekaserverapplication上添加@enableeurekaserver注解开启eureka server功能。
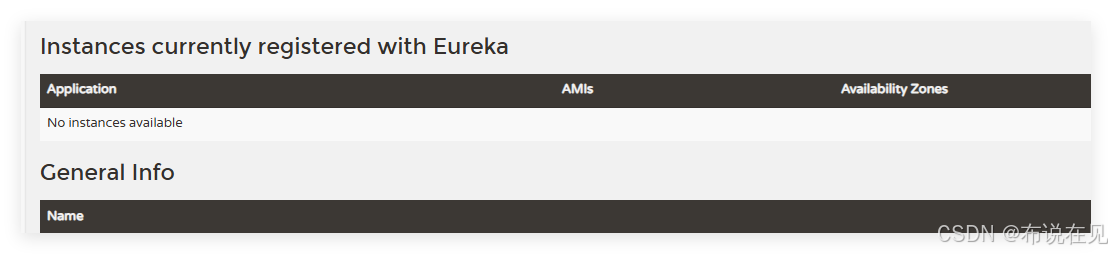
4)测试运行 http://localhost:8761
创建config-server
在config-4下创建config-server,添加依赖,添加配置,在启动类添加注解
可以参考操作
依赖
配置bootstrap
添加启动类注解
步骤3: 添加依赖
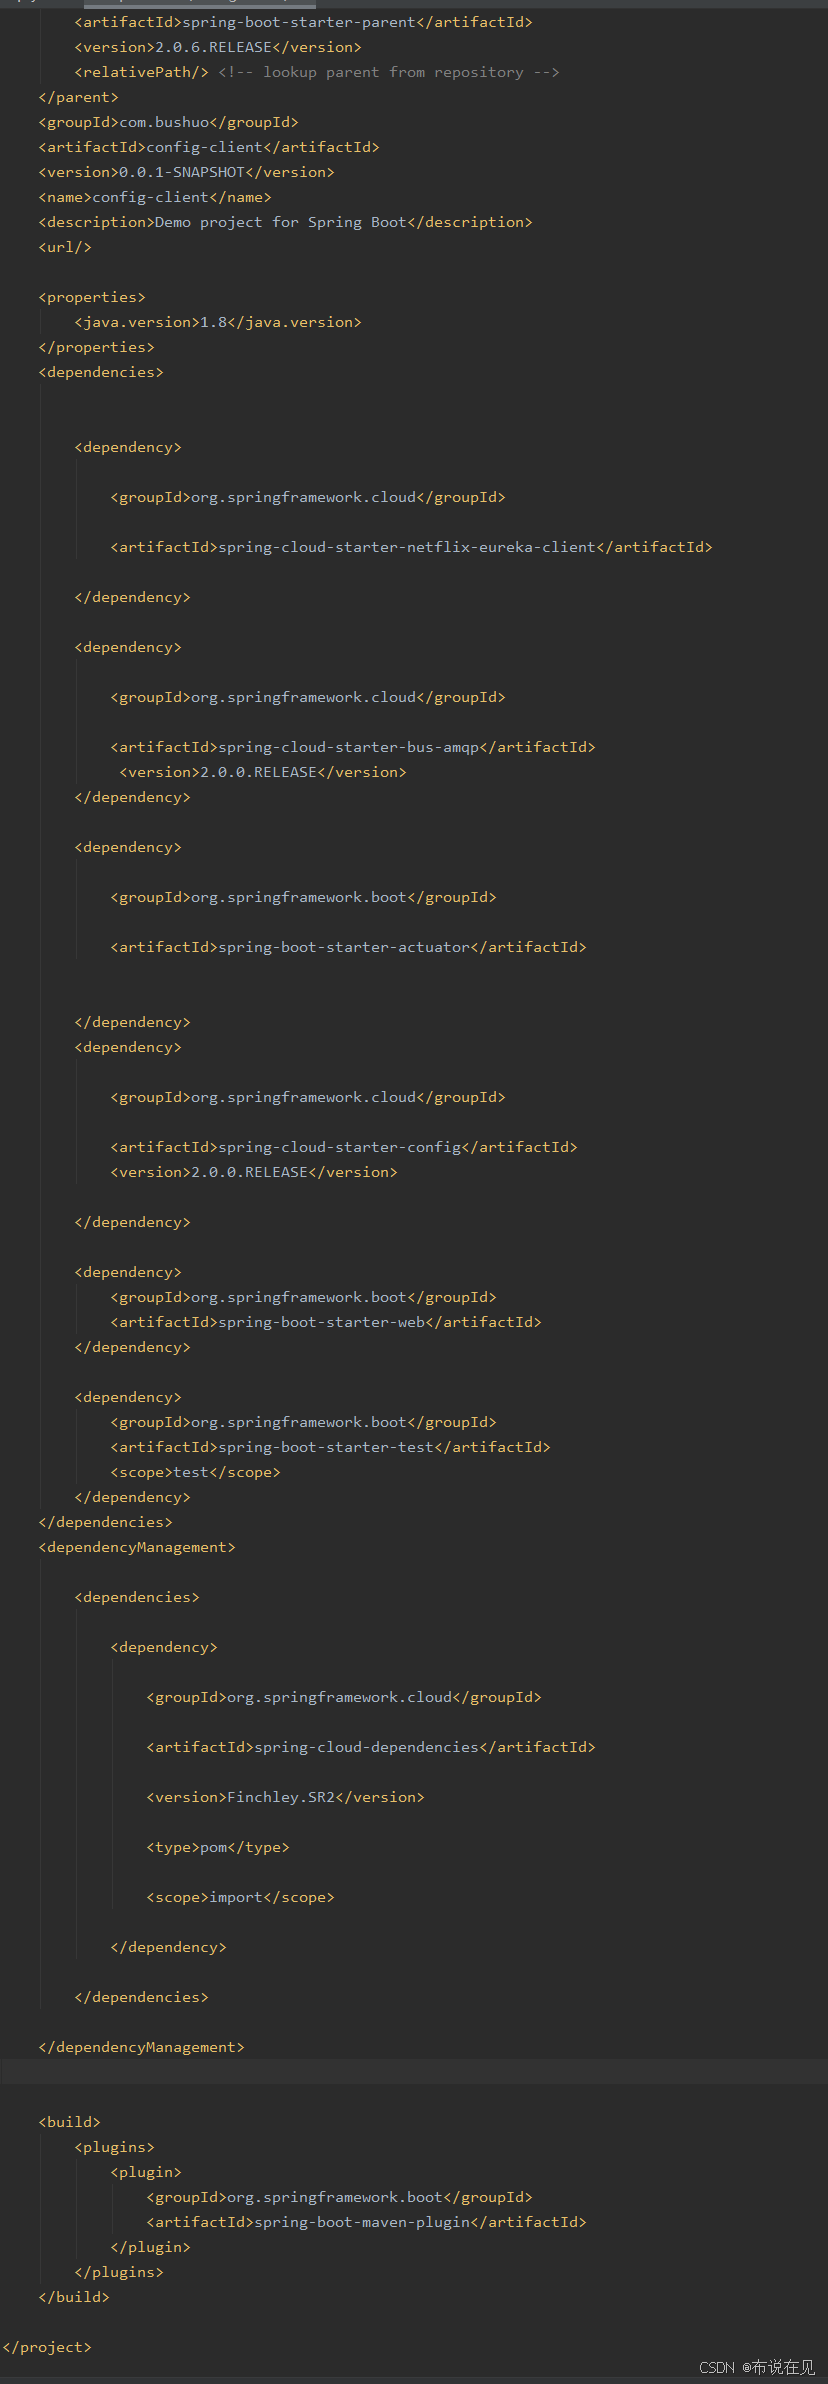
config server和config client与spring cloud bus整合实现配置自动刷新。改造config server与config client,在各自的pom.xml配置文件中添加spring-cloud-starter-bus-amqp依赖实现配置自动更新与spring-boot-starter-actuator依赖监控系统健康情况的工具。
        <groupid>org.springframework.cloud</groupid>
        <artifactid>spring-cloud-starter-bus-amqp</artifactid>
         <version>2.0.0.release</version>
    </dependency>
    <dependency>
        <groupid>org.springframework.boot</groupid>
        <artifactid>spring-boot-starter-actuator</artifactid>
    </dependency>
修改配置文件
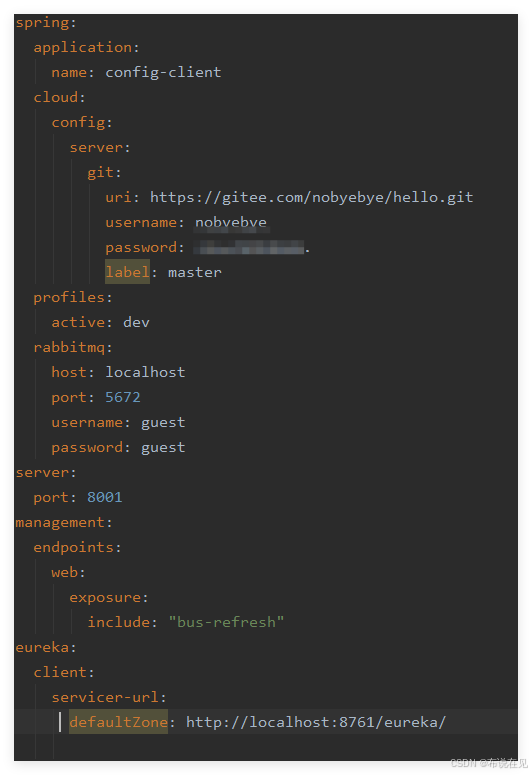
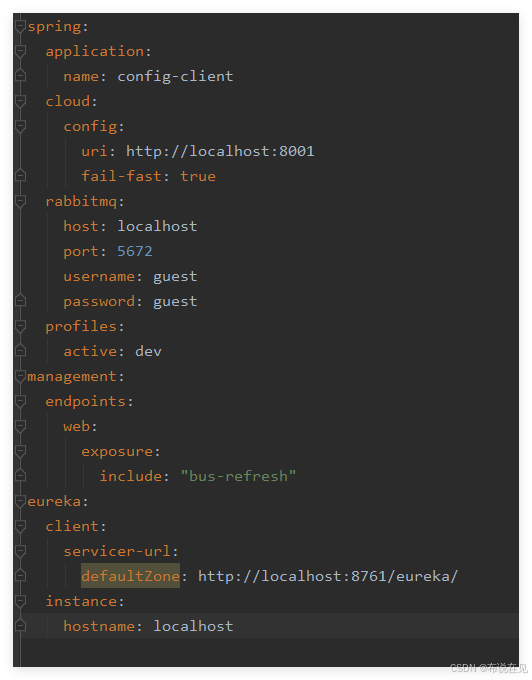
改造config server和config client的配置文件,在配置文件中设置rabbitmq属性的相关配置,包括主机地址、端口号、用户名和密码,如下所示。
spring:
application:
name: config-client
cloud:
config:
server:
git:
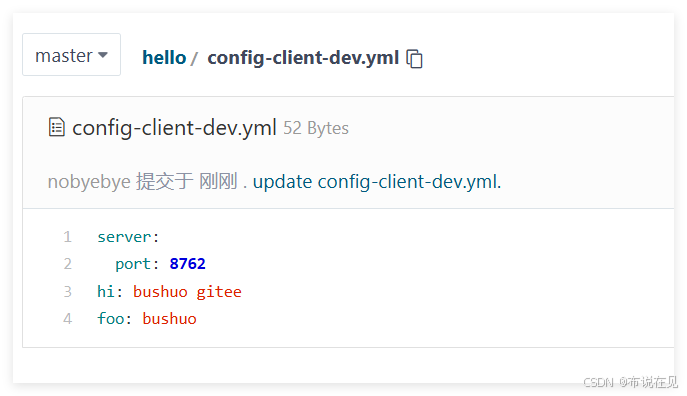
uri: https://gitee.com/nobyebye/hello.git
username: #自己的gitee用户名
password: #密码
label: master
profiles:
active: dev
rabbitmq:
host: localhost
port: 5672
username: guest
password: guest
server:
port: 8001
management:
endpoints:
web:
exposure:
include: "bus-refresh"步骤4:config client
config-client的bootstrap.yml
添加控制器
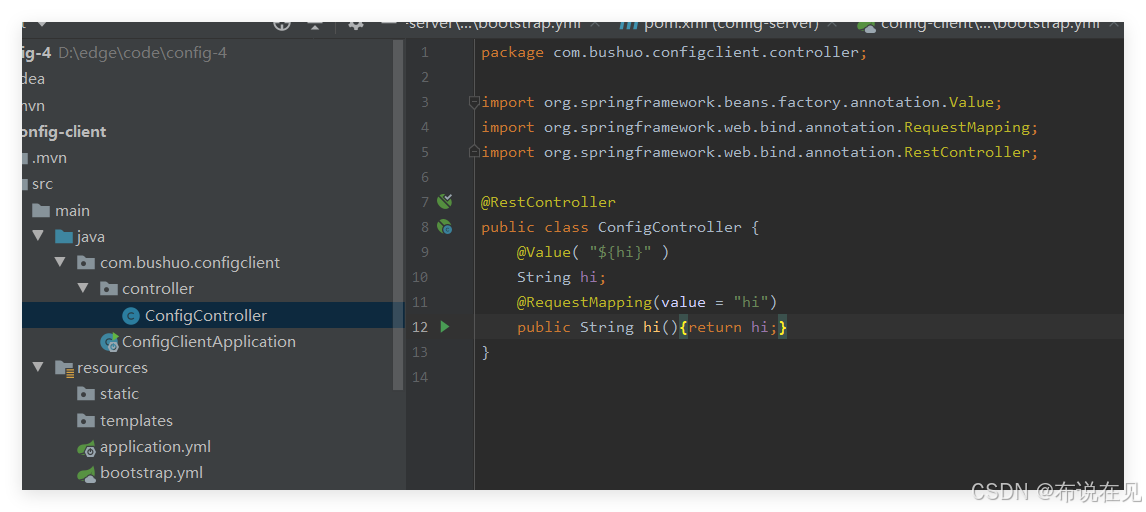
config client,在需要动态刷新配置的类configclientapplication上加上注解@refreshscope。
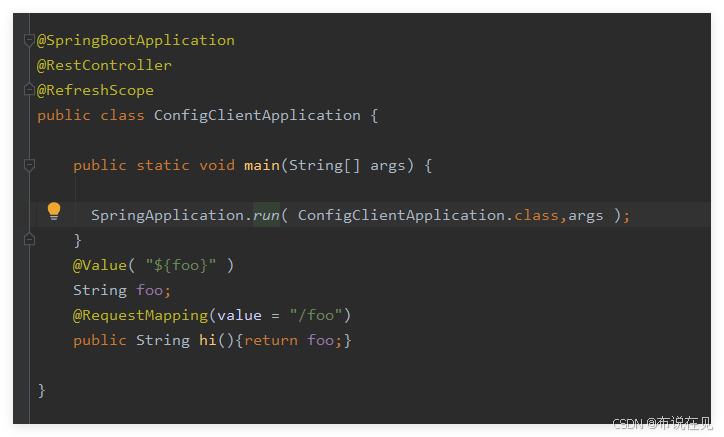
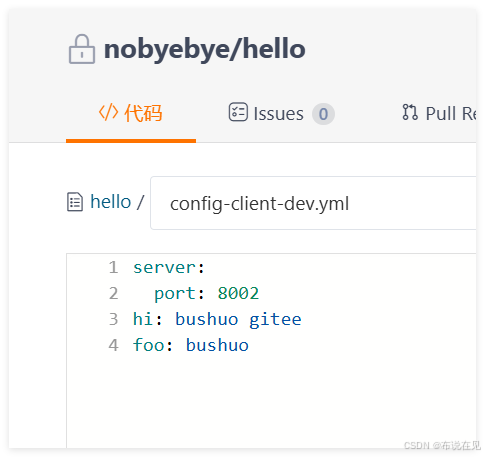
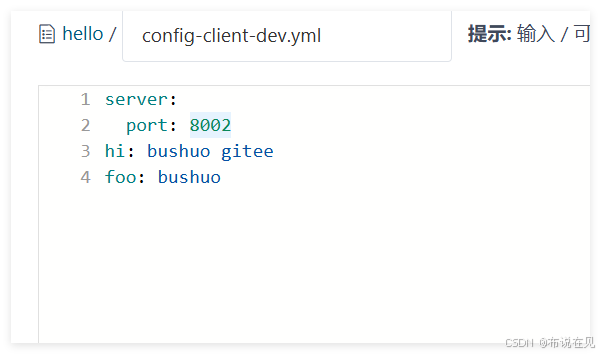
要在gitee的配置文件添加foo,不然没有注解
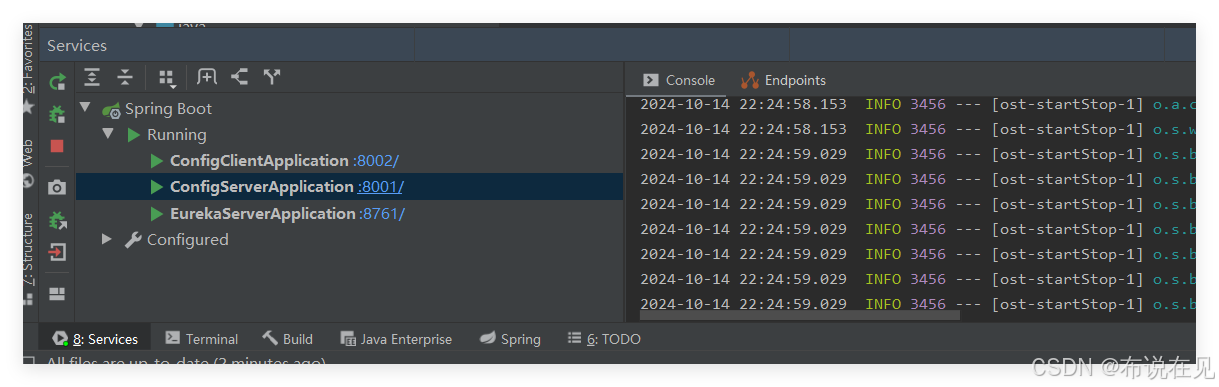
步骤5:测试运行
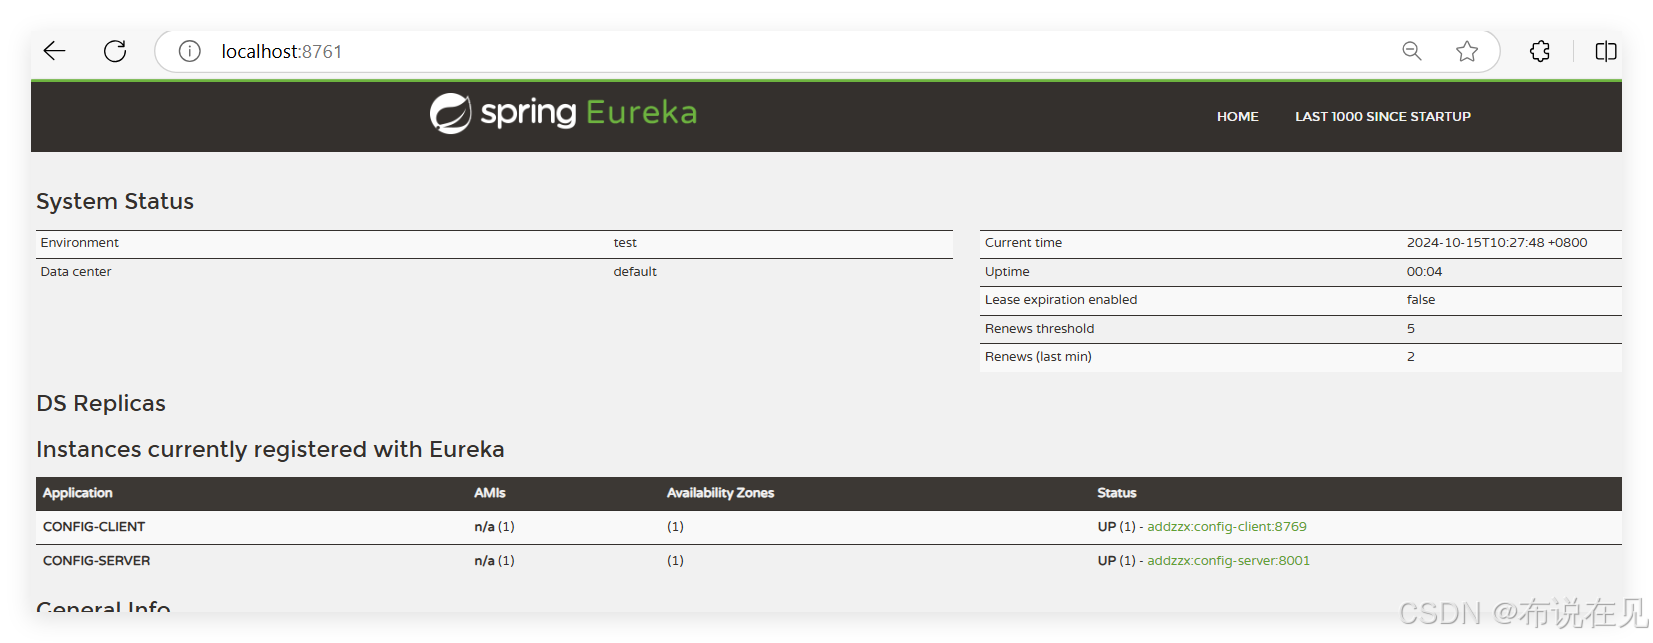
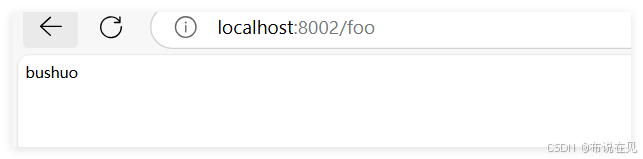
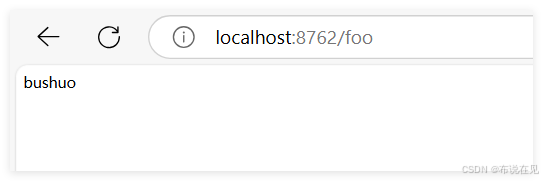
依次启动config-server、config-client项目。启动成功后,使用浏览器访问http://localhost:8002/foo
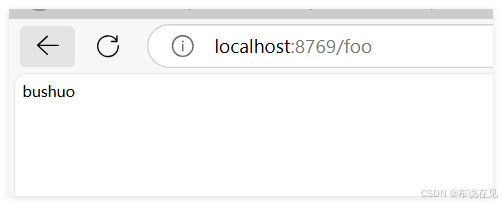
打开cmd输入命令:curl -x post http://localhost:8769/actuator/bus-refresh。

实现config与bus整合自动刷新后,系统能做到实时检测配置变更并自动应用,无需额外的人工干预,减少了系统中断时间和重启操作。这不仅提高了系统的稳定性,还能显著提升运维和开发的效率。
问题一
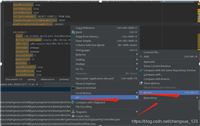
idea运行多个端口,没有services的窗口,点击edit configurations
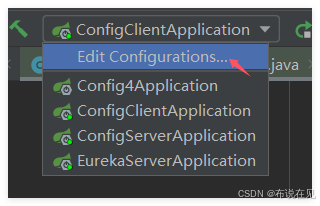
点击templates->+ springboot,apply,ok了
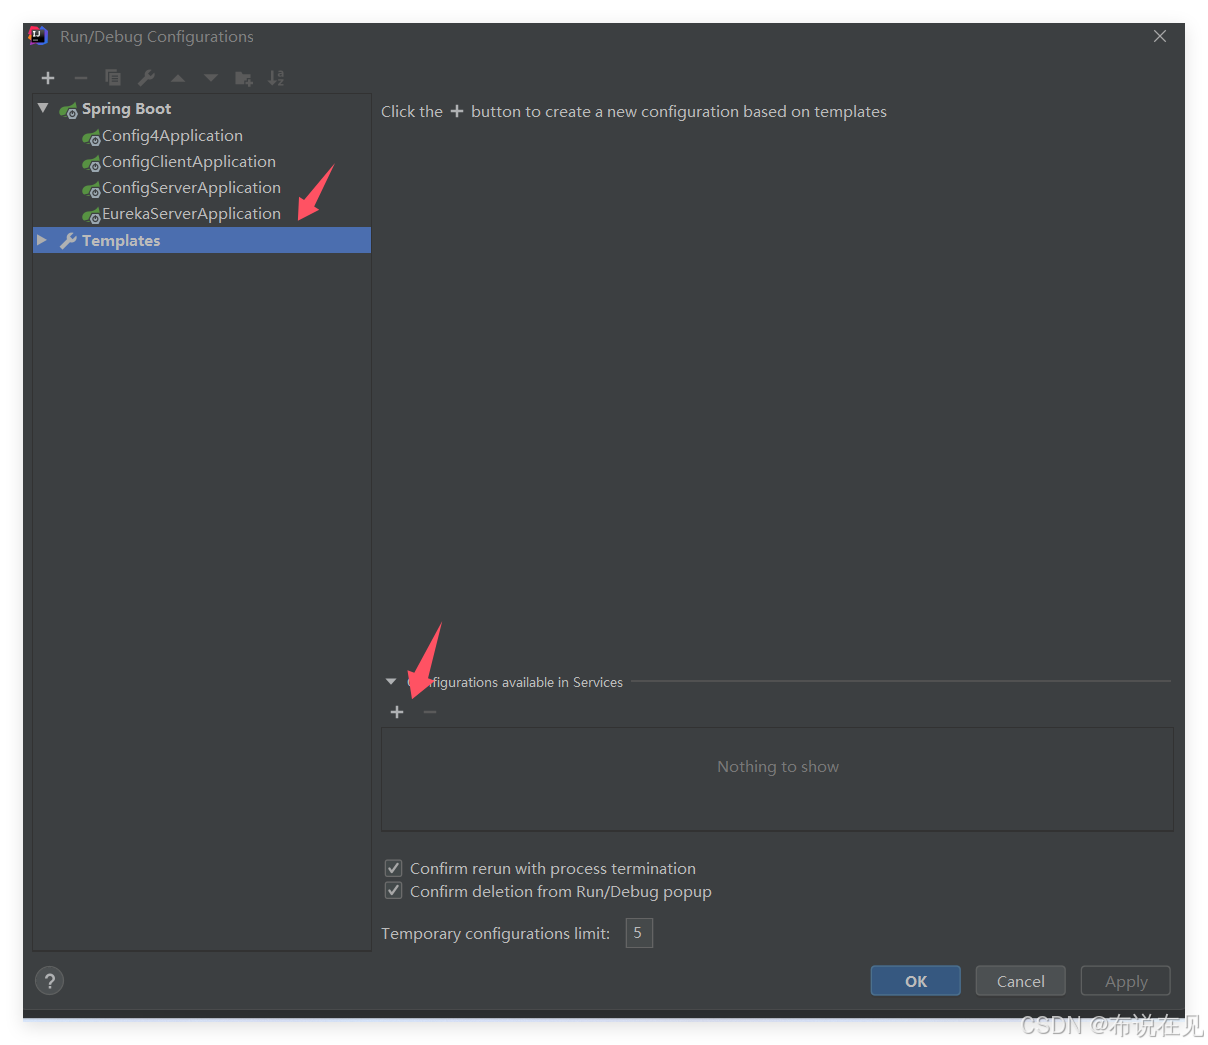
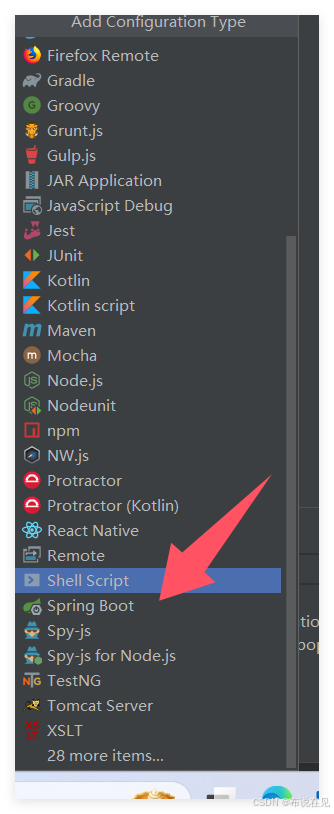
窗口出来了
问题二
整合bus自动刷新改进了之前的什么问题?
手动刷新繁琐:以往配置更新后需要手动重启各服务实例,耗时且麻烦。自动刷新可以省去这一过程,让更新更简单快捷。
减少服务中断:手动重启会导致短暂的服务中断。自动刷新避免了重启,提升了服务的连续性和可用性。
配置一致性:手动更新可能导致不同实例间配置不一致,带来同步问题。自动刷新确保所有实例同步更新,保持一致性。
降低运维复杂性:自动刷新减少了手动操作,降低运维负担,避免人为失误。
提高实时性:配置更新可实时应用,服务能更快地响应变化,提高了系统的适应性和灵活性。
总结
通过整合spring cloud config与bus实现配置自动刷新,可以在无需重启服务的情况下更新微服务配置。该机制减少了运维干预,提升了系统的稳定性和运维效率,尤其在快速变更的环境中十分实用。
到此这篇关于spring cloud config与bus整合实现微服务配置自动刷新的文章就介绍到这了,更多相关spring cloud config微服务配置自动刷新内容请搜索代码网以前的文章或继续浏览下面的相关文章希望大家以后多多支持代码网!


发表评论