1. 什么是任务编排
任务编排(task orchestration)是指将多个任务按照特定的依赖关系和执行顺序进行组织和管理的过程,以确保各个任务能够按照预定的逻辑顺序高效地执行。
2. 为什么需要任务编排
在复杂的业务场景中,任务间通常存在依赖关系,也就是某个任务会依赖另一个任务的执行结果,在这种情况下,我们需要通过任务编排,来确保任务按照正确的顺序进行执行。
在任务编排中,可以定义任务之间的依赖性、并行执行的策略、错误处理机制等,从而提高整体工作流的效率和可靠性。通过任务编排,可以实现复杂业务流程的自动化管理,优化资源利用,提高系统的灵活性与可维护性。
例如,以下任务的执行顺序:
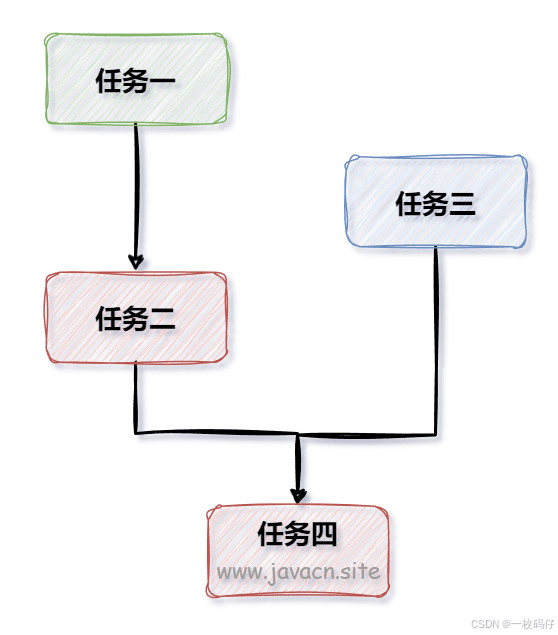
其中,任务二要等任务一执行完才能执行,而任务四要等任务二和任务三全部执行完才能执行。
3. 任务编排实现
任务编排和控制的主要手段有以下:
- future
- completablefuture
- countdownlatch
- semaphore
- cyclicbarrier
但如果是全局线程池,想要实现精准的任务编排,只能使用 future 或 completablefuture。
3.1 future 任务编排
使用 future 实现上述 4 个任务的编排(任务二要等任务一执行完才能执行,而任务四要等任务二和任务三全部执行完才能执行)
import java.util.concurrent.*;
import java.util.arrays;

public class taskorchestrator {
    public static void main(string[] args) {
        // 创建一个线程池来执行任务
        executorservice executor = executors.newfixedthreadpool(5);

        // 定义任务一
        future<string> taskoneresult = executor.submit(new callable<string>() {
            @override
            public string call() throws exception {
                thread.sleep(2000); // 模拟耗时操作
                return "task one result";
            }
        });

        // 定义任务二,依赖任务一
        future<string> tasktworesult = executor.submit(new callable<string>() {
            @override
            public string call() throws exception {
                string result = taskoneresult.get(); // 阻塞等待任务一完成
                thread.sleep(1000); // 模拟耗时操作
                return "task two result, got: " + result;
            }
        });

        // 定义任务三
        future<string> taskthreeresult = executor.submit(new callable<string>() {
            @override
            public string call() throws exception {
                thread.sleep(1500); // 模拟耗时操作
                return "task three result";
            }
        });

        // 定义任务四,依赖任务二和任务三
        future<string> taskfourresult = executor.submit(new callable<string>() {
            @override
            public string call() throws exception {
                string tasktwooutput = tasktworesult.get(); // 阻塞等待任务二完成
                string taskthreeoutput = taskthreeresult.get(); // 阻塞等待任务三完成
                thread.sleep(500); // 模拟耗时操作
                return "task four result, got: " + tasktwooutput + " and " + taskthreeoutput;
            }
        });

        // 打印最终结果
        try {
            system.out.println("final result: " + taskfourresult.get());
        } catch (interruptedexception | executionexception e) {
            e.printstacktrace();
        }
    }
}
3.2 completablefuture 任务编排
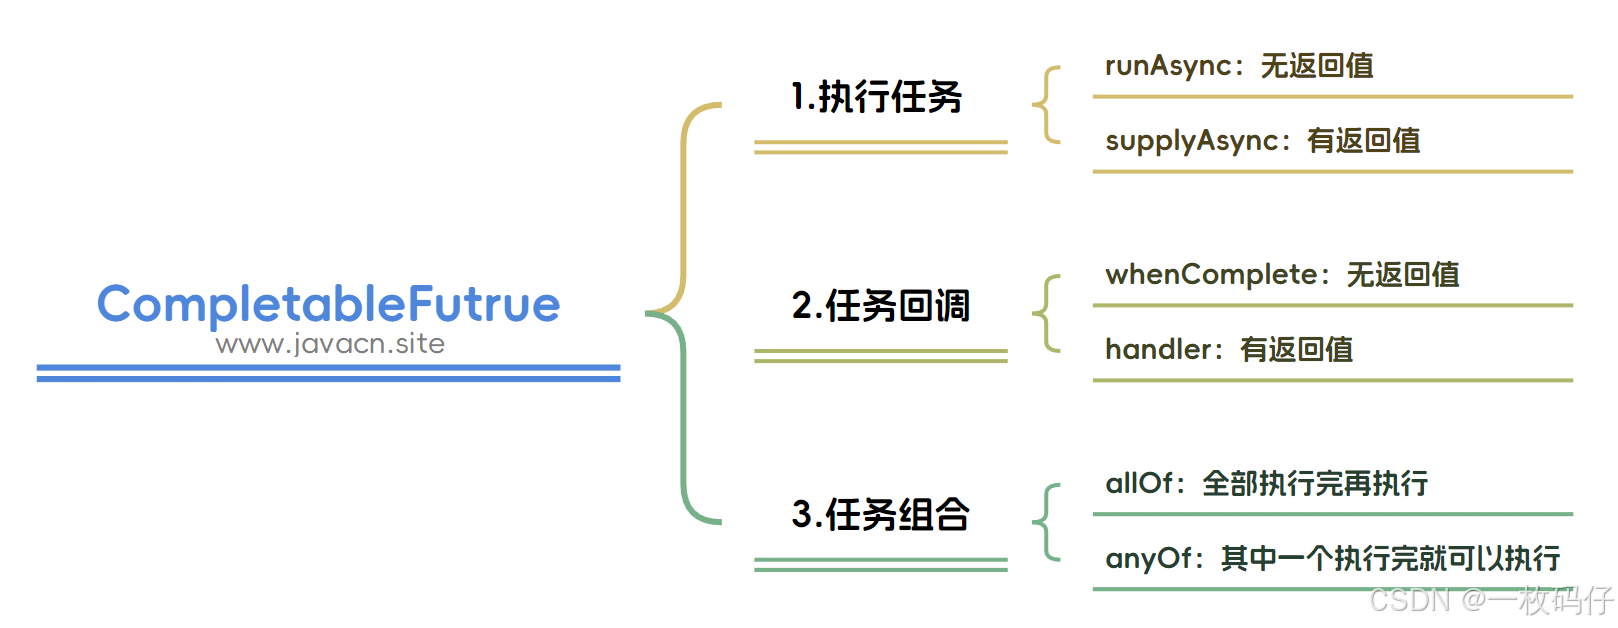
completablefutrue 提供的方法有很多,但最常用和最实用的核心方法只有以下几个:
接下来,使用 completablefuture 实现上述 4 个任务的编排(任务二要等任务一执行完才能执行,而任务四要等任务二和任务三全部执行完才能执行):
import java.util.concurrent.completablefuture;
import java.util.concurrent.executionexception;

public class completablefutureexample {

    public static void main(string[] args) {
        // 任务一:返回 "task 1 result"
        completablefuture<string> task1 = completablefuture.supplyasync(() -> {
            try {
                // 模拟耗时操作
                thread.sleep(1000);
            } catch (interruptedexception e) {
                thread.currentthread().interrupt();
                throw new runtimeexception(e);
            }
            return "task 1 result";
        });
        // 任务二:依赖任务一,返回 "task 2 result" + 任务一的结果
        completablefuture<string> task2 = task1.handle((result1, throwable) -> {
            try {
                // 模拟耗时操作
                thread.sleep(1000);
            } catch (interruptedexception e) {
                thread.currentthread().interrupt();
                throw new runtimeexception(e);
            }
            return "task 2 result " + result1;
        });
        // 任务三:和任务一、任务二并行执行,返回 "task 3 result"
        completablefuture<string> task3 = completablefuture.supplyasync(() -> {
            try {
                // 模拟耗时操作
                thread.sleep(800); // 任务三可能比任务二先完成
            } catch (interruptedexception e) {
                thread.currentthread().interrupt();
                throw new runtimeexception(e);
            }
            return "task 3 result";
        });
        // 任务四:依赖任务二和任务三,等待它们都完成后执行,返回 "task 4 result" + 任务二和任务三的结果
        completablefuture<string> task4 = completablefuture.allof(task2, task3).handle((res, throwable) -> {
            try {
                // 这里不需要显式等待,因为 allof 已经保证了它们完成
                return "task 4 result with " + task2.get() + " and " + task3.get();
            } catch (interruptedexception | executionexception e) {
                throw new runtimeexception(e);
            }
        });
        // 获取任务四的结果并打印
        string finalresult = task4.join();
        system.out.println(finalresult);
    }
}
到此这篇关于java 实现线程池任务编排的示例代码的文章就介绍到这了,更多相关java 线程池任务编排内容请搜索代码网以前的文章或继续浏览下面的相关文章希望大家以后多多支持代码网!


发表评论