1. 文章主要内容
本篇博客主要涉及两个主体内容。第一个:简单介绍global context block的原理。第二个:基于yolov5 6.x版本,与backbone部分的c3结构进行融合,提出一种新的结构c3gc(通读本篇博客需要10分钟左右的时间)。
这些点子都可以用来作为写sci四区、北大核心论文的一个小创新点!
2. global context block(原理:简单介绍,可自行详细研究)
2.1 global context block
global context block来源于gcnet论文,其主要的原理是通过non-local这种全局自注意力方法进行建模,让模型能够提取到全局上下文的关系(也可以说是特征),这样便可以增强模型提取特征的能力。另外,global context block通过结合senet的结构,使其模型的计算量得到很大的减少,使得其变为一个几乎没有消耗的即插即用模块。一般来说,yolov5的backbone部分是用来提前数据的特征,尤其是浅层的特征。而浅层容易忽略的特征容易在网络结构比较深的时候难以提取,这个时候我们将global context block与backbone的c3结构进行融合,提出一种新的提取特征结构c3gc,这样通过全局建模关系,能够使得有用的特征更容易提取,于是模型提点也是显而易见的了。
原论文地址:gcnet原论文
2.2 博主数据集实验效果
博主所训练的数据集特点:小尺寸目标居多,密集且目标尺寸不一,实验数据如下所示:
原yolov5s框架实验数据:p(查准率):0.935、r(召回率):0.927、map@0.5(平均检测精度):0.942
yolov5s+c3gc(backbone四个c3都替换为c3gc):p(查准率):0.960、r(召回率):0.933、map@0.5(平均检测精度):0.952
由实验数据对比,yolov5s+gc能够极大的提升p,同时r、map也有所提升,提升p指标,就表明检测精度更高,flops较原yolov5增加了0.3,几乎无消耗。
3. 实验流程
3.1 c3gc结构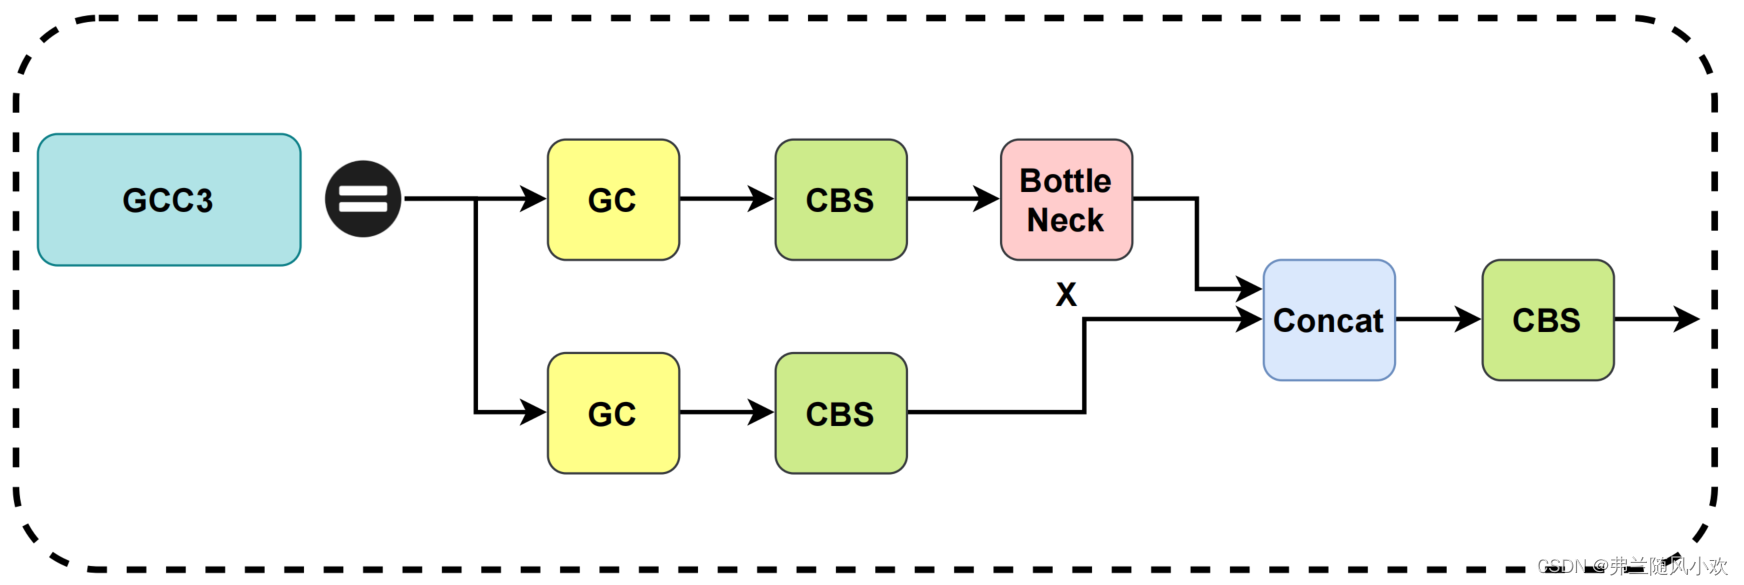
注意到:这里将gc(global context block)分别融合到c3的两个分支当中(当然,也可以融合到任何一个分支当中,这个可以自行实验)。
3.2 代码详细改进流程(重要!!!)
3.1 新建c3gc.py文件
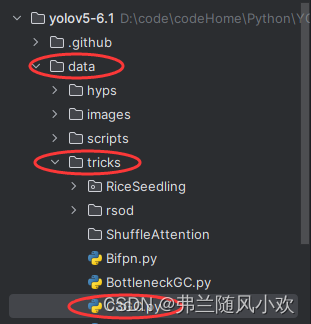
( 注意:博主使用的是pycharm集成开发工具)首先在data->tricks目录下新建一个叫c3gc的py文件( 注意:tricks文件夹是自定义创建的,没有自己创建一个即可),将如下代码复制到c3gc的py文件中:
import torch
import torch.nn as nn
from models.common import bottleneck


def autopad(k, p=none):  # kernel, padding
    # pad to 'same'
    if p is none:
        p = k // 2 if isinstance(k, int) else [x // 2 for x in k]  # auto-pad
    return p


class conv(nn.module):
    # standard convolution
    def __init__(self, c1, c2, k=1, s=1, p=none, g=1, act=true):  # ch_in, ch_out, kernel, stride, padding, groups
        super().__init__()
        self.conv = nn.conv2d(c1, c2, k, s, autopad(k, p), groups=g, bias=false)
        self.bn = nn.batchnorm2d(c2)
        self.act = nn.silu() if act is true else (act if isinstance(act, nn.module) else nn.identity())

    def forward(self, x):
        return self.act(self.bn(self.conv(x)))

    def forward_fuse(self, x):
        return self.act(self.conv(x))


def constant_init(module, val, bias=0):
    if hasattr(module, 'weight') and module.weight is not none:
        nn.init.constant_(module.weight, val)
    if hasattr(module, 'bias') and module.bias is not none:
        nn.init.constant_(module.bias, bias)


def kaiming_init(module,
                 a=0,
                 mode='fan_out',
                 nonlinearity='relu',
                 bias=0,
                 distribution='normal'):
    assert distribution in ['uniform', 'normal']
    if hasattr(module, 'weight') and module.weight is not none:
        if distribution == 'uniform':
            nn.init.kaiming_uniform_(
                module.weight, a=a, mode=mode, nonlinearity=nonlinearity)
        else:
            nn.init.kaiming_normal_(
                module.weight, a=a, mode=mode, nonlinearity=nonlinearity)
    if hasattr(module, 'bias') and module.bias is not none:
        nn.init.constant_(module.bias, bias)


def last_zero_init(m):
    if isinstance(m, nn.sequential):
        constant_init(m[-1], val=0)
        m[-1].inited = true
    else:
        constant_init(m, val=0)
        m.inited = true


class cb2d(nn.module):
    def __init__(self, inplanes, pool='att', fusions=['channel_add', 'channel_mul']):
        super(cb2d, self).__init__()
        assert pool in ['avg', 'att']
        assert all([f in ['channel_add', 'channel_mul'] for f in fusions])
        assert len(fusions) > 0, 'at least one fusion should be used'
        self.inplanes = inplanes
        self.planes = inplanes // 4
        self.pool = pool
        self.fusions = fusions
        if 'att' in pool:
            self.conv_mask = nn.conv2d(inplanes, 1, kernel_size=1)
            self.softmax = nn.softmax(dim=2)
        else:
            self.avg_pool = nn.adaptiveavgpool2d(1)
        if 'channel_add' in fusions:
            self.channel_add_conv = nn.sequential(
                nn.conv2d(self.inplanes, self.planes, kernel_size=1),
                nn.layernorm([self.planes, 1, 1]),
                nn.relu(inplace=true),
                nn.conv2d(self.planes, self.inplanes, kernel_size=1)
            )
        else:
            self.channel_add_conv = none
        if 'channel_mul' in fusions:
            self.channel_mul_conv = nn.sequential(
                nn.conv2d(self.inplanes, self.planes, kernel_size=1),
                nn.layernorm([self.planes, 1, 1]),
                nn.relu(inplace=true),
                nn.conv2d(self.planes, self.inplanes, kernel_size=1)
            )
        else:
            self.channel_mul_conv = none
        self.reset_parameters()

    def reset_parameters(self):
        if self.pool == 'att':
            kaiming_init(self.conv_mask, mode='fan_in')
            self.conv_mask.inited = true

        if self.channel_add_conv is not none:
            last_zero_init(self.channel_add_conv)
        if self.channel_mul_conv is not none:
            last_zero_init(self.channel_mul_conv)

    def spatial_pool(self, x):
        batch, channel, height, width = x.size()
        if self.pool == 'att':  # iscyy
            input_x = x
            input_x = input_x.view(batch, channel, height * width)
            input_x = input_x.unsqueeze(1)
            context_mask = self.conv_mask(x)
            context_mask = context_mask.view(batch, 1, height * width)
            context_mask = self.softmax(context_mask)
            context_mask = context_mask.unsqueeze(3)
            context = torch.matmul(input_x, context_mask)
            context = context.view(batch, channel, 1, 1)
        else:
            context = self.avg_pool(x)

        return context

    def forward(self, x):
        context = self.spatial_pool(x)

        if self.channel_mul_conv is not none:
            channel_mul_term = torch.sigmoid(self.channel_mul_conv(context))
            out = x * channel_mul_term
        else:
            out = x
        if self.channel_add_conv is not none:
            channel_add_term = self.channel_add_conv(context)
            out = out + channel_add_term
        return out


class c3gc(nn.module):
    def __init__(self, c1, c2, n=1, shortcut=true, g=1,
                 e=0.5):  # ch_in, ch_out, number, shortcut, groups, expansion #iscyy

        super(c3gc, self).__init__()
        c_ = int(c2 * e)  # hidden channels
        self.gc = cb2d(c1)
        self.cv1 = conv(c1, c_, 1, 1)
        self.cv2 = conv(c1, c_, 1, 1)
        self.cv3 = conv(2 * c_, c2, 1)  # act=frelu(c2)
        # self.m = nn.sequential(*[cb2d(c_) for _ in range(n)])
        self.m = nn.sequential(*[bottleneck(c_, c_, shortcut, g, e=1.0) for _ in range(n)])

    def forward(self, x):
        out = torch.cat((self.m(self.cv1(self.gc(x))), self.cv2(self.gc(x))), dim=1)
        out = self.cv3(out)
        return out

class gcbottleneck(nn.module):
    # standard bottleneck
    def __init__(self, c1, c2, shortcut=true, g=1, e=0.5):  # ch_in, ch_out, shortcut, groups, expansion
        super().__init__()
        c_ = int(c2 * e)  # hidden channels
        self.cv1 = conv(c1, c_, 1, 1)
        self.gc = cb2d(c1)
        self.cv2 = conv(c_, c2, 3, 1, g=g)
        self.add = shortcut and c1 == c2

    def forward(self, x):
        return x + self.cv2(self.gc(self.cv1(x))) if self.add else self.cv2(self.gc(self.cv1(x)))
        # 注意到这里的self.gc有两个,就分别对应于c3gc结构图的两个分支,如果想要只融合一个分支便删掉一个self.gc即可。
另外项目的data-tricks目录结构如下所示:( 之所以要新建文件,是为了方便,清晰的分辨哪些创新点,而不是一股脑都放在一个文件中)
3.2 创建一个yolov5s-gc.yaml文件
本实验以yolov5s作为基础模型,其他的yolov5模型类似。需要注意到,新建的文件一般存放于models文件夹下,另外需要修改文件中的nc(即为类别数目,根据自己的数据集来),其代码如下所示:
# yolov5 🚀 by ultralytics, gpl-3.0 license

# parameters
nc: 4  # number of classes
depth_multiple: 0.33  # model depth multiple
width_multiple: 0.50  # layer channel multiple
anchors:
  - [10,13, 16,30, 33,23]  # p3/8  小目标
  - [30,61, 62,45, 59,119]  # p4/16 中目标
  - [116,90, 156,198, 373,326]  # p5/32  大目标

# yolov5 v6.0 backbone
backbone:
  # [from, number, module, args]
  [[-1, 1, conv, [64, 6, 2, 2]],  # 0-p1/2  output_channel, kernel_size, stride, padding
   [-1, 1, conv, [128, 3, 2]],  # 1-p2/4
   [-1, 3, c3gc, [128]],
   [-1, 1, conv, [256, 3, 2]],  # 3-p3/8
   [-1, 6, c3gc, [256]],
   [-1, 1, conv, [512, 3, 2]],  # 5-p4/16
   [-1, 9, c3gc, [512]],
   [-1, 1, conv, [1024, 3, 2]],  # 7-p5/32
   [-1, 3, c3gc, [1024]],
   [-1, 1, sppf, [1024, 5]],  # 9
  ]

# yolov5 v6.0 head
head:
  [[-1, 1, conv, [512, 1, 1]],
   [-1, 1, nn.upsample, [none, 2, 'nearest']],
   [[-1, 6], 1, concat, [1]],  # cat backbone p4
   [-1, 3, c3, [512, false]],  # 13

   [-1, 1, conv, [256, 1, 1]],
   [-1, 1, nn.upsample, [none, 2, 'nearest']],
   [[-1, 4], 1, concat, [1]],  # cat backbone p3
   [-1, 3, c3, [256, false]],  # 17 (p3/8-small)

   [-1, 1, conv, [256, 3, 2]],
   [[-1, 14], 1, concat, [1]],  # cat head p4
   [-1, 3, c3, [512, false]],  # 20 (p4/16-medium)

   [-1, 1, conv, [512, 3, 2]],
   [[-1, 10], 1, concat, [1]],  # cat head p5
   [-1, 3, c3, [1024, false]],  # 23 (p5/32-large)

   [[17, 20, 23], 1, detect, [nc, anchors]],  # detect(p3, p4, p5)
  ]
注意到,这里是使用四个c3gc替换了原本的c3结构,具体替换多少,可以自行尝试。
3.3 在yolo.py文件中引入c3gc
在models文件夹下的yolo.py文件如下图的位置中,引入c3gc并在头文件部分主动添加如下引入代码。
在yolo.py最上面添加如下代码:
from data.tricks.c3gc import c3gc
然后将c3gc添加到yolo.py文件中如图所示的位置,一共是两个地方:
3.4 在train.py文件中修改配置文件
在train.py文件中将配置文件修改为yolov5s-gc.yaml,如下图所示:

4. 本篇小结
本篇博客主要介绍了c3gc+yolov5的修改详细流程,助力模型高效涨点。另外,在修改过程中,要是有任何问题,评论区交流;如果博客对您有帮助,请帮忙点个赞,收藏一下;后续会持续更新本人实验当中觉得有用的点子,如果很感兴趣的话,可以关注一下,谢谢大家啦!


发表评论