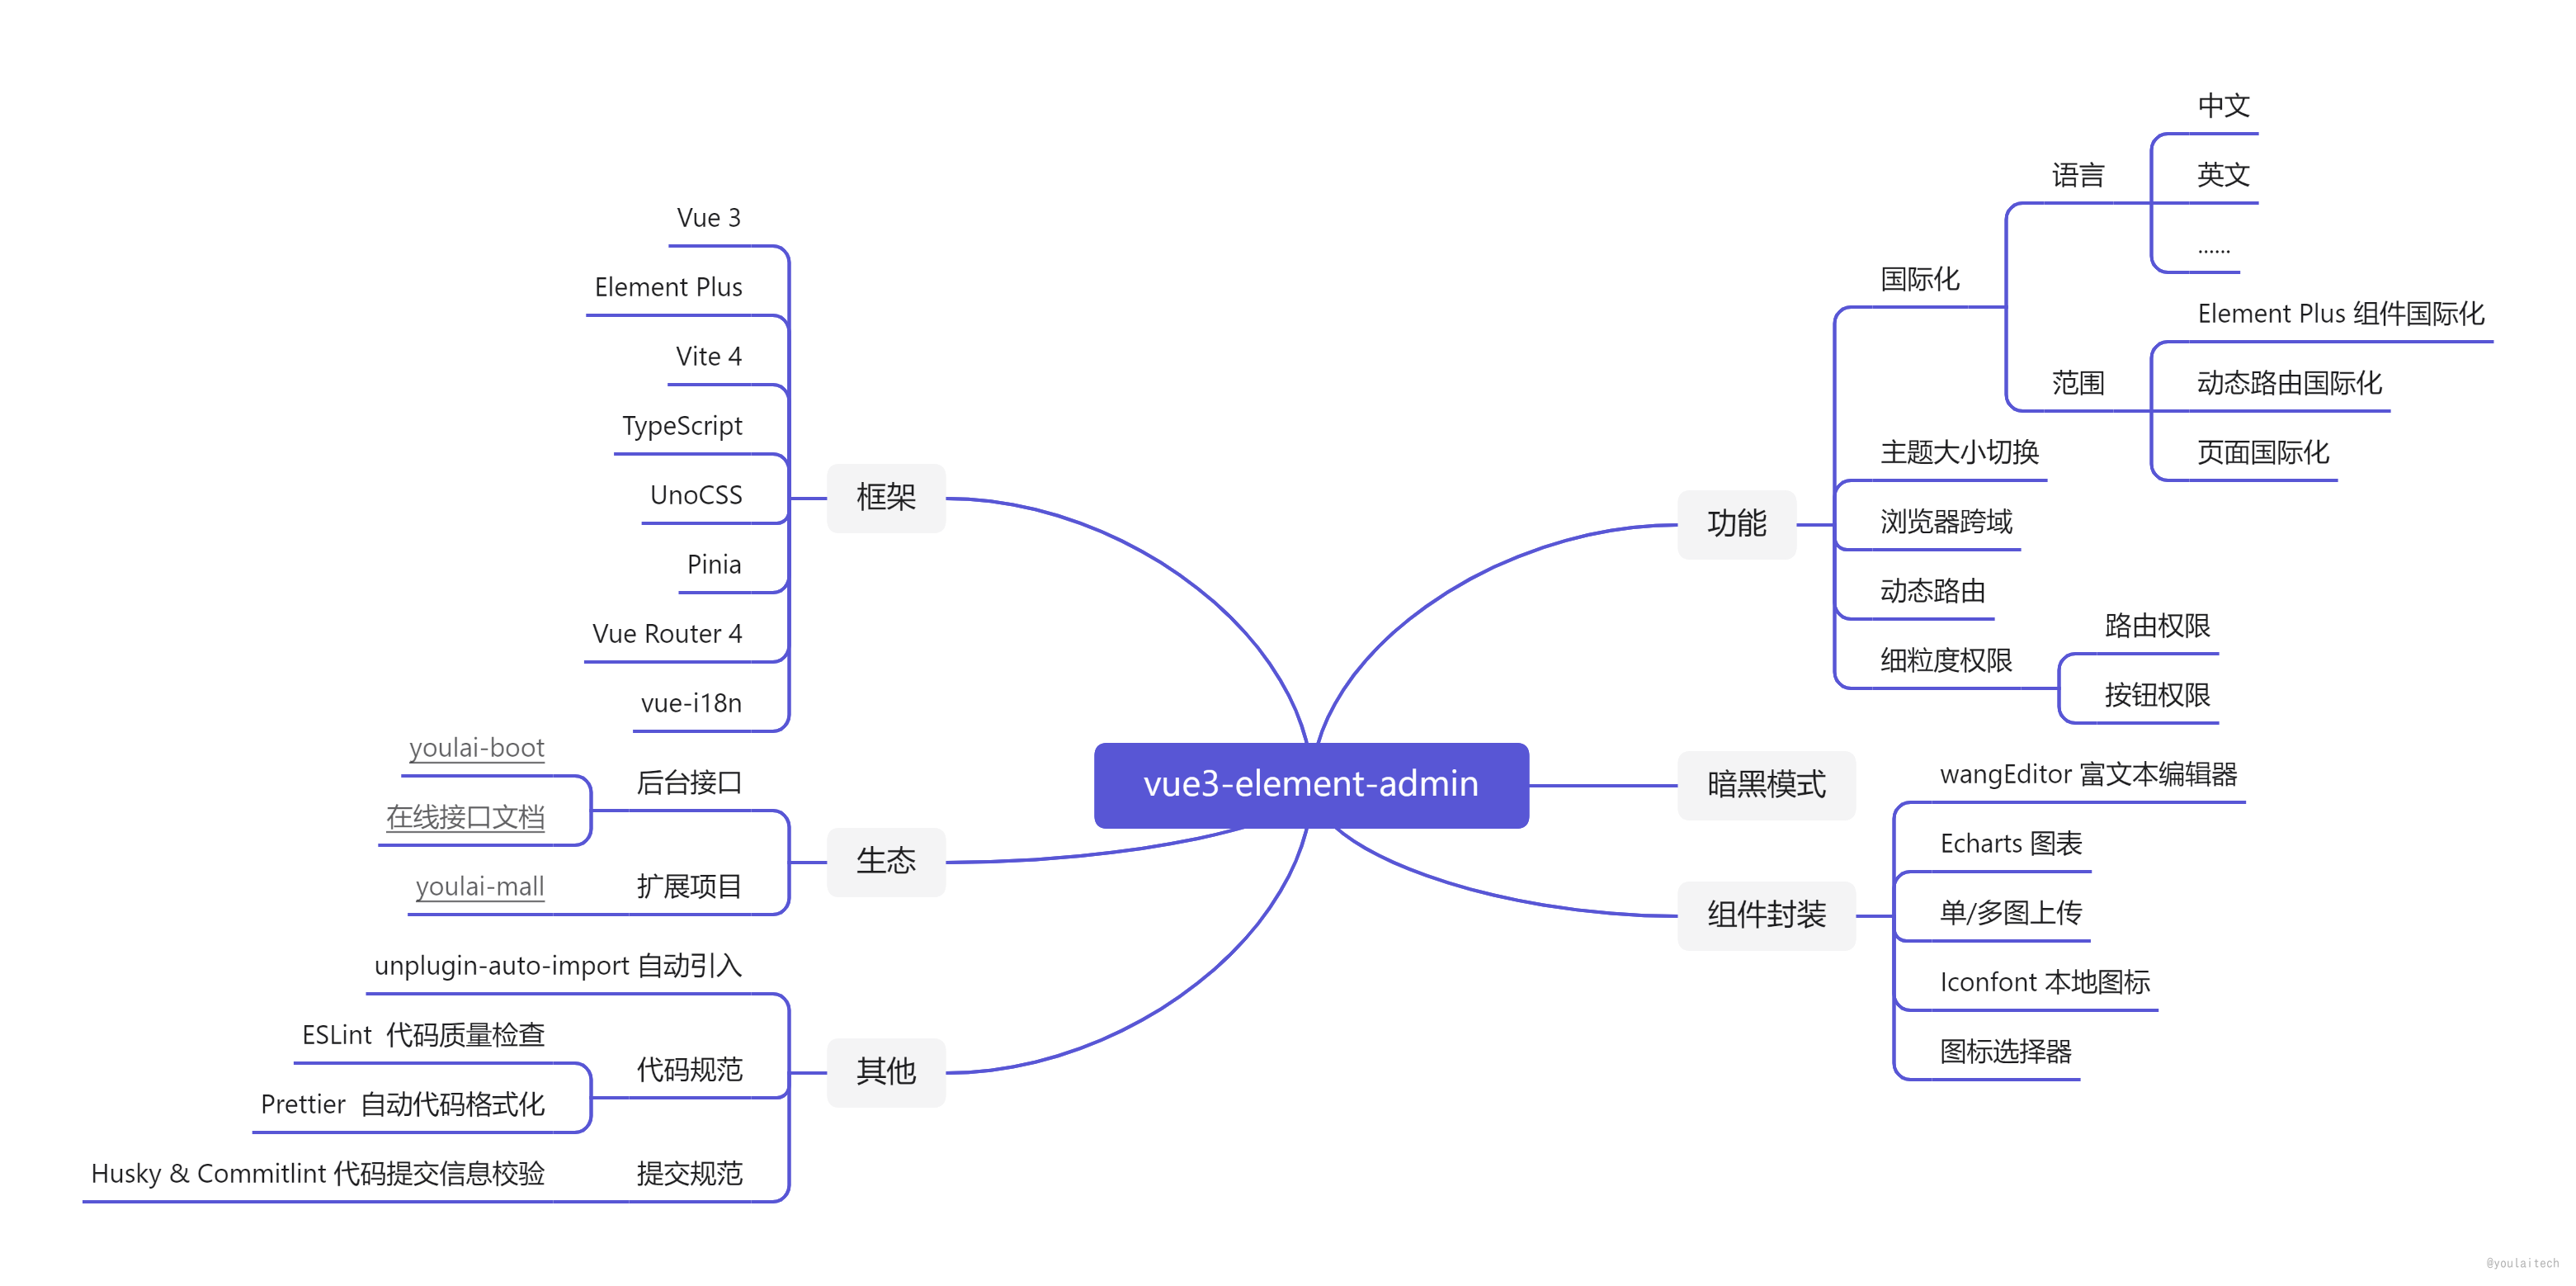
前言
本篇是 vue3-element-admin v2.x 版本从 0 到 1,相较于 主要增加了对原子css(unocss)、按需自动导入、暗黑模式的支持。
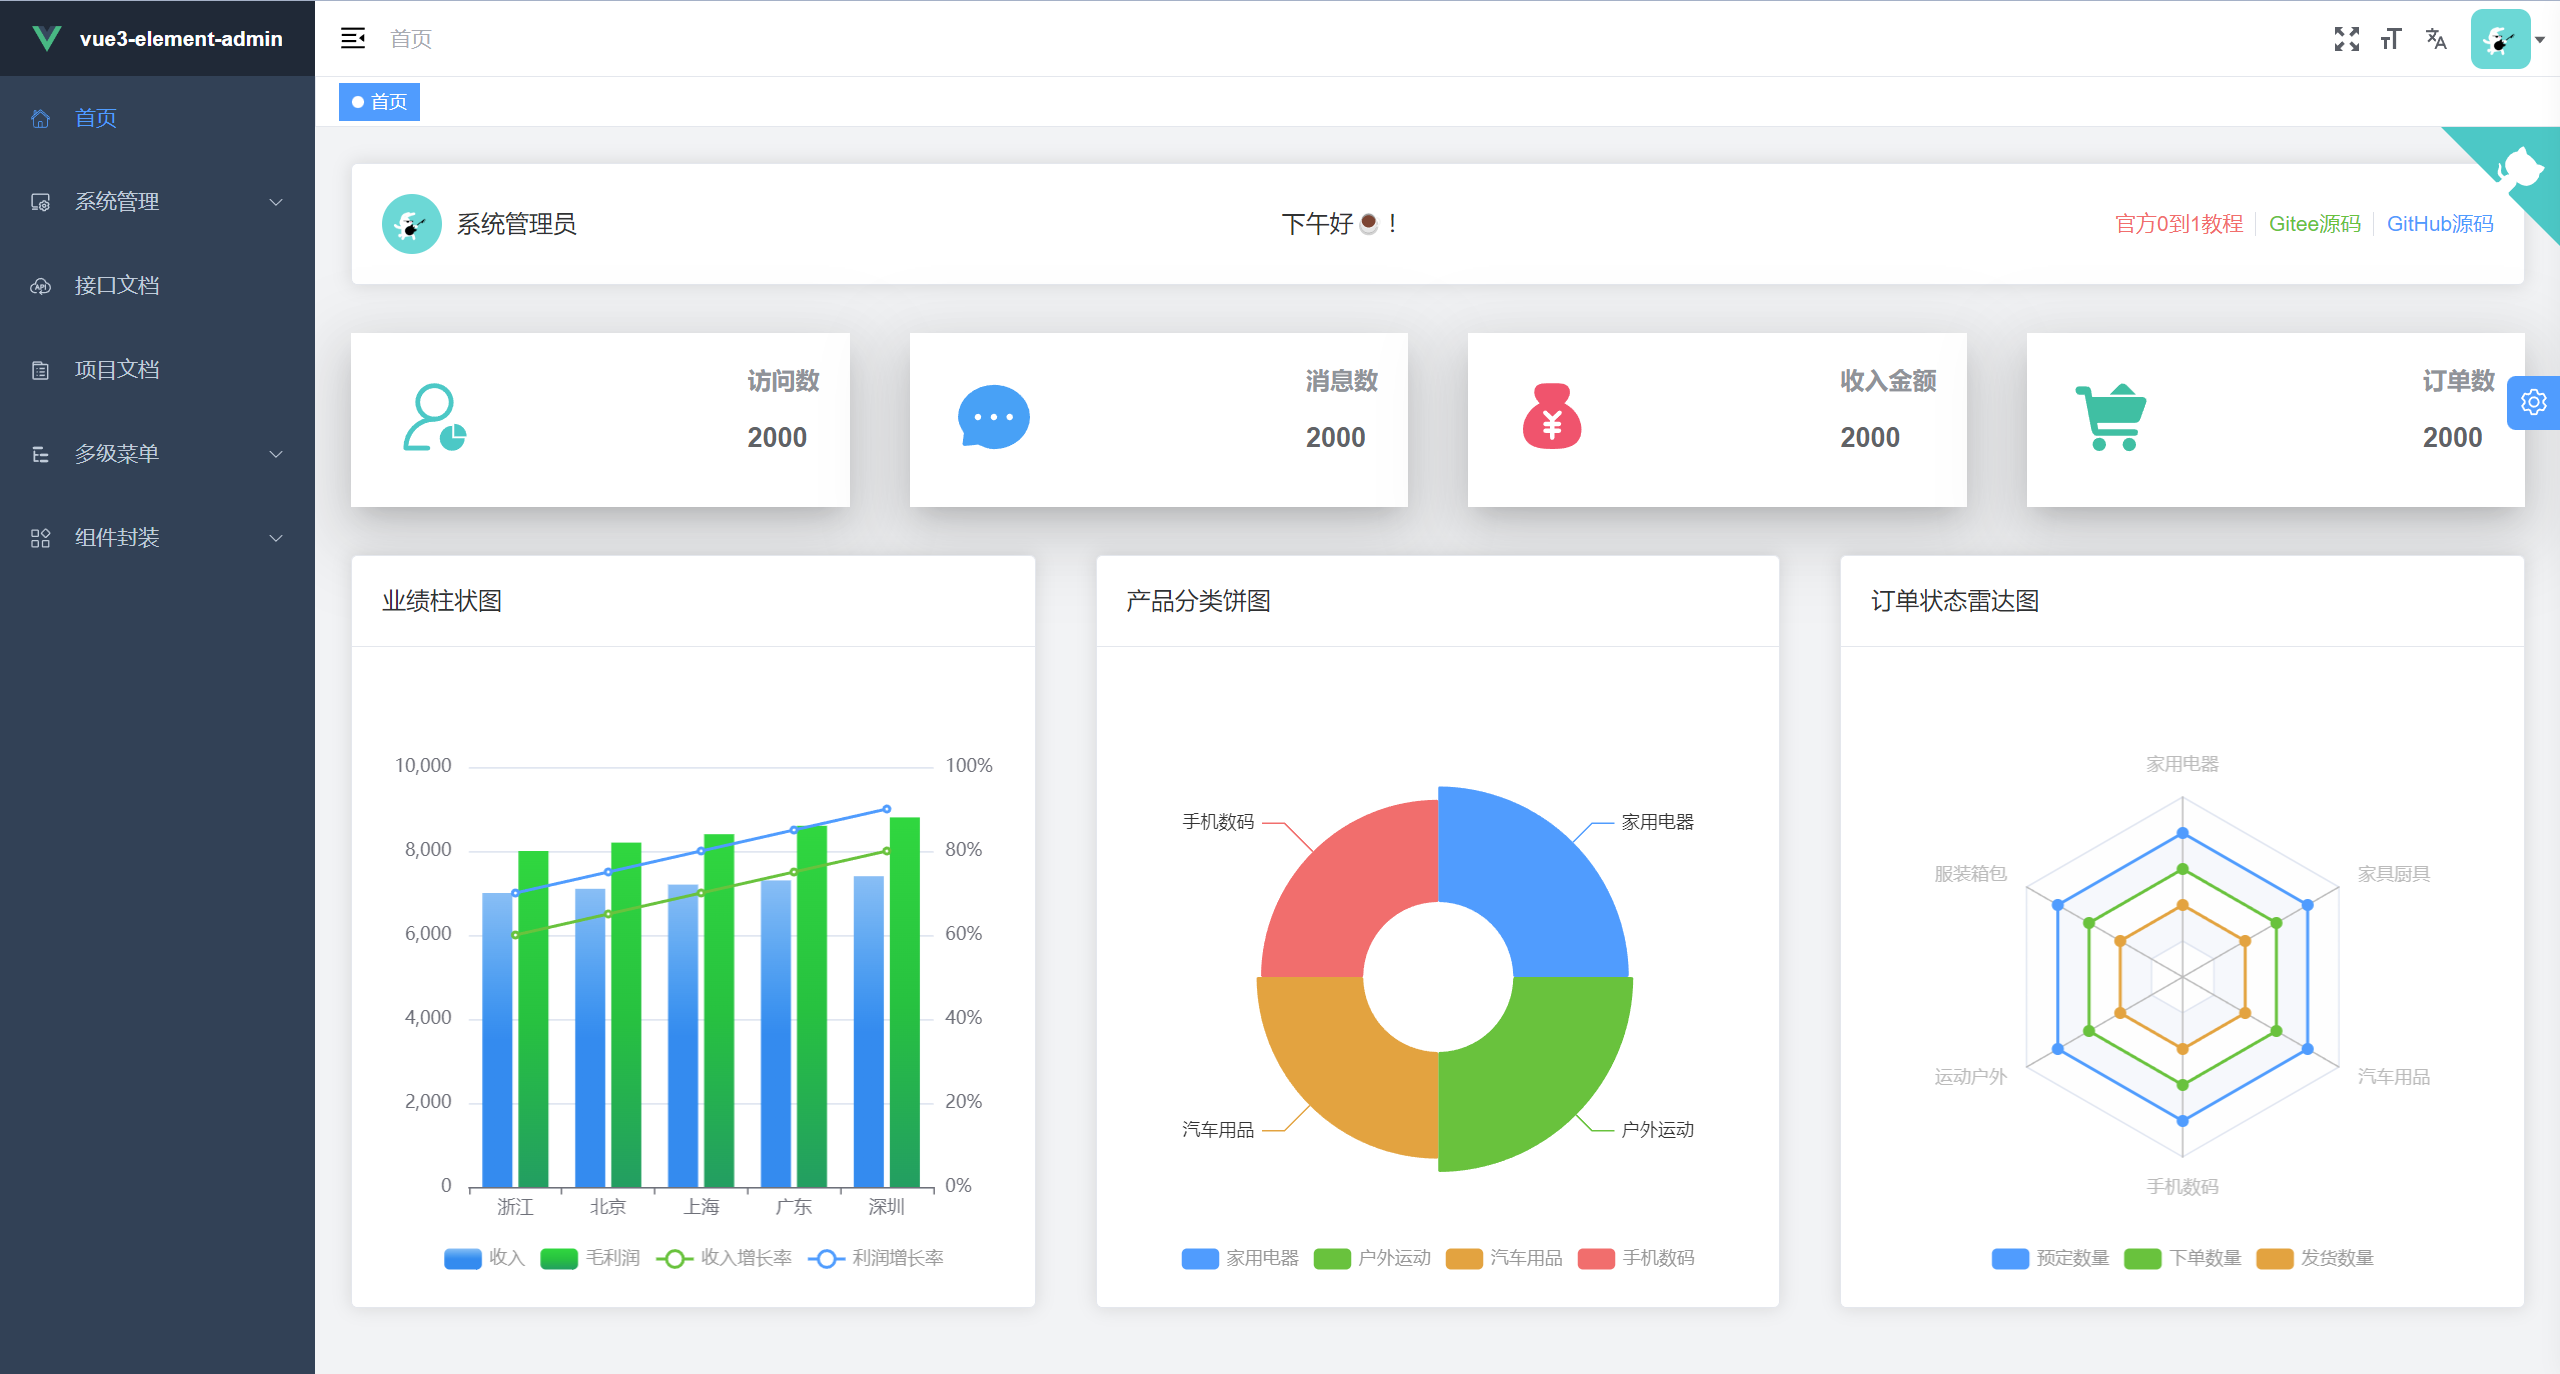
项目预览
在线预览
首页控制台
 |
|---|
 |
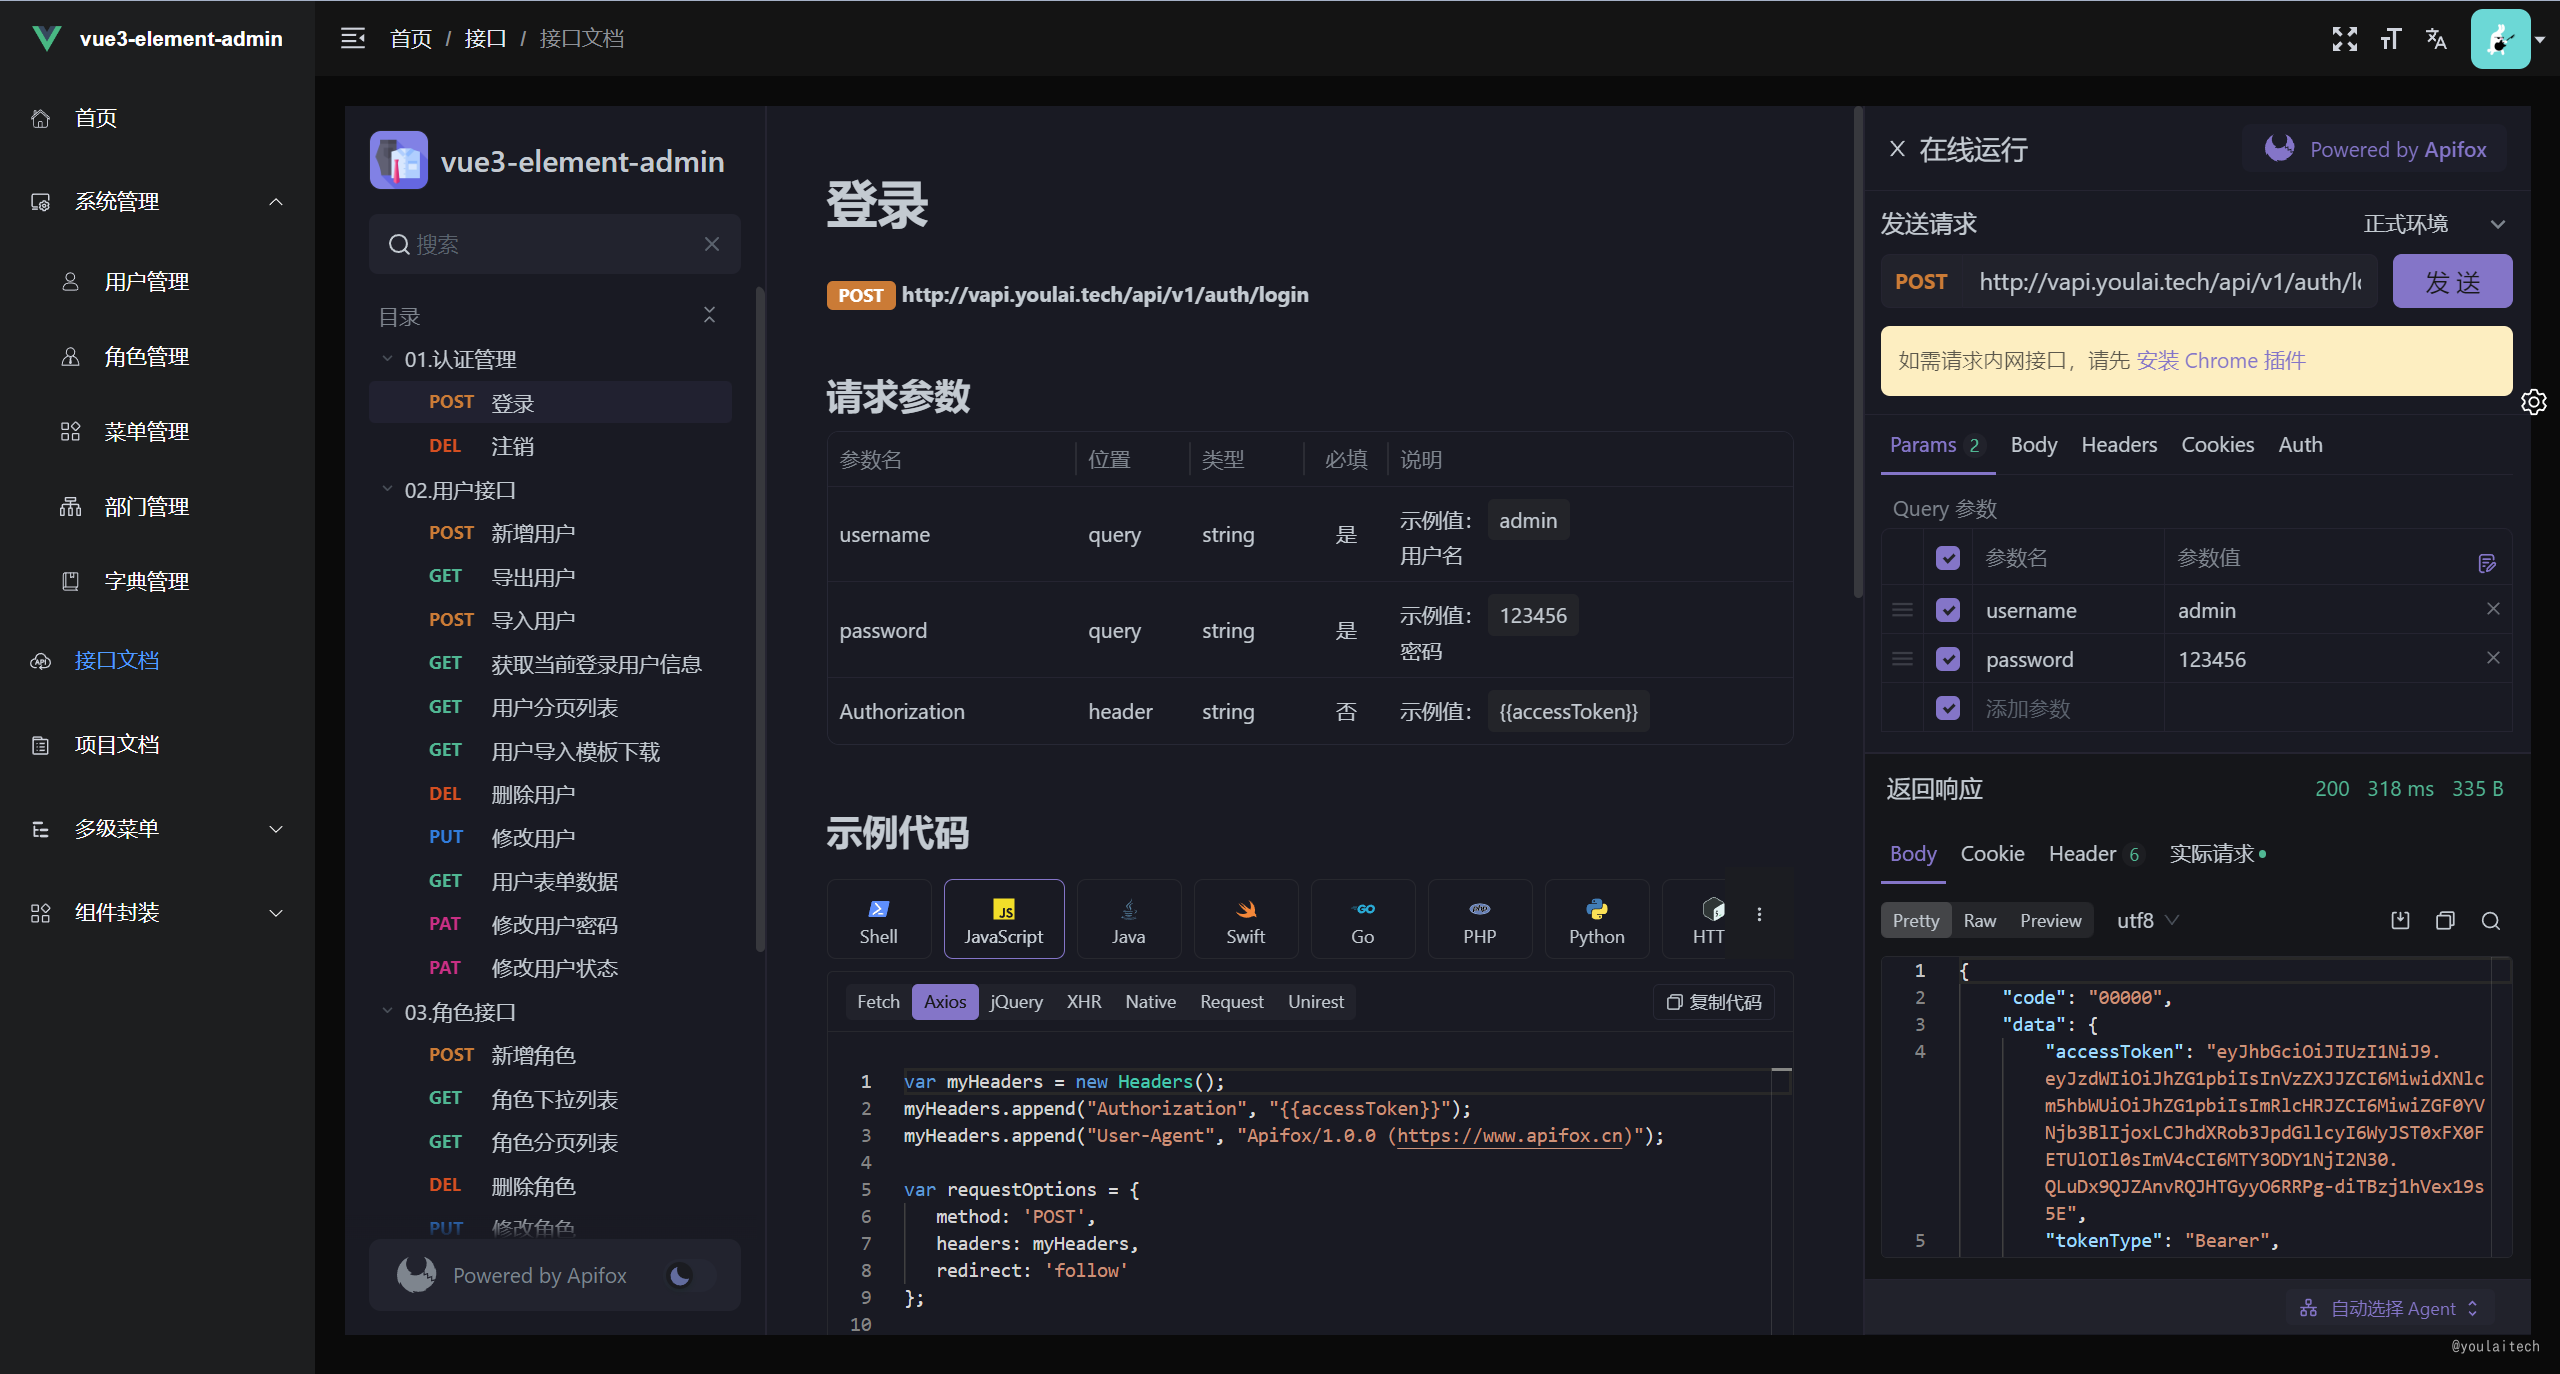
接口文档
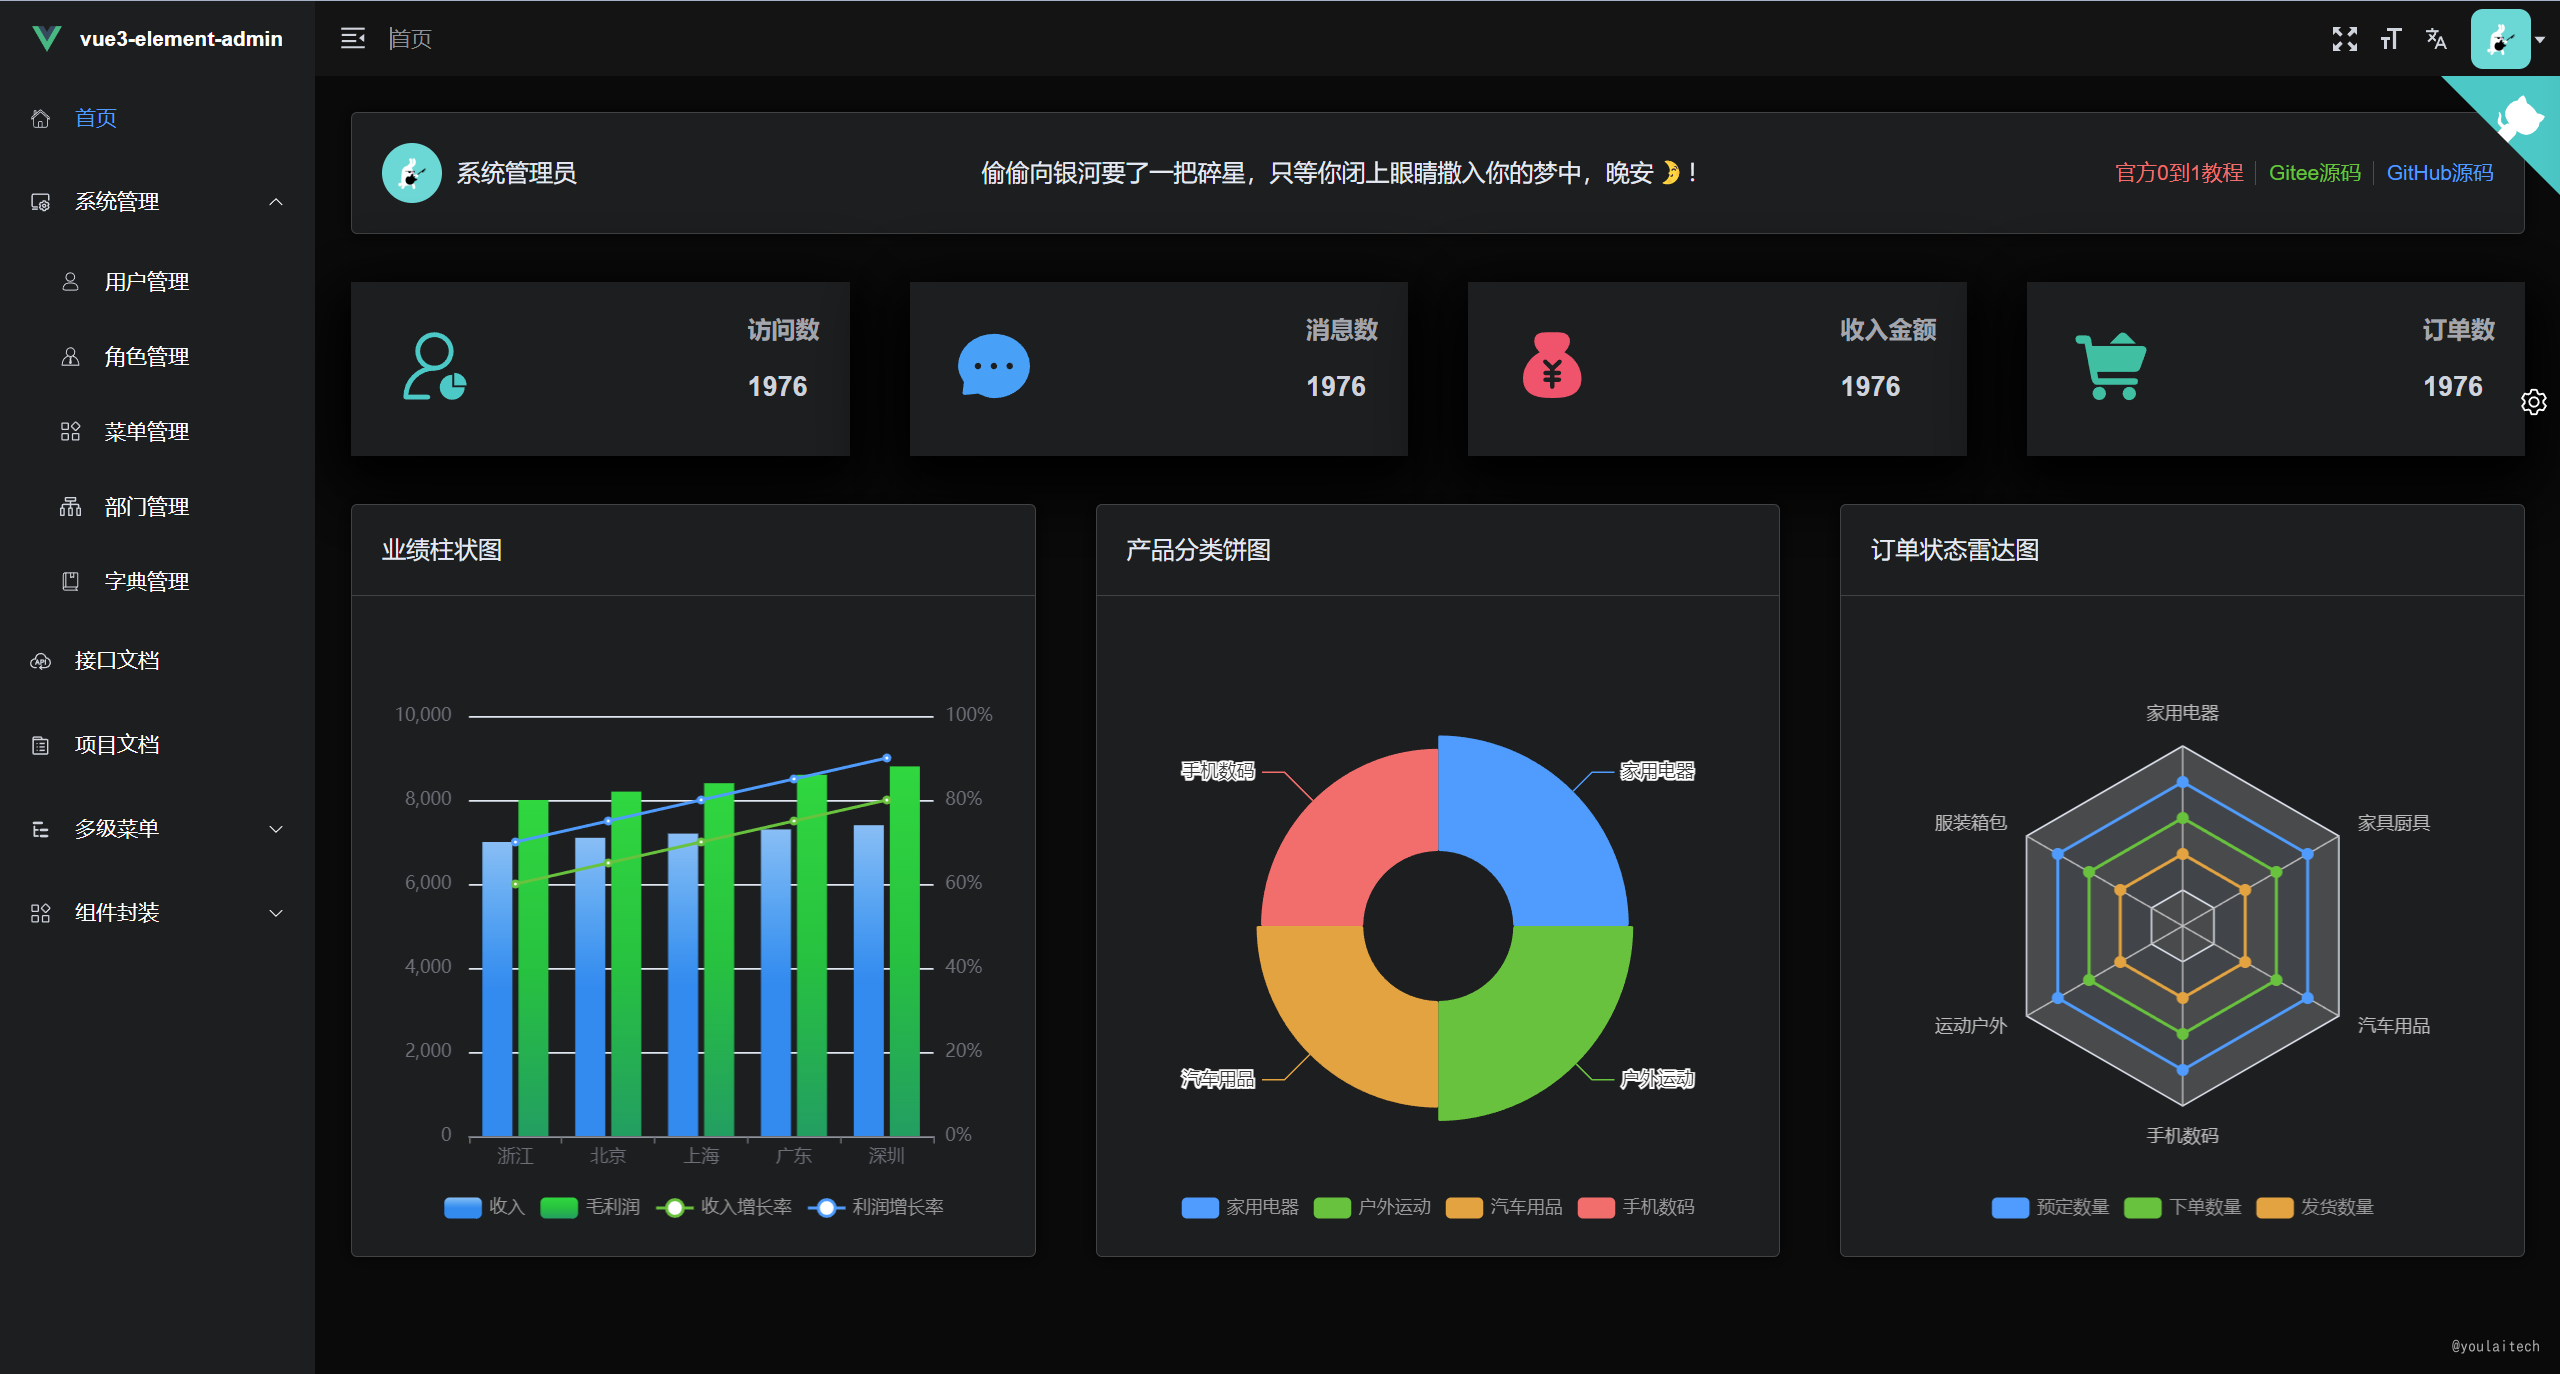
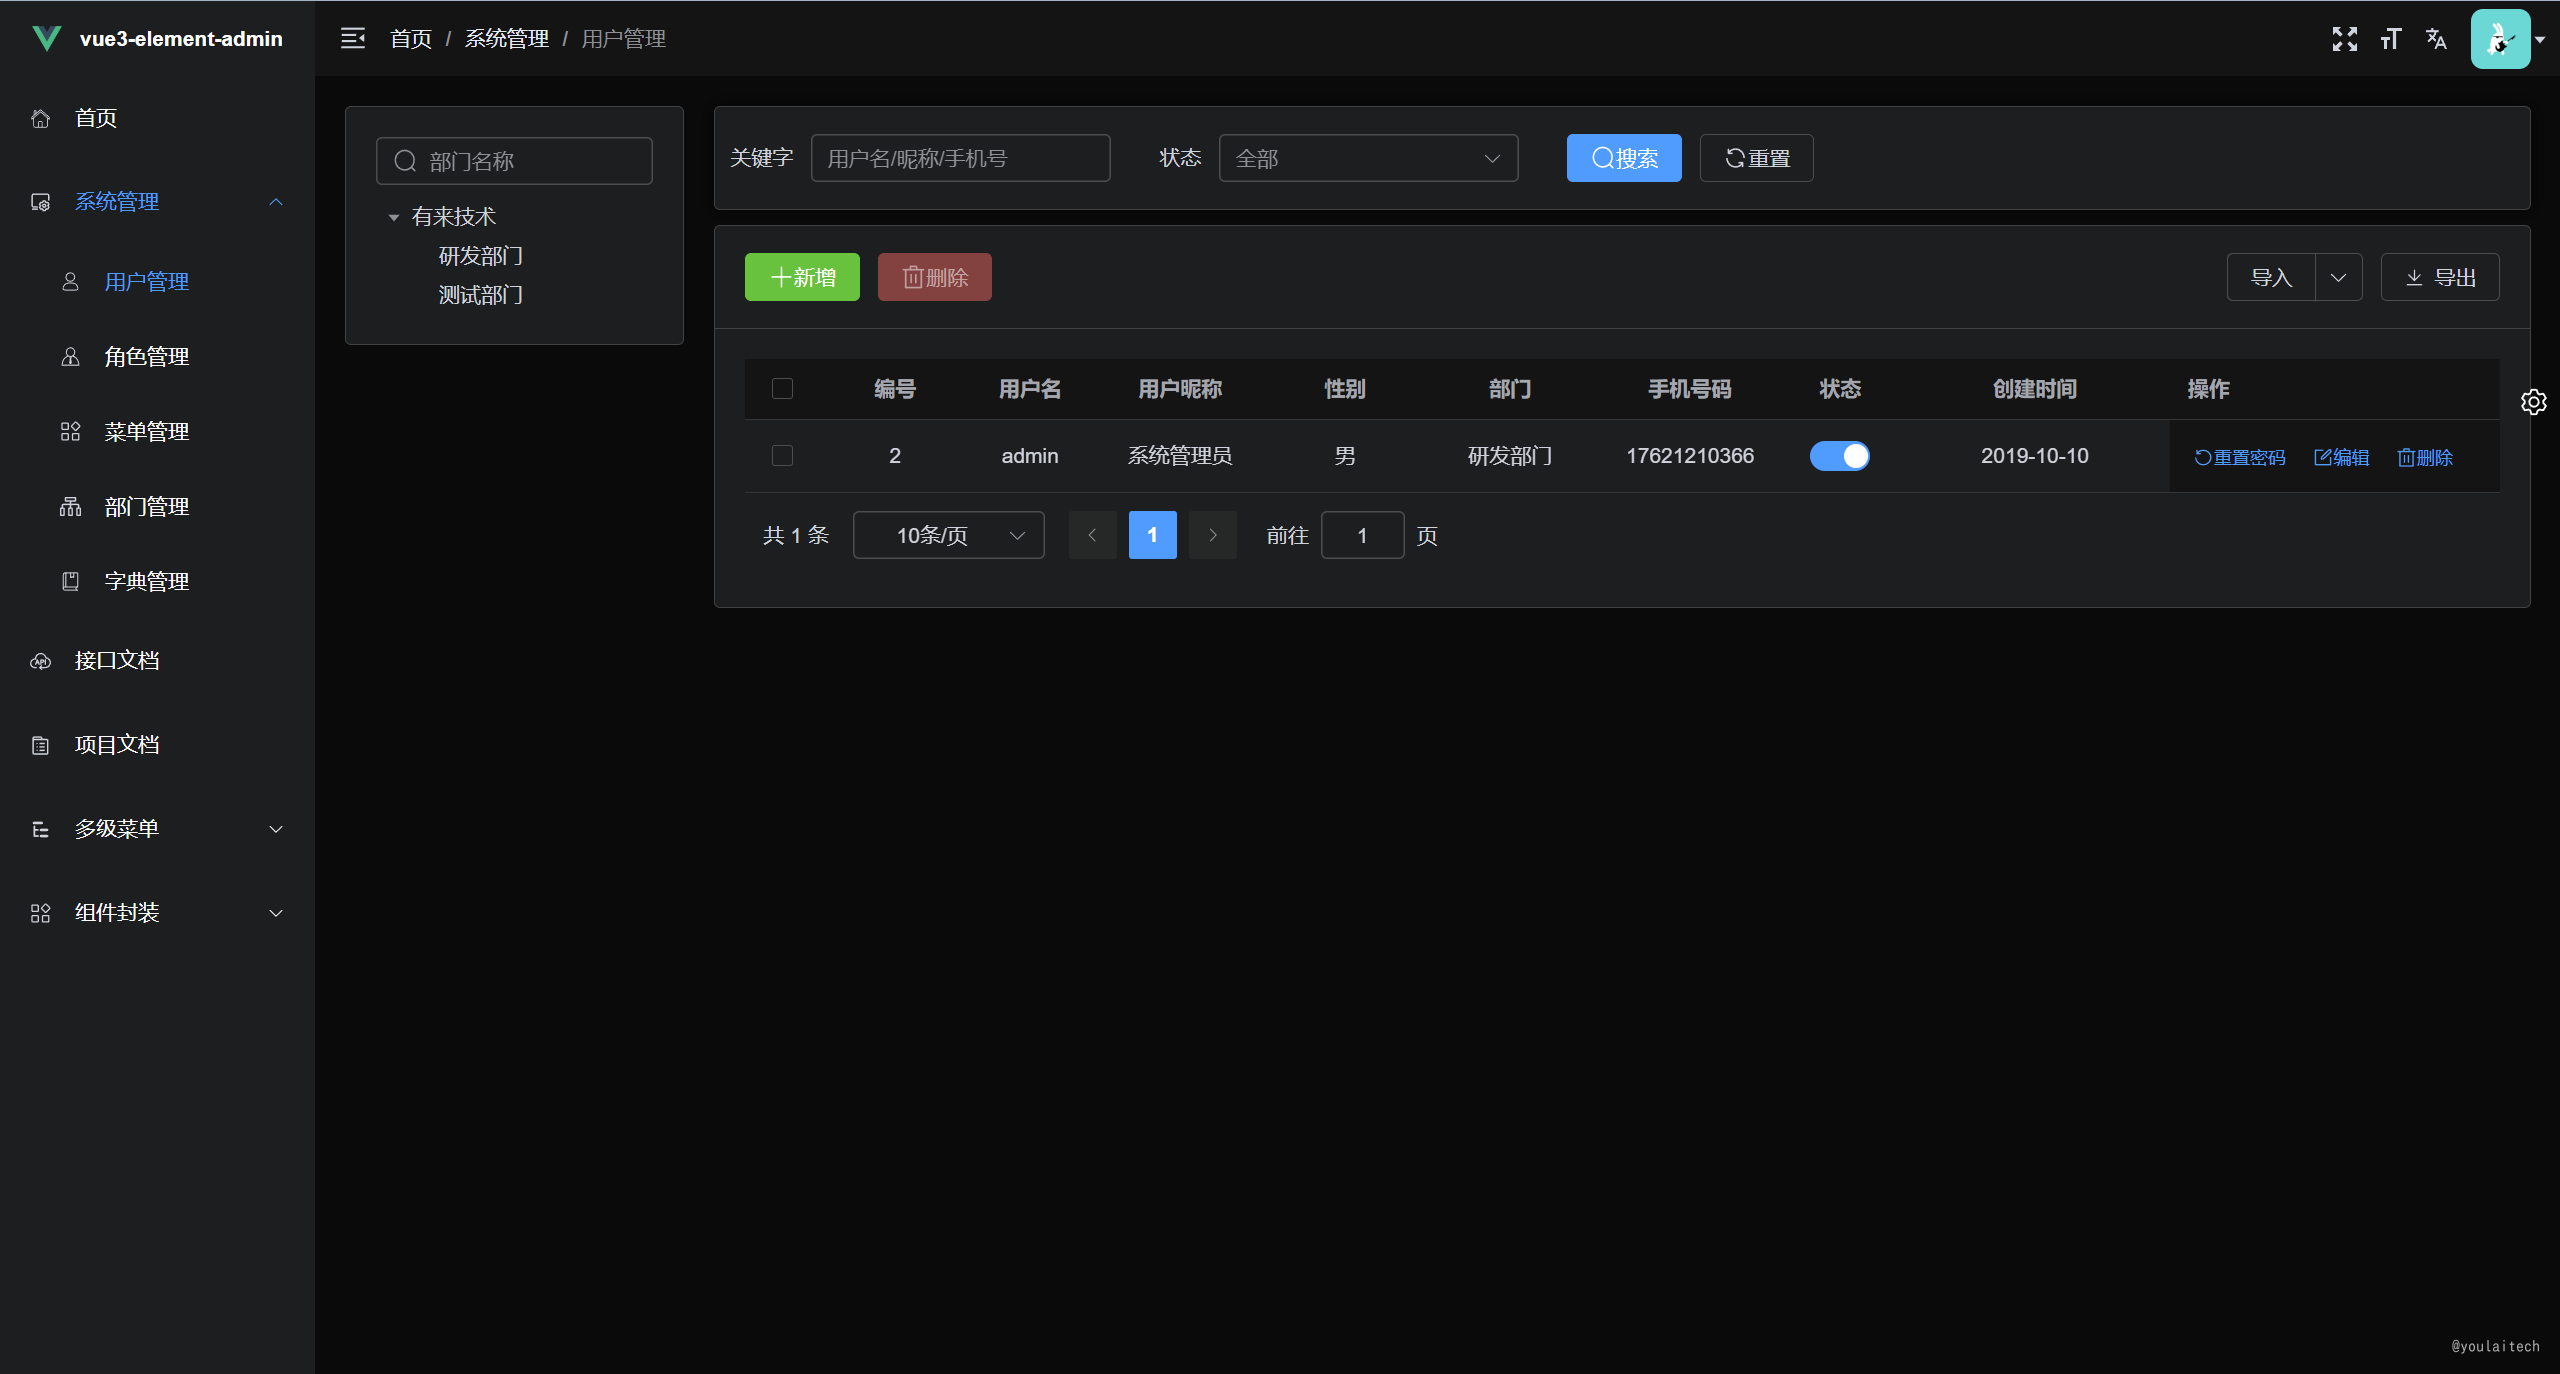
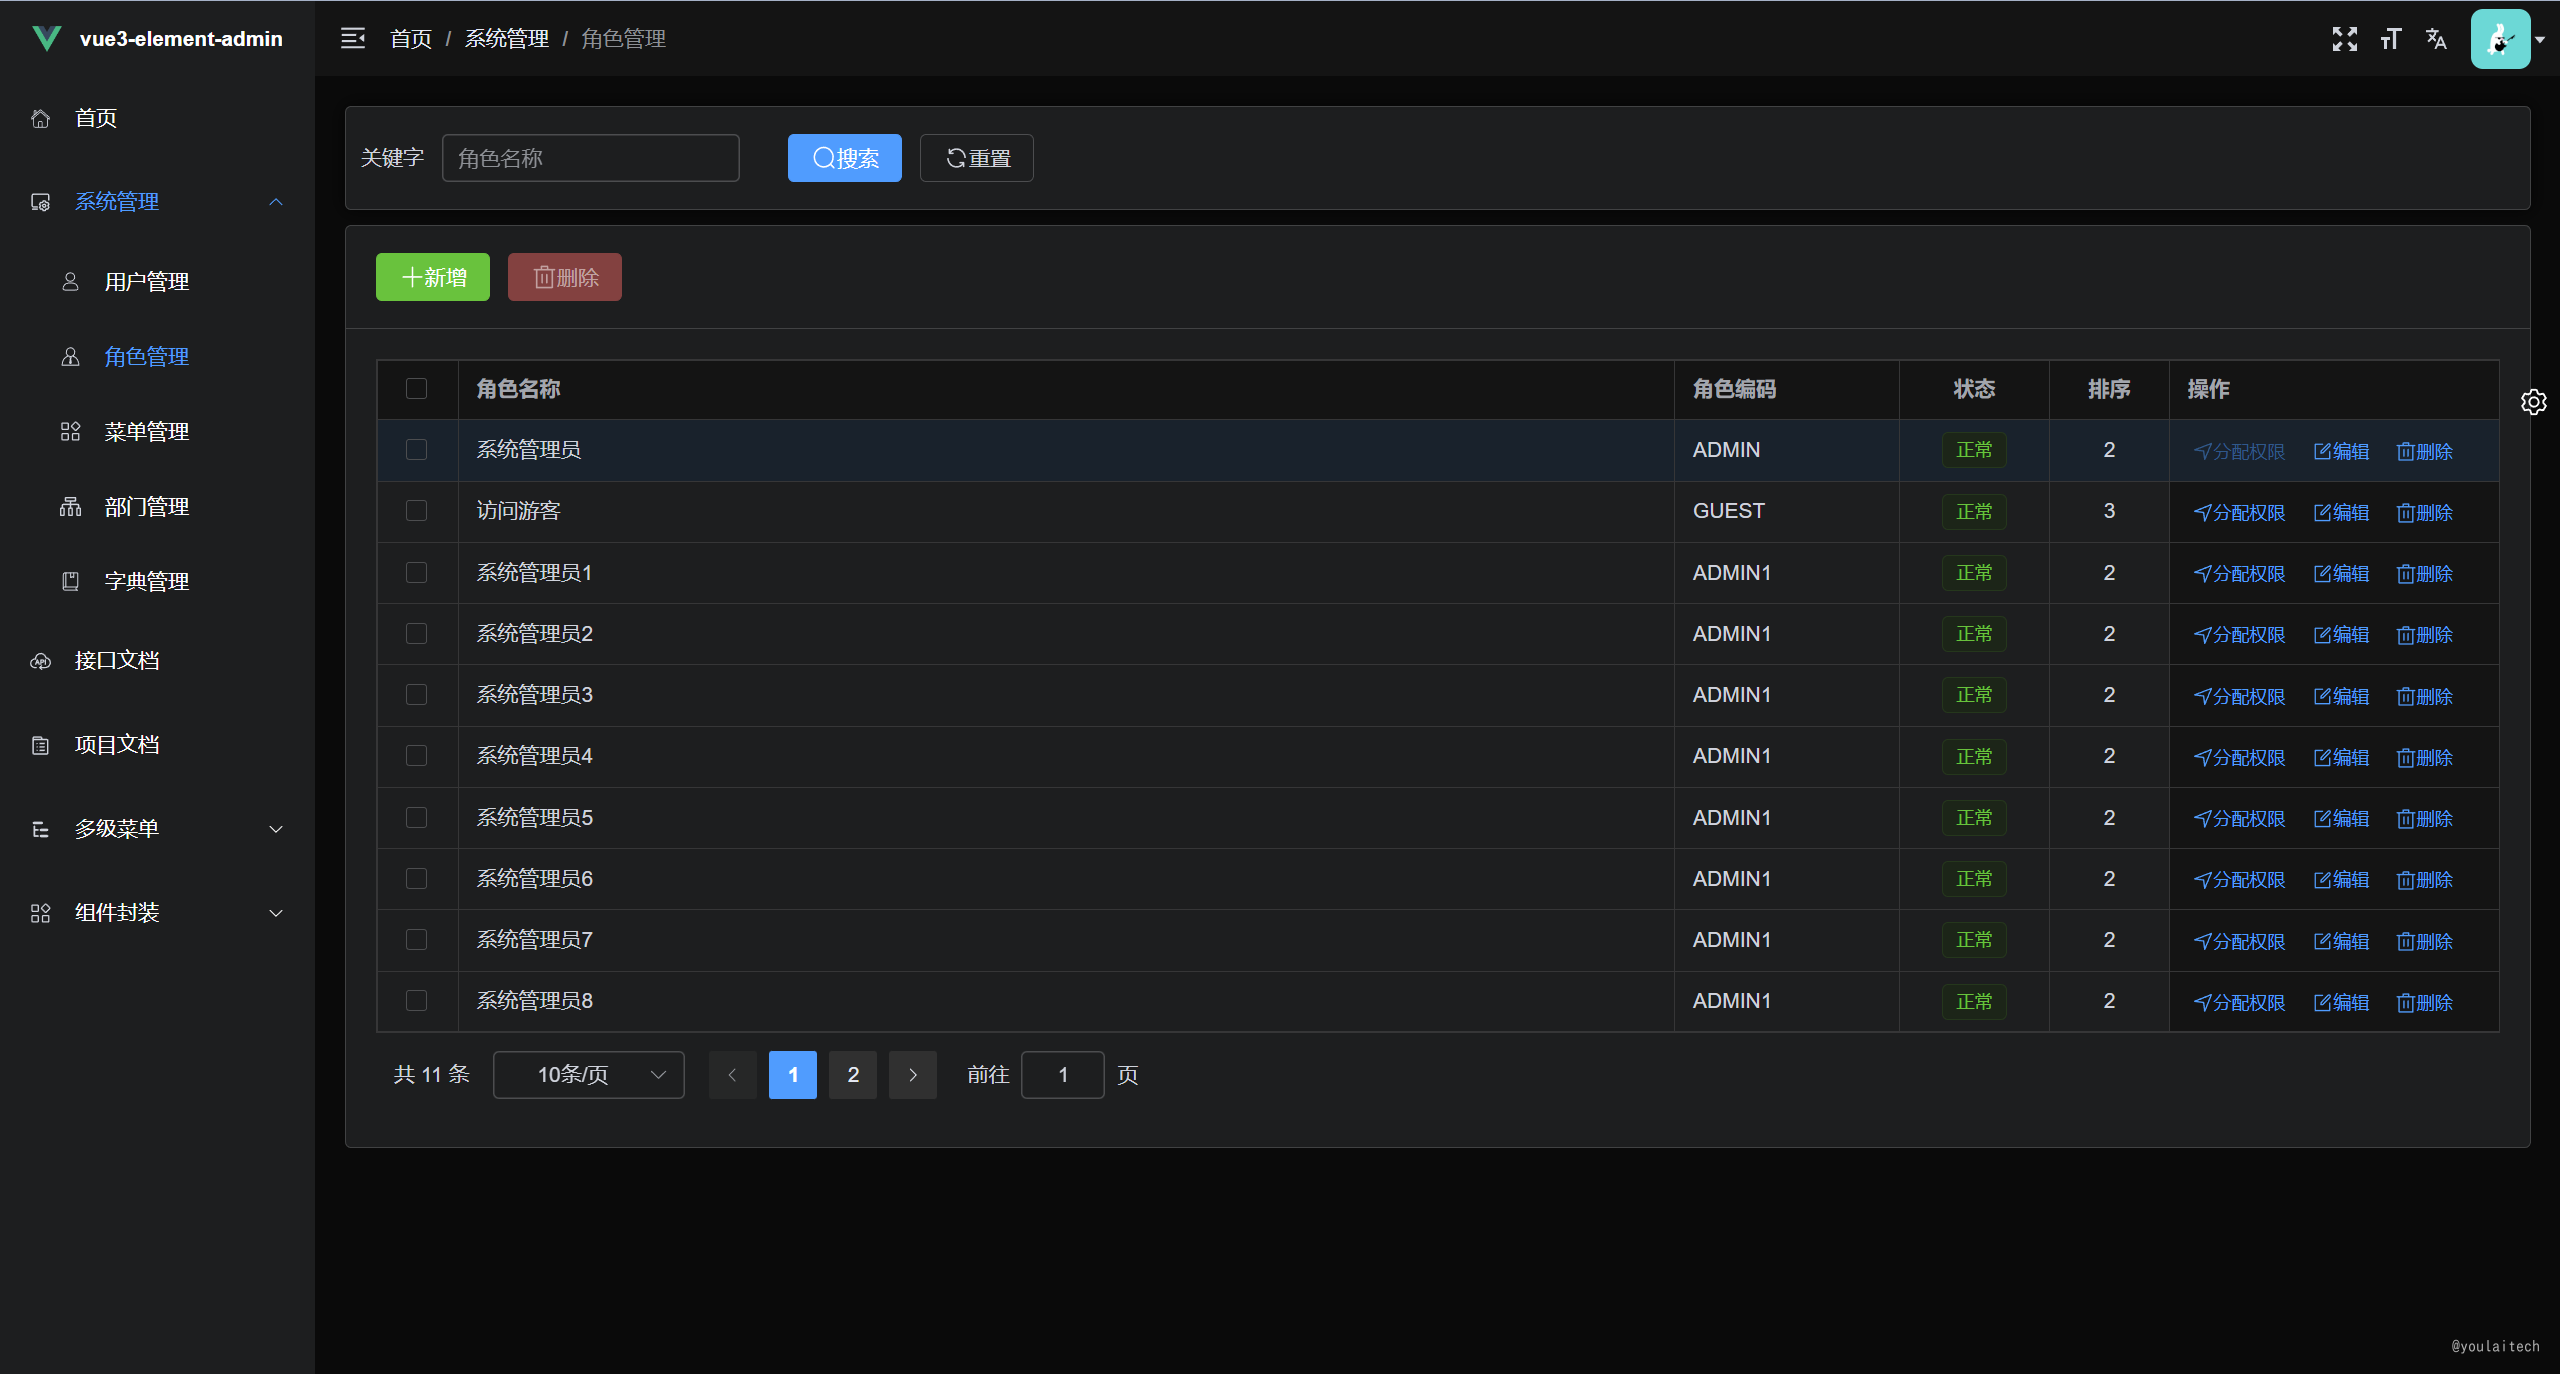
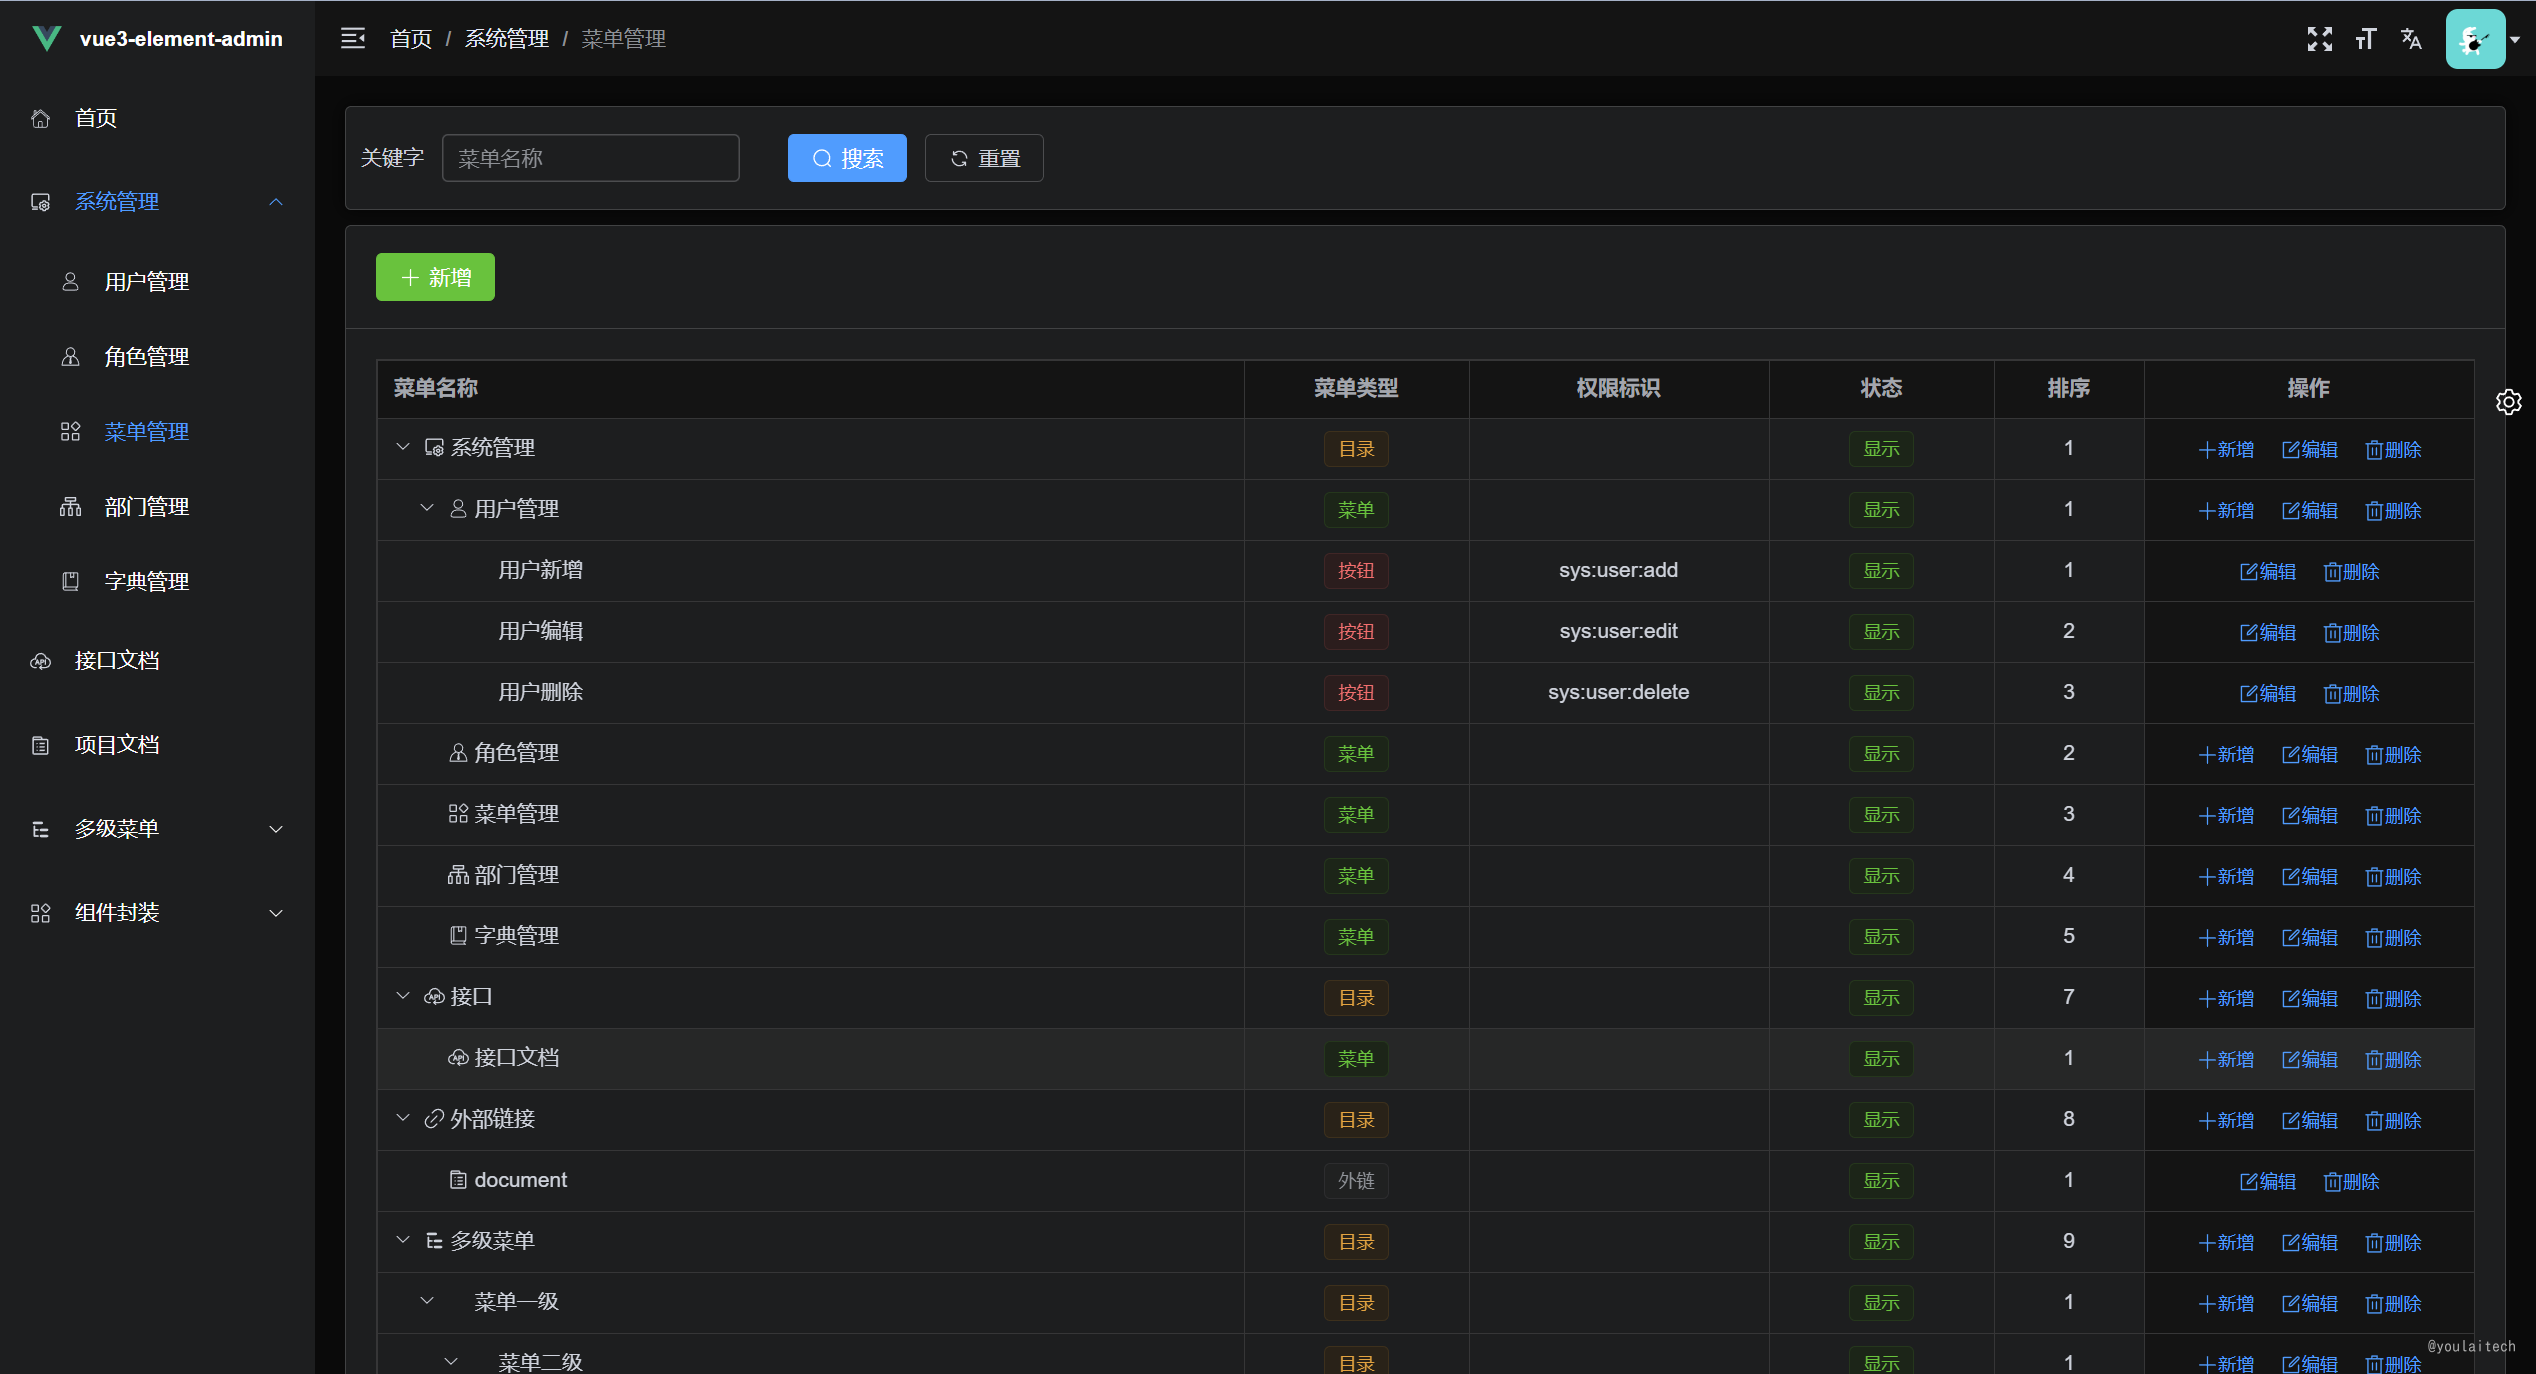
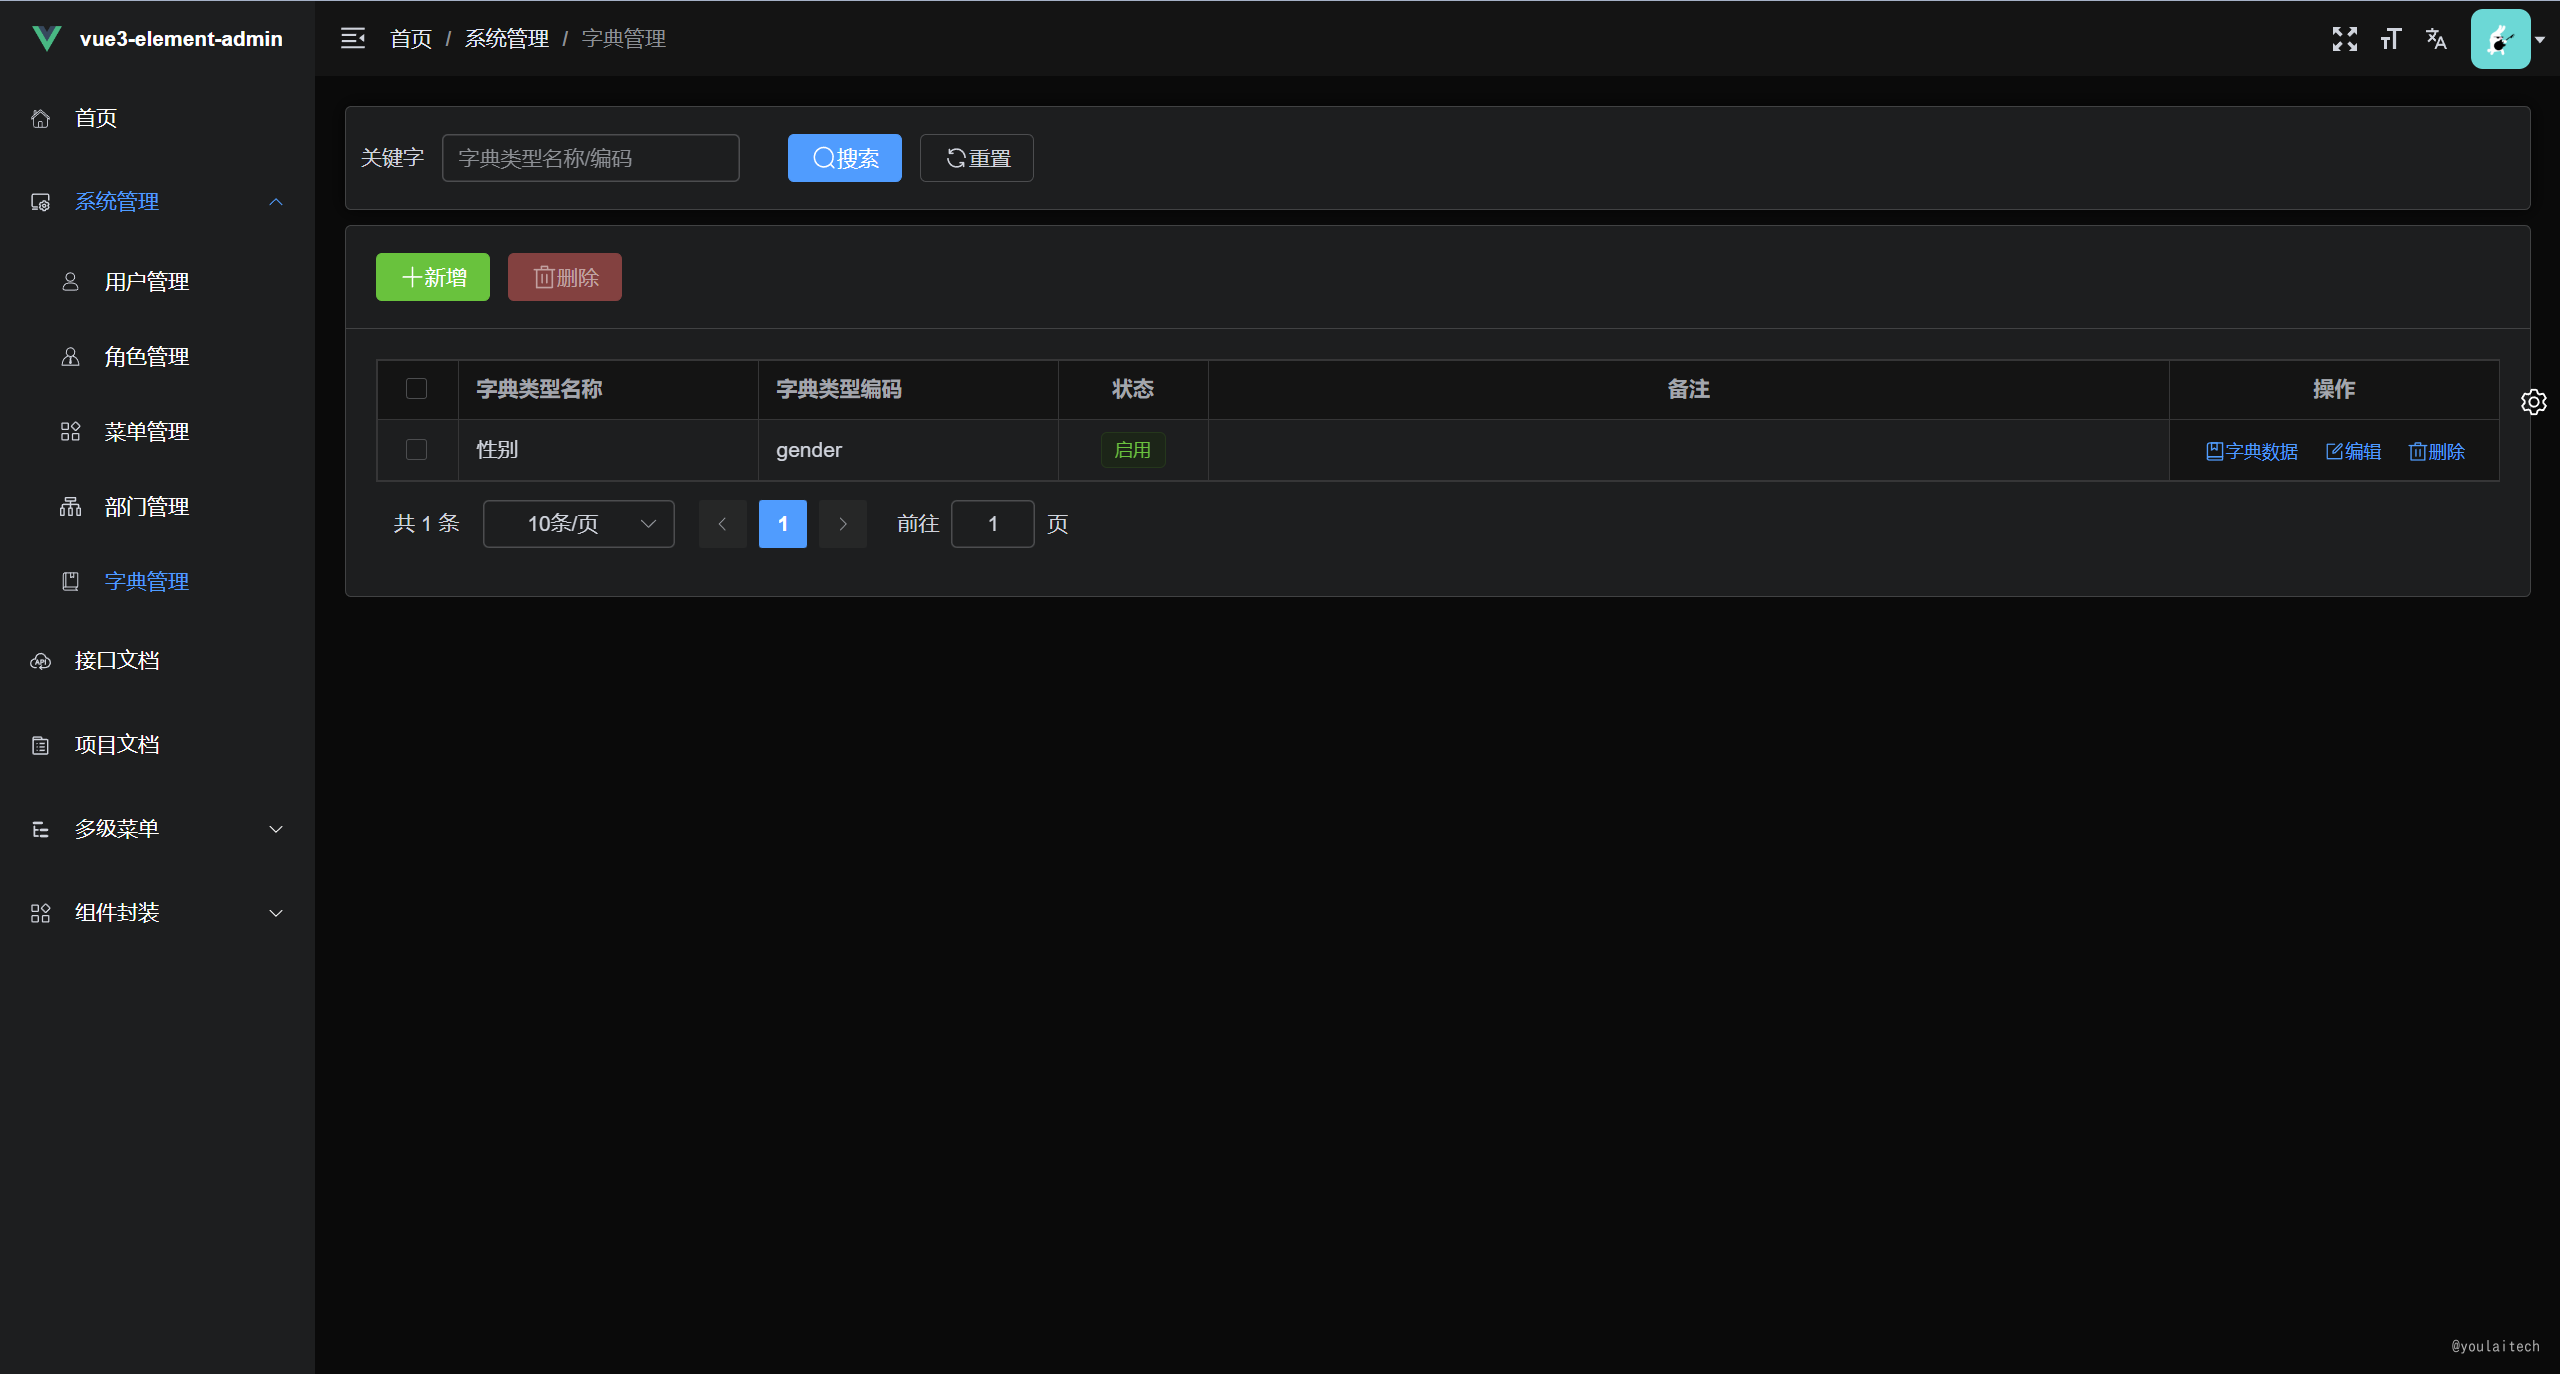
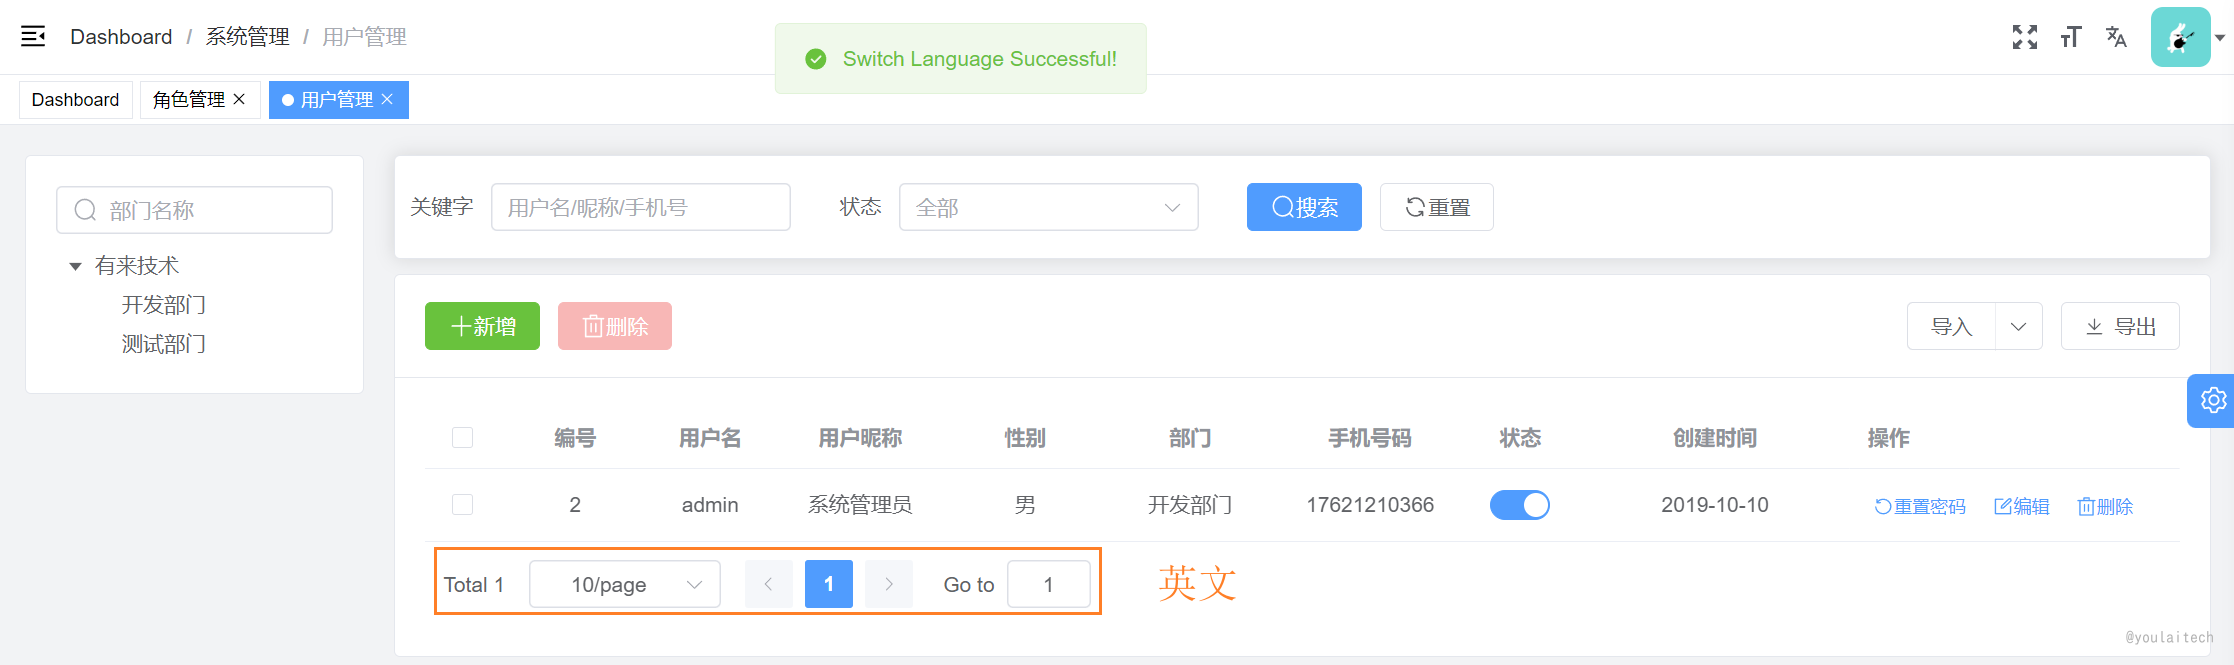
权限管理系统
 |  |
|---|---|
 |  |
扩展生态
youlai-mall 有来开源商城:spring cloud微服务+ vue3-element-admin+uni-app
| youlai-mall 商品管理 | mall-app 移动端 |
|---|---|
 |  |
项目指南
功能清单
技术栈&官网
| 技术栈 | 描述 | 官网 |
|---|---|---|
| vue3 | 渐进式 javascript 框架 | https://cn.vuejs.org/ |
| element plus | 基于 vue 3,面向设计师和开发者的组件库 | https://element-plus.gitee.io/zh-cn/ |
| vite | 前端开发与构建工具 | https://cn.vitejs.dev/ |
| typescript | 微软新推出的一种语言,是 javascript 的超集 | https://www.tslang.cn/ |
| pinia | 新一代状态管理工具 | https://pinia.vuejs.org/ |
| vue router | vue.js 的官方路由 | https://router.vuejs.org/zh/ |
| wangeditor | typescript 开发的 web 富文本编辑器 | https://www.wangeditor.com/ |
| echarts | 一个基于 javascript 的开源可视化图表库 | https://echarts.apache.org/zh/ |
| vue-i18n | vue 国际化多语言插件 | https://vue-i18n.intlify.dev/ |
| vueuse | 基于vue组合式api的实用工具集(类比hutool工具) | http://www.vueusejs.com/ |
前/后端源码
| gitee | github | |
|---|---|---|
| 前端 | vue3-element-admin | vue3-element-admin |
| 后端 | youlai-boot | youlai-boot |
接口文档
- 接口调用地址:https://vapi.youlai.tech
- 接口文档地址:在线接口文档
- openapi 3.0 文档地址:http://vapi.youlai.tech/v3/api-docs
环境准备
| 名称 | 备注 | |
|---|---|---|
| 开发工具 | vscode 下载 | - |
| 运行环境 | node 16+ 下载 | 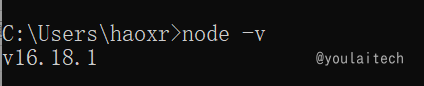 |
| vscode插件(必装) | 插件市场搜索 vue language features (volar) 和 typescript vue plugin (volar) 安装,且禁用 vetur |  |
项目初始化
按照 🍃vite 官方文档 - 搭建第一个 vite 项目 说明,执行以下命令完成 vue 、typescirpt 模板项目的初始化
npm init vite@latest vue3-element-admin --template vue-ts
-
**
vue3-element-admin**: 自定义的项目名称 -
vue-ts:vue+typescript模板的标识,查看 create-vite 以获取每个模板的更多细节:vue,vue-ts,react,react-ts
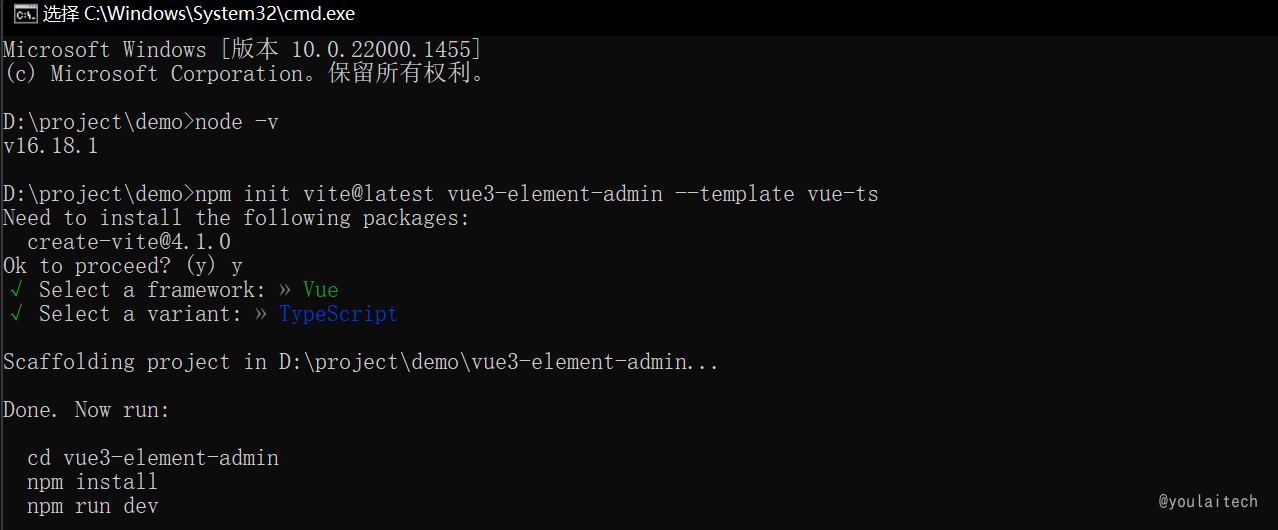
初始化完成项目位于 d:\project\demo\vue3-element-admin , 使用 vscode 导入,执行以下命令启动:
npm install
npm run dev
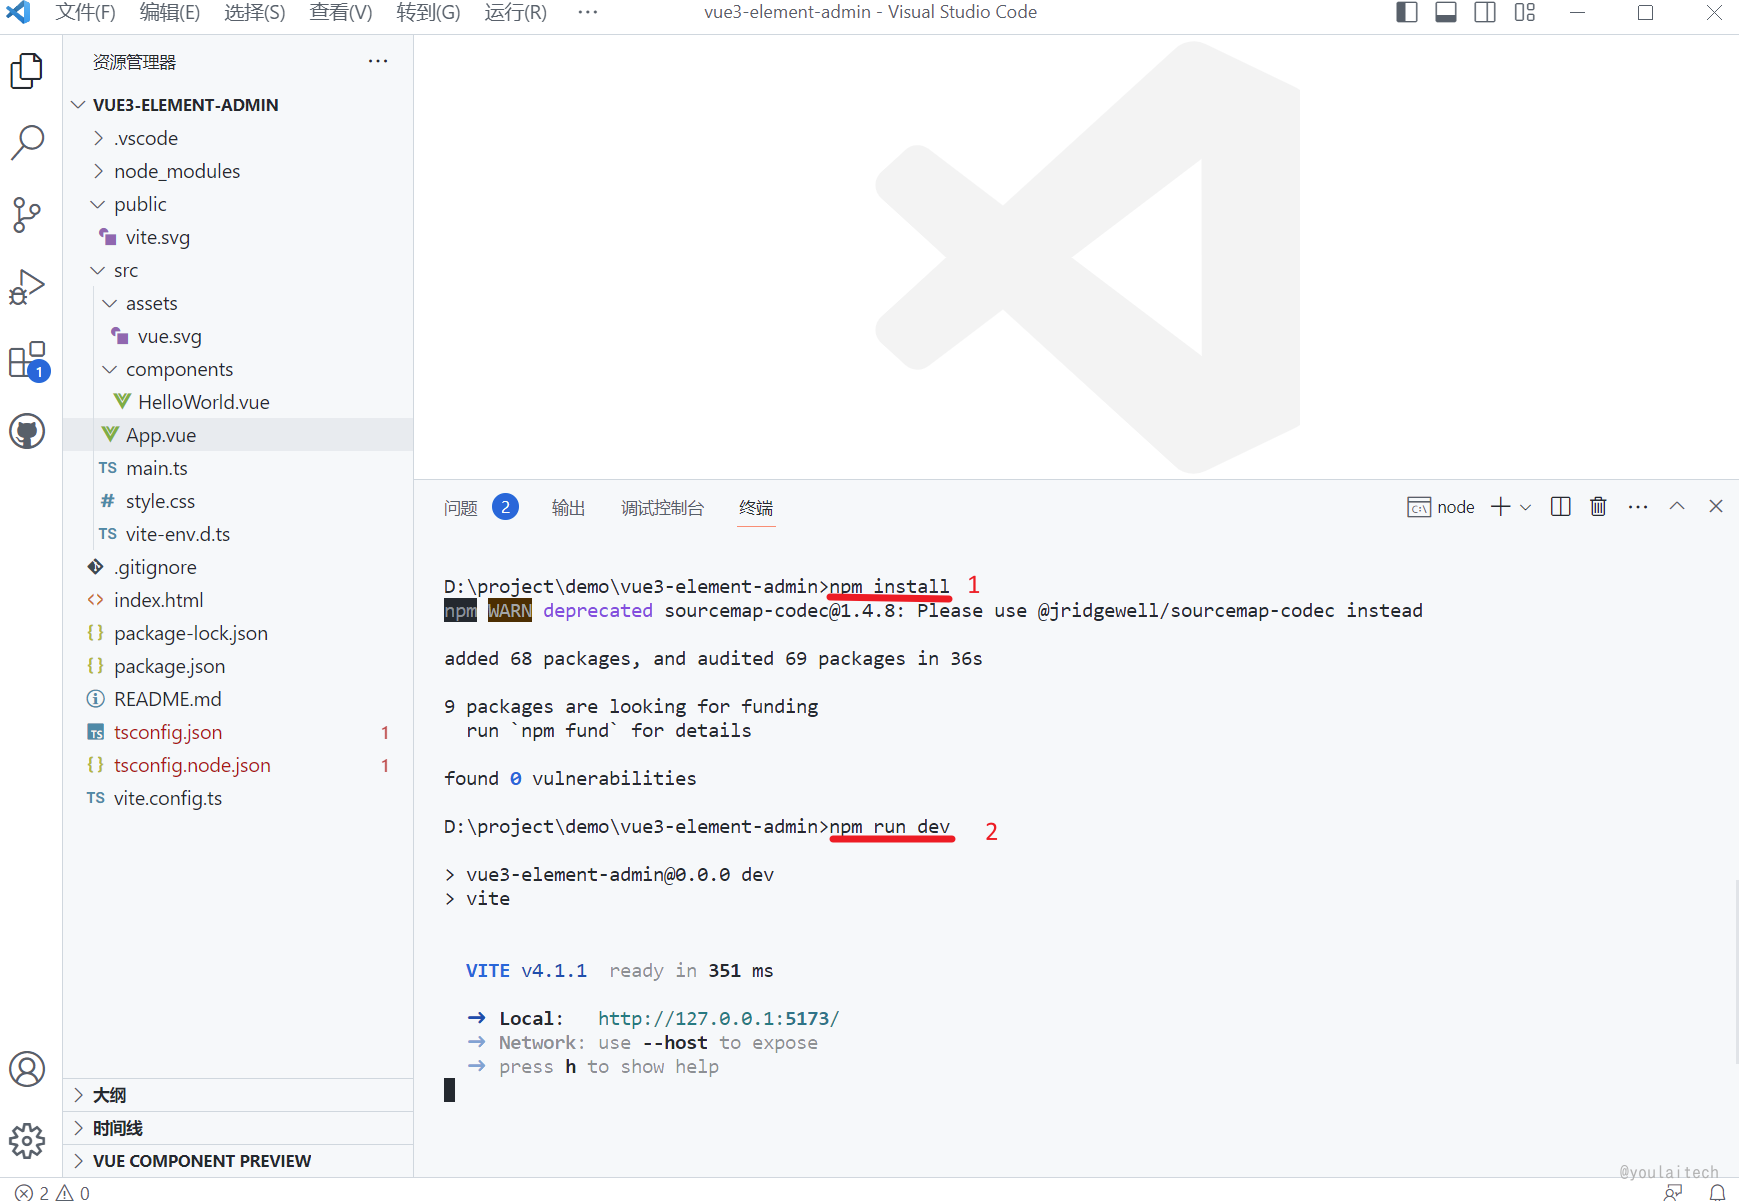
浏览器访问 localhost:5173 预览

路径别名配置
vite 配置
typescirpt 编译器配置
// tsconfig.json
"compileroptions": {
    ...
    "baseurl": "./", // 解析非相对模块的基地址,默认是当前目录
    "paths": { // 路径映射,相对于baseurl
    	"@/*": ["src/*"]
    }
}
路径别名使用
// src/app.vue
import helloworld from '/src/components/helloworld.vue'
						↓
import helloworld from '@/components/helloworld.vue'

安装自动导入
概念
为了避免在多个页面重复引入 api 或 组件,由此而产生的自动导入插件来节省重复代码和提高开发效率。
| 插件 | 概念 | 自动导入对象 |
|---|---|---|
| unplugin-auto-import | 按需自动导入api | ref,reactive,watch,computed 等api |
| unplugin-vue-components | 按需自动导入组件 | element plus 等三方库和指定目录下的自定义组件 |
看下自动导入插件未使用和使用的区别:
| 插件名 | 未使用自动导入 | 使用自动导入 |
|---|---|---|
| unplugin-auto-import | 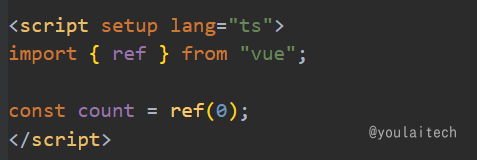 | 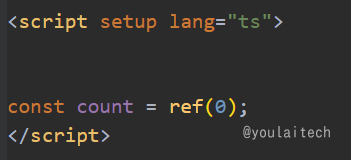 |
| unplugin-vue-components | 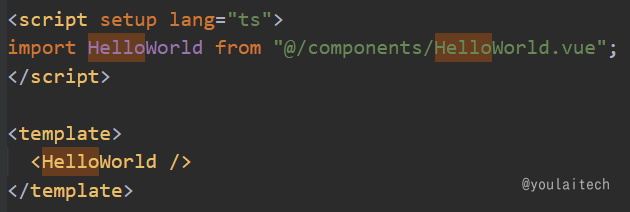 | 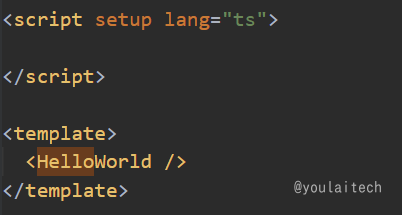 |
安装插件依赖
npm install -d unplugin-auto-import unplugin-vue-components
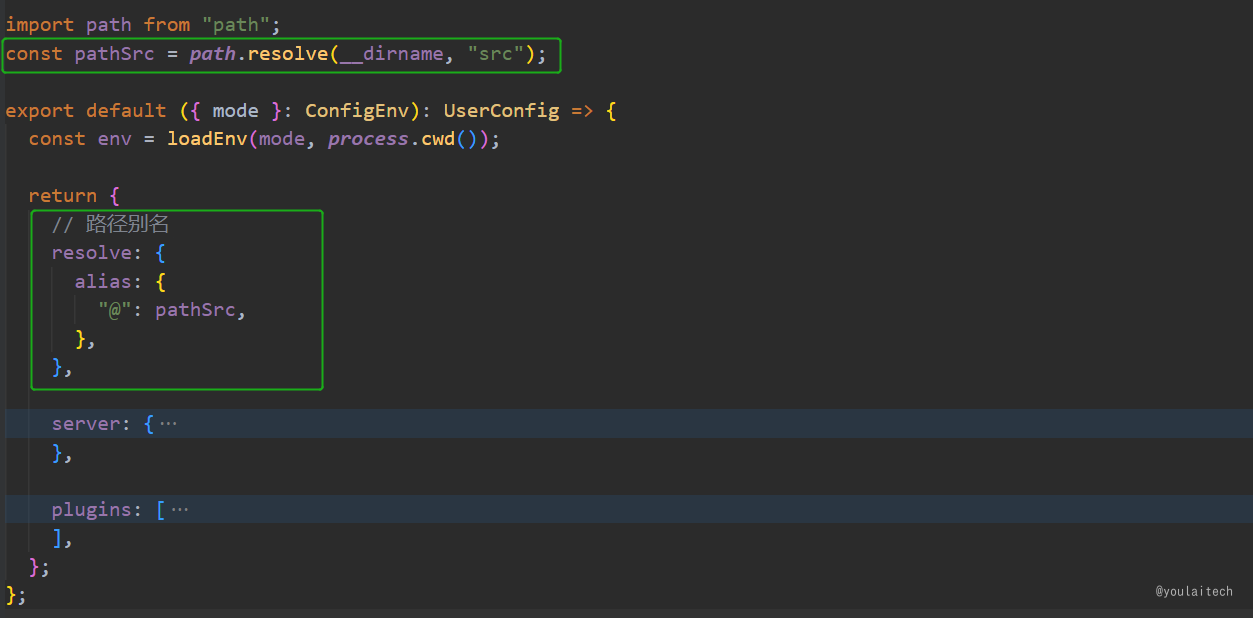
vite.config.ts - 自动导入配置
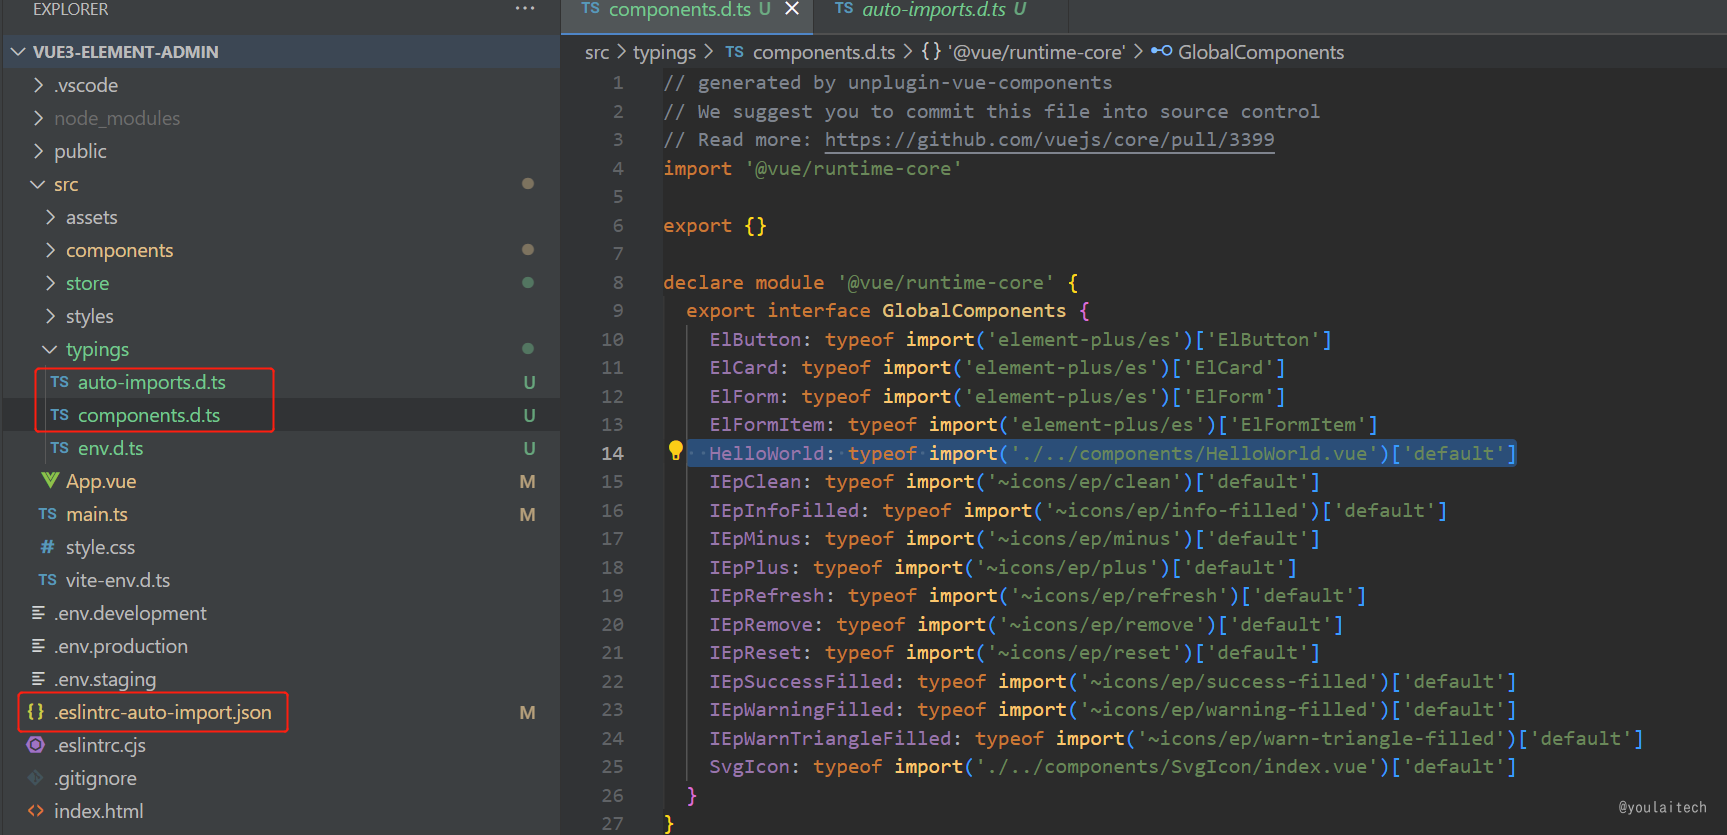
新建 /src/types 目录用于存放自动导入函数和组件的ts类型声明文件
import autoimport from "unplugin-auto-import/vite";
import components from "unplugin-vue-components/vite";

plugins: [
  autoimport({
    // 自动导入 vue 相关函数,如:ref, reactive, toref 等
    imports: ["vue"],
    eslintrc: {
      enabled: true, // 是否自动生成 eslint 规则,建议生成之后设置 false
      filepath: "./.eslintrc-auto-import.json", // 指定自动导入函数 eslint 规则的文件
    },
    dts: path.resolve(pathsrc, "types", "auto-imports.d.ts"), // 指定自动导入函数ts类型声明文件路径
  }),
  components({
    dts: path.resolve(pathsrc, "types", "components.d.ts"), // 指定自动导入组件ts类型声明文件路径
  }),
]
.eslintrc.cjs - 自动导入函数 eslint 规则引入
"extends": [
    "./.eslintrc-auto-import.json"
],
tsconfig.json - 自动导入ts类型声明文件引入
{
  "include": ["src/**/*.d.ts"]
}
自动导入效果
运行项目 npm run dev 自动
整合 element plus
需要完成上面一节的 自动导入 的安装和配置
安装 element plus
npm install element-plus
安装自动导入 icon 依赖
npm i -d unplugin-icons
vite.config.ts 配置
参考: element-plus-best-practices - vite.config.ts
// vite.config.ts
import { elementplusresolver } from "unplugin-vue-components/resolvers";
import icons from "unplugin-icons/vite";
import iconsresolver from "unplugin-icons/resolver";

export default ({ mode }: configenv): userconfig => {

  return {
    plugins: [
      // ...
      autoimport({
        // ...
        resolvers: [
          // 自动导入 element plus 相关函数,如:elmessage, elmessagebox... (带样式)
          elementplusresolver(),
          // 自动导入图标组件
          iconsresolver({}),
        ]
        vuetemplate: true, // 是否在 vue 模板中自动导入
        dts: path.resolve(pathsrc, 'types', 'auto-imports.d.ts') // 自动导入组件类型声明文件位置,默认根目录

      }),
      components({
        resolvers: [
          // 自动导入 element plus 组件
          elementplusresolver(),
          // 自动注册图标组件
          iconsresolver({
            enabledcollections: ["ep"] // element-plus图标库,其他图标库 https://icon-sets.iconify.design/
          }),
        ],
        dts: path.resolve(pathsrc, "types", "components.d.ts"), //  自动导入组件类型声明文件位置,默认根目录
      }),
      icons({
        // 自动安装图标库
        autoinstall: true,
      }),
    ],
  };
};
示例代码
<!-- src/components/helloworld.vue -->
<div>
  <el-button type="success"><i-ep-successfilled />success</el-button>
  <el-button type="info"><i-ep-infofilled />info</el-button>
  <el-button type="warning"><i-ep-warningfilled />warning</el-button>
  <el-button type="danger"><i-ep-warntrianglefilled />danger</el-button>
</div>
效果预览
整合 svg 图标
参考: vite-plugin-svg-icons 安装文档
安装依赖
npm install -d fast-glob@3.2.11
npm install -d vite-plugin-svg-icons@2.0.1
创建 src/assets/icons 目录 , 放入从 iconfont 复制的 svg 图标
main.ts 引入注册脚本
// src/main.ts
import 'virtual:svg-icons-register';
vite.config.ts 配置插件
// vite.config.ts
import { createsvgiconsplugin } from 'vite-plugin-svg-icons';

export default ({command, mode}: configenv): userconfig => {
 return (
     {
         plugins: [
             createsvgiconsplugin({
                 // 指定需要缓存的图标文件夹
                 icondirs: [path.resolve(process.cwd(), 'src/assets/icons')],
                 // 指定symbolid格式
                 symbolid: 'icon-[dir]-[name]',
             })
         ]
     }
 )
}
svg 组件封装
<!-- src/components/svgicon/index.vue -->
<script setup lang="ts">
const props = defineprops({
prefix: {
 type: string,
 default: "icon",
},
iconclass: {
 type: string,
 required: false,
},
color: {
 type: string,
},
size: {
 type: string,
 default: "1em",
},
});

const symbolid = computed(() => `#${props.prefix}-${props.iconclass}`);
</script>

<template>
<svg
 aria-hidden="true"
 class="svg-icon"
 :style="'width:' + size + ';height:' + size"
>
 <use :xlink:href="symbolid" :fill="color" />
</svg>
</template>

<style scoped>
.svg-icon {
display: inline-block;
outline: none;
width: 1em;
height: 1em;
vertical-align: -0.15em; /* 因icon大小被设置为和字体大小一致,而span等标签的下边缘会和字体的基线对齐,故需设置一个往下的偏移比例,来纠正视觉上的未对齐效果 */
fill: currentcolor; /* 定义元素的颜色,currentcolor是一个变量,这个变量的值就表示当前元素的color值,如果当前元素未设置color值,则从父元素继承 */
overflow: hidden;
}
</style>
组件使用
<!-- src/components/helloworld.vue -->
<template>
 <el-button type="info"><svg-icon icon-class="block"/>svg 本地图标</el-button>
</template>

整合 scss
安装依赖
npm i -d sass
创建 variables.scss 变量文件,添加变量 $bg-color 定义,注意规范变量以 $ 开头
// src/styles/variables.scss
$bg-color:#242424;
vite 配置导入 scss 全局变量文件
// vite.config.ts
css: {
    // css 预处理器
    preprocessoroptions: {
        //define global scss variable
        scss: {
            javascriptenabled: true,
            additionaldata: `@use "@/styles/variables.scss" as *;`
        }
    }
}
style 标签使用scss全局变量
<!-- src/components/helloworld.vue -->
<template>
  <div class="box" />
</template>

<style lang="scss" scoped>
.box {
  width: 100px;
  height: 100px;
  background-color: $bg-color;
}
</style>
上面导入的 scss 全局变量在 typescript 不生效的,需要创建一个以 .module.scss 结尾的文件
// src/styles/variables.module.scss

// 导出 variables.scss 文件的变量
:export{
    bgcolor:$bg-color
}
typescript 使用 scss 全局变量
<!-- src/components/helloworld.vue -->
<script setup lang="ts">
  import variables from "@/styles/variables.module.scss";
  console.log(variables.bgcolor)
</script>

<template>
  <div style="width:100px;height:100px" :style="{ 'background-color': variables.bgcolor }" />
</template>
整合 unocss
安装依赖
npm install -d unocss
vite.config.ts 配置
// vite.config.ts
import unocss from 'unocss/vite'

export default {
  plugins: [
    unocss({ /* options */ }),
  ],
}
main.ts 引入 uno.css
// src/main.ts
import 'uno.css'
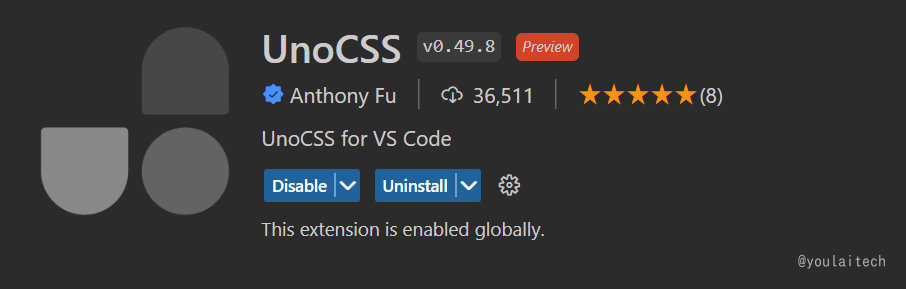
vscode 安装 unocss 插件
再看下具体使用方式和实际效果:
| 代码 | 效果 |
|---|---|
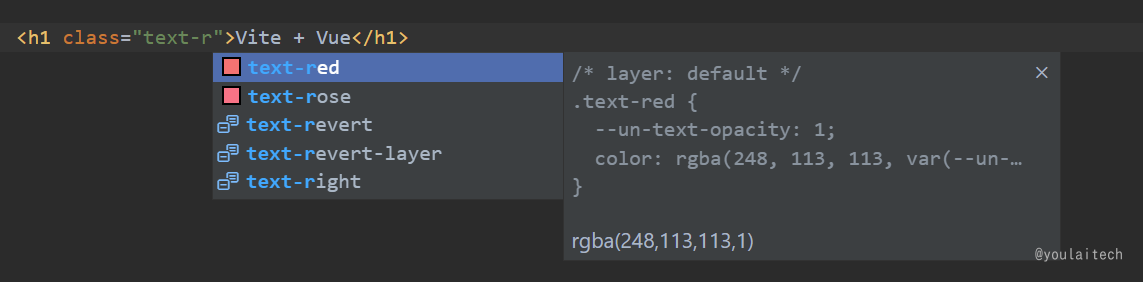 |  |
如果unocss 插件智能提示不生效,请参考:vscode插件unocss智能提示不生效解决 。
整合 pinia
参考:pinia 官方文档
安装依赖
npm install pinia
main.ts 引入 pinia
// src/main.ts
import { createpinia } from "pinia";
import app from "./app.vue";

createapp(app).use(createpinia()).mount("#app");
定义 store
根据 pinia 官方文档-核心概念 描述 ,store 定义分为选项式和组合式 , 先比较下两种写法的区别:
| 选项式 option store | 组合式 setup store |
|---|---|
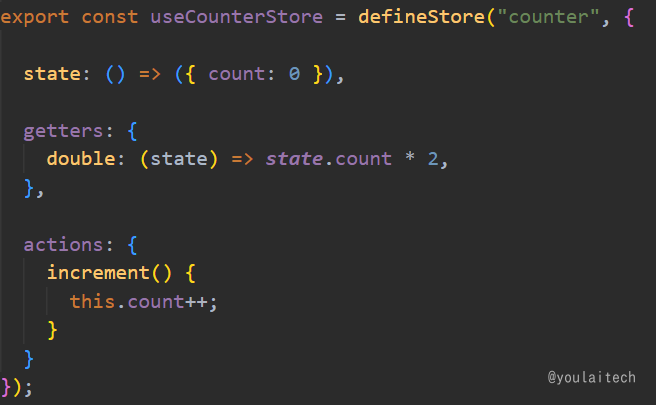 |  |
至于如何选择,官方给出的建议 :选择你觉得最舒服的那一个就好 。
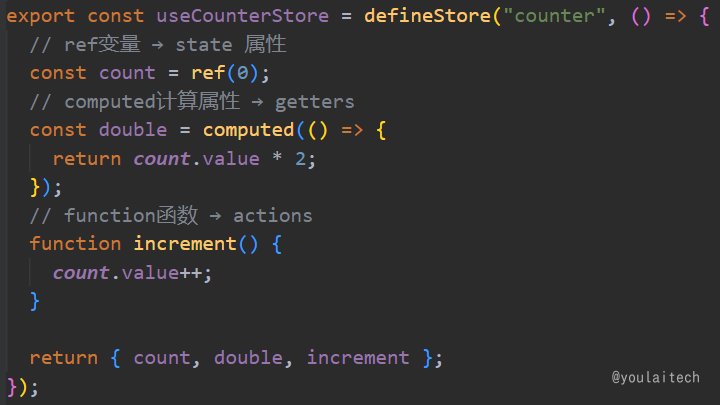
这里选择组合式,新建文件 src/store/counter.ts
// src/store/counter.ts
import { definestore } from "pinia";

export const usecounterstore = definestore("counter", () => {
  // ref变量 → state 属性
  const count = ref(0);
  // computed计算属性 → getters
  const double = computed(() => {
    return count.value * 2;
  });
  // function函数 → actions
  function increment() {
    count.value++;
  }

  return { count, double, increment };
});
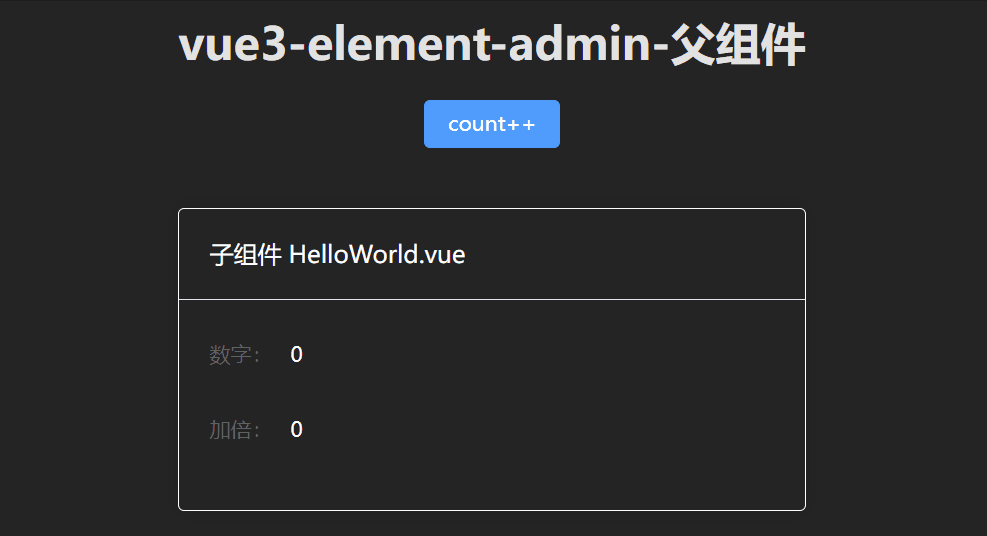
父组件
<!-- src/app.vue -->
<script setup lang="ts">
import helloworld from "@/components/helloworld.vue";

import { usecounterstore } from "@/store/counter";
const counterstore = usecounterstore();
</script>

<template>
  <h1 class="text-3xl">vue3-element-admin-父组件</h1>
  <el-button type="primary" @click="counterstore.increment">count++</el-button>
  <helloworld />
</template>
子组件
<!-- src/components/helloworld.vue -->
<script setup lang="ts">
import { usecounterstore } from "@/store/counter";
const counterstore = usecounterstore();
</script>

<template>
  <el-card  class="text-left text-white border-white border-1 border-solid mt-10 bg-[#242424]" >
    <template #header> 子组件 helloworld.vue</template>
    <el-form>
      <el-form-item label="数字:"> {{ counterstore.count }}</el-form-item>
      <el-form-item label="加倍:"> {{ counterstore.double }}</el-form-item>
    </el-form>
  </el-card>
</template>
效果预览
环境变量
参考: vite 环境变量配置官方文档
env配置文件
项目根目录新建 .env.development 、.env.production
-
开发环境变量配置:.env.development
# 变量必须以 vite_ 为前缀才能暴露给外部读取 vite_app_title = 'vue3-element-admin' vite_app_port = 3000 vite_app_base_api = '/dev-api' -
生产环境变量配置:.env.production
vite_app_title = 'vue3-element-admin'
vite_app_port = 3000
vite_app_base_api = '/prod-api'
环境变量智能提示
新建 src/types/env.d.ts文件存放环境变量ts类型声明
// src/types/env.d.ts
interface importmetaenv {
  /**
   * 应用标题
   */
  vite_app_title: string;
  /**
   * 应用端口
   */
  vite_app_port: number;
  /**
   * api基础路径(反向代理)
   */
  vite_app_base_api: string;
}

interface importmeta {
  readonly env: importmetaenv;
}
使用自定义环境变量就会有智能提示,环境变量的读取和使用请看下一节的跨域处理中的 vite.config.ts的配置。

跨域处理
跨域原理
浏览器同源策略: 协议、域名和端口都相同是同源,浏览器会限制非同源请求读取响应结果。
本地开发环境通过 vite 配置反向代理解决浏览器跨域问题,生产环境则是通过 nginx 配置反向代理 。
vite.config.ts 配置代理
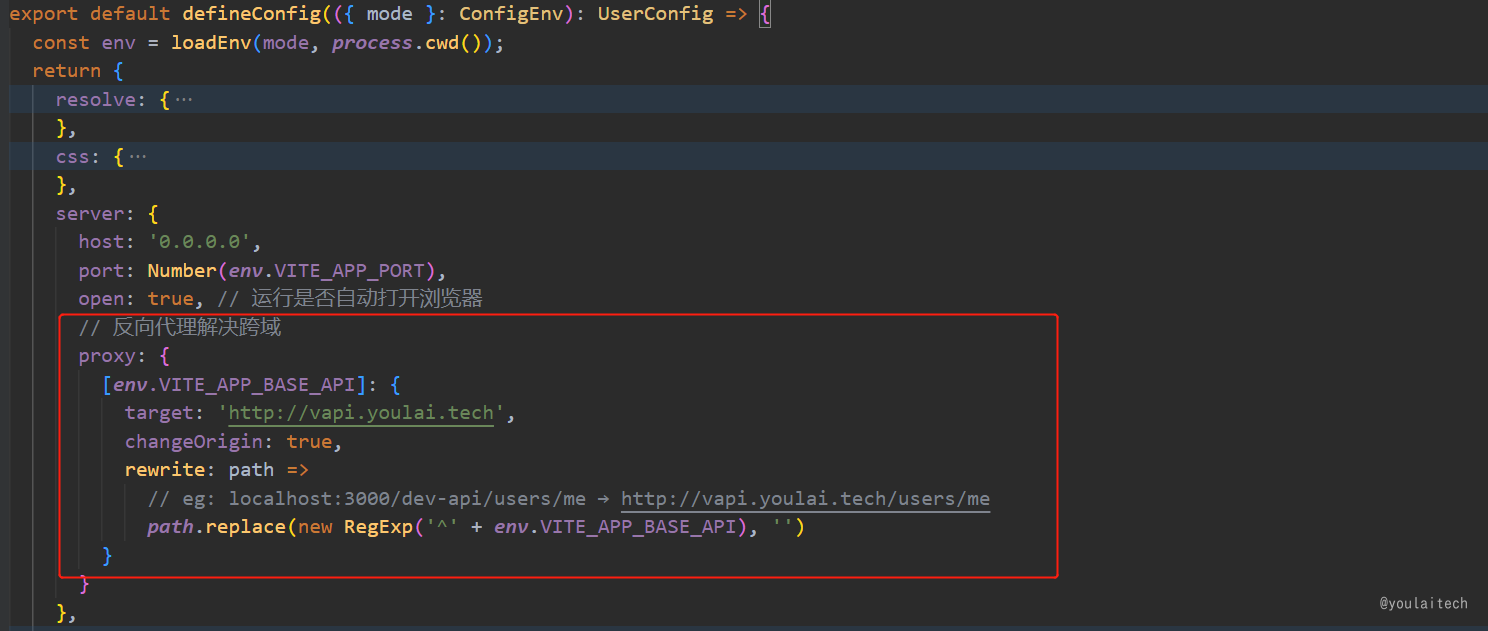
表面肉眼看到的请求地址: http://localhost:3000/dev-api/api/v1/users/me
真实访问的代理目标地址: http://vapi.youlai.tech/api/v1/users/me

整合 axios
参考: axios 官方文档
安装依赖
npm install axios
axios 工具类封装
//  src/utils/request.ts
import axios, { internalaxiosrequestconfig, axiosresponse } from 'axios';
import { useuserstorehook } from '@/store/modules/user';

// 创建 axios 实例
const service = axios.create({
  baseurl: import.meta.env.vite_app_base_api,
  timeout: 50000,
  headers: { 'content-type': 'application/json;charset=utf-8' }
});

// 请求拦截器
service.interceptors.request.use(
  (config: internalaxiosrequestconfig) => {
    const userstore = useuserstorehook();
    if (userstore.token) {
      config.headers.authorization = userstore.token;
    }
    return config;
  },
  (error: any) => {
    return promise.reject(error);
  }
);

// 响应拦截器
service.interceptors.response.use(
  (response: axiosresponse) => {
    const { code, msg } = response.data;
    // 登录成功
    if (code === '00000') {
      return response.data;
    }

    elmessage.error(msg || '系统出错');
    return promise.reject(new error(msg || 'error'));
  },
  (error: any) => {
    if (error.response.data) {
      const { code, msg } = error.response.data;
      // token 过期,跳转登录页
      if (code === 'a0230') {
        elmessagebox.confirm('当前页面已失效,请重新登录', '提示', {
          confirmbuttontext: '确定',
          type: 'warning'
        }).then(() => {
          localstorage.clear(); // @vueuse/core 自动导入
          window.location.href = '/';
        });
      }else{
          elmessage.error(msg || '系统出错');
      }
    }
    return promise.reject(error.message);
  }
);

// 导出 axios 实例
export default service;
登录接口实战
访问 vue3-element-admin 在线接口文档, 查看登录接口请求参数和响应数据类型
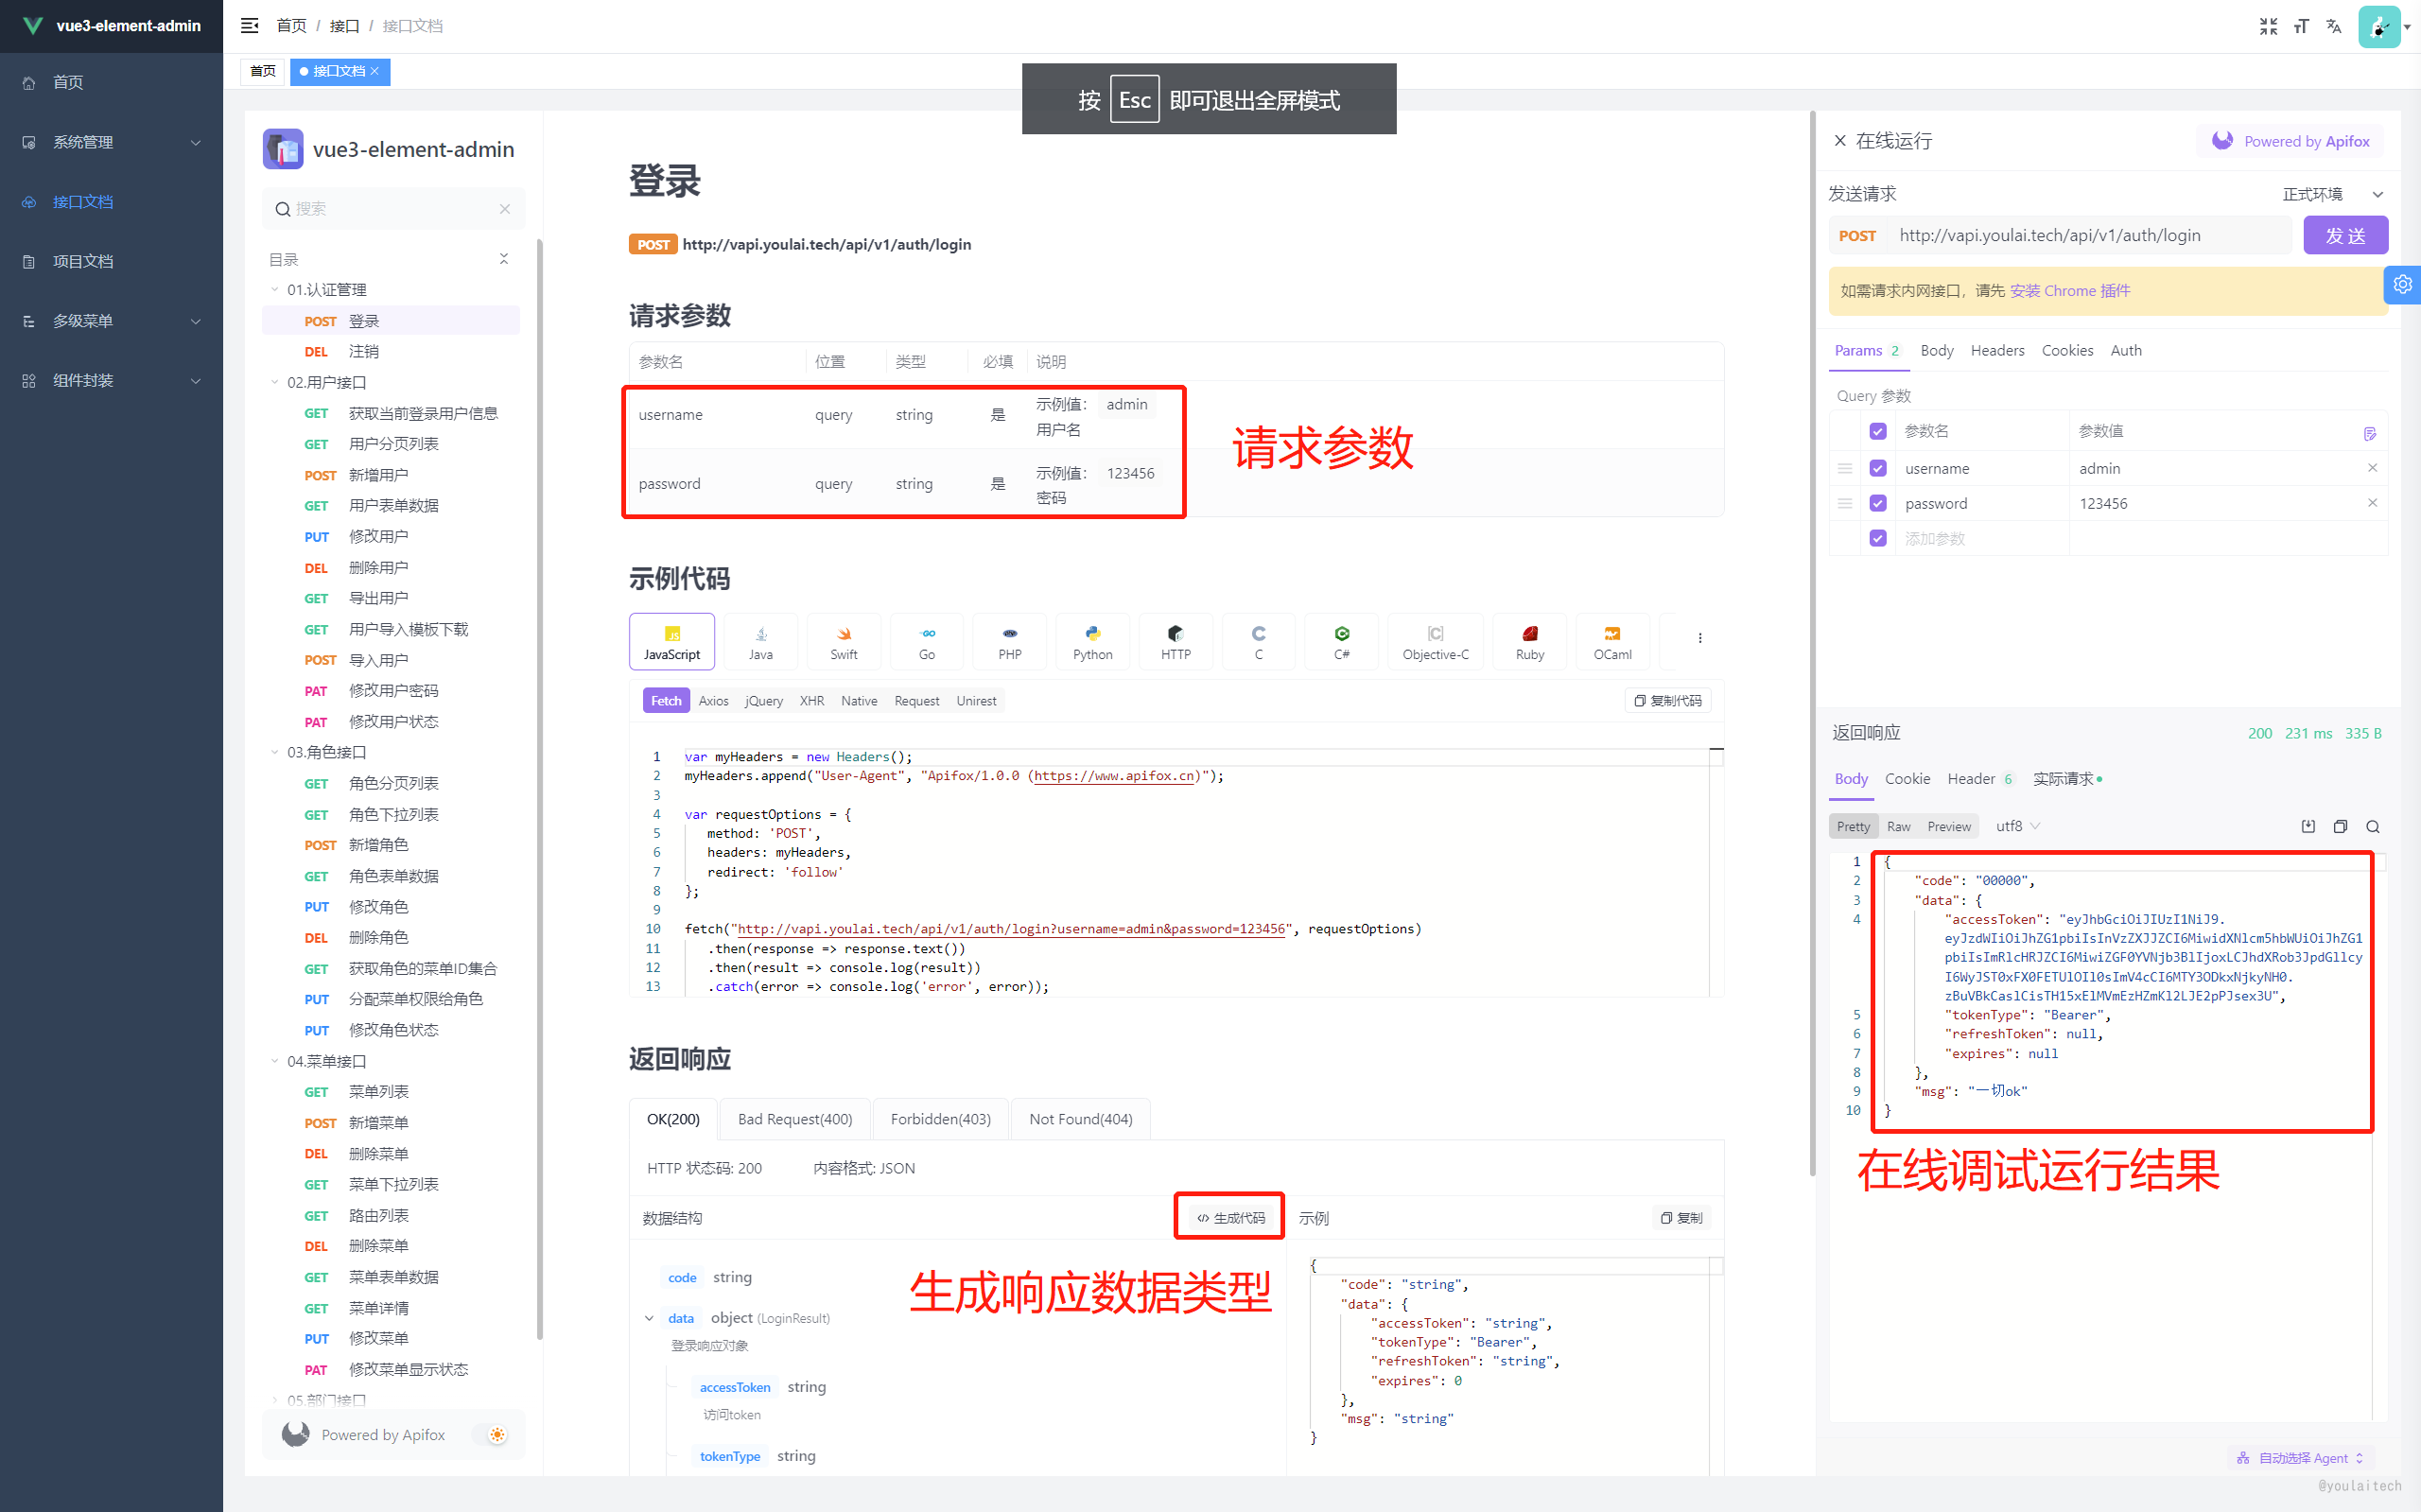
点击 生成代码 获取登录响应数据 typescript 类型定义
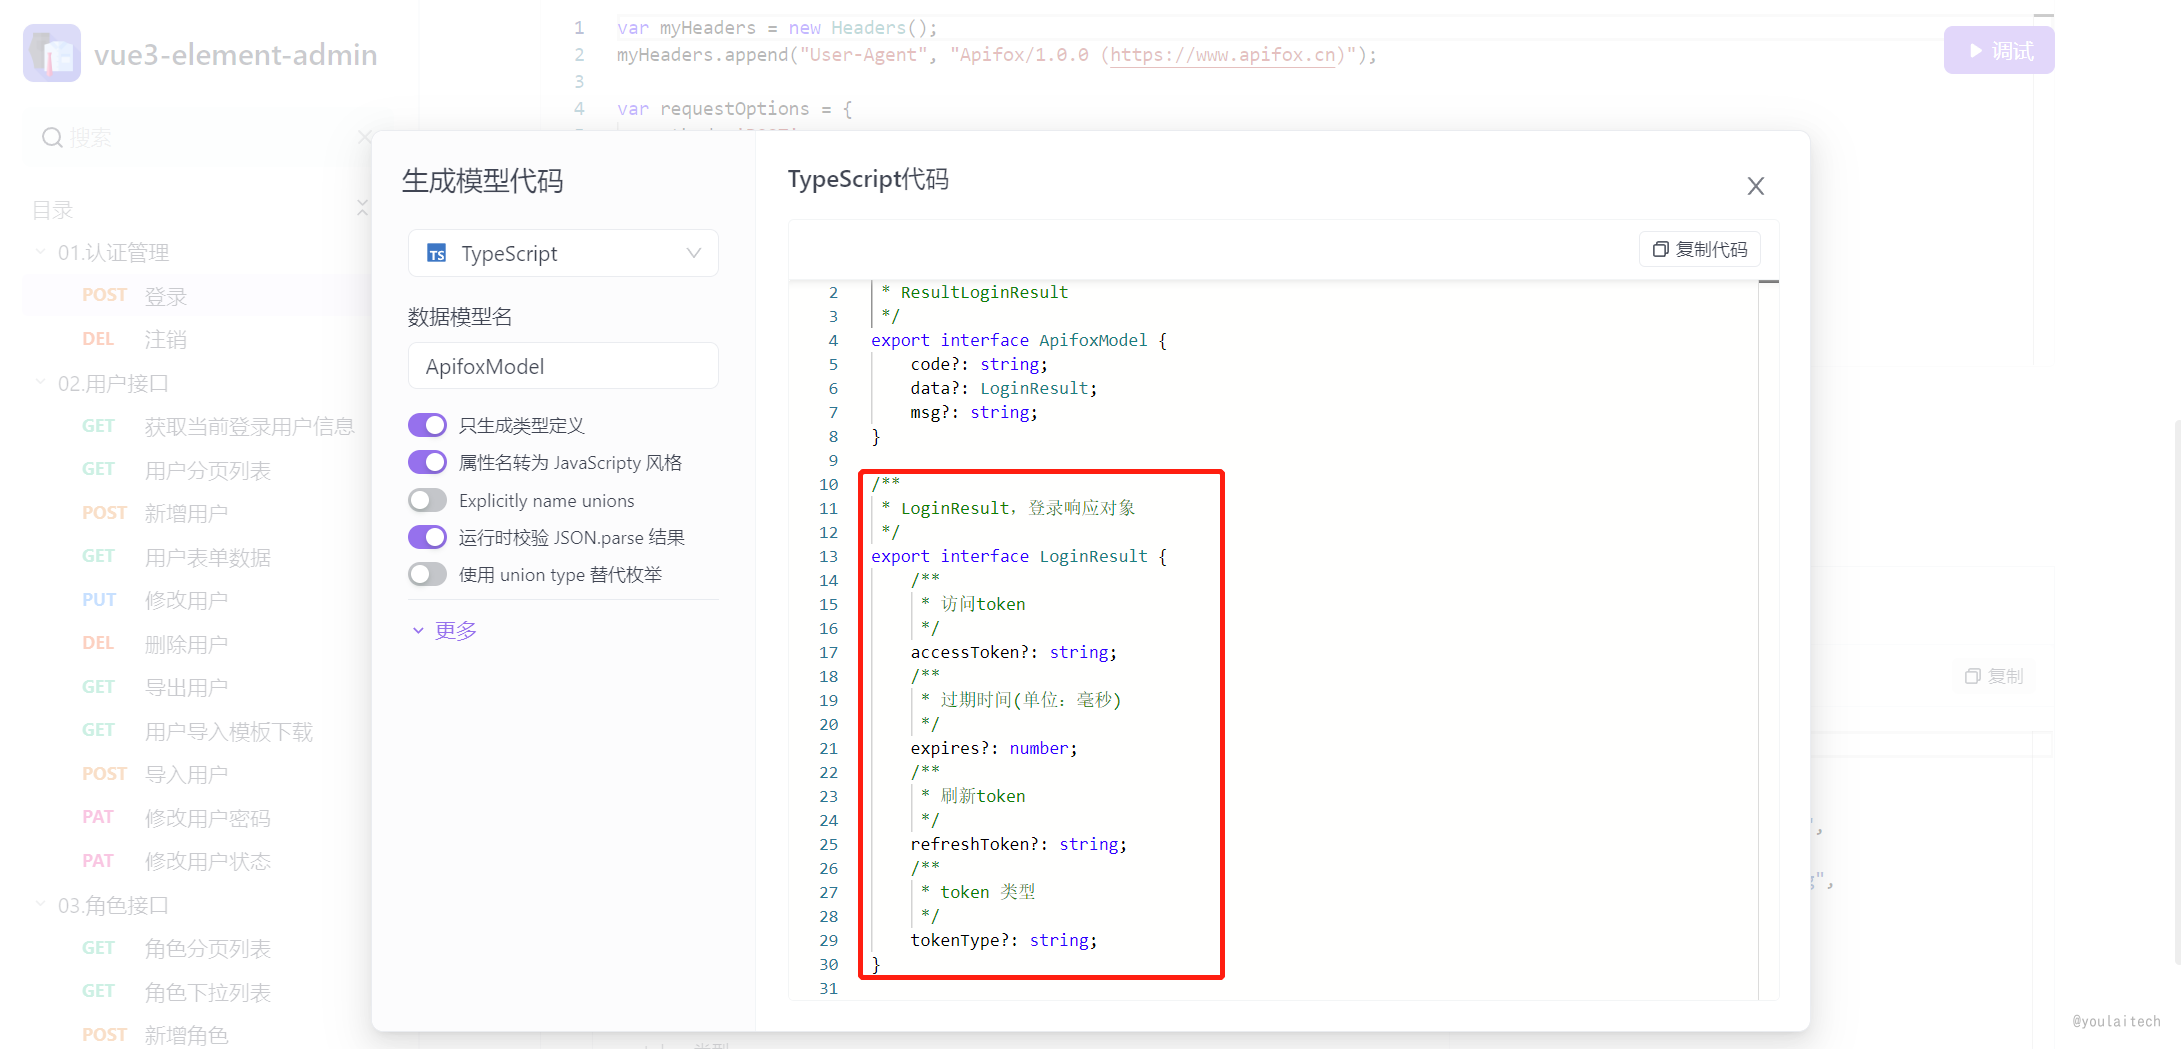
将类型定义复制到 src/api/auth/types.ts 文件中
/**
 * 登录请求参数
 */
export interface logindata {
  /**
   * 用户名
   */
  username: string;
  /**
   * 密码
   */
  password: string;
}

/**
 * 登录响应
 */
export interface loginresult {
  /**
   * 访问token
   */
  accesstoken?: string;
  /**
   * 过期时间(单位:毫秒)
   */
  expires?: number;
  /**
   * 刷新token
   */
  refreshtoken?: string;
  /**
   * token 类型
   */
  tokentype?: string;
}
登录 api 定义
// src/api/auth/index.ts
import request from '@/utils/request';
import { axiospromise } from 'axios';
import { logindata, loginresult } from './types';

/**
 * 登录api
 *
 * @param data {logindata}
 * @returns
 */
export function loginapi(data: logindata): axiospromise<loginresult> {
  return request({
    url: '/api/v1/auth/login',
    method: 'post',
    params: data
  });
}
登录 api 调用
// src/store/modules/user.ts
import { loginapi } from '@/api/auth';
import { logindata } from '@/api/auth/types';

/**
 * 登录调用
 *
 * @param {logindata}
 * @returns
 */
function login(logindata: logindata) {
  return new promise<void>((resolve, reject) => {
    loginapi(logindata)
      .then(response => {
        const { tokentype, accesstoken } = response.data;
        token.value = tokentype + ' ' + accesstoken; // bearer eyjhbgcioijiuzi1nij9.xxx.xxx
        resolve();
      })
      .catch(error => {
        reject(error);
      });
  });
}
动态路由
安装 vue-router
npm install vue-router@next
路由实例
创建路由实例,顺带初始化静态路由,而动态路由需要用户登录,根据用户拥有的角色进行权限校验后进行初始化
// src/router/index.ts
import { createrouter, createwebhashhistory, routerecordraw } from 'vue-router';

export const layout = () => import('@/layout/index.vue');

// 静态路由
export const constantroutes: routerecordraw[] = [
  {
    path: '/redirect',
    component: layout,
    meta: { hidden: true },
    children: [
      {
        path: '/redirect/:path(.*)',
        component: () => import('@/views/redirect/index.vue')
      }
    ]
  },

  {
    path: '/login',
    component: () => import('@/views/login/index.vue'),
    meta: { hidden: true }
  },

  {
    path: '/',
    component: layout,
    redirect: '/dashboard',
    children: [
      {
        path: 'dashboard',
        component: () => import('@/views/dashboard/index.vue'),
        name: 'dashboard',
        meta: { title: 'dashboard', icon: 'homepage', affix: true }
      }
    ]
  }
];

/**
 * 创建路由
 */
const router = createrouter({
  history: createwebhashhistory(),
  routes: constantroutes as routerecordraw[],
  // 刷新时,滚动条位置还原
  scrollbehavior: () => ({ left: 0, top: 0 })
});

/**
 * 重置路由
 */
export function resetrouter() {
  router.replace({ path: '/login' });
  location.reload();
}

export default router;
全局注册路由实例
// main.ts
import router from "@/router";

app.use(router).mount('#app')
动态权限路由
路由守卫 src/permission.ts ,获取当前登录用户的角色信息进行动态路由的初始化
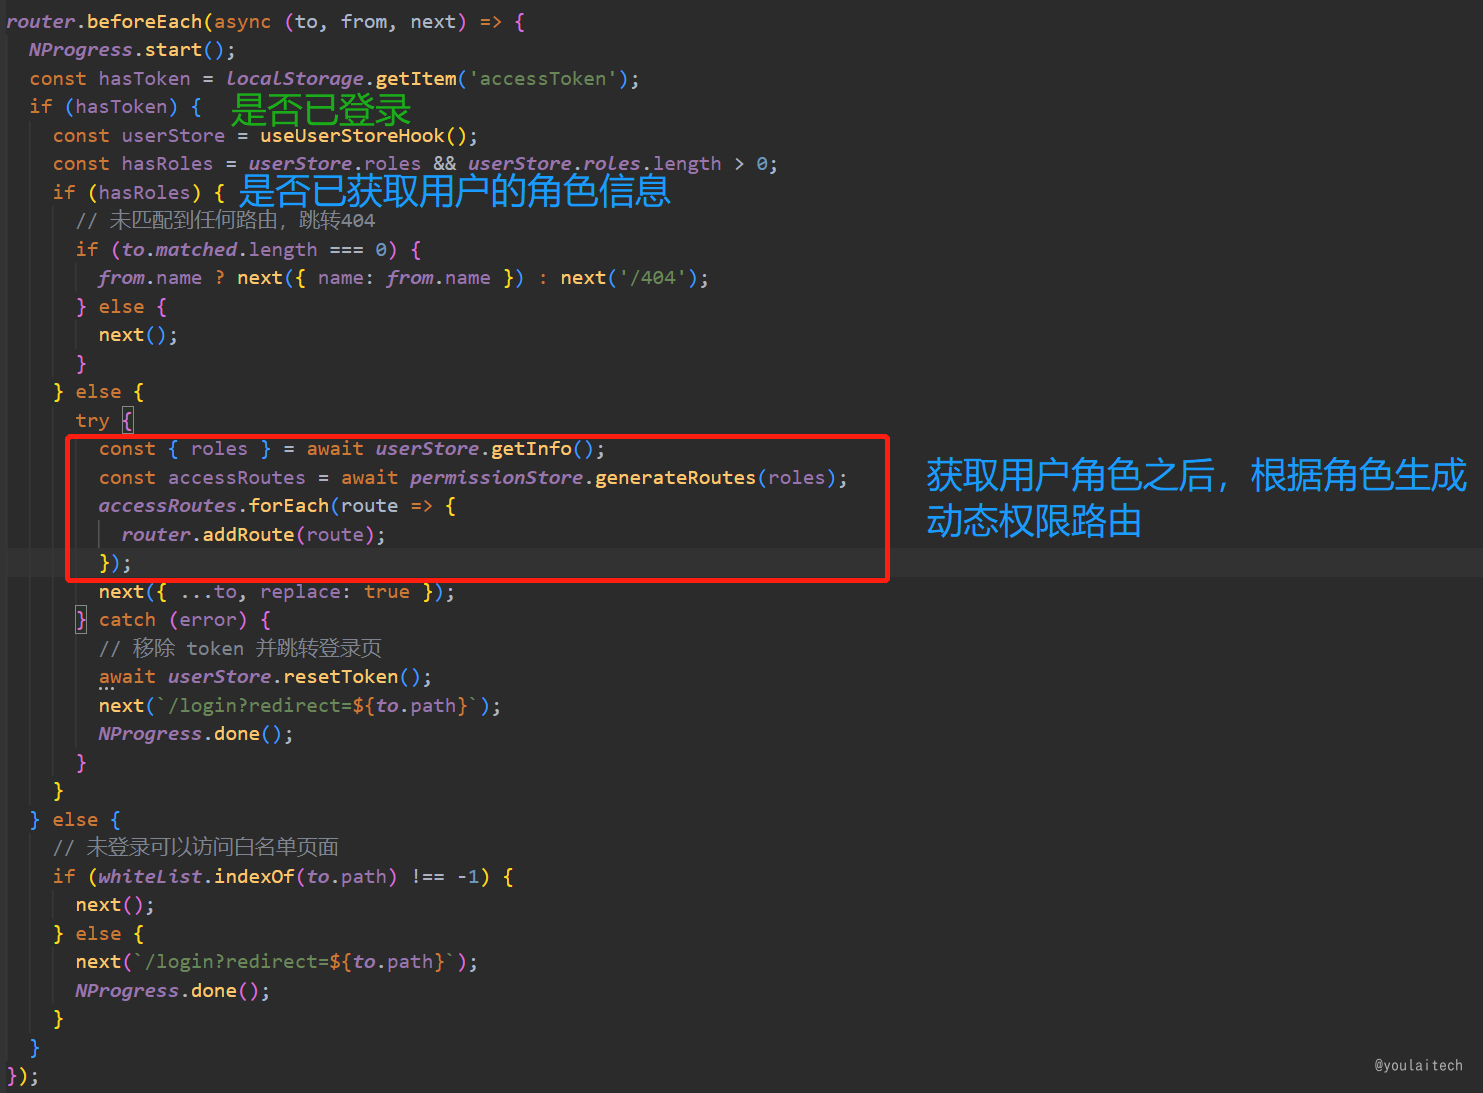
最终调用 permissionstore.generateroutes(roles) 方法生成动态路由
// src/store/modules/permission.ts
import { listroutes } from '@/api/menu';

export const usepermissionstore = definestore('permission', () => {
  const routes = ref<routerecordraw[]>([]);

  function setroutes(newroutes: routerecordraw[]) {
    routes.value = constantroutes.concat(newroutes);
  }
  /**
   * 生成动态路由
   *
   * @param roles 用户角色集合
   * @returns
   */
  function generateroutes(roles: string[]) {
    return new promise<routerecordraw[]>((resolve, reject) => {
      // 接口获取所有路由
      listroutes()
        .then(({ data: asyncroutes }) => {
          // 根据角色获取有访问权限的路由
          const accessedroutes = filterasyncroutes(asyncroutes, roles);
          setroutes(accessedroutes);
          resolve(accessedroutes);
        })
        .catch(error => {
          reject(error);
        });
    });
  }
  // 导出 store 的动态路由数据 routes
  return { routes, setroutes, generateroutes };
});
接口获取得到的路由数据

根据路由数据 (routes)生成菜单的关键代码
| src/layout/componets/sidebar/index.vue | src/layout/componets/sidebar/sidebaritem.vue |
|---|---|
 | 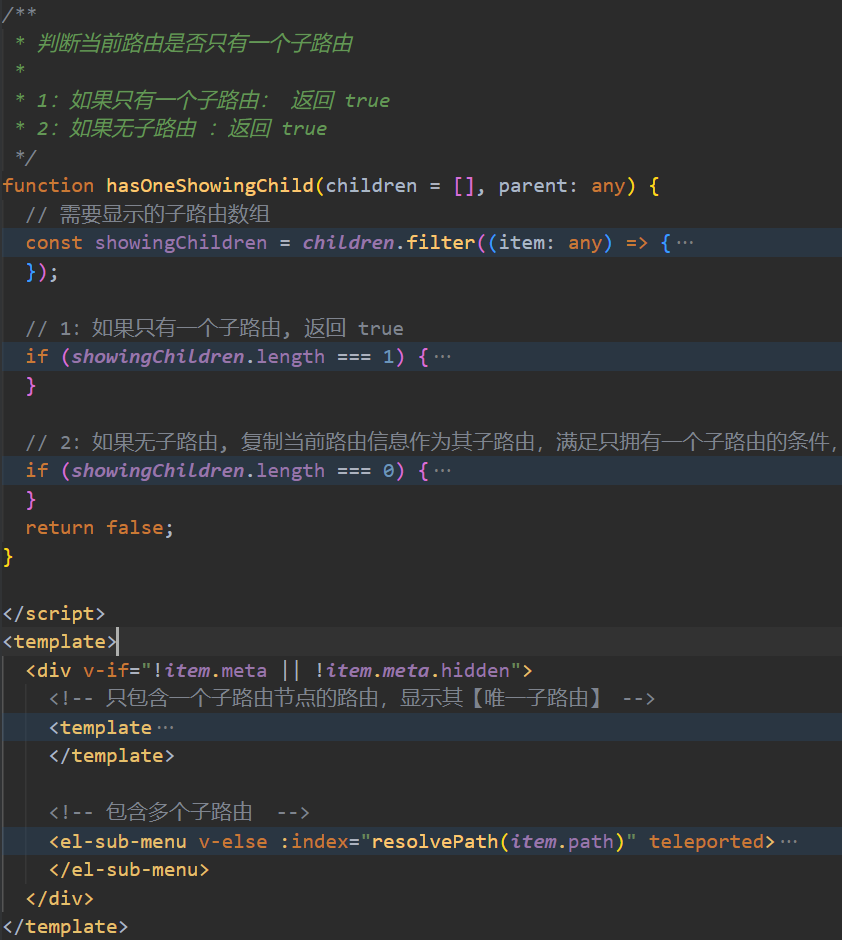 |
按钮权限
除了 vue 内置的一系列指令 (比如 v-model 或 v-show) 之外,vue 还允许你注册自定义的指令 (custom directives),以下就通过自定义指令的方式实现按钮权限控制。
**自定义指令 **
// src/directive/permission/index.ts

import { useuserstorehook } from '@/store/modules/user';
import { directive, directivebinding } from 'vue';

/**
 * 按钮权限
 */
export const hasperm: directive = {
  mounted(el: htmlelement, binding: directivebinding) {
    // 「超级管理员」拥有所有的按钮权限
    const { roles, perms } = useuserstorehook();
    if (roles.includes('root')) {
      return true;
    }
    // 「其他角色」按钮权限校验
    const { value } = binding;
    if (value) {
      const requiredperms = value; // dom绑定需要的按钮权限标识

      const hasperm = perms?.some(perm => {
        return requiredperms.includes(perm);
      });

      if (!hasperm) {
        el.parentnode && el.parentnode.removechild(el);
      }
    } else {
      throw new error(
        "need perms! like v-has-perm=\"['sys:user:add','sys:user:edit']\""
      );
    }
  }
};
全局注册自定义指令
// src/directive/index.ts
import type { app } from 'vue';

import { hasperm } from './permission';

// 全局注册 directive 方法
export function setupdirective(app: app<element>) {
  // 使 v-hasperm 在所有组件中都可用
  app.directive('hasperm', hasperm);
}
// src/main.ts
import { setupdirective } from '@/directive';

const app = createapp(app);
// 全局注册 自定义指令(directive)
setupdirective(app);
组件使用自定义指令
// src/views/system/user/index.vue
<el-button v-hasperm="['sys:user:add']">新增</el-button>
<el-button v-hasperm="['sys:user:delete']">删除</el-button>
国际化
element plus 国际化
简单的使用方式请参考 element plus 官方文档-国际化示例,以下介绍 vue3-element-admin 整合 pinia 实现国际化语言切换。
element plus 提供了一个 vue 组件 configprovider 用于全局配置国际化的设置。
<!-- src/app.vue -->
<script setup lang="ts">
import { elconfigprovider } from 'element-plus';
import { useappstore } from '@/store/modules/app';
const appstore = useappstore();
</script>

<template>
  <el-config-provider :locale="appstore.locale" >
    <router-view />
  </el-config-provider>
</template>
定义 store
// src/store/modules/app.ts
import { definestore } from 'pinia';
import { usestorage } from '@vueuse/core';
import defaultsettings from '@/settings';

// 导入 element plus 中英文语言包
import zhcn from 'element-plus/es/locale/lang/zh-cn';
import en from 'element-plus/es/locale/lang/en';

// setup
export const useappstore = definestore('app', () => {

  const language = usestorage('language', defaultsettings.language);

  /**
   * 根据语言标识读取对应的语言包
   */
  const locale = computed(() => {
    if (language?.value == 'en') {
      return en;
    } else {
      return zhcn;
    }
  });

  /**
   * 切换语言
   */
  function changelanguage(val: string) {
    language.value = val;
  }

  return {
    language,
    locale,
    changelanguage
  };
});
切换语言组件调用
<!-- src/components/langselect/index.vue -->
<script setup lang="ts">
import { usei18n } from 'vue-i18n';
import svgicon from '@/components/svgicon/index.vue';
import { useappstore } from '@/store/modules/app';

const appstore = useappstore();
const { locale } = usei18n();

function handlelanguagechange(lang: string) {
  locale.value = lang;
  appstore.changelanguage(lang);
  if (lang == 'en') {
    elmessage.success('switch language successful!');
  } else {
    elmessage.success('切换语言成功!');
  }
}
</script>

<template>
  <el-dropdown trigger="click" @command="handlelanguagechange">
    <div>
      <svg-icon icon-class="language" />
    </div>
    <template #dropdown>
      <el-dropdown-menu>
        <el-dropdown-item
          :disabled="appstore.language === 'zh-cn'"
          command="zh-cn"
        >
          中文
        </el-dropdown-item>
        <el-dropdown-item :disabled="appstore.language === 'en'" command="en">
          english
        </el-dropdown-item>
      </el-dropdown-menu>
    </template>
  </el-dropdown>
</template>
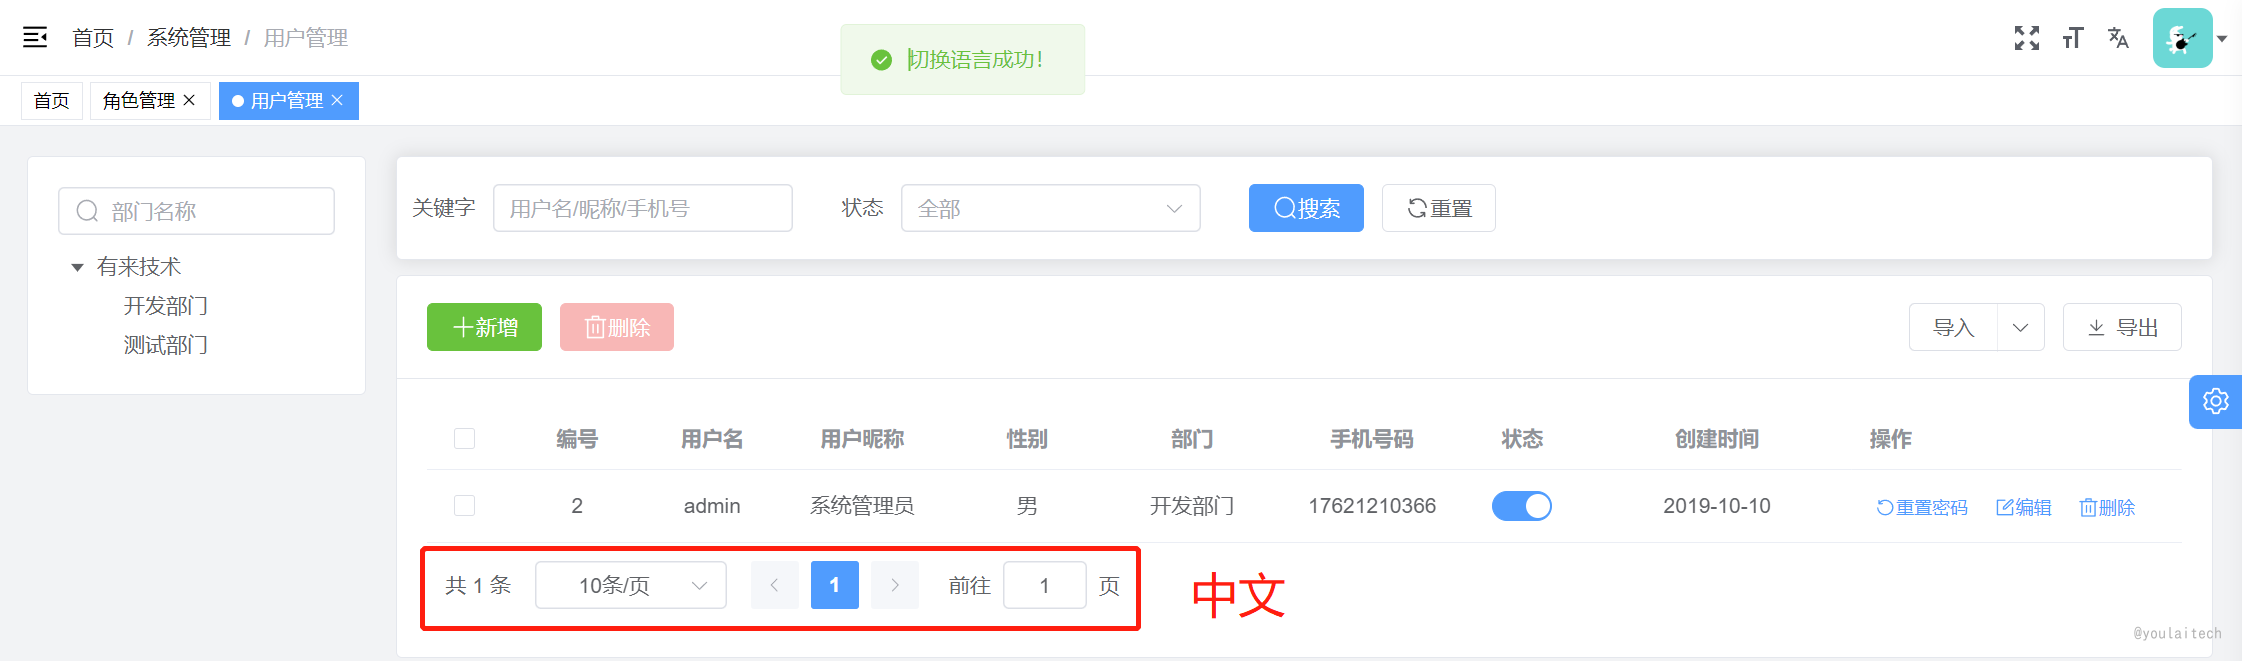
从 element plus 分页组件看下国际化的效果
vue-i18n 自定义国际化
参考:vue-i18n 官方文档 - installation
安装 vue-i18n
npm install vue-i18n@9
自定义语言包
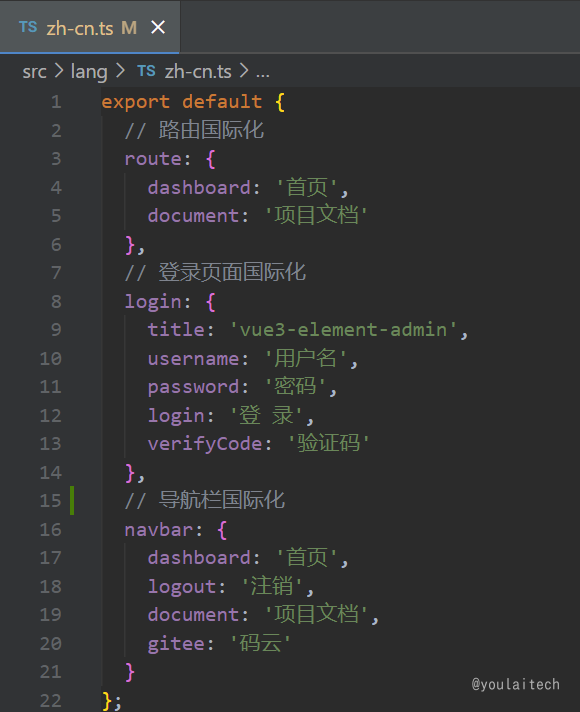
创建 src/lang/package 语言包目录,存放自定义的语言文件
| 中文语言包 zh-cn.ts | 英文语言包 en.ts |
|---|---|
 |  |
创建 i18n 实例
// src/lang/index.ts
import { createi18n } from 'vue-i18n';
import { useappstore } from '@/store/modules/app';

const appstore = useappstore();
// 本地语言包
import enlocale from './package/en';
import zhcnlocale from './package/zh-cn';

const messages = {
  'zh-cn': {
    ...zhcnlocale
  },
  en: {
    ...enlocale
  }
};
// 创建 i18n 实例
const i18n = createi18n({
  legacy: false,
  locale: appstore.language,
  messages: messages
});
// 导出 i18n 实例
export default i18n;
i18n 全局注册
// main.ts

// 国际化
import i18n from '@/lang/index';

app.use(i18n).mount('#app');
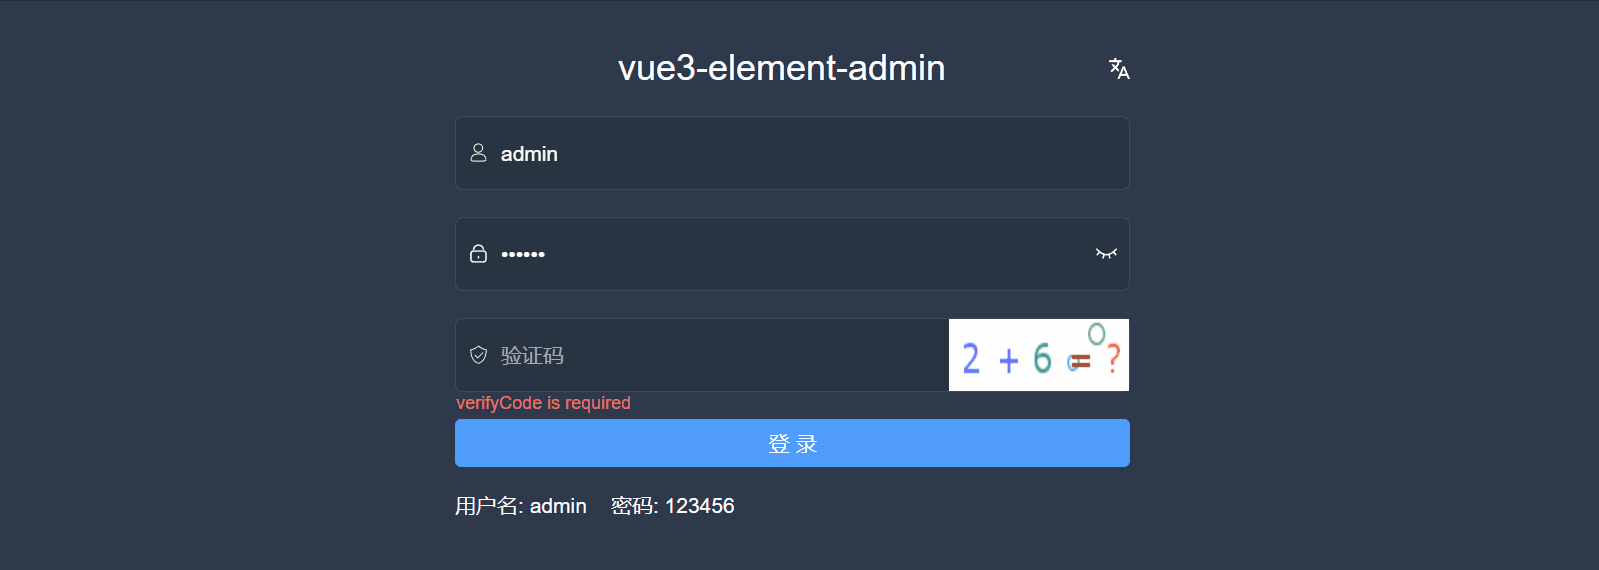
登录页面国际化使用
<span>{{ $t("login.title") }}</span>
在登录页面 src/view/login/index.vue 查看如何使用
效果预览
暗黑模式
element plus 2.2.0 版本开始支持暗黑模式,启用方式参考 element plus 官方文档 - 暗黑模式, 官方也提供了示例 element-plus-vite-starter 模版 。
这里根据官方文档和示例讲述 vue3-element-admin 是如何使用 vueuse 的 usedark 方法实现暗黑模式的动态切换。
导入 element plus 暗黑模式变量
// src/main.ts
import 'element-plus/theme-chalk/dark/css-vars.css'
切换暗黑模式设置
<!-- src/layout/components/settings/index.vue -->
<script setup lang="ts">

import iconepsunny from '~icons/ep/sunny';
import iconepmoon from '~icons/ep/moon';

/**
 * 暗黑模式
 */
const settingsstore = usesettingsstore();
const isdark = usedark();
const toggledark = () => usetoggle(isdark);

</script>

<template>
  <div class="settings-container">
    <h3 class="text-base font-bold">项目配置</h3>
    <el-divider>主题</el-divider>

    <div class="flex justify-center" @click.stop>
      <el-switch
        v-model="isdark"
        @change="toggledark"
        inline-prompt
        :active-icon="iconepmoon"
        :inactive-icon="iconepsunny"
        active-color="var(--el-fill-color-dark)"
        inactive-color="var(--el-color-primary)"
      />
    </div>
  </div>
</template>
自定义变量
除了 element plus 组件样式之外,应用中还有很多自定义的组件和样式,像这样的:
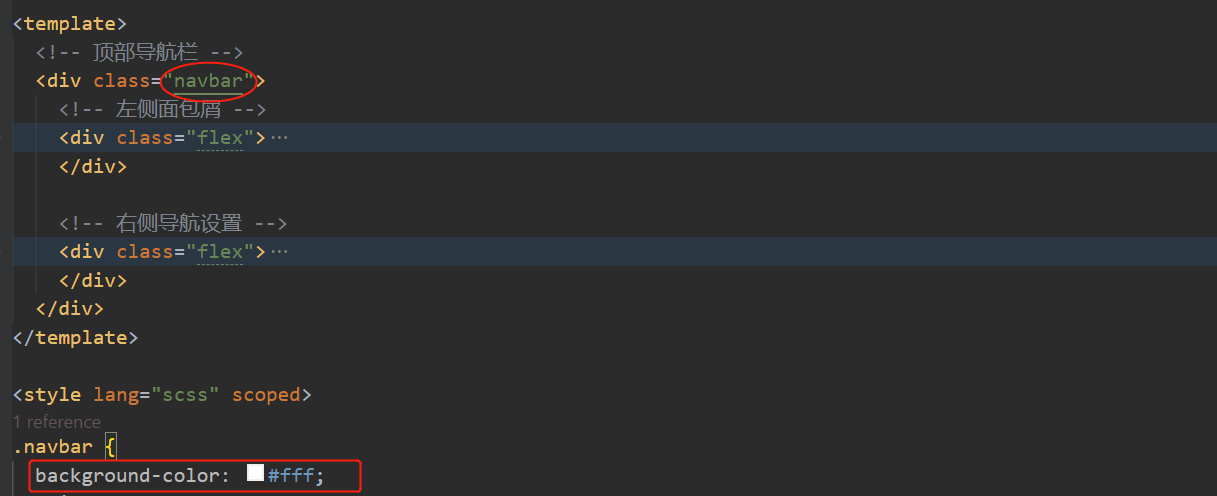
应对自定义组件样式实现暗黑模式步骤如下:
新建 src/styles/dark.scss
html.dark {
  /* 修改自定义元素的样式 */
  .navbar {
    background-color: #141414;
  }
}
在 element plus 的样式之后导入它
// main.ts
import 'element-plus/theme-chalk/dark/css-vars.css'
import '@/styles/dark.scss';
效果预览

组件封装
wangeditor 富文本
参考: wangeditor 官方文档
安装 wangeditor
npm install @wangeditor/editor @wangeditor/editor-for-vue@next
wangeditor 组件封装
<!-- src/components/wangeditor/index.vue -->
<template>
  <div style="border: 1px solid #ccc">
    <!-- 工具栏 -->
    <toolbar
      :editor="editorref"
      :defaultconfig="toolbarconfig"
      style="border-bottom: 1px solid #ccc"
      :mode="mode"
    />
    <!-- 编辑器 -->
    <editor
      :defaultconfig="editorconfig"
      v-model="defaulthtml"
      @onchange="handlechange"
      style="height: 500px; overflow-y: hidden"
      :mode="mode"
      @oncreated="handlecreated"
    />
  </div>
</template>

<script setup lang="ts">
import { onbeforeunmount, shallowref, reactive, torefs } from 'vue';
import { editor, toolbar } from '@wangeditor/editor-for-vue';

// api 引用
import { uploadfileapi } from '@/api/file';

const props = defineprops({
  modelvalue: {
    type: [string],
    default: ''
  }
});

const emit = defineemits(['update:modelvalue']);

// 编辑器实例,必须用 shallowref
const editorref = shallowref();

const state = reactive({
  toolbarconfig: {},
  editorconfig: {
    placeholder: '请输入内容...',
    menu_conf: {
      uploadimage: {
        // 自定义图片上传
        async customupload(file: any, insertfn: any) {
          uploadfileapi(file).then(response => {
            const url = response.data.url;
            insertfn(url);
          });
        }
      }
    }
  },
  defaulthtml: props.modelvalue,
  mode: 'default'
});

const { toolbarconfig, editorconfig, defaulthtml, mode } = torefs(state);

const handlecreated = (editor: any) => {
  editorref.value = editor; // 记录 editor 实例,重要!
};

function handlechange(editor: any) {
  emit('update:modelvalue', editor.gethtml());
}

// 组件销毁时,也及时销毁编辑器
onbeforeunmount(() => {
  const editor = editorref.value;
  if (editor == null) return;
  editor.destroy();
});
</script>

<style src="@wangeditor/editor/dist/css/style.css"></style>
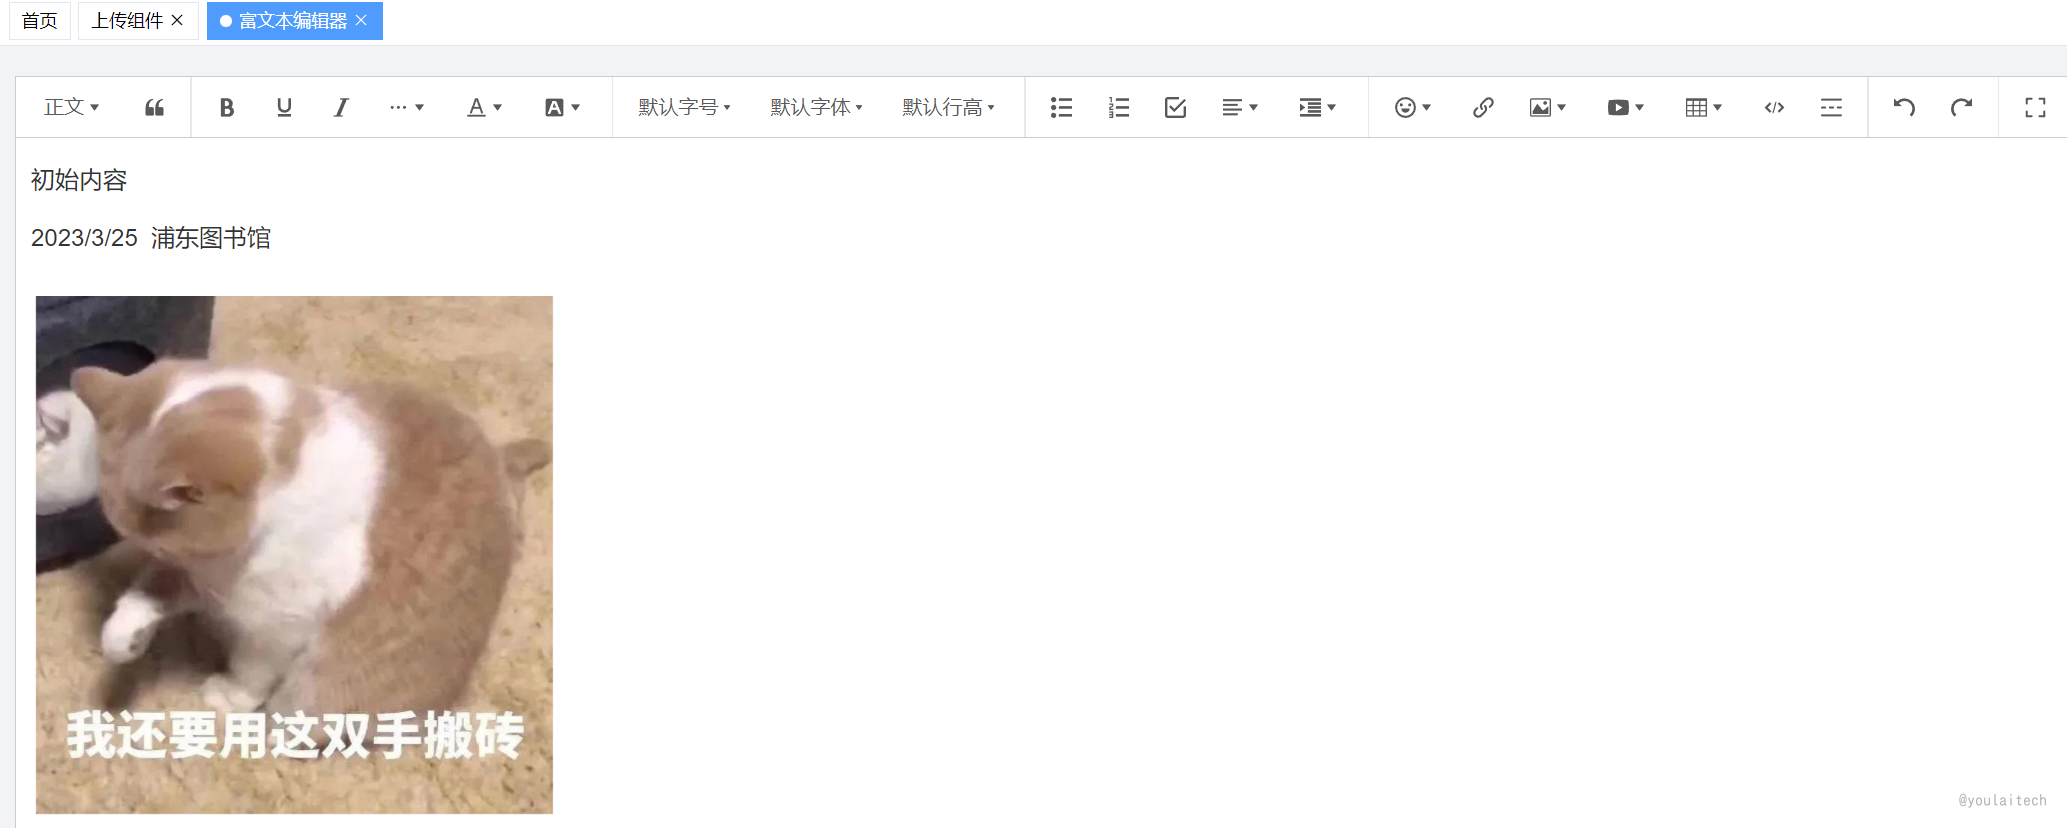
使用案例
<!-- wangeditor富文本编辑器示例 -->
<script setup lang="ts">
import editor from '@/components/wangeditor/index.vue';
const value = ref('初始内容');
</script>

<template>
  <div class="app-container">
    <editor v-model="value" style="height: 600px" />
  </div>
</template>
效果预览
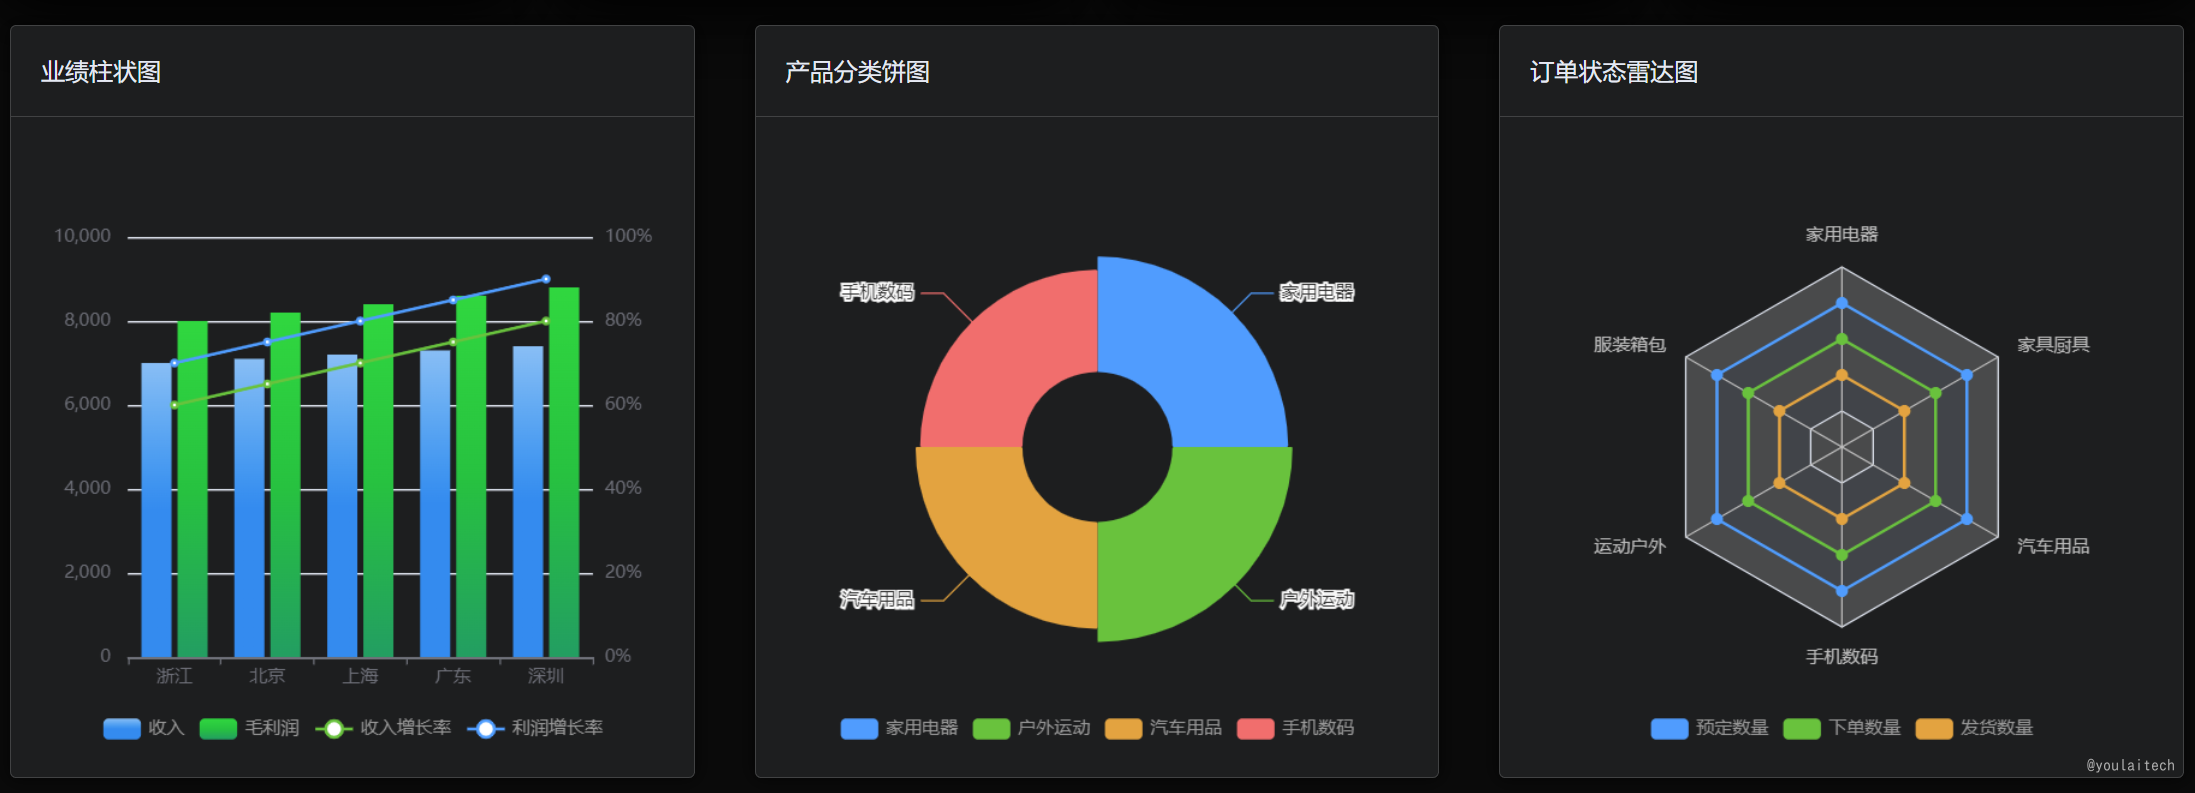
echarts 图表
安装 echarts
npm install echarts
组件封装
<!-- src/views/dashboard/components/chart/barchart.vue -->
<template>
  <el-card>
    <template #header> 线 + 柱混合图 </template>
    <div :id="id" :class="classname" :style="{ height, width }" />
  </el-card>
</template>

<script setup lang="ts">
import * as echarts from 'echarts';

const props = defineprops({
  id: {
    type: string,
    default: 'barchart'
  },
  classname: {
    type: string,
    default: ''
  },
  width: {
    type: string,
    default: '200px',
    required: true
  },
  height: {
    type: string,
    default: '200px',
    required: true
  }
});

const options = {
  grid: {
    left: '2%',
    right: '2%',
    bottom: '10%',
    containlabel: true
  },
  tooltip: {
    trigger: 'axis',
    axispointer: {
      type: 'cross',
      crossstyle: {
        color: '#999'
      }
    }
  },
  legend: {
    x: 'center',
    y: 'bottom',
    data: ['收入', '毛利润', '收入增长率', '利润增长率'],
    textstyle: {
      color: '#999'
    }
  },
  xaxis: [
    {
      type: 'category',
      data: ['浙江', '北京', '上海', '广东', '深圳'],
      axispointer: {
        type: 'shadow'
      }
    }
  ],
  yaxis: [
    {
      type: 'value',
      min: 0,
      max: 10000,
      interval: 2000,
      axislabel: {
        formatter: '{value} '
      }
    },
    {
      type: 'value',
      min: 0,
      max: 100,
      interval: 20,
      axislabel: {
        formatter: '{value}%'
      }
    }
  ],
  series: [
    {
      name: '收入',
      type: 'bar',
      data: [7000, 7100, 7200, 7300, 7400],
      barwidth: 20,
      itemstyle: {
        color: new echarts.graphic.lineargradient(0, 0, 0, 1, [
          { offset: 0, color: '#83bff6' },
          { offset: 0.5, color: '#188df0' },
          { offset: 1, color: '#188df0' }
        ])
      }
    },
    {
      name: '毛利润',
      type: 'bar',
      data: [8000, 8200, 8400, 8600, 8800],
      barwidth: 20,
      itemstyle: {
        color: new echarts.graphic.lineargradient(0, 0, 0, 1, [
          { offset: 0, color: '#25d73c' },
          { offset: 0.5, color: '#1bc23d' },
          { offset: 1, color: '#179e61' }
        ])
      }
    },
    {
      name: '收入增长率',
      type: 'line',
      yaxisindex: 1,
      data: [60, 65, 70, 75, 80],
      itemstyle: {
        color: '#67c23a'
      }
    },
    {
      name: '利润增长率',
      type: 'line',
      yaxisindex: 1,
      data: [70, 75, 80, 85, 90],
      itemstyle: {
        color: '#409eff'
      }
    }
  ]
};

onmounted(() => {
  // 图表初始化
  const chart = echarts.init(
    document.getelementbyid(props.id) as htmldivelement
  );
  chart.setoption(options);

  // 大小自适应
  window.addeventlistener('resize', () => {
    chart.resize();
  });
});
</script>
组件使用
<script setup lang="ts">
import barchart from './components/barchart.vue';
</script>

<template>
  <barchart id="barchart" height="400px"width="300px" />
</template>
效果预览
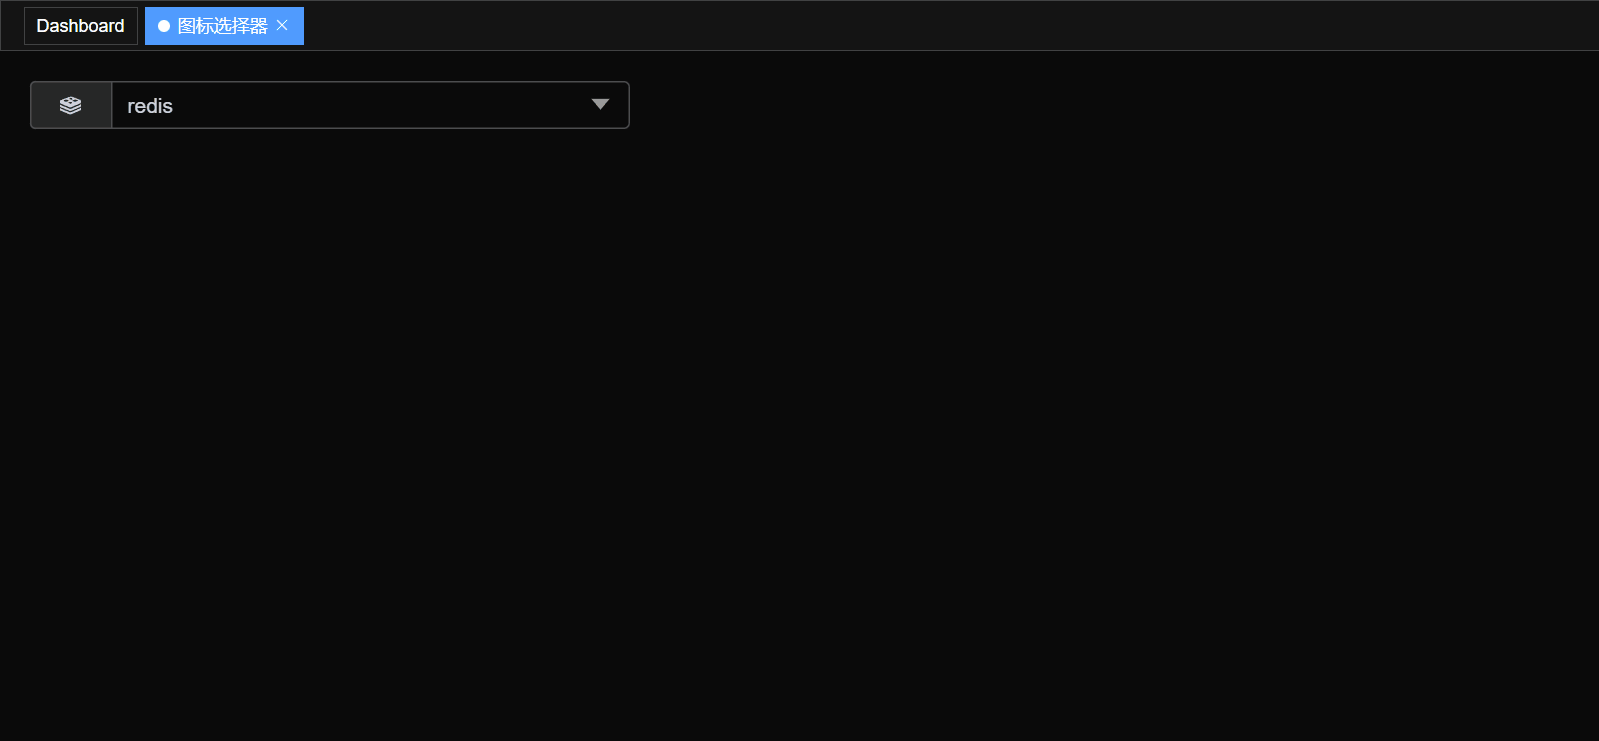
图标选择器
组件封装
<!-- src/components/iconselect/index.vue -->
<script setup lang="ts">
const props = defineprops({
  modelvalue: {
    type: string,
    require: false
  }
});

const emit = defineemits(['update:modelvalue']);
const inputvalue = toref(props, 'modelvalue');

const visible = ref(false); // 弹窗显示状态

const iconnames: string[] = []; // 所有的图标名称集合

const filtervalue = ref(''); // 筛选的值
const filtericonnames = ref<string[]>([]); // 过滤后的图标名称集合

const iconselectorref = ref(null);
/**
 * 加载 icon
 */
function loadicons() {
  const icons = import.meta.glob('../../assets/icons/*.svg');
  for (const icon in icons) {
    const iconname = icon.split('assets/icons/')[1].split('.svg')[0];
    iconnames.push(iconname);
  }
  filtericonnames.value = iconnames;
}

/**
 * 筛选图标
 */
function handlefilter() {
  if (filtervalue.value) {
    filtericonnames.value = iconnames.filter(iconname =>
      iconname.includes(filtervalue.value)
    );
  } else {
    filtericonnames.value = iconnames;
  }
}

/**
 * 选择图标
 */
function handleselect(iconname: string) {
  emit('update:modelvalue', iconname);
  visible.value = false;
}

/**
 * 点击容器外的区域关闭弹窗 vueuse onclickoutside
 */
onclickoutside(iconselectorref, () => (visible.value = false));

onmounted(() => {
  loadicons();
});
</script>

<template>
  <div class="iconselect-container" ref="iconselectorref">
    <el-input
      v-model="inputvalue"
      readonly
      @click="visible = !visible"
      placeholder="点击选择图标"
    >
      <template #prepend>
        <svg-icon :icon-class="inputvalue" />
      </template>
    </el-input>

    <el-popover
      shadow="none"
      :visible="visible"
      placement="bottom-end"
      trigger="click"
      width="400"
    >
      <template #reference>
        <div
          @click="visible = !visible"
          class="cursor-pointer text-[#999] absolute right-[10px] top-0 height-[32px] leading-[32px]"
        >
          <i-ep-caret-top v-show="visible"></i-ep-caret-top>
          <i-ep-caret-bottom v-show="!visible"></i-ep-caret-bottom>
        </div>
      </template>

      <!-- 下拉选择弹窗 -->
      <el-input
        class="p-2"
        v-model="filtervalue"
        placeholder="搜索图标"
        clearable
        @input="handlefilter"
      />
      <el-divider border-style="dashed" />

      <el-scrollbar height="300px">
        <ul class="icon-list">
          <li
            class="icon-item"
            v-for="(iconname, index) in filtericonnames"
            :key="index"
            @click="handleselect(iconname)"
          >
            <el-tooltip :content="iconname" placement="bottom" effect="light">
              <svg-icon
                color="var(--el-text-color-regular)"
                :icon-class="iconname"
              />
            </el-tooltip>
          </li>
        </ul>
      </el-scrollbar>
    </el-popover>
  </div>
</template>
组件使用
<!-- src/views/demo/iconselect.vue -->
<script setup lang="ts">
const iconname = ref('edit');
</script>

<template>
  <div class="app-container">
    <icon-select v-model="iconname" />
  </div>
</template>
效果预览
规范配置
代码统一规范
【vue3-element-admin】eslint+prettier+stylelint+editorconfig 约束和统一前端代码规范
git 提交规范
【vue3-element-admin】husky + lint-staged + commitlint + commitizen + cz-git 配置 git 提交规范
启动部署
项目启动
# 安装 pnpm
npm install pnpm -g

# 安装依赖
pnpm install

# 项目运行
pnpm run dev
项目部署
# 项目打包
pnpm run build:prod
生成的静态文件在工程根目录 dist 文件夹
faq
1: defineprops is not defined
-
问题描述
‘defineprops’ is not defined.eslint no-undef

-
解决方案
根据 eslint 官方解决方案描述,解析器使用
vue-eslint-parserv9.0.0 + 版本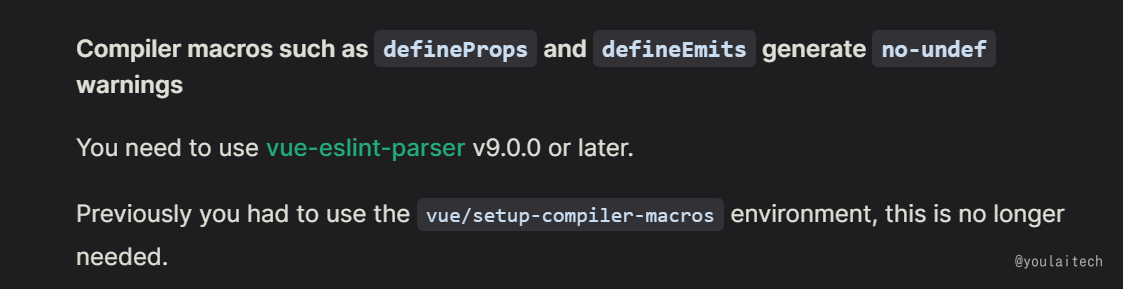
安装
vue-eslint-parser解析器npm install -d vue-eslint-parser
.eslintrc.js关键配置(v9.0.0及以上版本无需配置编译宏vue/setup-compiler-macros)如下 :parser: 'vue-eslint-parser', extends: [ 'eslint:recommended', // ... ],重启
vscode已无报错提示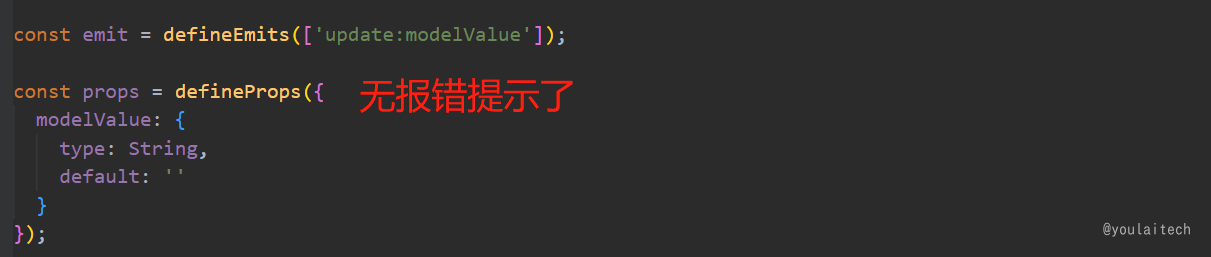
2: vite 首屏加载慢(白屏久)
-
问题描述
参考文章:为什么有人说 vite 快,有人却说 vite 慢
vite 启动时,并不像 webpack 那样做一个全量的打包构建,所以启动速度非常快。启动以后,浏览器发起请求时,
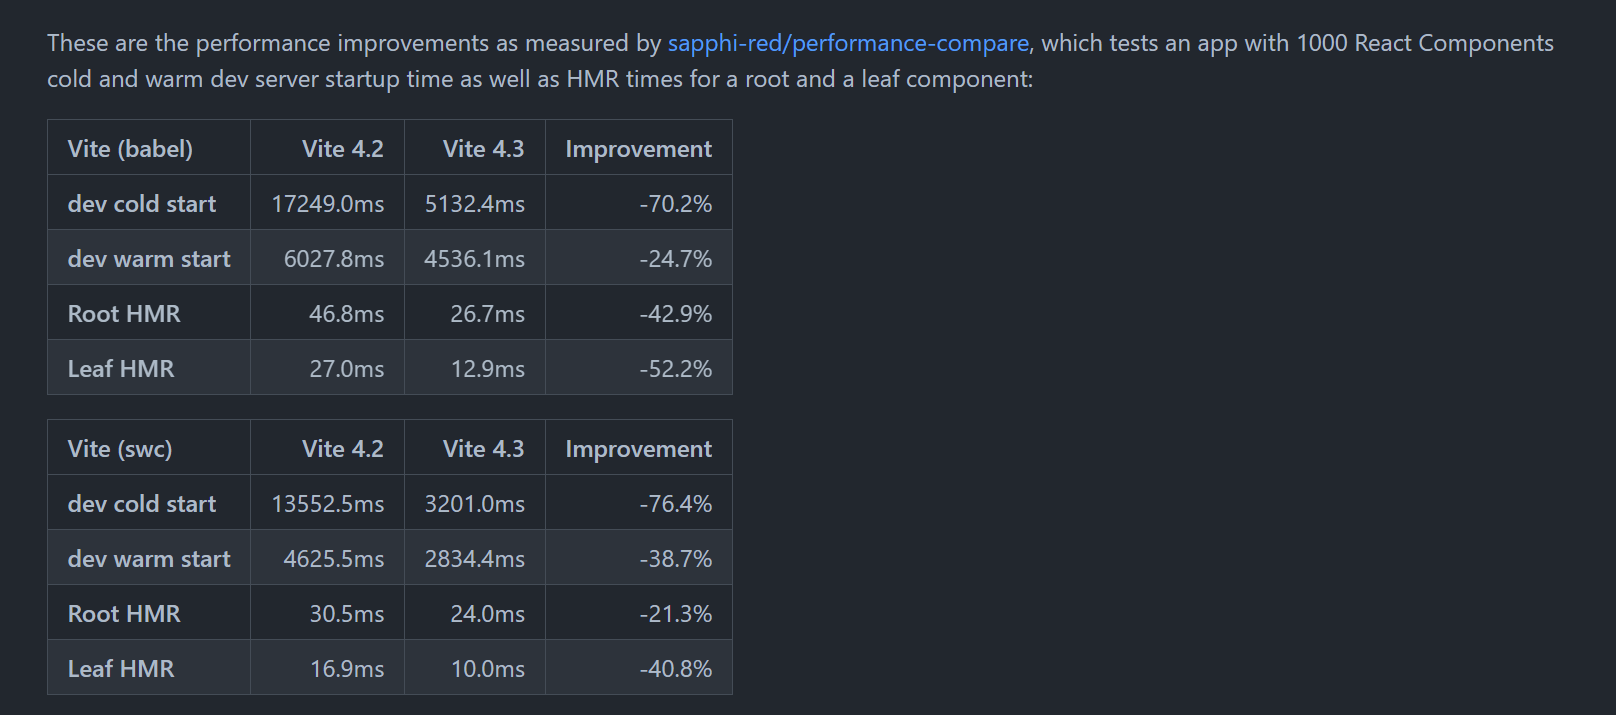
dev server要把请求需要的资源发送给浏览器,中间需要经历预构建、对请求文件做路径解析、加载源文件、对源文件做转换,然后才能把内容返回给浏览器,这个时间耗时蛮久的,导致白屏时间较长。解决方案升级 vite 4.3 版本
https://github.com/vitejs/vite/blob/main/packages/vite/changelog.md
结语
本篇从项目介绍、环境准备、vscode 的代码规范配置 、整合各种框架 、再到最后的启动部署,完整讲述如何基于 vue3 + vite4 + typescript + element plus 等主流技术栈从 0 到 1构建一个企业应用级管理前端框架。


发表评论