一、前言
作为一只前端攻城狮,没有一个属于自己的组件库,那岂不是狮子没有了牙齿,士兵没有了武器,姑娘没有了大宝sod蜜,你没有了我....
言归正传,下面将给大家介绍如何通过webpack5编译一个ts组件发布到npm平台。
二、思路
1、通过webpack5初始化一个typescript环境
2、使用typescript编写一个组件库
3、通过webpack5进行编译
4、配置package.json,通过npm发布编译后的组件库
5、在项目中的引用
三、实现
1、webpack5初始化环境
【1】创建一个名为simple-js的项目
npm init
【2】安装webpack相关的包
npm install webpack webpack-cli --save-dev
【3】使用webpack进行配置
npm webpack-cli init
或
.\node_modules\.bin\webpack-cli init
- 是否使用webpack-dev-server(进行测试)
- 是否创建html 在仓库里(htmlwebpackplugin会把打包好的js文件,自动绑到html 文件)
- 是否需要pwa
自动生成文件:
- tsconfig (ts配置文件)
- postcss.config
- webpack.config (webpack配置文件)
【4】配置文件详情
1、tsconfig.json
{
  "compileonsave": false,
  "compileroptions": {
    "outdir": "./dist/",// 打包到的目录
    "sourcemap": false,// 是否生成sourcemap(用于浏览器调试)
    "noimplicitany": false,
    "nounusedlocals": true,
    "nounusedparameters": true,
    "declaration": true,// 是否生成声明文件(重要配置,便于查看方法类型)
    "declarationdir": "./dist/types/",// 声明文件打包的位置
    "declarationmap": false,// 是否生成声明文件map文件(便于调试)
    "moduleresolution": "node",
    "module": "esnext",
    "target": "es5",// 转化成的目标语言
    "baseurl": "./",
    "types": [
      "node"
    ],
    "typeroots": [
      "./node_modules/@types"
    ],
    "lib": [
      "dom",
      "es2015"
    ],
    "jsx": "react",
    "allowjs": false
  },
  "include": [
    "src/**/*.ts",
    "typings.d.ts",
    "src/main.js",
  ],// 要打包的文件
  "exclude": [
    "node_modules",
    "*.test.ts"
  ]
}
2、webpack.config.js
// generated using webpack-cli https://github.com/webpack/webpack-cli
const path = require('path');
//clean-webpack-plugin: 实现每次编译时先清理上次编译结果
const { cleanwebpackplugin } = require('clean-webpack-plugin');
const htmlwebpackplugin = require('html-webpack-plugin');
const isproduction = process.env.node_env == 'production';
const config = {
    entry: './src/index.ts',
    output: {
        path: path.resolve(__dirname, 'dist'),
        filename: 'main.js', // 输出文件名
        library: 'simplejs', // 库的名称 -全局引入时可以使用
        librarytarget: 'umd', // 支持的模块系统
        // umdnameddefine: true // 会为 umd 模块创建一个命名的 amd 模块
    },
    devserver: {
        open: true,
        host: 'localhost',
    },
    plugins: [
        new htmlwebpackplugin({
            template: 'index.html',
        }),
        new cleanwebpackplugin()
    ],
    module: {
        rules: [
            {
                test: /\.ts$/i,
                loader: 'ts-loader',
                exclude: ['/node_modules/'],
            },
            {
                test: /\.(eot|svg|ttf|woff|woff2|png|jpg|gif)$/i,
                type: 'asset',
            }
        ]
    },
    resolve: {
        extensions: ['.tsx', '.ts', '.jsx', '.js', '...'],
    },
};
module.exports = () => {
    if (isproduction) {
        config.mode = 'production';
    } else {
        config.mode = 'development';
    }
    return config;
};
2、使用typescript编写一个组件库(simple-js)
simple-js组件库中集成算法、类型判断等常用的公共方法。
【1】方法文件
src\algorithm\index.ts
import { storagecapacityunit } from './algorithm-types';
// @params - str: 文本
// @params - showtotal: 显示文本的总个数
// 功能描述:截断文本,中间出现省略号
const truncatetext = (str: string, showtotal: number): string => {
    if (str.length > showtotal) {
        const prefixnum = math.floor(showtotal / 2);
        const suffixnum = showtotal - prefixnum;
        return `${str.slice(0, prefixnum)}...${str.slice(-suffixnum)}`;
    }
    return str;
}
// @params1 - value: 需要转换的值
// @params2 - sourceunit: 转换前单位
// @params3 - sourceunit: 转换后单位
// @params4 - base: 转换进制
// 功能描述:存储单位的转换,
const unitswitchforstoragecapacity = (value: number, sourceunit: storagecapacityunit, targetunit: storagecapacityunit, base = 1024): number => {
    const unitlist = ['b', 'kb', 'mb', 'gb', 'tb', 'pb', 'eb', 'zb', 'yb'];
    const sourceunitindex = unitlist.findindex(ele => ele === sourceunit);
    const targetunitindex = unitlist.findindex(ele => ele === targetunit);
    if (sourceunitindex === -1 || targetunitindex === -1) {
        console.error('转换失败,sourceunit或者targetunit不再转换列表')
        return value;
    }
    const exponent = sourceunitindex - targetunitindex;
    const resvalue = value * math.pow(base, exponent);
    return number.isinteger(resvalue) ? resvalue : number(resvalue.tofixed(2));
}
【2】接口文件
src\algorithm\algorithm-types.ts
export type storagecapacityunit = 'b'| 'kb'| 'mb'| 'gb'| 'tb'| 'pb'| 'eb'| 'zb' | 'yb';
【3】主文件
主文件中是simple-js的导出模块的入口:
import { truncatetext, unitswitchforstoragecapacity } from './algorithm/index';
import { isobject, isemptyobject, isnullorundefined } from './type/index';
export {
    truncatetext,
    unitswitchforstoragecapacity,
    isobject,
    isemptyobject,
    isnullorundefined
}
3、通过webpack5进行编译
编译:
npm run build
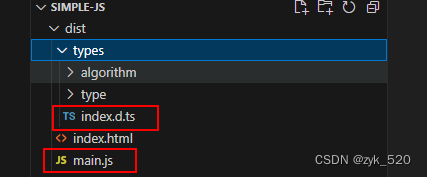
编译后文件目录:
main.js:组件库的主代码文件
index.d.ts:组件库的类型文件入口
4、配置package.json,通过npm发布编译后的组件库
{
  "name": "simple-js-zyk", //npm平台的包
  "version": "1.0.0",
  "description": "工具包",//包的描述说明
  "main": "./dist/main.js", // 组件库的入口文件
  "types": "./dist/types/index.d.ts", // 组件库中类型的文件入口
  "files": [
    "dist"
  ], //npm发布的目录
  "scripts": {
    "test": "echo \"error: no test specified\" && exit 1",
    "build": "webpack --mode=production --node-env=production",
    "build:dev": "webpack --mode=development",
    "build:prod": "webpack --mode=production --node-env=production",
    "watch": "webpack --watch",
    "serve": "webpack serve"
  },
  "author": "",
  "license": "isc",
  "devdependencies": {
    "@webpack-cli/generators": "^3.0.7",
    "clean-webpack-plugin": "^4.0.0",
    "html-webpack-plugin": "^5.6.0",
    "simple-js-zyk": "^1.0.0",
    "ts-loader": "^9.5.1",
    "typescript": "^5.4.5",
    "webpack": "^5.91.0",
    "webpack-cli": "^5.1.4"
  }
}npm发布流程见:npm发布vue组件
5、在项目中的引用
【1】在普通js项目中的使用
1)安装simple-js-zyk包
npm install --save-dev simple-js-zyk
2)项目中在index.html引入
script type="text/javascript" src="./node_modules/simple-js-zyk/dist/main.js"></script>
3)使用
<script type="module">
        console.log(simplejs.truncatetext('xxxxxxxssssss', 4));
        console.log(simplejs.unitswitchforstoragecapacity(100, 'mb', 'kb'))
 </script>
【2】在vue项目中使用
1)安装simple-js-zyk包
npm install --save-dev simple-js-zyk
2)vue项目tsconfig.json文件中引入simple-js-zyk的文件类型
{
    ...
    "compileroptions": {
        "types": ["node_modules/base-tool-zyk/dist/types"]
    }
    ...
}
3)在vue模块文件中使用
import * as simplejs from 'simple-js-zyk';
console.log(simplejs.algorithm.truncatetext('asxasxsaasss', 3))
结果:

到此这篇关于使用webpack5+typescript+npm发布组件库的文章就介绍到这了,更多相关webpack5发布组件库内容请搜索代码网以前的文章或继续浏览下面的相关文章希望大家以后多多支持代码网!


发表评论