
 我要评论
我要评论纲要
- 令牌设计模式: 为什么需要区分
access token与refresh token - 前端令牌存储策略: 内存、
cookie(httponly)、sessionstorage、localstorage安全性对比 - spring security 自定义 jwt 认证过滤器核心思路: 直接构造
authentication对象并置入securitycontext - jwt 工具类增强: 支持签名密钥分离、创建访问/刷新令牌的 helper 方法
- 外部配置实现: 使用
@configurationproperties将过期时间等参数迁移至application.yml - 完整项目结构: 展示包结构和关键类
- 配置示例与单元测试修复
访问令牌与刷新令牌的设计哲学
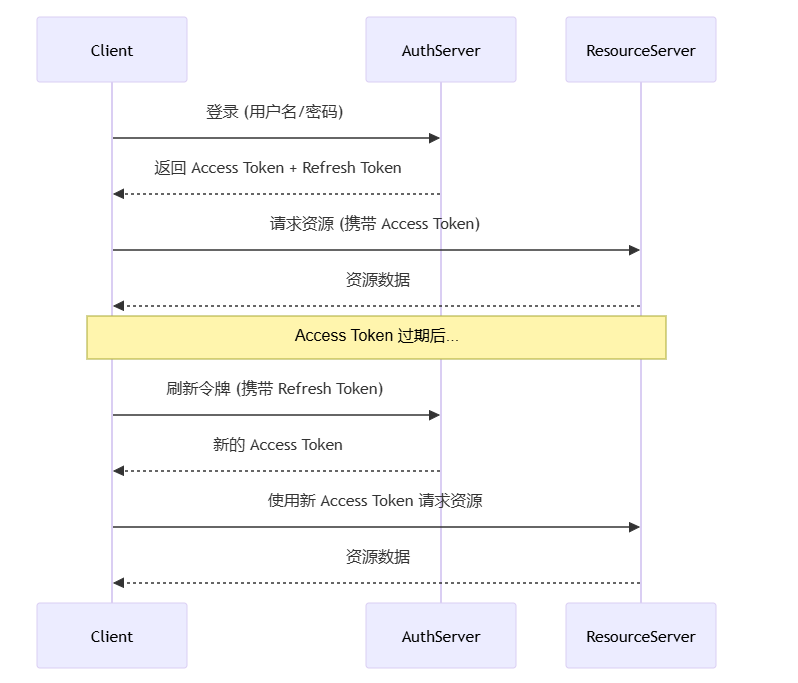
在分布式认证体系中,令牌一旦签发即视为“已暴露”。没有任何客户端存储方案能百分之百阻止令牌被窃取,因此安全策略的核心是降低令牌泄露后的影响范围与时间窗口。由此引入两种令牌:
- 访问令牌 (
access token):直接携带权限访问资源,生命周期极短(分钟级),即使泄露也会快速失效。 - 刷新令牌 (
refresh token):不能直接访问资源,唯一用途是换取新的访问令牌,有效期较长(小时、天或月),且签发时使用不同密钥。
这种职责分离的设计,配合 ip 风控、异常行为检测、多因子认证等手段,可以构建纵深防御体系。
令牌在前端的存储选择
| 存储方式 | 安全性 | 特点 |
|---|---|---|
| 内存 (vuex/redux) | 最高 | 页面刷新即丢失,需重新登录 |
cookie (httponly, secure, samesite) | 较高 | 只能由服务端设置,无法通过 js 读取,可限制域名 |
sessionstorage | 中等 | 关闭浏览器标签页后清除,略优于 localstorage |
localstorage | 较低 | 永久存储,所有同源脚本均可访问,不推荐 |
实际项目中建议采用 cookie (httponly) 存储刷新令牌,访问令牌可存于内存并配合静默刷新。无论采用哪种方案,都不应只依赖令牌本身的安全性,还需要在服务端结合限流、设备指纹、异地登录检测等多重措施。
spring security 集成 jwt 的核心步骤
spring security 没有内置适用于前后端分离的 jwtauthenticationfilter,但实现一个自定义过滤器非常简单。整个认证流程的“心脏”就是将填充完整的 authentication 对象放入 securitycontextholder:
- 从请求头中提取 jwt 字符串
- 解析并校验令牌
- 构造
usernamepasswordauthenticationtoken,设置权限 - 调用
securitycontextholder.getcontext().setauthentication(...)
认证失败时清空上下文并交由后续过滤器链处理。
下面我们就从改造 jwt 工具类开始,逐步完成一个可外部配置的生产级 jwt 过滤器。
jwt 工具类增强:支持双密钥与外部配置
新增appproperties配置类
将令牌过期时间与签名密钥等抽离到配置文件中,避免硬编码。
package com.example.demo.config;
import org.springframework.boot.context.properties.configurationproperties;
import org.springframework.context.annotation.configuration;
@configuration
@configurationproperties(prefix = "app")
public class appproperties {
    private jwt jwt = new jwt();
    public jwt getjwt() {
        return jwt;
    }
    public void setjwt(jwt jwt) {
        this.jwt = jwt;
    }
    public static class jwt {
        /** 访问令牌过期时间(毫秒),默认5分钟 */
        private long accesstokenexpiretime = 5 * 60 * 1000l;
        /** 刷新令牌过期时间(毫秒),默认30天 */
        private long refreshtokenexpiretime = 30 * 24 * 60 * 60 * 1000l;
        /** 访问令牌签名密钥 */
        private string accesstokensecret = "default-access-secret";
        /** 刷新令牌签名密钥 */
        private string refreshtokensecret = "default-refresh-secret";
        // getters and setters
        public long getaccesstokenexpiretime() {
            return accesstokenexpiretime;
        }
        public void setaccesstokenexpiretime(long accesstokenexpiretime) {
            this.accesstokenexpiretime = accesstokenexpiretime;
        }
        public long getrefreshtokenexpiretime() {
            return refreshtokenexpiretime;
        }
        public void setrefreshtokenexpiretime(long refreshtokenexpiretime) {
            this.refreshtokenexpiretime = refreshtokenexpiretime;
        }
        public string getaccesstokensecret() {
            return accesstokensecret;
        }
        public void setaccesstokensecret(string accesstokensecret) {
            this.accesstokensecret = accesstokensecret;
        }
        public string getrefreshtokensecret() {
            return refreshtokensecret;
        }
        public void setrefreshtokensecret(string refreshtokensecret) {
            this.refreshtokensecret = refreshtokensecret;
        }
    }
}
改进后的jwtutil工具类
工具类提供生成访问令牌、刷新令牌以及解析验证的核心逻辑,密钥和过期时间均从 appproperties 注入。
package com.example.demo.util;
import com.example.demo.config.appproperties;
import io.jsonwebtoken.*;
import io.jsonwebtoken.security.keys;
import org.springframework.stereotype.component;
import java.nio.charset.standardcharsets;
import java.security.key;
import java.util.date;
@component
public class jwtutil {
    private final appproperties appproperties;
    public jwtutil(appproperties appproperties) {
        this.appproperties = appproperties;
    }
    /**
     * 生成访问令牌
     */
    public string createaccesstoken(string subject) {
        appproperties.jwt jwtconfig = appproperties.getjwt();
        return generatetoken(subject, jwtconfig.getaccesstokensecret(),
                jwtconfig.getaccesstokenexpiretime());
    }
    /**
     * 生成刷新令牌
     */
    public string createrefreshtoken(string subject) {
        appproperties.jwt jwtconfig = appproperties.getjwt();
        return generatetoken(subject, jwtconfig.getrefreshtokensecret(),
                jwtconfig.getrefreshtokenexpiretime());
    }
    /**
     * 通用令牌生成方法
     */
    private string generatetoken(string subject, string secret, long expirationms) {
        key key = keys.hmacshakeyfor(secret.getbytes(standardcharsets.utf_8));
        date now = new date();
        date expiration = new date(now.gettime() + expirationms);
        return jwts.builder()
                .setsubject(subject)
                .setissuedat(now)
                .setexpiration(expiration)
                .signwith(key, signaturealgorithm.hs256)
                .compact();
    }
    /**
     * 解析令牌,返回主体(用户名)
     */
    public string parsetoken(string token, string secret) {
        key key = keys.hmacshakeyfor(secret.getbytes(standardcharsets.utf_8));
        jws<claims> claimsjws = jwts.parserbuilder()
                .setsigningkey(key)
                .build()
                .parseclaimsjws(token);
        return claimsjws.getbody().getsubject();
    }
    /**
     * 校验令牌是否有效
     */
    public boolean validatetoken(string token, string secret) {
        try {
            parsetoken(token, secret);
            return true;
        } catch (jwtexception | illegalargumentexception e) {
            return false;
        }
    }
    /**
     * 获取访问令牌密钥(供过滤器使用)
     */
    public string getaccesstokensecret() {
        return appproperties.getjwt().getaccesstokensecret();
    }
}
配置文件application.yml
通过 app.jwt 前缀即可自定义密钥和过期时间,ide 会自动提示。
app:
  jwt:
    access-token-expire-time: 300000   # 5分钟
    refresh-token-expire-time: 2592000000  # 30天
    access-token-secret: my-access-secret-key-must-be-long
    refresh-token-secret: my-refresh-secret-key-must-be-long
自定义 jwt 认证过滤器
基于上述工具类,我们可以轻松编写一个 jwtauthenticationfilter,它只做三件事:提取、验证、写入上下文。
package com.example.demo.security;
import com.example.demo.util.jwtutil;
import org.springframework.security.authentication.usernamepasswordauthenticationtoken;
import org.springframework.security.core.context.securitycontextholder;
import org.springframework.web.filter.onceperrequestfilter;
import javax.servlet.filterchain;
import javax.servlet.servletexception;
import javax.servlet.http.httpservletrequest;
import javax.servlet.http.httpservletresponse;
import java.io.ioexception;
import java.util.collections;
public class jwtauthenticationfilter extends onceperrequestfilter {
    private final jwtutil jwtutil;
    public jwtauthenticationfilter(jwtutil jwtutil) {
        this.jwtutil = jwtutil;
    }
    @override
    protected void dofilterinternal(httpservletrequest request,
                                    httpservletresponse response,
                                    filterchain filterchain) throws servletexception, ioexception {
        string header = request.getheader("authorization");
        if (header != null && header.startswith("bearer ")) {
            string token = header.substring(7);
            string secret = jwtutil.getaccesstokensecret();
            if (jwtutil.validatetoken(token, secret)) {
                string username = jwtutil.parsetoken(token, secret);
                // 实际项目应从数据库加载用户权限,此处仅做示例
                usernamepasswordauthenticationtoken authentication =
                        new usernamepasswordauthenticationtoken(username, null, collections.emptylist());
                securitycontextholder.getcontext().setauthentication(authentication);
            } else {
                // 令牌无效,清空上下文交给后续过滤器
                securitycontextholder.clearcontext();
            }
        }
        filterchain.dofilter(request, response);
    }
}
最后,在 spring security 配置类中将自定义过滤器添加至 usernamepasswordauthenticationfilter 之前即可生效。
项目代码结构
src/main/java/com/example/demo/
├── config
│   └── appproperties.java
├── security
│   ├── jwtauthenticationfilter.java
│   └── securityconfig.java
├── util
│   └── jwtutil.java
└── demoapplication.java
src/main/resources/
└── application.yml
单元测试修复
原有的测试用例需要传入 appproperties 才能正常使用 jwtutil。可以通过手动构造默认配置或使用 @springboottest 加载上下文来解决:
// 简单构造示例
appproperties props = new appproperties();
// 内部 jwt 对象已有默认值,无需额外设置
jwtutil jwtutil = new jwtutil(props);
string accesstoken = jwtutil.createaccesstoken("testuser");
assertnotnull(accesstoken);
assertequals("testuser", jwtutil.parsetoken(accesstoken, props.getjwt().getaccesstokensecret()));
总结
本文从令牌类型设计、安全存储策略开始,详细讲解了如何在 spring security 体系中集成 jwt,并通过 @configurationproperties 将重要参数外部化,最终实现了一个可配置、易扩展的 jwt 认证过滤器。
所附代码包含完整的 package 和 import,可直接复制运行,只需确保项目已引入 spring-boot-starter-security 和 jjwt 依赖。
到此这篇关于spring security + oauth2:jwt 访问令牌、刷新令牌与外部配置的文章就介绍到这了,更多相关spring security+oauth2与jwt访问令牌内容请搜索代码网以前的文章或继续浏览下面的相关文章希望大家以后多多支持代码网!



发表评论