适合读者:掌握了函数和列表字典的 python 入门开发者
一个 10 万行的 nginx 访问日志,筛出所有状态码为 500 的请求行,按 url 分组统计次数,再把结果写成 json 报告——不用 excel,不用数据库,一个 python 脚本搞定,运行时间不到一秒。
这就是文件操作的实际价值所在。数据不可能永远活在内存里,程序的输入来自文件,输出也要写回文件,两者之间的这段代码就是文件操作的核心。
本篇用一个日志分析器作为贯穿场景,从最基础的 open() 函数讲起,覆盖文本读写、csv、json、路径处理,以及几个在生产代码里真正会踩的坑。
一、文件读写基础
1.1 open() 函数与三种模式
python 用内置的 open() 函数打开文件,最重要的两个参数是路径和模式:
# 读取文件(默认模式,文件不存在会报 filenotfounderror)
file = open("access.log", "r")

# 写入文件(会覆盖原有内容,文件不存在则创建)
file = open("output.txt", "w")

# 追加内容(不覆盖,在原有内容末尾继续写)
file = open("output.txt", "a")
三种模式的行为差异:
| 模式 | 文件存在 | 文件不存在 | 常见场景 |
|---|---|---|---|
"r" | 正常打开 | 报 filenotfounderror | 读取配置、日志 |
"w" | 清空重写 | 自动创建 | 生成报告、输出结果 |
"a" | 追加写入 | 自动创建 | 追加日志、增量输出 |
处理二进制文件:图片、pdf 等二进制文件需要加 "b" 模式(如 "rb", "wb"),本篇聚焦文本文件。
1.2 with open():正确的文件打开姿势
手动 open() 的问题是:如果读取过程中程序崩溃,文件句柄就不会被关闭,长期运行的程序会耗尽系统的文件描述符。
with 语句解决了这个问题:
# 推荐写法:with 语句保证文件一定被关闭
with open("access.log", "r", encoding="utf-8") as f:
    content = f.read()
# 离开 with 代码块后,f 自动关闭,无论是否有异常

# 不推荐写法:需要手动 close(),一旦出错容易忘记
f = open("access.log", "r", encoding="utf-8")
content = f.read()
f.close()  # 如果 read() 出错,这行就执行不到
with 语句背后用的是 python 的上下文管理器协议——文件对象实现了 __enter__ 和 __exit__ 方法,with 块结束时会自动调用 __exit__,无论是否发生异常都会执行关闭操作。
encoding 参数不要省略:不同操作系统的默认编码不同(windows 是 gbk,linux/macos 是 utf-8),省略 encoding 会导致代码在不同环境下行为不一致。
1.3 四种读取方式:如何选择
打开文件之后,有四种方式读取内容,选错了会直接影响内存占用:
with open("access.log", "r", encoding="utf-8") as f:

    # 方式1:read() — 一次性读取全部内容,返回字符串
    content = f.read()
    # 适合:小文件(< 几十 mb),需要整体处理

    # 方式2:readline() — 每次读取一行,返回字符串(含 \n)
    line = f.readline()
    # 适合:需要手动控制读取进度的场景

    # 方式3:readlines() — 一次性读取所有行,返回列表
    lines = f.readlines()
    # 适合:小文件,需要按行处理并保留所有行

    # 方式4:for line in f — 逐行迭代(推荐)
    for line in f:
        process(line)
    # 适合:大文件(按需读取,内存友好)
内存开销对比:
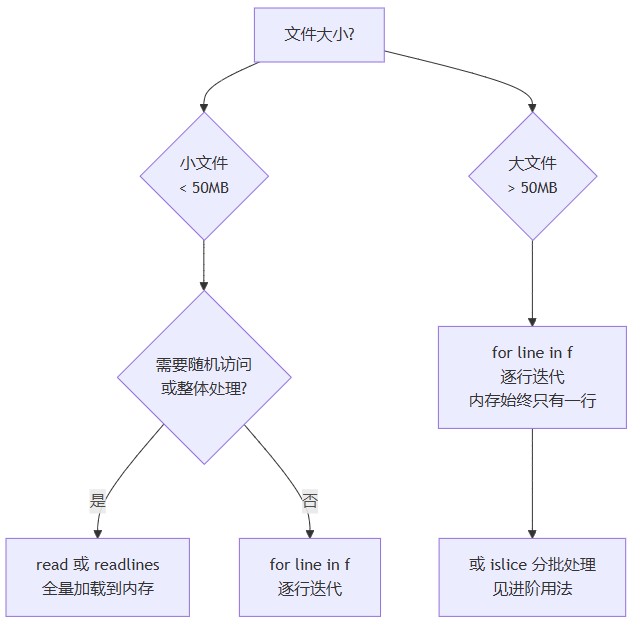
实际经验:一个 500mb 的日志文件,read() 需要占用约 500mb 内存,for line in f 的内存占用始终不超过一行的大小(通常几百字节)。
二、写入文件
2.1 write() 与 writelines()
# write():写入一个字符串,返回写入的字符数
with open("output.txt", "w", encoding="utf-8") as f:
    f.write("第一行\n")        # \n 换行符需要手动添加
    f.write("第二行\n")
    count = f.write("第三行\n")
    print(count)               # 输出写入的字符数

# writelines():写入字符串列表,不自动添加换行符
lines = ["第一行\n", "第二行\n", "第三行\n"]
with open("output.txt", "w", encoding="utf-8") as f:
    f.writelines(lines)
两者的区别只有一个:writelines() 接受可迭代对象,但不会自动在每个元素后面添加换行符,换行符需要包含在每个字符串里。
2.2 追加写入
"a" 模式在文件末尾继续写入,不覆盖原有内容:
def append_log(message):
    """追加一条日志记录"""
    import datetime
    timestamp = datetime.datetime.now().strftime("%y-%m-%d %h:%m:%s")
    with open("app.log", "a", encoding="utf-8") as f:
        f.write(f"[{timestamp}] {message}\n")

append_log("用户登录成功")
append_log("查询请求处理完成")
# 每次调用都在 app.log 末尾追加一行
三、csv 文件读写
csv(comma-separated values)是最常见的表格数据格式,python 内置了 csv 模块处理它。
3.1 读取 csv
import csv

# 读取 csv 文件,每行返回一个列表
with open("students.csv", "r", encoding="utf-8") as f:
    reader = csv.reader(f)
    header = next(reader)    # 第一行通常是表头
    print("字段名:", header)  # ['姓名', '分数', '班级']

    for row in reader:
        print(row)            # ['张三', '92', '高一甲班']
更推荐的方式是用 dictreader,把每行转成字典,直接用字段名取值:
import csv

with open("students.csv", "r", encoding="utf-8") as f:
    reader = csv.dictreader(f)

    for row in reader:
        # row 是一个字典:{'姓名': '张三', '分数': '92', '班级': '高一甲班'}
        name = row["姓名"]
        score = int(row["分数"])   # csv 里数字是字符串,需要手动转换
        print(f"{name}: {score} 分")
3.2 写入 csv
import csv

students = [
    {"姓名": "张三", "分数": 92, "班级": "高一甲班"},
    {"姓名": "李四", "分数": 87, "班级": "高一乙班"},
    {"姓名": "王五", "分数": 95, "班级": "高一甲班"},
]

with open("output.csv", "w", encoding="utf-8-sig", newline="") as f:
    fieldnames = ["姓名", "分数", "班级"]
    writer = csv.dictwriter(f, fieldnames=fieldnames)

    writer.writeheader()   # 写入表头行
    writer.writerows(students)
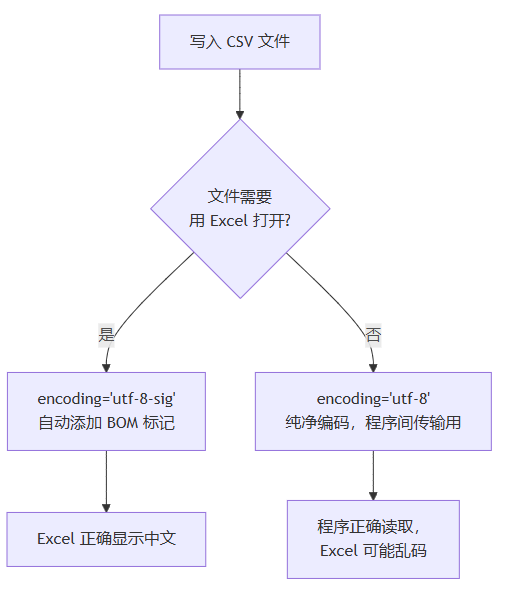
3.3 编码坑:utf-8 vs utf-8-sig
这是 csv 处理最常见的坑:
# 写入时用 utf-8
with open("output.csv", "w", encoding="utf-8") as f:
    writer = csv.writer(f)
    writer.writerow(["姓名", "分数"])
# 用 excel 打开:第一列显示 "锘縿名" 或乱码

# 写入时用 utf-8-sig(bom 标记版本)
with open("output.csv", "w", encoding="utf-8-sig") as f:
    writer = csv.writer(f)
    writer.writerow(["姓名", "分数"])
# 用 excel 打开:正常显示中文
原因:excel 打开 csv 文件时会检查文件开头是否有 bom(byte order mark,字节顺序标记)。utf-8-sig 编码在文件开头写入 bom(\xef\xbb\xbf),告诉 excel 这是 utf-8 文件,excel 就能正确识别中文。
规则:
- 程序读/写,不涉及 excel:用
utf-8 - 需要 excel 打开中文 csv:写入用
utf-8-sig,读取时utf-8和utf-8-sig都能正确读取
四、json 文件读写
json 是 web api 和配置文件的主流格式,python 内置 json 模块处理它。
4.1 读取 json(json.load)
import json

# 从文件读取 json,自动转换为 python 对象
with open("config.json", "r", encoding="utf-8") as f:
    config = json.load(f)

# config 现在是 python 字典或列表
print(config["database"]["host"])  # 像操作普通字典一样
4.2 写入 json(json.dump)
import json

report = {
    "date": "2024-01-15",
    "total_requests": 12453,
    "error_count": 23,
    "error_urls": ["/api/user/login", "/api/order/create"],
    "success_rate": 99.82
}

with open("report.json", "w", encoding="utf-8") as f:
    json.dump(
        report,
        f,
        ensure_ascii=false,   # 不把中文转义成 \uxxxx,保持可读性
        indent=2              # 每级缩进 2 个空格,文件更易读
    )
生成的 json 文件:
{
  "date": "2024-01-15",
  "total_requests": 12453,
  "error_count": 23,
  "error_urls": [
    "/api/user/login",
    "/api/order/create"
  ],
  "success_rate": 99.82
}
4.3 python 对象与 json 的类型对照
json 的类型系统比 python 窄,写入时会做自动转换:
| python 类型 | json 格式 | 读回 python 的类型 |
|---|---|---|
dict | {} 对象 | dict |
list / tuple | [] 数组 | list |
str | "string" | str |
int / float | 数字 | int / float |
true / false | true / false | bool |
none | null | none |
set | ❌ 不支持 | — |
datetime | ❌ 不支持 | — |
常见坑:set 和 datetime 对象无法直接序列化为 json,需要手动转换(set → list,datetime → iso 字符串):
import datetime, json

data = {
 "tags": {"python", "backend"},     # set 类型
 "created": datetime.datetime.now() # datetime 类型
}

# 直接 json.dump 会报 typeerror
# 需要手动转换
data["tags"] = list(data["tags"])
data["created"] = data["created"].isoformat()

print(json.dumps(data))
# {"tags": ["python", "backend"], "created": "2024-01-15t10:30:00"}
五、路径处理:pathlib 的现代写法
路径处理是文件操作的基础,传统方式用 os.path 字符串拼接,python 3.4+ 推出的 pathlib 模块更加直观。
5.1 pathlib 基本操作
from pathlib import path

# 创建路径对象
data_dir = path("data")
log_file = data_dir / "access.log"   # / 运算符拼接路径(自动处理斜杠)
print(log_file)                        # data/access.log(或 data\access.log)

# 常用属性
p = path("/home/user/projects/app.log")
print(p.name)       # app.log(文件名含扩展名)
print(p.stem)       # app(文件名不含扩展名)
print(p.suffix)     # .log(扩展名)
print(p.parent)     # /home/user/projects(父目录)

# 检查路径状态
print(p.exists())           # 是否存在
print(p.is_file())          # 是否是文件
print(p.is_dir())           # 是否是目录

# 创建目录(mkdir 和 parents=true 允许多级创建)
output_dir = path("output/reports/2024")
output_dir.mkdir(parents=true, exist_ok=true)  # exist_ok=true 已存在不报错
5.2 pathlib vs os.path 对比
import os
from pathlib import path

# ———— 路径拼接 ————
# os.path 写法(字符串,跨平台需要注意斜杠)
config_path = os.path.join("config", "settings", "dev.json")

# pathlib 写法(/ 操作符,自动处理跨平台)
config_path = path("config") / "settings" / "dev.json"

# ———— 读取文件内容 ————
# os.path 写法
with open(os.path.join("data", "users.json"), "r", encoding="utf-8") as f:
    data = json.load(f)

# pathlib 写法(直接在 path 对象上调用 read_text)
data = json.loads(path("data", "users.json").read_text(encoding="utf-8"))

# ———— 列出目录下所有 .log 文件 ————
# os.path 写法(需要 os.listdir + 过滤)
logs = [f for f in os.listdir("logs") if f.endswith(".log")]

# pathlib 写法(glob 模式,更直观)
logs = list(path("logs").glob("*.log"))
# 递归查找所有子目录的 .log 文件
all_logs = list(path("logs").rglob("*.log"))
六、常见报错速查
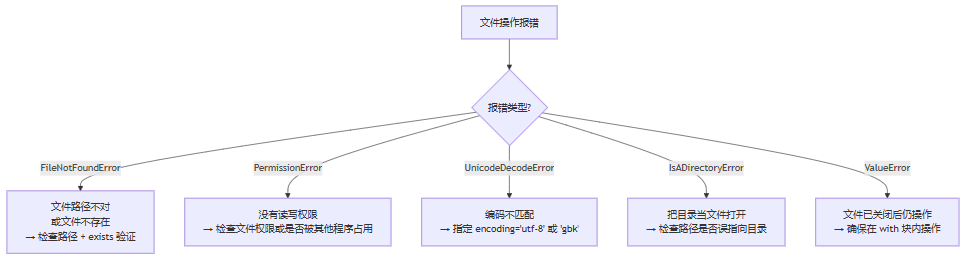
| 报错 | 典型原因 | 解决方法 |
|---|---|---|
filenotfounderror | 路径拼写错误,或文件被移动/删除 | 用 path.exists() 先验证路径;打印路径确认 |
permissionerror | 文件被 excel 等程序占用(windows);或目录权限不足 | 关闭占用程序;用管理员权限运行 |
unicodedecodeerror | 文件编码与 encoding 参数不匹配 | 用 chardet 库检测编码;常见的是 gbk vs utf-8 |
unicodeencodeerror | 写入时文件编码无法表示该字符 | 写入用 utf-8 或 utf-8-sig |
stopiteration | next(reader) 但文件为空 | 先检查文件是否有内容 |
七、实战:日志分析器
7.1 日志格式说明
标准 nginx 访问日志格式:
192.168.1.100 - - [15/jan/2024:10:30:00 +0800] "get /api/user/profile http/1.1" 200 1234
192.168.1.101 - - [15/jan/2024:10:30:01 +0800] "post /api/order/create http/1.1" 500 89
每行关键字段:ip 地址 / 时间戳 / http 方法 + url / 状态码 / 响应大小
7.2 版本一:统计日志级别
先从一个更简单的场景入手——分析应用日志,统计 error/warning/info 各出现多少次:
from pathlib import path

def analyze_app_log(log_path):
    """
    统计应用日志中各级别的出现次数。

    参数:
        log_path: 日志文件路径(字符串或 path 对象)

    返回:
        dict: {'error': n, 'warning': n, 'info': n, 'unknown': n}
    """
    log_path = path(log_path)

    if not log_path.exists():
        print(f"日志文件不存在: {log_path}")
        return {}

    counts = {"error": 0, "warning": 0, "info": 0, "unknown": 0}

    with open(log_path, "r", encoding="utf-8") as f:
        for line in f:          # 逐行读取,内存友好
            line = line.strip() # 去掉行首行尾空白和换行符
            if not line:        # 跳过空行
                continue

            # 判断日志级别(日志格式通常包含 [error] 或 error:)
            matched = false
            for level in ["error", "warning", "info"]:
                if level in line:
                    counts[level] += 1
                    matched = true
                    break

            if not matched:
                counts["unknown"] += 1

    return counts


# 使用示例
result = analyze_app_log("app.log")
for level, count in result.items():
    print(f"{level:10s}: {count} 条")
输出示例:
error : 23 条
warning : 156 条
info : 8934 条
unknown : 0 条
7.3 版本二:分析 nginx 访问日志,输出 json 报告
import re
import json
from pathlib import path
from collections import defaultdict


def parse_nginx_log_line(line):
    """
    解析一行 nginx 标准访问日志。
    返回包含 ip / url / status / size 的字典,解析失败返回 none。
    """
    # 匹配标准 nginx combined 日志格式
    pattern = r'(\s+) \s+ \s+ \[.*?\] "(\w+) (\s+) \s+" (\d+) (\d+)'
    match = re.match(pattern, line)
    if not match:
        return none

    return {
        "ip": match.group(1),
        "method": match.group(2),
        "url": match.group(3),
        "status": int(match.group(4)),
        "size": int(match.group(5)),
    }


def analyze_nginx_log(log_path, output_path=none):
    """
    分析 nginx 访问日志,生成统计报告。

    参数:
        log_path:   输入日志文件路径
        output_path: 输出 json 报告路径,为 none 则不写文件

    返回:
        dict: 统计报告
    """
    log_path = path(log_path)

    if not log_path.exists():
        raise filenotfounderror(f"日志文件不存在: {log_path}")

    # 统计数据
    total_lines = 0
    parsed_lines = 0
    status_counts = defaultdict(int)   # 各状态码出现次数
    error_urls = defaultdict(int)      # 5xx 错误的 url 分布
    top_ips = defaultdict(int)         # 各 ip 的请求次数
    total_bytes = 0

    with open(log_path, "r", encoding="utf-8") as f:
        for line in f:
            total_lines += 1
            line = line.strip()
            if not line:
                continue

            parsed = parse_nginx_log_line(line)
            if parsed is none:
                continue  # 解析失败,跳过该行

            parsed_lines += 1
            status = parsed["status"]
            status_counts[status] += 1
            top_ips[parsed["ip"]] += 1
            total_bytes += parsed["size"]

            # 收集 5xx 错误 url
            if 500 <= status < 600:
                error_urls[parsed["url"]] += 1

    # 构建报告
    error_rate = 0.0
    if parsed_lines > 0:
        error_5xx = sum(v for k, v in status_counts.items() if 500 <= k < 600)
        error_rate = round(error_5xx / parsed_lines * 100, 2)

    # 按请求数排序取 top 10
    top_10_ips = sorted(top_ips.items(), key=lambda x: x[1], reverse=true)[:10]
    top_10_errors = sorted(error_urls.items(), key=lambda x: x[1], reverse=true)[:10]

    report = {
        "summary": {
            "total_lines": total_lines,
            "parsed_lines": parsed_lines,
            "total_bytes": total_bytes,
            "error_rate_5xx": f"{error_rate}%",
        },
        "status_distribution": dict(sorted(status_counts.items())),
        "top_10_client_ips": [{"ip": ip, "requests": n} for ip, n in top_10_ips],
        "top_10_error_urls": [{"url": url, "errors": n} for url, n in top_10_errors],
    }

    # 写入 json 报告
    if output_path:
        output_path = path(output_path)
        output_path.parent.mkdir(parents=true, exist_ok=true)
        with open(output_path, "w", encoding="utf-8") as f:
            json.dump(report, f, ensure_ascii=false, indent=2)
        print(f"报告已写入: {output_path}")

    return report


# 运行分析
if __name__ == "__main__":
    report = analyze_nginx_log(
        log_path="access.log",
        output_path="reports/nginx_report.json"
    )

    print(f"总请求数: {report['summary']['parsed_lines']}")
    print(f"5xx 错误率: {report['summary']['error_rate_5xx']}")
    print("\ntop 5 错误 url:")
    for item in report["top_10_error_urls"][:5]:
        print(f"  {item['errors']:5d} 次  {item['url']}")
7.4 运行效果示例
报告已写入: reports/nginx_report.json
总请求数: 98342
5xx 错误率: 0.23%
top 5 错误 url:
89 次 /api/order/create
45 次 /api/payment/callback
23 次 /api/user/update
12 次 /api/product/import
8 次 /internal/health
八、文件操作语法速查
| 操作 | 代码 | 注意点 |
|---|---|---|
| 读取全部内容 | f.read() | 大文件慎用,内存全量加载 |
| 逐行读取 | for line in f: | 大文件首选,内存友好 |
| 写入覆盖 | open("f", "w") | 清空原有内容 |
| 写入追加 | open("f", "a") | 在末尾续写 |
| csv 读(推荐) | csv.dictreader(f) | 每行是字典,按字段名取值 |
| csv 写(含中文) | encoding="utf-8-sig" | excel 打开不乱码 |
| json 读 | json.load(f) | 自动转 python 对象 |
| json 写 | json.dump(..., ensure_ascii=false) | 中文不转义 |
| 路径拼接 | path("dir") / "file.txt" | 跨平台,自动处理斜杠 |
| 创建目录 | path.mkdir(parents=true, exist_ok=true) | 两个参数通常都要加 |
写在最后
文件操作的坑不少,但绕开大多数麻烦只需要记几条:
- 始终用
with open(),而不是手动close() - 始终指定
encoding,不要依赖系统默认编码 - 大文件逐行迭代,不要
read()把 gb 级日志塞进内存 - csv 含中文要用 excel 打开,写入用
utf-8-sig - json 写入记得加
ensure_ascii=false,否则中文变成\uxxxx
日志分析器是这些知识点的一次完整串联——文件路径用 pathlib,文件读取用逐行迭代,统计结果用字典,报告输出用 json。这套组合在实际项目里出现频率极高,可以直接拿去改造使用。
到此这篇关于python高效实现读写文件和处理csv/json详解的文章就介绍到这了,更多相关python文件操作内容请搜索代码网以前的文章或继续浏览下面的相关文章希望大家以后多多支持代码网!


发表评论