我把 springboot + vue3 整合 sse 的文章写得更加详细,包括依赖引入、配置说明、完整代码、测试方法和注意事项,让你真正可以“一分钟开箱即用”。
一、技术原理简介
sse(server-sent events) 是一种基于 http 的服务器向客户端单向实时通信技术。
特点:
- 基于标准 http 协议,无需 websocket 复杂握手。
- 服务端保持长连接,随时推送数据。
- 浏览器原生支持
eventsourceapi。 - 适合 通知推送、实时日志、股票行情、聊天消息(单向) 等场景。
二、后端:springboot 实现 sse
1. 引入依赖
使用 maven 的 pom.xml引入 spring boot web 依赖(spring boot 自带 sse 支持,无需额外 jar):
<dependencies>
    <!-- spring boot web -->
    <dependency>
        <groupid>org.springframework.boot</groupid>
        <artifactid>spring-boot-starter-web</artifactid>
    </dependency>
    <!-- 测试用:方便发 post 请求 -->
    <dependency>
        <groupid>org.springframework.boot</groupid>
        <artifactid>spring-boot-starter-test</artifactid>
        <scope>test</scope>
    </dependency>
</dependencies>说明:spring-boot-starter-web已经包含了 javax.servlet-api和 spring mvc,sseemitter类位于 org.springframework.web.servlet.mvc.method.annotation.sseemitter,无需额外引入 jar。
2. 配置文件
application.yml(或 application.properties)保持默认即可,无需特殊配置。
如果需要跨域,可以加:
spring:
  web:
    cors:
      allowed-origins: "*"
3. sse 控制器代码
package com.example.sse.controller;
import org.springframework.http.mediatype;
import org.springframework.web.bind.annotation.*;
import org.springframework.web.servlet.mvc.method.annotation.sseemitter;
import java.io.ioexception;
import java.util.map;
import java.util.concurrent.concurrenthashmap;
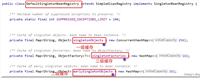
@restcontroller
@requestmapping("/sse")
public class ssecontroller {
// 保存每个用户的 sse 连接,生产环境可用 redis 等分布式缓存
private final map<string, sseemitter> emitters = new concurrenthashmap<>();
/**
* 客户端订阅接口
* get /sse/subscribe/{userid}
*/
@getmapping(value = "/subscribe/{userid}", produces = mediatype.text_event_stream_value)
public sseemitter subscribe(@pathvariable string userid) {
// 0 表示永不超时,如需超时可用 60_000 毫秒
sseemitter emitter = new sseemitter(0l);
emitters.put(userid, emitter);
// 完成时移除
emitter.oncompletion(() -> emitters.remove(userid));
// 超时移除
emitter.ontimeout(() -> emitters.remove(userid));
// 出错移除
emitter.onerror((e) -> emitters.remove(userid));
return emitter;
}
/**
* 服务端推送消息接口
* post /sse/push/{userid}
*/
@postmapping("/push/{userid}")
public void push(@pathvariable string userid, @requestbody string message) {
sseemitter emitter = emitters.get(userid);
if (emitter != null) {
try {
// name("message") 对应前端的 event type
emitter.send(sseemitter.event().name("message").data(message));
} catch (ioexception e) {
emitters.remove(userid);
}
}
}
}
4. 启动类
package com.example.sse;

import org.springframework.boot.springapplication;
import org.springframework.boot.autoconfigure.springbootapplication;

@springbootapplication
public class sseapplication {
    public static void main(string[] args) {
        springapplication.run(sseapplication.class, args);
    }
}
三、前端:vue3 连接 sse
1. 创建 vue3 项目
npm create vite@latest sse-demo -- --template vue
cd sse-demo
npm install
2. 组件代码
src/components/ssedemo.vue:
<template>
  <div>
    <h3>sse 实时消息推送</h3>
    <ul>
      <li v-for="(msg, index) in messages" :key="index">{{ msg }}</li>
    </ul>
  </div>
</template>
<script setup>
import { ref, onmounted, onbeforeunmount } from 'vue'
const messages = ref([])
let eventsource = null
onmounted(() => {
  // 替换为你的后端地址和 userid
  eventsource = new eventsource('http://localhost:8080/sse/subscribe/user123')
  // 接收消息
  eventsource.onmessage = (event) => {
    messages.value.push(event.data)
  }
  // 错误处理
  eventsource.onerror = (err) => {
    console.error('sse connection error:', err)
    eventsource.close()
  }
})
onbeforeunmount(() => {
  if (eventsource) {
    eventsource.close()
  }
})
</script>
3. 在 app.vue 中使用
<template>
  <ssedemo />
</template>
<script setup>
import ssedemo from './components/ssedemo.vue'
</script>
四、测试方法
1.启动 springboot 后端:默认端口 8080。
2.启动 vue3 前端
npm run dev
打开浏览器访问 http://localhost:5173。
3.发送测试消息
用 postman 或 curl 发 post 请求:
curl -x post http://localhost:8080/sse/push/user123 \
-h "content-type: application/json" \
-d '"hello sse 实时消息!"'
前端页面会立刻收到并显示消息。
五、注意事项与优化
跨域问题:前后端分离时,后端需配置 cors,否则浏览器会拦截 eventsource 连接。
心跳保活:长时间无消息时,连接可能被代理或浏览器断开。可在服务端定时推送注释行保持活跃:
emitter.send(sseemitter.event().comment("heartbeat"));
多用户广播:当前示例是点对点(一个用户一个连接),如需群发,可维护一个 list<sseemitter>或按频道分组。
生产环境
- 使用 redis 或消息队列管理连接,支持集群。
- 设置合理的超时时间与重连机制。
- 对敏感消息加密传输(https)。
总结
- 后端:
sseemitter+@getmapping(produces=text_event_stream_value) - 前端:
new eventsource(url)+onmessage接收 - 引入 jar:仅需
spring-boot-starter-web,零额外依赖。
到此这篇关于springboot+vue3整合sse实现实时消息推送的文章就介绍到这了,更多相关springboot sse实时消息推送内容请搜索代码网以前的文章或继续浏览下面的相关文章希望大家以后多多支持代码网!


发表评论