数据源自动管理
引入jdbc的依赖和springboot的应用场景
        <dependency>
            <groupid>org.springframework.boot</groupid>
            <artifactid>spring-boot-starter-web</artifactid>
        </dependency>
        <dependency>
            <groupid>org.springframework.boot</groupid>
            <artifactid>spring-boot-starter-test</artifactid>
            <scope>test</scope>
        </dependency>
        <dependency>
            <groupid>org.springframework.boot</groupid>
            <artifactid>spring-boot-starter-jdbc</artifactid>
        </dependency>
        <dependency>
            <groupid>mysql</groupid>
            <artifactid>mysql-connector-java</artifactid>
            <scope>runtime</scope>
        </dependency>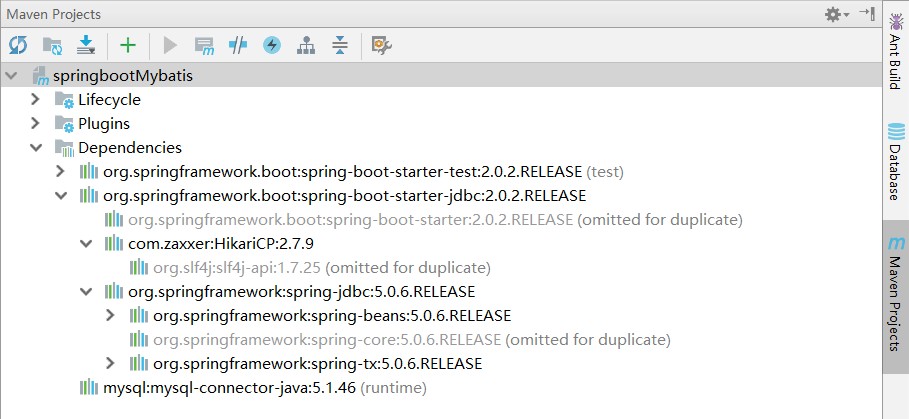
创建application.yaml

测试数据源
@runwith(springrunner.class)
@springboottest
public class datasourcestest {
    @autowired
    datasource datasource;
    @test
    public void contextloads() throws sqlexception {
        system.out.println(datasource.getclass());
        connection connection = datasource.getconnection();
        system.out.println(connection);
        connection.close();
    }
}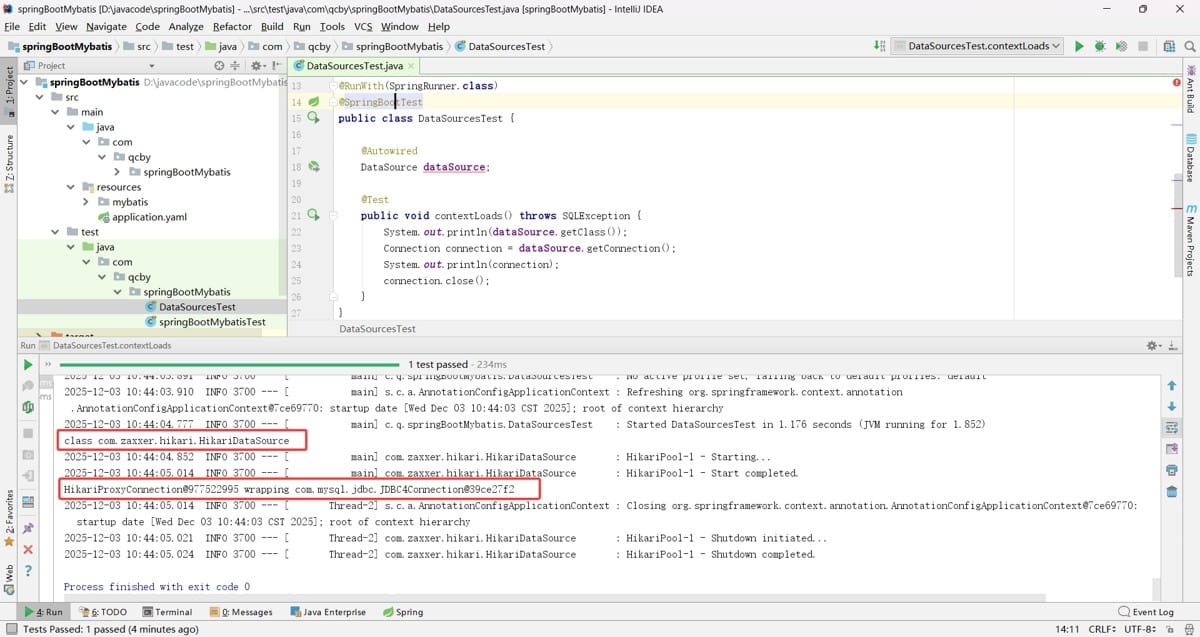
org.springframework.boot.autoconfigure.jdbc
参考 org.springframework.boot.autoconfigure.jdbc.datasourceconfiguration,springboot 默认使用的是 hikari 连接池,默认支持 org.apache.tomcat.jdbc.pool.datasource、hikaridatasource、dbcp2.basicdatasource 数据源连接池类型,使用 spring.datasource.type 进行指定自定义的数据源类型。
自定义数据源类型源码:

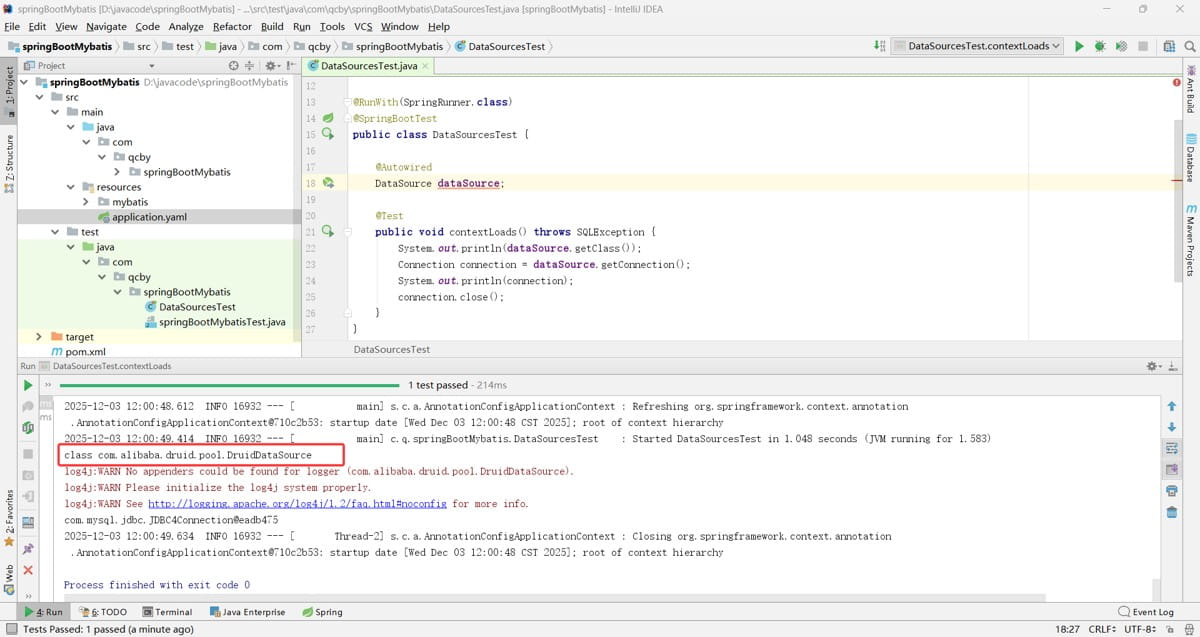
配置druid数据源
首先需要引入druid 连接池和日志依赖
        <dependency>
            <groupid>com.alibaba</groupid>
            <artifactid>druid</artifactid>
            <version>1.0.9</version>
        </dependency>
        <dependency>
            <groupid>log4j</groupid>
            <artifactid>log4j</artifactid>
            <version>1.2.17</version>
        </dependency>
在 application.yaml 中加入 spring.datasource.type=com.alibaba.druid.pool.druiddatasource
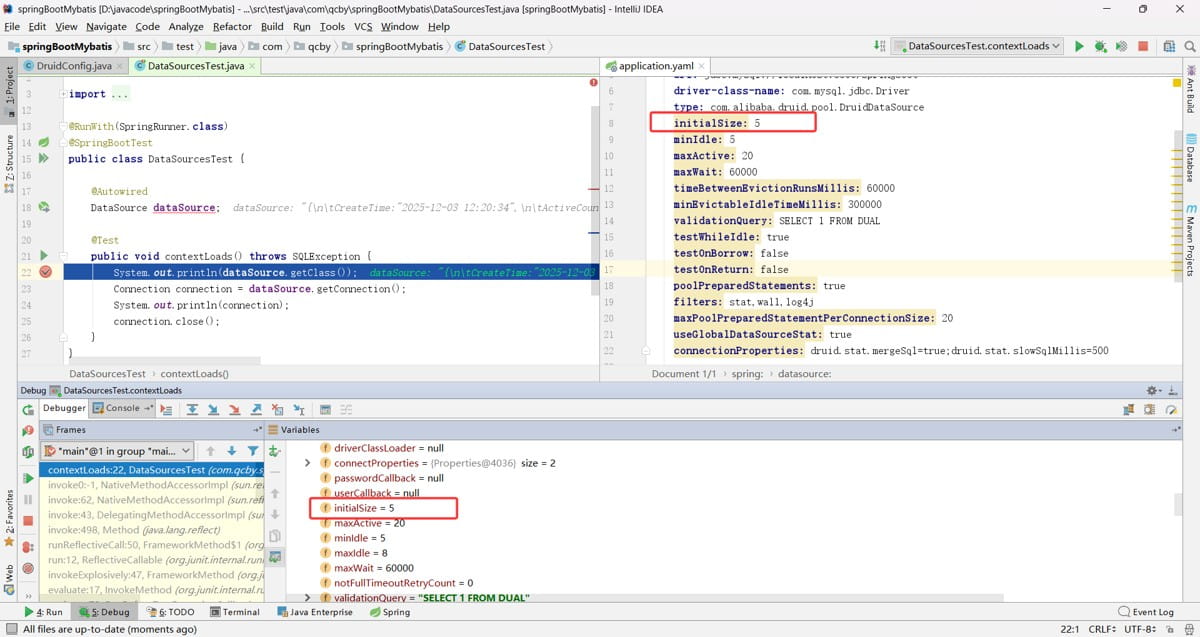
验证:
在 application.yaml 中加入其他属性配置
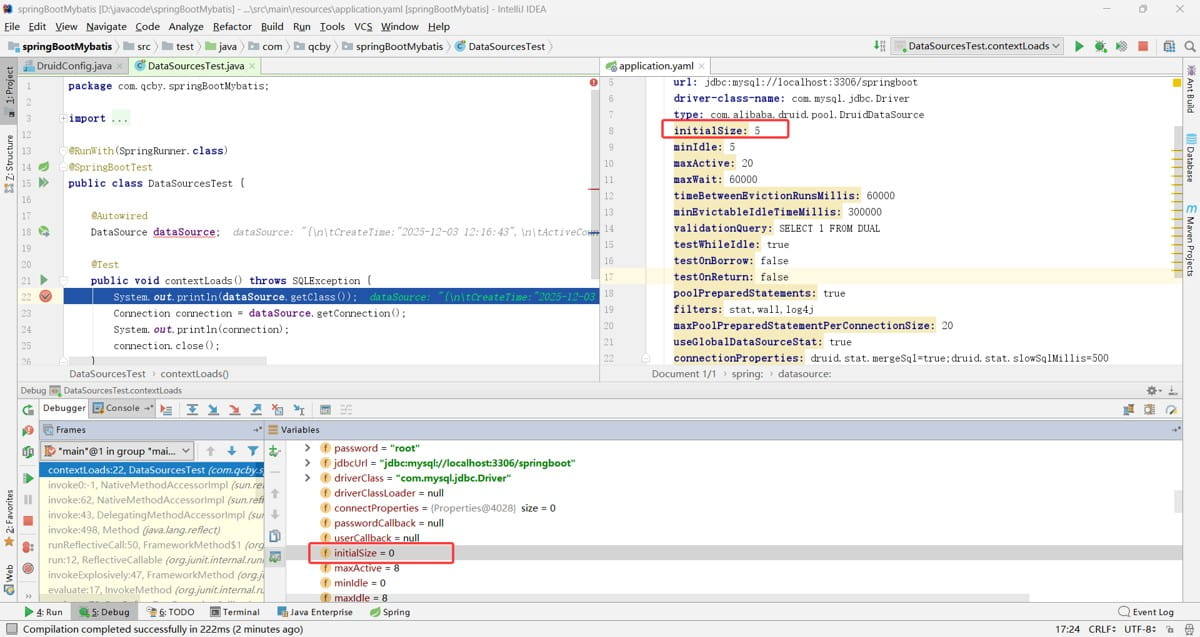
datasourceproperties 类源码:
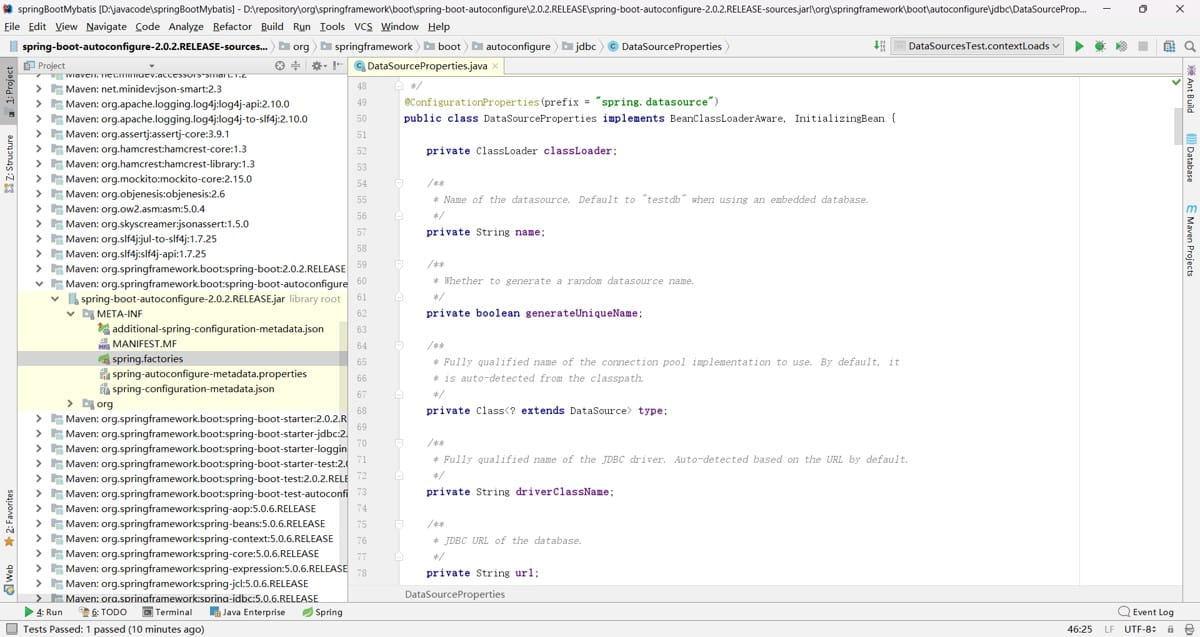
spring.datasource 中默认没有这些属性,所以 application.yaml 中会标黄,且不起作用
我们需要创建数据源注册类
@configuration
public class druidconfig {
    @configurationproperties(prefix = "spring.datasource")
    @bean
    public datasource datasource(){
        return new druiddatasource();
    }
}
druiddatasource 类包含了那些其他配置属性,如图:
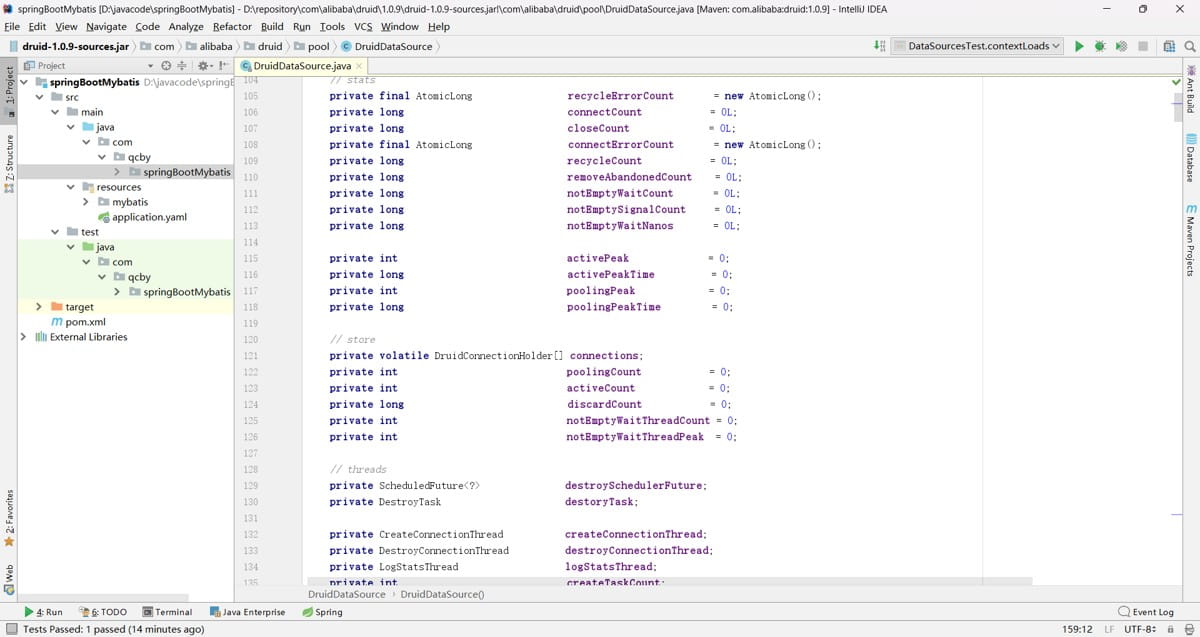
验证,发现这样属性配置就起作用了
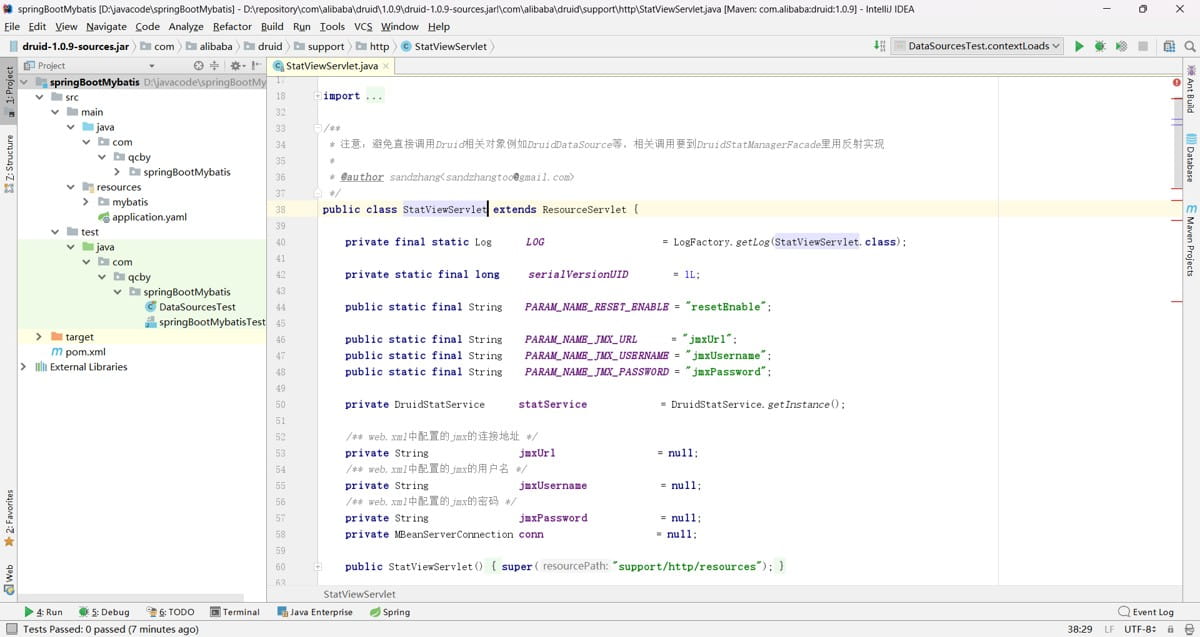
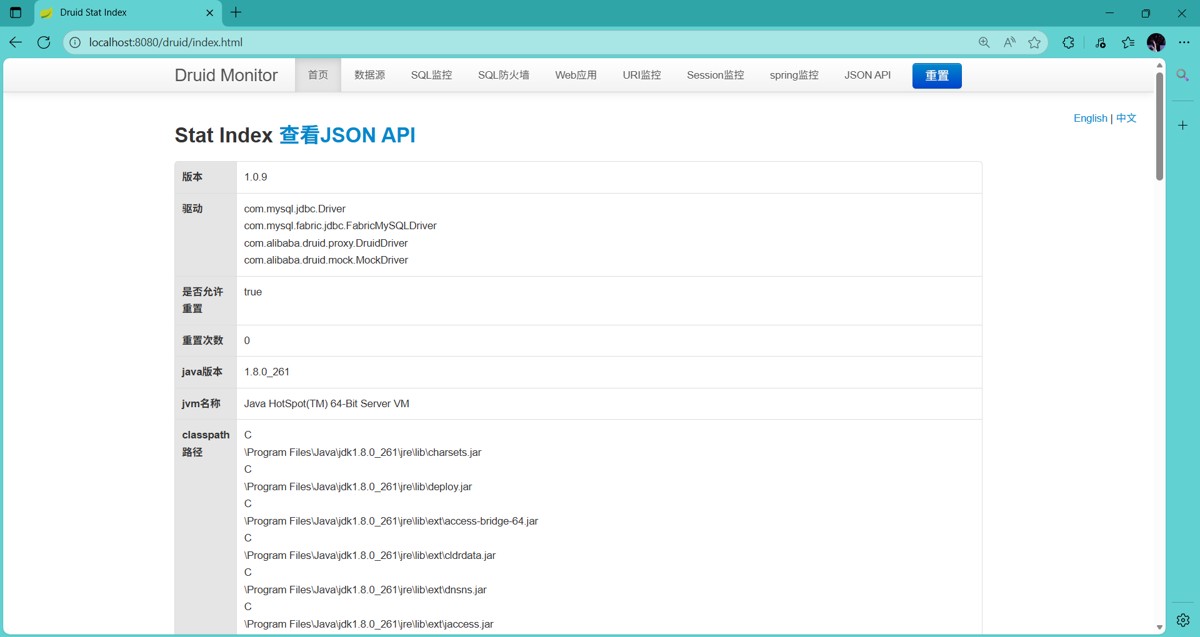
配置druid运行期监控
statviewservlet 是 druid 数据库连接池提供的一个内置监控 servlet,核心作用是通过 web 界面可视化监控 druid 连接池的运行状态、sql 执行情况、慢查询统计等核心指标,是 druid 连接池的核心监控组件之一。
webstatfilter 是 druid 数据库连接池提供的一款 web 监控过滤器,核心作用是采集 web 应用中http 请求与数据库操作的关联链路数据,为 statviewservlet(druid 监控页面)提供web 层面的监控数据支撑。

代码内容:
我们需要配置一个管理后台的 servlet,还需要配置一个监控的 filter,以及配置初始化参数
@configuration
public class druidconfig {
    @configurationproperties(prefix = "spring.datasource")
    @bean
    public datasource datasource(){
        return new druiddatasource();
    }
    @bean
    public servletregistrationbean statviewservlet(){
        servletregistrationbean bean = new servletregistrationbean(new statviewservlet(),
                "/druid/*");
        map<string,string> initparams = new hashmap<>();
        initparams.put("loginusername","root");
        initparams.put("loginpassword","root");
        initparams.put("allow","");//默认就是允许所有访问
        initparams.put("deny","192.168.15.21");
        bean.setinitparameters(initparams);
        return bean;
    }
    //2、配置一个web监控的filter
    @bean
    public filterregistrationbean webstatfilter(){
        filterregistrationbean bean;
        bean = new filterregistrationbean();
        bean.setfilter(new webstatfilter());
        map<string,string> initparams = new hashmap<>();
        initparams.put("exclusions","*.js,*.css,/druid/*");
        bean.setinitparameters(initparams);
        bean.seturlpatterns(arrays.aslist("/*"));
        return bean;
    }
}
http://localhost:8080/druid 打开监控页面
springboot整合jdbctemplate
首先需要在数据库中创建表
set foreign_key_checks=0;
-- ----------------------------
-- table structure for user
-- ----------------------------
drop table if exists `user`;
create table `user` (
  `username` varchar(10) default null,
  `userid` int(10) not null,
  `password` varchar(10) default null,
  primary key (`userid`)
) engine=innodb default charset=utf8;
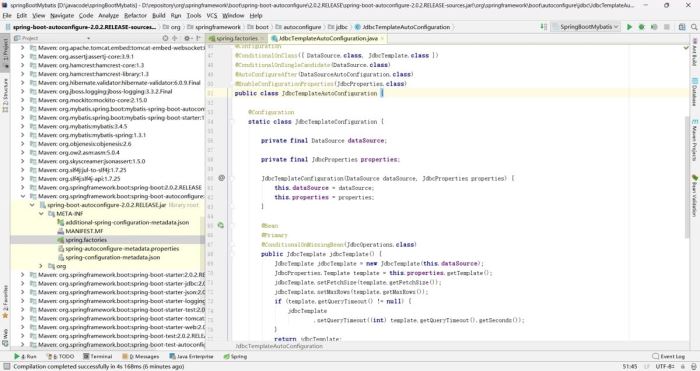
springboot中提供了jdbctemplateautoconfiguration的自动配置 org.springframework.boot.autoconfigure.jdbc.jdbctemplateautoconfiguration,
jdbctemplateautoconfiguration源码:
@controller
public class testcontroller {
@autowired
jdbctemplate jdbctemplate;
@responsebody
@requestmapping("/query")
public list<map<string, object>> query(){
list<map<string, object>> maps = jdbctemplate.queryforlist("select * from user");
return maps;
}
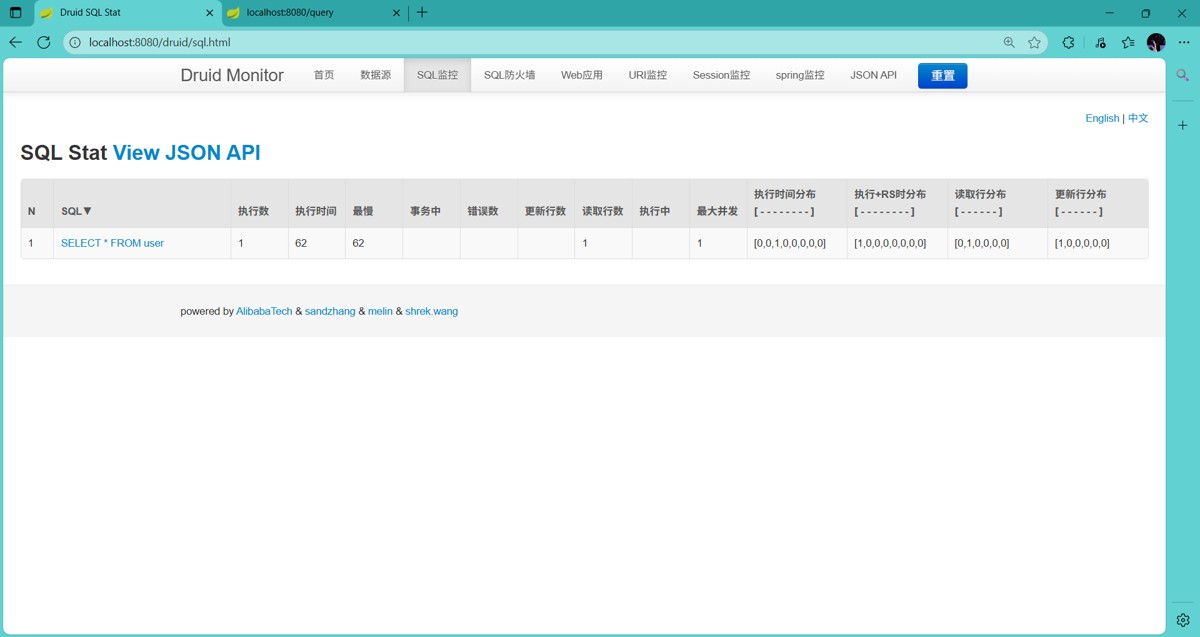
}由于 springboot 中提供了 jdbctemplateautoconfiguration 的自动配置,直接使用 @autowired 注解注入即可,启动 springboot,测试访问 http://localhost:8080/query

访问成功
打开监控页面
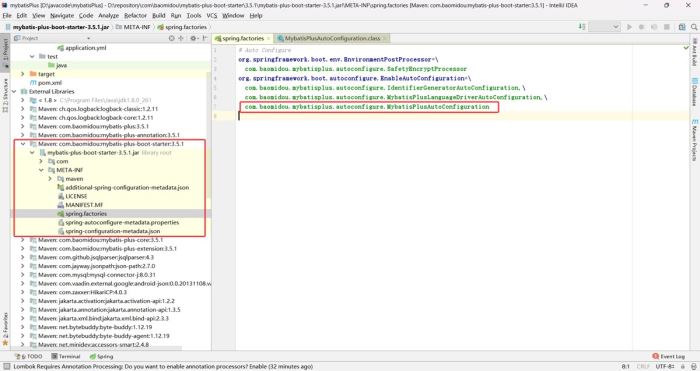
springboot整合mybatis注解版
导入 mybatis 整合 springboot 模块
        <dependency>
            <groupid>org.mybatis.spring.boot</groupid>
            <artifactid>mybatis-spring-boot-starter</artifactid>
            <version>1.3.1</version>
        </dependency>
com.baomidou.mybatisplus.autoconfigure.mybatisplusautoconfiguration
创建javabean
import java.util.date;
public class person {
    private int pid;
    private string pname;
    private string addr;
    private int gender;
    private date birth;
    public person() {
    }
    public person(int pid, string pname, string addr, int gender, date birth) {
        this.pid = pid;
        this.pname = pname;
        this.addr = addr;
        this.gender = gender;
        this.birth = birth;
    }
    public int getpid() {
        return pid;
    }
    public void setpid(int pid) {
        this.pid = pid;
    }
    public string getpname() {
        return pname;
    }
    public void setpname(string pname) {
        this.pname = pname;
    }
    public string getaddr() {
        return addr;
    }
    public void setaddr(string addr) {
        this.addr = addr;
    }
    public int getgender() {
        return gender;
    }
    public void setgender(int gender) {
        this.gender = gender;
    }
    public date getbirth() {
        return birth;
    }
    public void setbirth(date birth) {
        this.birth = birth;
    }
    @override
    public string tostring() {
        return "person{" +
                "pid=" + pid +
                ", pname='" + pname + '\'' +
                ", addr='" + addr + '\'' +
                ", gender=" + gender +
                ", birth=" + birth +
                '}';
    }
}
创建mapper
import java.util.list;
@mapper
public interface personmapper {
    @select("select * from person")
    public list<person> getpersons();
    @select("select * from person t where t.pid = #{id}")
    public person getpersonbyid(int id);
    @options(usegeneratedkeys =true, keyproperty = "pid")
    @insert("insert into person(pid, pname, addr,gender, birth)" +
            " values(#{pid}, #{pname}, #{addr},#{gender}, #{birth})")
    public void insert(person person);
    @delete("delete from person where pid = #{id}")
    public void update(int id);
}
其中 @options(usegeneratedkeys =true, keyproperty = “pid”),mybatis 会获取到自增的 pid,自动赋值给传入的 person 对象的 pid 属性。
@mapper 用于明确标记 mybatis 对应的 mapper 接口,核心职责是为 mybatis 提供接口识别信号,触发 mybatis 对接口的解析与动态代理实现类生成;在 spring boot 整合 mybatis的场景下,该动态代理类会被自动注册为 spring 容器中的 bean,支持业务代码通过 @autowired 直接注入使用。
单元测试
@runwith(springrunner.class)
@springboottest
public class springbootmybatistest {
    @autowired
    personmapper personmapper;
    @test
    public void testmybatis() throws sqlexception {
        list<person> persons = personmapper.getpersons();
        for (person person : persons) {
            system.out.println(person);
        }
    }
 @test
    public void testmybatis1() throws sqlexception {
        person p = personmapper.getpersonbyid(1);
        system.out.println(p);
    }
}
开启 mybatis 的下划线转驼峰命名自动映射功能
@configuration
public class mybatisconfig {
    @bean
    public configurationcustomizer getcustomizer(){
        return new configurationcustomizer() {
            @override
            public void customize(org.apache.ibatis.session.configuration configuration) {
                configuration.setmapunderscoretocamelcase(true);
            }
        };
    }
}
当项目中 mapper 接口数量较多,若在每个 mapper 接口上逐一添加 @mapper 注解,会增加重复工作量且不易维护。此时可采用 @mapperscan 注解的批量扫描方案。在 mybatis 相关配置类或 spring boot 主启动类上添加 @mapperscan 注解,指定 mapper 接口所在的包路径,mybatis 会自动扫描该路径下所有接口,将其识别为 mapper 接口,无需额外标注 @mapper,即可完成动态代理实现类的生成与 spring bean 的注册。
springboot整合mybatis配置文件
classpath:mybatis 下创建 sqlmapconfig.xml 全局配置文件
<?xml version="1.0" encoding="utf-8" ?>
<!doctype configuration
        public "-//mybatis.org//dtd config 3.0//en"
        "http://mybatis.org/dtd/mybatis-3-config.dtd">
<configuration>
    <settings>
        <setting name="mapunderscoretocamelcase" value="true"/>
    </settings>
</configuration>
其中 mapunderscoretocamelcase 值为 true 用于开启下划线转驼峰命名自动映射功能
创建sql映射文件 personmapper.xml
<?xml version="1.0" encoding="utf-8" ?>
<!doctype mapper public "-//mybatis.org//dtd mapper 3.0//en"
        "http://mybatis.org/dtd/mybatis-3-mapper.dtd">
<mapper namespace="com.qcby.springbootmybatis.mapper.personmapper">
    <select id="getpersons" resulttype="com.qcby.springbootmybatis.bean.person">
        select * from person
    </select>
</mapper>
在 application.yaml 中配置 mybatis 相关配置信息

其中
config-location 值为全局配置文件路径
mapper-locations 值为sql映射文件
type-aliases-package 值为实体类全类名
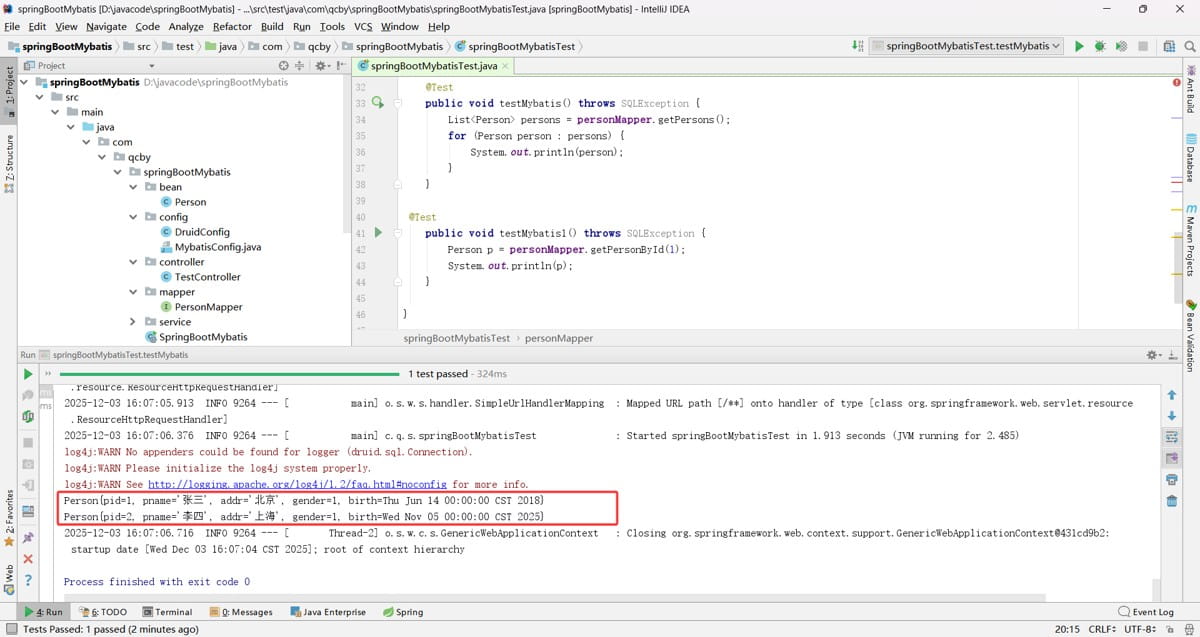
测试验证
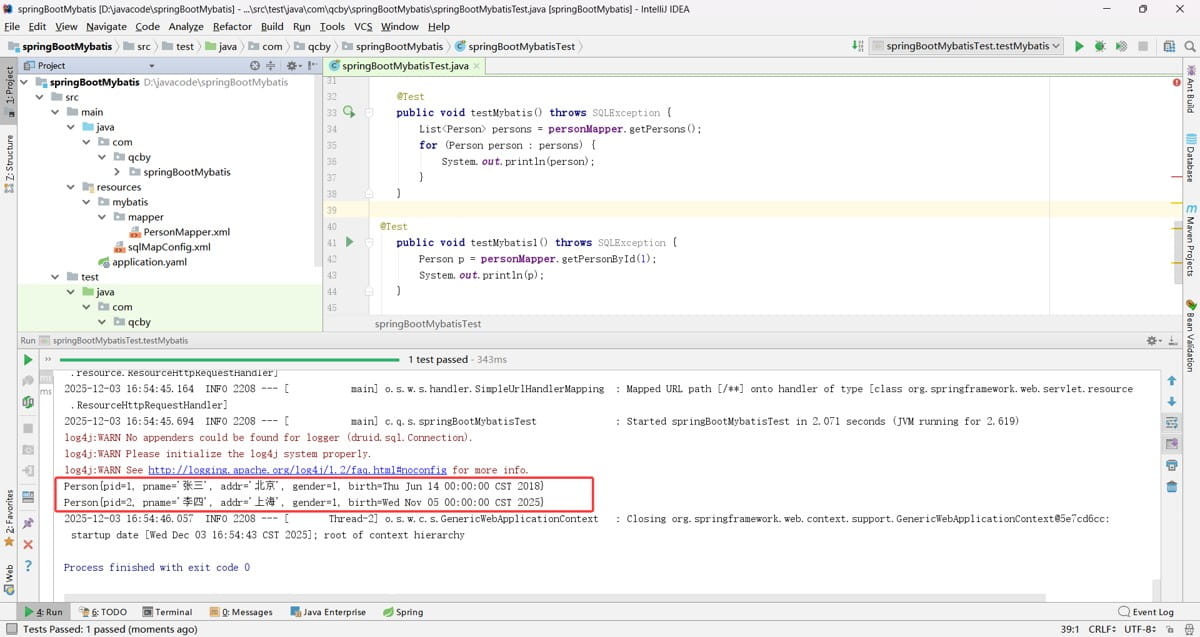
使用了 springboo t整合 mybatis 配置文件方式,springboot 整合mybatis 注解版也同样会生效
到此这篇关于springboot数据层开发的文章就介绍到这了,更多相关springboot数据层内容请搜索代码网以前的文章或继续浏览下面的相关文章希望大家以后多多支持代码网!


发表评论