前言介绍
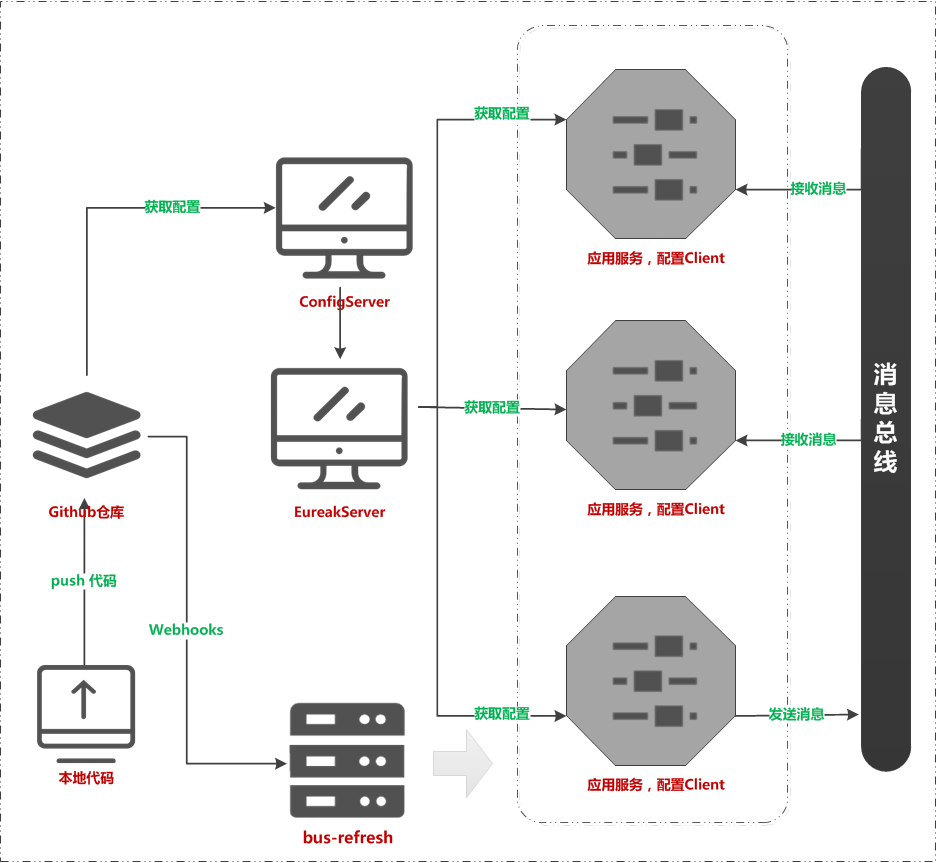
在微服务架构中,为了更方便的向微服务实例广播消息,我们通常会构建一个消息中心,让所有的服务实例都连接上来,而该消息中心所发布的消息都会被微服务实例监听和消费,我们把这种机制叫做消息总线(springcloud
bus)
当我们的微服务达到是几个到百个以上,在更新配置时,不太可能一个个刷新或者重启,这样既不能保证效率也容易导致遗漏造成事故。因此我们需要springcloud bus 提供总线服务,在我们push代码到git的时候,通过webhooks(http://localhost:port/actuator/bus-refresh/)执行刷新,消息总线会通知各个实例更新配置,以达到自动更新全服务配置。
环境准备
- jdk 1.8、idea2018、maven3
- spring boot 2.0.6.release
- spring cloud finchley.sr2
需要有一个git帐号,用来创建配置中心以及开启webhooks服务,添加回调
rabbitmq服务端环境安装
- 下载erlang;http://www.erlang.org/downloads {安装后配置环境变量:d:\program files\erl10.5}
- 下载rabbitmq;http://www.rabbitmq.com/download.html {安装后cmd依次执行}
- cd d:\program files\rabbitmq server\rabbitmq_server-3.8.1\sbin
- rabbitmq-plugins.bat enable rabbitmq_management
- rabbitmq-service.bat stop
- rabbitmq-service.bat start
- 浏览器访问;http://127.0.0.1:15672
- 服务端口5672
代码示例
itstack-demo-springcloud-07
├── itstack-demo-springcloud-config-client
│   └── src
│       └── main
│           ├── java
│           │   └── org.itstack.demo
│           │        ├── web
│           │        │   └── configclientcontroller.java
│           │        └── configclientapplication.java
│           └── resources
│               ├── application.yml
│               └── bootstrap.yml
├── itstack-demo-springcloud-config-server
│   └── src
│       └── main
│           ├── java
│           │   └── org.itstack.demo
│           │        └── configserverapplication.java
│           └── resources
│               └── application.yml
└── itstack-demo-springcloud-eureka-server
     └── src
        └── main
            ├── java
            │   └── org.itstack.demo
            │        └── eurekaserverapplication.java
            └── resources
                └── application.yml
itstack-demo-springcloud-config-client | 配置获取客户端方,提供自动刷新http
web/configclientcontroller.java & 添加注解@refreshscope自动刷新配置
@restcontroller
@refreshscope
public class configclientcontroller {

    @value("${info.profile:error}")
    private string profile;

    @getmapping("/config")
    public mono<string> config() {
        return mono.justorempty(profile);
    }

}
configclientapplication.java & 普通配置即可
@springbootapplication
public class configclientapplication {

    public static void main(string[] args) {
        springapplication.run(configclientapplication.class, args);
    }

}
application.yml & 需要配置endpoints,这样才可以暴漏刷新服务
spring:
  application:
    name: itstack-demo-springcloud-config-client
  cloud:
    bus:
      trace:
        enabled: true
      enabled: true
server:
  port: 9001

# 如果不使用消息总线,则开启如下配置 /actuator/refresh 这个 endpoint 暴露出来
#management:
#  endpoints:
#    web:
#      exposure:
#        include: refresh
bootstrap.yml & 配置中心服务配置,http://localhost:7397 添加配置服务
spring:
  cloud:
    config:
      name: config-client         # 对应 {application} 部分,例如;config-client-dev = 只取最后一个符号'-'之前的
      profile: dev                # 对应 {profile} 部分
      label: master               # 对应 {label} 部分,即 git 的分支。如果配置中心使用的是本地存储,则该参数无用
      discovery:
        enabled: true             # 开启 config 服务发现支持
        service-id: itstack-demo-springcloud-config-server        # 配置服务name

#配置文件会被转换成 web,访问规则如下;
#/{application}/{profile}[/{label}]
#/{application}-{profile}.yml
#/{label}/{application}-{profile}.yml
#/{application}-{profile}.properties
#/{label}/{application}-{profile}.properties

eureka:
  client:
    service-url:
      defaultzone: http://localhost:7397/eureka/
itstack-demo-springcloud-config-server | 配置提供服务端方,链接git配置工程地址
configserverapplication.java & 添加注解@enableconfigserver设置成配置服务中心
@springbootapplication
@enableconfigserver
public class configserverapplication {

    public static void main(string[] args) {
        springapplication.run(configserverapplication.class, args);
    }

}
application.yml & 配置信息,消息总线刷新
server:
  port: 8080

spring:
  application:
    name: itstack-demo-springcloud-config-server
  cloud:
    config:
      server:
        git:
          uri: https://github.com/fuzhengwei/itstack-demo-config  # 换成自己的配置git仓库的地址,如果没有可以新建工程地址,也可以克隆我的;https://github.com/fuzhengwei/itstack-demo-config
          search-paths: config-repo                               # git仓库地址下的底层配置文件名称,如果配置多个用逗号','分割。

# 如果配置中心需要访问权限,则开启配置
# spring.cloud.config.server.git.username:github账户
# spring.cloud.config.server.git.password:github密码

eureka:
  client:
    service-url:
      defaultzone: http://localhost:7397/eureka/
management:
  endpoints:
    web:
      exposure:
        include: bus-refresh
itstack-demo-springcloud-eureka-server | 服务注册发现
eurekaserverapplication.java & 添加注解@enableeurekaserver启动服务发现
@springbootapplication
@enableeurekaserver
public class eurekaserverapplication {

    public static void main(string[] args) {
        springapplication.run( eurekaserverapplication.class, args );
    }

}
application.yml & 配置信息
server:
  port: 7397

eureka:
  instance:
    hostname: localhost
  client:
    registerwitheureka: false
    fetchregistry: false
    serviceurl:
      defaultzone: http://${eureka.instance.hostname}:${server.port}/eureka/

spring:
  application:
    name: itstack-demo-springcloud-eureka-server
测试验证
1.准备好自己github的配置仓库,也可以克隆我的git;https://github.com/fuzhengwei/itstack-demo-config {有一组配置配置文件}
2.配置webhooks,在https://github.com/换你自己的fuzhengwei/换你自己的itstack-demo-netty/settings/hooks/new
3.分别启动服务
1.启动rabbitmq服务;http://127.0.0.1:15672/#/
2.itstack-demo-springcloud-eureka-server 服务注册发现
3.itstack-demo-springcloud-config-server 配置server
4.itstack-demo-springcloud-config-client 配置client
4.访问配置服务,端口7397;http://localhost:8080/config-client/dev
4.1.访问结果
{
	"name": "config-client",
	"profiles": [
		"dev"
	],
	"label": null,
	"version": "ea0b1a1017595d542aa01b8b2bda68f9620dd81a",
	"state": null,
	"propertysources": [
		{
			"name": "https://github.com/fuzhengwei/itstack-demo-config/config-repo/config-client-dev.yml",
			"source": {
				"info.profile": "dev bus"
			}
		}
	]
}
4.2.访问规则{配置文件会被转换成 web 接口,规则如下}
/{application}/{profile}[/{label}]
/{application}-{profile}.yml
/{label}/{application}-{profile}.yml
/{application}-{profile}.properties
/{label}/{application}-{profile}.properties
4.3.访问配置文件;http://localhost:8080/config-client-dev.yml {可以直接访问查看配置信息}
info: profile: dev bus
5.访问使用配置的客户端
5.1.访问端口9001;http://localhost:9001/config
dev bus
5.2更改配置,post请求刷新配置总线;http://localhost:8080/actuator/bus-refresh/ {如果配置git的webhooks则更新代码自动刷新}
5.3访问端口9001;http://localhost:9001/config
dev
总结
spring cloud bus 可以更加方便的控制全局信息,用于统一刷新并通过mq方式通过客户端
如果你的内网想进行git的webhooks配置,可以使用http://natapp.cn进行内网穿透映射,他会给你提供免费外网调用服务
消息总线方式不只是应用于配置刷新,在一起同步信息请求中都可以使用,以及自己的项目架设上
以上为个人经验,希望能给大家一个参考,也希望大家多多支持代码网。


发表评论