在spring boot中保存前端上传的图片可以通过以下步骤实现:
1. 添加依赖
确保在pom.xml中已包含spring web依赖:
<dependency>
    <groupid>org.springframework.boot</groupid>
    <artifactid>spring-boot-starter-validation</artifactid>
</dependency>
2. 配置文件上传限制
在application.properties中设置文件大小限制:
spring.servlet.multipart.max-file-size=10mb
spring.servlet.multipart.max-request-size=10mb
#====自定义变量======
#文件上传地址
file.upload.dir=uploads/
3. 创建文件上传控制器
package com.hirain.mall.controller;
import com.hirain.mall.common.apirestresponse;
import jakarta.servlet.http.httpservletrequest;
import org.springframework.beans.factory.annotation.value;
import org.springframework.web.bind.annotation.postmapping;
import org.springframework.web.bind.annotation.requestmapping;
import org.springframework.web.bind.annotation.requestparam;
import org.springframework.web.bind.annotation.restcontroller;
import org.springframework.web.multipart.multipartfile;
import java.nio.file.files;
import java.nio.file.path;
import java.nio.file.paths;
import java.util.map;
import java.util.uuid;
@restcontroller
@requestmapping("/images")
public class imagecontroller {
    @value("${file.upload.dir}") // 从配置文件中读取路径
    private string uploaddir;
    @postmapping("/upload")
    public apirestresponse<?> uploadimage(
            @requestparam("image") multipartfile file,
            httpservletrequest request) {
        try {
            // 创建目录 (如果不存在)
            path uploadpath = paths.get(uploaddir);
            if (!files.exists(uploadpath)) {
                files.createdirectories(uploadpath);
            }
            // 生成唯一文件名 (避免覆盖)
            string originalfilename = file.getoriginalfilename();
            string fileext = originalfilename.substring(originalfilename.lastindexof("."));
            string newfilename = uuid.randomuuid() + fileext;
            // 保存文件
            path targetpath = uploadpath.resolve(newfilename);
            files.copy(file.getinputstream(), targetpath);
            // 生成访问 url (使用环境信息构建完整url)
            string baseurl = request.getrequesturl().tostring().replace(request.getrequesturi(), "");
            string imageurl = baseurl + "/images/" + newfilename;
            return apirestresponse.success(map.of(
                    "filename", newfilename,
                    "url", imageurl//完成静态资源映射配置后,通过浏览器直接访问该地址即可访问图片
            ));
        } catch (exception e) {
            return apirestresponse.error(500,"上传失败: " + e.getmessage());
        }
    }
}
4.静态资源映射配置类webconfig
package com.hirain.mall.config;
import org.springframework.beans.factory.annotation.value;
import org.springframework.context.annotation.configuration;
import org.springframework.web.servlet.config.annotation.resourcehandlerregistry;
import org.springframework.web.servlet.config.annotation.webmvcconfigurer;
import java.io.file;
@configuration
public class webconfig implements webmvcconfigurer {
    @value("${file.upload.dir}")
    private string uploaddir;
    @override
    public void addresourcehandlers(resourcehandlerregistry registry) {
        // 将真实的上传目录映射为虚拟路径
        registry.addresourcehandler("/images/**")
                .addresourcelocations("file:" + uploaddir + file.separator);
    }
}
5. 前端调用示例(html)
<input type="file" id="imageinput">
<button onclick="uploadimage()">上传</button>
<script>
async function uploadimage() {
const fileinput = document.getelementbyid('imageinput');
const formdata = new formdata();
formdata.append('image', fileinput.files[0]);
const response = await fetch('http://localhost:8080/images/upload', {
method: 'post',
body: formdata
});
const result = await response.text();
console.log(result);
}
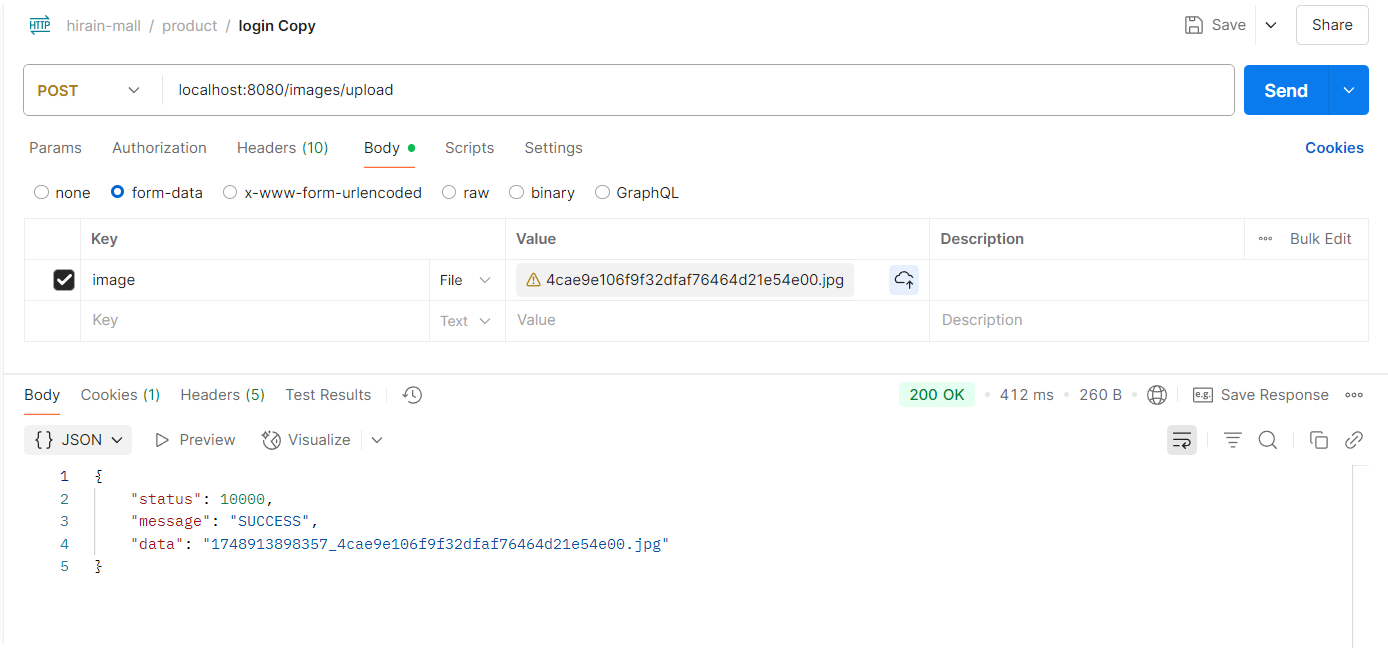
</script>6. postman调用示例
关键点说明:
文件保存路径:
- 示例中使用相对路径
uploads/(项目根目录下) - 生产环境建议使用绝对路径(如
/var/www/uploads/)
文件名处理:
- 使用时间戳前缀确保唯一性
- 保留原始文件名后缀(通过
file.getoriginalfilename()获取)
异常处理:
- 捕获
ioexception处理文件操作异常 - 返回错误信息给前端
添加文件类型校验:
if (!file.getcontenttype().startswith("image/")) {
    return "仅支持图片文件";
}添加安全限制:
- 限制文件扩展名(jpg, png等)
- 使用病毒扫描工具扫描上传文件
云存储方案:
- 生产环境建议使用云存储(aws s3, 阿里云oss等)
- 示例代码替换为云存储sdk的上传逻辑
处理流程示意图:
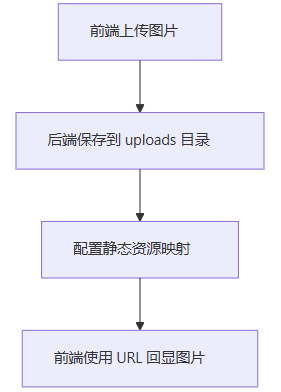
其中,前端上传图片后,后端保存在本地的流程如下:
前端 → 发送multipart请求 → spring控制器 → 验证文件 → 生成唯一文件名 → 保存到本地 → 返回结果
根据实际需求选择本地存储或云存储方案,并注意做好文件类型校验和安全防护措施。
到此这篇关于spring boot中保存前端上传的图片的文章就介绍到这了,更多相关spring boot前端上传图片内容请搜索代码网以前的文章或继续浏览下面的相关文章希望大家以后多多支持代码网!


发表评论