这篇文章将非常系统地讲解如何使用 spring boot 结合 microsoft sql server 2019 完成一个完整的登录验证系统,包括数据库连接问题、ssl证书错误处理、cors跨域详细解释和解决方案。
适合需要前后端联调、单独部署数据库、独立登录服务的场景。
一、环境准备
- 开发工具:idea 2025.1
- spring boot 版本:3.4.3
- sql server 版本:microsoft sql server 2019
- 浏览器:chrome/edge
技术选型
- spring boot web
- jdbc 数据库连接
- html + javascript 作为前端
项目结构建议
boounionloginbackend/
├── src/
│   └── main/
│       ├── java/com/example/boounion/
│       │   ├── controller/logincontroller.java
│       │   ├── model/user.java
│       │   ├── service/userservice.java
│       │   └── boounionloginbackendapplication.java
│       └── resources/
│			└── static/index.html
│           └── application.properties
├── pom.xml
二、数据库配置详解(application.properties)
spring.datasource.url=jdbc:sqlserver://localhost:1433;databasename=boouniondb;encrypt=true;trustservercertificate=true
spring.datasource.username=sa
spring.datasource.password=bl123456
spring.datasource.driver-class-name=com.microsoft.sqlserver.jdbc.sqlserverdriver
spring.jpa.hibernate.ddl-auto=none
server.port=8080
重点解释:
encrypt=true:sql server 2019 默认要求连接加密。如果不加,会连接失败。trustservercertificate=true:如果你没有配置 ssl 证书,可以加上此参数,忽略证书校验,避免出现pkix path building failed错误。server.port=8080:设置后端启动端口为8080,确保和前端访问一致。
连接 sql server 常见错误总结:
| 错误提示 | 原因 | 解决方法 |
|---|---|---|
| tcp 1433端口连接失败 | sql server未开启tcp/ip | 配置sql server网络协议,启用tcp/ip |
| ssl 连接失败 pkix error | 缺少受信任证书 | 配置 encrypt=true 且 trustservercertificate=true |
| 登录失败 | 用户名密码错误 | 确认账号密码正确且允许sql登录 |
遇到的错误是典型的 ssl 证书验证失败,错误信息如下:
驱动程序无法通过使用 ssl 与 sql server 建立安全连接。
错误: pkix path building failed: unable to find valid certification path
三、前端登录界面(index.html)
页面结构:
<input type="text" id="username" placeholder="用户名">
<input type="password" id="password" placeholder="密码">
<button onclick="login()">登录</button>
美化 css 省略,重要的是 登录函数逻辑。
登录逻辑 javascript:
function login() {
  const username = document.getelementbyid("username").value;
  const password = document.getelementbyid("password").value;

  fetch("/api/login", {
    method: "post",
    headers: { "content-type": "application/json" },
    body: json.stringify({ username, password })
  })
  .then(response => response.json().then(data => ({ status: response.status, body: data })))
  .then(({ status, body }) => {
    if (status === 200 && body.status === "success") {
      window.location.href = body.redirecturl;
    } else {
      alert(body.message || "登录失败");
    }
  })
  .catch(() => alert("请求失败,请检查网络"));
}
特点:
- 使用 fetch() 发送 post 请求,提交 json 格式用户名和密码。
- 登录成功后,前端通过 window.location.href 跳转。
- 登录失败,使用 alert 弹窗提示用户。
- 完全符合现代前后端分离开发方式。
四、后端登录接口(logincontroller.java)
核心逻辑:
@postmapping("/login")
public responseentity<map<string, object>> login(@requestbody user user) {
    string result = userservice.login(user);
    map<string, object> response = new hashmap<>();

    switch (result) {
        case "登录成功":
            response.put("status", "success");
            response.put("redirecturl", "https://www.baidu.com/s?wd=csdn");
            return responseentity.ok(response);
        case "密码错误":
            response.put("status", "error");
            response.put("message", "密码错误");
            return responseentity.status(401).body(response);
        case "用户不存在":
            response.put("status", "error");
            response.put("message", "用户不存在");
            return responseentity.status(404).body(response);
        default:
            response.put("status", "error");
            response.put("message", "服务器异常");
            return responseentity.status(500).body(response);
    }
}
亮点说明:
- 使用 map 封装返回 json,灵活可扩展。
- 成功返回 200 状态,带 redirecturl,由前端跳转。
- 失败返回具体的 401/404/500 状态码,便于前端判断并提示。
✅ 保证登录接口符合 restful api 设计规范。
五、数据库验证逻辑(userservice.java)
简单查询用户密码:
try (connection conn = drivermanager.getconnection(dburl, dbuser, dbpassword)) {
    string sql = "select password from users where username = ?";
    try (preparedstatement stmt = conn.preparestatement(sql)) {
        stmt.setstring(1, user.getusername());
        try (resultset rs = stmt.executequery()) {
            if (!rs.next()) return "用户不存在";
            if (!rs.getstring("password").equals(user.getpassword())) return "密码错误";
            return "登录成功";
        }
    }
} catch (sqlexception e) {
    e.printstacktrace();
    return "数据库错误";
}
安全设计要点:
- 使用 preparedstatement,防止 sql 注入攻击。
- 明文密码对比(后期建议增加加密如 bcrypt)。
- 连接和关闭资源使用 try-with-resources,避免泄漏。
六、跨域 cors 问题详细解决
现象
前端 fetch 请求接口时报错:
access to fetch at ‘http://localhost:8080/api/login’ from origin ‘http://localhost:5500’ has been blocked by cors policy.
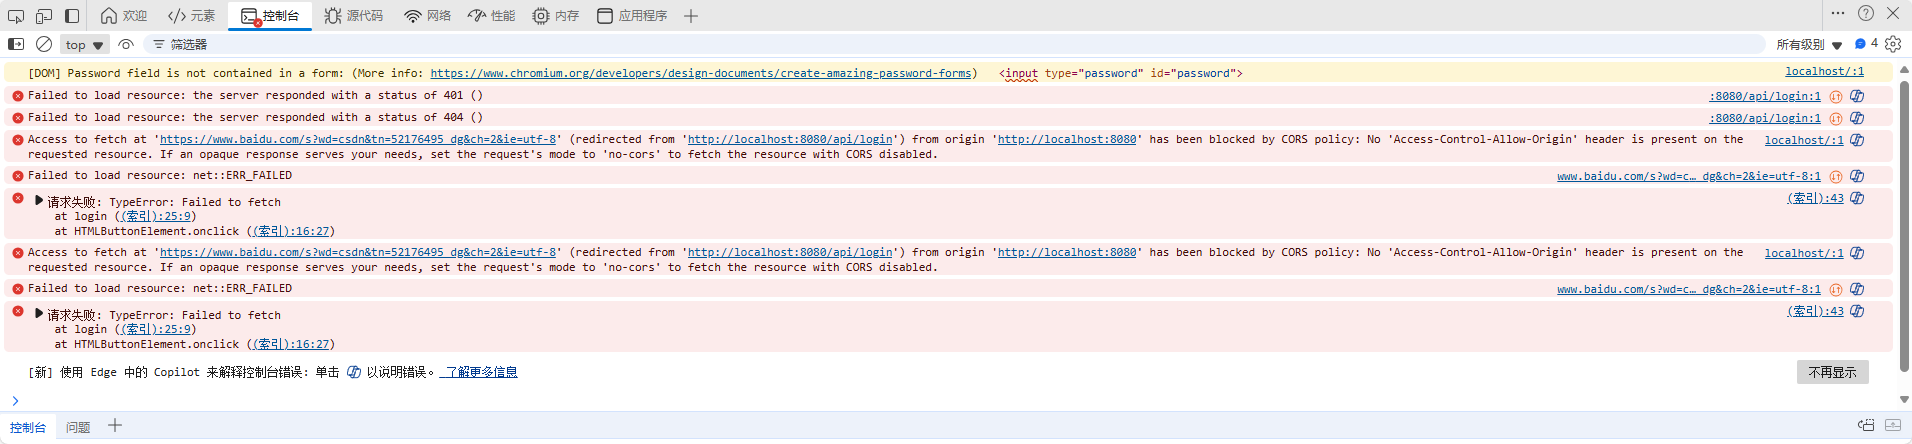
原因
浏览器安全策略,跨域请求被拦截。
完整解决方案:
1. 配置全局允许跨域
创建 webconfig.java:
@configuration
public class webconfig implements webmvcconfigurer {
    @override
    public void addcorsmappings(corsregistry registry) {
        registry.addmapping("/**")
                .allowedorigins("http://localhost:5500")
                .allowedmethods("get", "post")
                .allowcredentials(true);
    }
}
allowedorigins指定你的前端地址(可以是 ip、本地域名)。allowedmethods指定支持的方法,如 post、get。allowcredentials(true)允许带上 cookie(如果未来需要)。
2. 单接口上临时添加 @crossorigin
如果你只想允许登录接口跨域:
@crossorigin(origins = "http://localhost:5500")
@postmapping("/login")
✅ 推荐使用全局配置统一处理,维护简单。
七、总结
- 数据库连接重点:sql server 需要
encrypt=true,如果无证书,加trustservercertificate=true - 跨域问题重点:spring boot 后端必须添加 cors 配置,否则前端 fetch 会被浏览器拦截。
- 前端处理重点:fetch 请求成功后由前端自己 window.location.href 跳转。
- 后端接口规范:登录接口返回 200状态+json,而不是 302重定向。
- 安全建议:生产环境密码应加密存储,使用 bcrypt 算法。
附录:完整文件(可自行补全代码)
pom.xml ✅
<?xml version="1.0" encoding="utf-8"?>
<project xmlns="http://maven.apache.org/pom/4.0.0"
         xmlns:xsi="http://www.w3.org/2001/xmlschema-instance"
         xsi:schemalocation="http://maven.apache.org/pom/4.0.0 http://maven.apache.org/xsd/maven-4.0.0.xsd">
    <modelversion>4.0.0</modelversion>

    <groupid>org.example</groupid>
    <artifactid>boounionerp</artifactid>
    <version>1.0-snapshot</version>
    <packaging>jar</packaging>

    <!-- spring boot 父项目 -->
    <parent>
        <groupid>org.springframework.boot</groupid>
        <artifactid>spring-boot-starter-parent</artifactid>
        <version>3.4.3</version>
        <relativepath/>
    </parent>

    <properties>
        <maven.compiler.source>17</maven.compiler.source>
        <maven.compiler.target>17</maven.compiler.target>
        <project.build.sourceencoding>utf-8</project.build.sourceencoding>
    </properties>

    <dependencies>
        <!-- spring boot web 模块(包含内嵌 tomcat) -->
        <dependency>
            <groupid>org.springframework.boot</groupid>
            <artifactid>spring-boot-starter-web</artifactid>
        </dependency>

        <!-- 开发工具(自动重启,非必须) -->
        <dependency>
            <groupid>org.springframework.boot</groupid>
            <artifactid>spring-boot-devtools</artifactid>
            <scope>runtime</scope>
        </dependency>

        <!-- sql server jdbc 驱动 -->
        <dependency>
            <groupid>com.microsoft.sqlserver</groupid>
            <artifactid>mssql-jdbc</artifactid>
            <version>11.2.3.jre11</version>
        </dependency>
    </dependencies>

    <build>
        <plugins>
            <plugin>
                <groupid>org.springframework.boot</groupid>
                <artifactid>spring-boot-maven-plugin</artifactid>
            </plugin>
        </plugins>
    </build>
</project>
index.html ✅
<!doctype html>
<html lang="zh">
<head>
  <meta charset="utf-8">
  <title>登录界面</title>
  <style>
    body {
      font-family: arial;
      padding: 50px;
      background-color: #f0f2f5;
    }
    .login-box {
      background-color: white;
      padding: 20px;
      width: 300px;
      margin: auto;
      border-radius: 5px;
      box-shadow: 0 0 10px rgba(0, 0, 0, 0.1);
    }
    input {
      width: 100%;
      margin-bottom: 10px;
      padding: 8px;
      box-sizing: border-box;
    }
    button {
      width: 100%;
      padding: 8px;
      background-color: #4caf50;
      color: white;
      border: none;
      cursor: pointer;
    }
  </style>
</head>
<body>
  <div class="login-box">
    <h2>登录</h2>
    <input type="text" id="username" placeholder="用户名">
    <input type="password" id="password" placeholder="密码">
    <button onclick="login()">登录</button>
  </div>

  <script>
    function login() {
      const username = document.getelementbyid("username").value;
      const password = document.getelementbyid("password").value;

      fetch("/api/login", {
        method: "post",
        headers: {
          "content-type": "application/json"
        },
        body: json.stringify({ username, password })
      })
      .then(response => response.json().then(data => ({ status: response.status, body: data })))
      .then(({ status, body }) => {
        if (status === 200 && body.status === "success") {
          window.location.href = body.redirecturl;
        } else {
          alert(body.message || "登录失败");
        }
      })
      .catch(error => {
        alert("请求失败,请检查网络");
        console.error(error);
      });
    }
  </script>
</body>
</html>
application.properties ✅
# 数据库连接配置
spring.datasource.url=jdbc:sqlserver://localhost:1433;databasename=boouniondb;encrypt=true;trustservercertificate=true
spring.datasource.username=sa
spring.datasource.password=bl123456
spring.datasource.driver-class-name=com.microsoft.sqlserver.jdbc.sqlserverdriver

# 其他常规配置
spring.jpa.hibernate.ddl-auto=none
server.port=8080
main.java ✅
package org.example;

import org.springframework.boot.springapplication;
import org.springframework.boot.autoconfigure.springbootapplication;

/**
 * ==================================================
 * this class main is responsible for [功能描述].
 *
 * @author darker
 * @version 1.0
 * ==================================================
 */

@springbootapplication
public class main {
    public static void main(string[] args) {
        springapplication.run(main.class, args);
    }
}
user.java ✅
package org.example.model;

/**
 * ==================================================
 * this class user is responsible for [功能描述].
 *
 * @author darker
 * @version 1.0
 * ==================================================
 */

public class user {
    private string username;
    private string password;

    public user() {}

    public user(string username, string password) {
        this.username = username;
        this.password = password;
    }

    public string getusername() { return username; }
    public void setusername(string username) { this.username = username; }

    public string getpassword() { return password; }
    public void setpassword(string password) { this.password = password; }
}
userservice.java ✅
package org.example.service;

import org.example.model.user;
import org.springframework.beans.factory.annotation.value;
import org.springframework.stereotype.service;

import java.sql.*;

/**
 * ==================================================
 * this class userservice is responsible for [功能描述].
 *
 * @author darker
 * @version 1.0
 * ==================================================
 */

@service
public class userservice {
    @value("${spring.datasource.url}")
    private string dburl;

    @value("${spring.datasource.username}")
    private string dbuser;

    @value("${spring.datasource.password}")
    private string dbpassword;

    public string login(user user) {
        try (connection conn = drivermanager.getconnection(dburl, dbuser, dbpassword)) {

            string checkusersql = "select password from users where username = ?";
            try (preparedstatement stmt = conn.preparestatement(checkusersql)) {
                stmt.setstring(1, user.getusername());

                try (resultset rs = stmt.executequery()) {
                    if (!rs.next()) {
                        return "用户不存在";
                    }

                    string dbpassword = rs.getstring("password");
                    if (!dbpassword.equals(user.getpassword())) {
                        return "密码错误";
                    }

                    return "登录成功";
                }
            }

        } catch (sqlexception e) {
            e.printstacktrace();
            return "数据库错误";
        }
    }
}
logincontroller.java ✅
package org.example.controller;

import org.example.model.user;
import org.example.service.userservice;
import org.springframework.beans.factory.annotation.autowired;
import org.springframework.http.responseentity;
import org.springframework.web.bind.annotation.*;

import java.util.hashmap;
import java.util.map;

/**
 * ==================================================
 * this class logincontroller is responsible for [功能描述].
 *
 * @author darker
 * @version 1.0
 * ==================================================
 */

@restcontroller
@requestmapping("/api")
public class logincontroller {
    @autowired
    private userservice userservice;

    @postmapping("/login")
    public responseentity<map<string, object>> login(@requestbody user user) {
        string result = userservice.login(user);
        map<string, object> response = new hashmap<>();

        switch (result) {
            case "登录成功":
                // 拼接带参数的跳转地址
                /*
                 string url = string.format(
                        "https://www.baidu.com/s?username=%s",
                        user.getusername()
                 );
                 */
                string url = "https://www.baidu.com/s?wd=csdn";
                response.put("status", "success");
                response.put("redirecturl", url);
                return responseentity.ok(response);
            case "密码错误":
                response.put("status", "error");
                response.put("message", "密码错误");
                return responseentity.status(401).body(response);
            case "用户不存在":
                response.put("status", "error");
                response.put("message", "用户不存在");
                return responseentity.status(404).body(response);
            default:
                response.put("status", "error");
                response.put("message", "服务器异常");
                return responseentity.status(500).body(response);
        }
    }
}
到此这篇关于springboot连接microsoft sql server实现登录验证的文章就介绍到这了,更多相关springboot连sql登录验证内容请搜索代码网以前的文章或继续浏览下面的相关文章希望大家以后多多支持代码网!


发表评论