给一个方法加上了@async 注解,期待它能异步执行,结果发现它还是同步执行的?更困惑的是,同样的注解在其他地方却能正常工作。这个问题困扰了很多 java 开发者,尤其是当你在同一个类中调用带有@async 注解的方法时。今天,我们就来深入解析这个问题的原因,并提供多种实用的解决方案。
spring @async 的正常工作原理
在讨论内部调用问题前,我们先了解一下@async 注解的基本工作原理。
import org.springframework.scheduling.annotation.async;
import org.springframework.stereotype.service;
import org.springframework.beans.factory.annotation.autowired;

// 简单的用户类
class user {
    private string email;
    private string name;

    // 默认构造器(spring bean实例化需要)
    public user() {}

    public user(string email, string name) {
        this.email = email;
        this.name = name;
    }

    public string getemail() { return email; }
    public string getname() { return name; }
    public void setemail(string email) { this.email = email; }
    public void setname(string name) { this.name = name; }
}

@service
public class emailservice {

    @async
    public void sendemail(string to, string content) {
        // 耗时的邮件发送逻辑
        system.out.println("发送邮件中... 当前线程: " + thread.currentthread().getname());
    }
}

@service
public class userservice {
    @autowired
    private emailservice emailservice;

    public void registeruser(user user) {
        // 用户注册逻辑
        system.out.println("注册用户中... 当前线程: " + thread.currentthread().getname());

        // 异步发送欢迎邮件
        emailservice.sendemail(user.getemail(), "欢迎注册!");

        // 注册完成,立即返回
        system.out.println("注册完成!");
    }
}
spring @async 的工作原理如下:
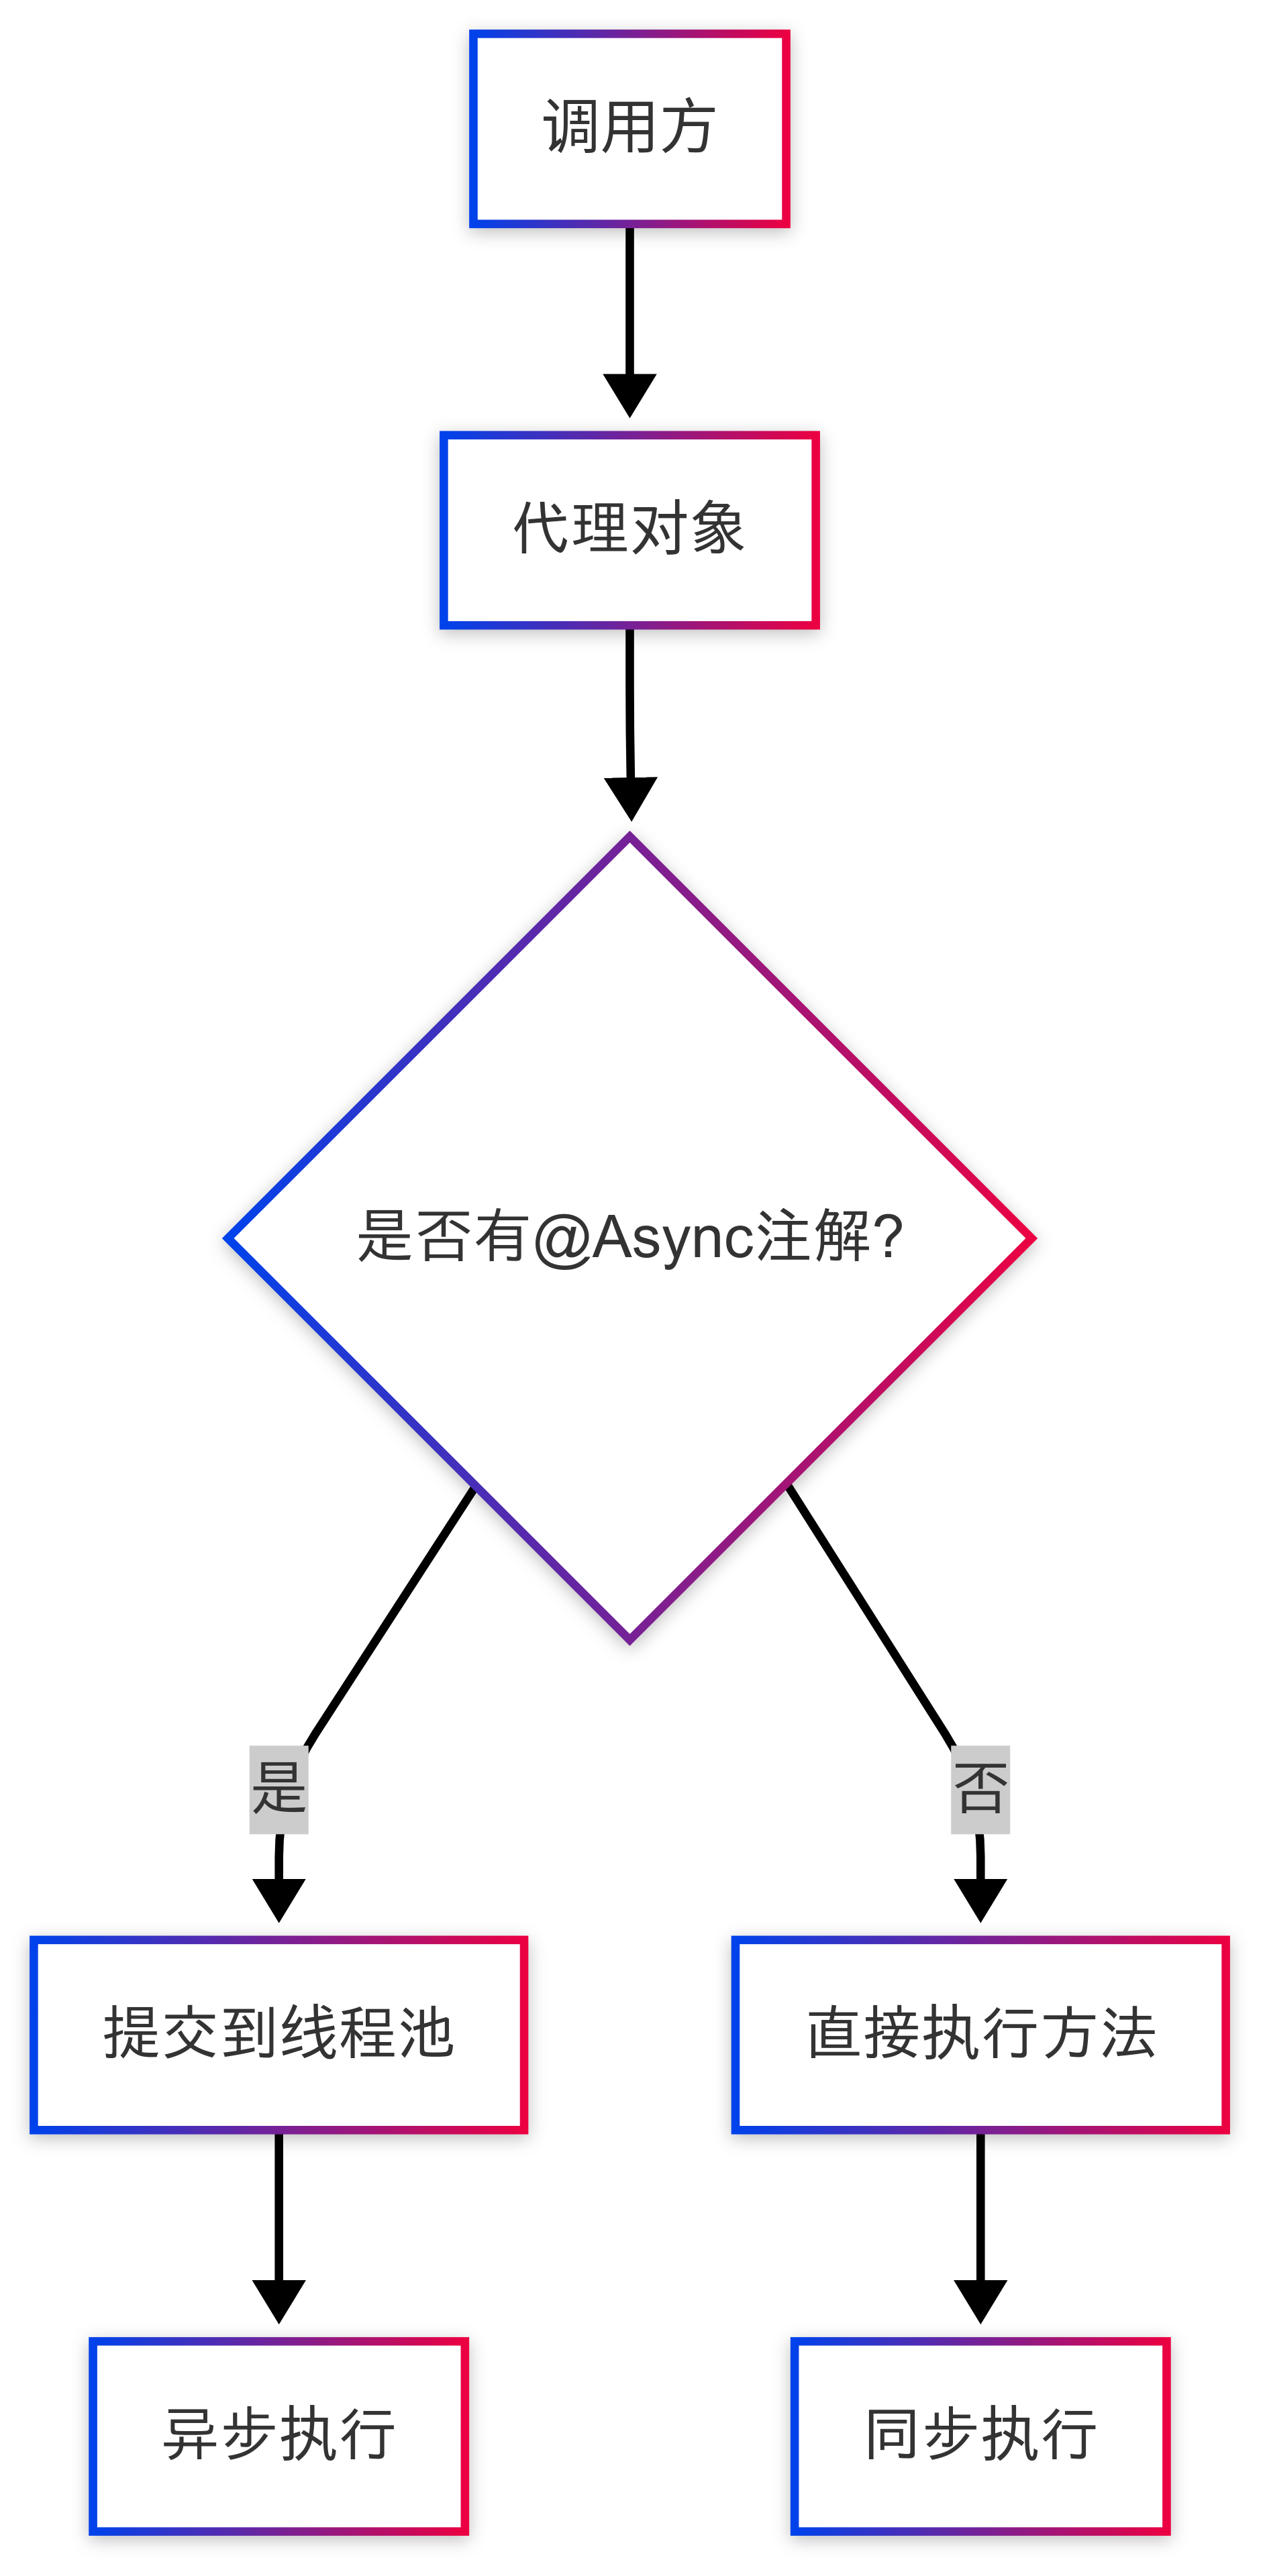
spring 通过 aop 代理实现@async 功能。当一个方法被@async 注解标记时,spring 会创建一个代理对象。当外部代码调用该方法时,调用实际上首先被代理对象拦截,然后代理将任务提交到线程池异步执行。
spring 默认对实现接口的类使用 jdk 动态代理,对非接口类使用 cglib 代理。但无论哪种代理,重要的是调用必须经过代理对象,才能触发@async 的处理逻辑。
内部调用问题
问题出现在同一个类中调用自己的@async 方法时:
import org.springframework.scheduling.annotation.async;
import org.springframework.stereotype.service;
import java.util.list;

@service
public class notificationservice {

    public void notifyall(list<user> users, string message) {
        system.out.println("开始通知所有用户... 当前线程: " + thread.currentthread().getname());

        for (user user : users) {
            // 调用同一个类中的@async方法
            sendnotification(user, message);  // 问题:这里变成了同步调用!
        }

        system.out.println("通知流程初始化完成!");  // 实际要等所有通知发送完才会执行到这里
    }

    @async
    public void sendnotification(user user, string message) {
        // 模拟耗时操作
        try {
            system.out.println("正在发送通知给" + user.getname() +
                    "... 当前线程: " + thread.currentthread().getname());
            thread.sleep(1000); // 模拟耗时操作
        } catch (interruptedexception e) {
            thread.currentthread().interrupt();
        }
    }
}上面的代码中,虽然sendnotification方法标记了@async,但当在notifyall方法中调用它时,它还是会同步执行,这不是我们预期的行为。
为什么内部调用会失效?
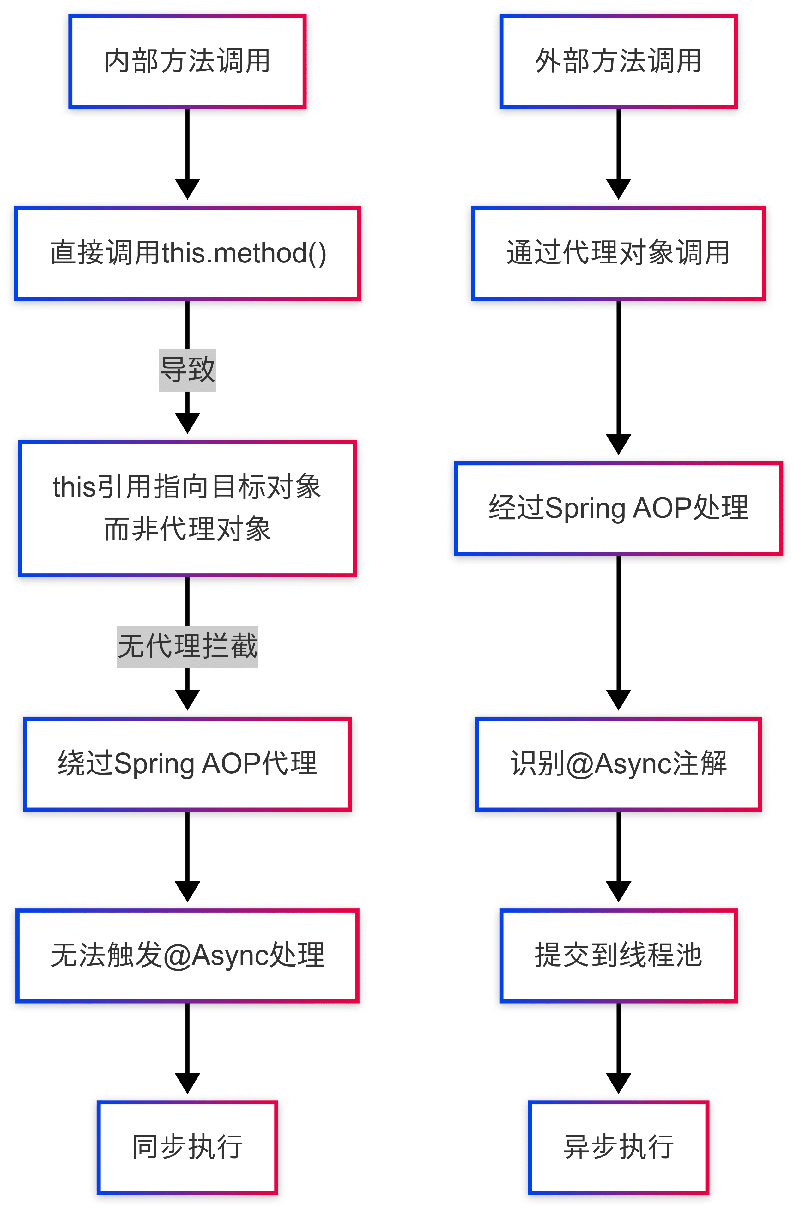
内部调用失效的核心原因是:spring 的 aop 是基于代理实现的,而内部方法调用会绕过代理机制。
当你在一个类中直接调用同一个类的方法时(即使用this.method()或简单的method()),这种调用是通过 java 的常规方法调用机制直接执行的,完全绕过了 spring 创建的代理对象。没有经过代理,@async 注解就无法被识别和处理,因此方法会按普通方法同步执行。
从源码角度看,spring 通过asyncannotationbeanpostprocessor处理带有@async 注解的方法,创建代理对象。当方法调用经过代理时,代理会检测注解并将任务提交给配置的taskexecutor(spring 用于执行异步任务的核心接口,提供线程池管理等功能)。内部调用直接执行原始方法,根本不经过这个处理流程。
五种解决方案
方案 1:自我注入(self-injection)
最简单的方法是在类中注入自己:
import org.springframework.scheduling.annotation.async;
import org.springframework.stereotype.service;
import org.springframework.beans.factory.annotation.autowired;
import java.util.list;

@service
public class notificationservice {

    @autowired
    private notificationservice self;  // 注入自己的代理对象

    public void notifyall(list<user> users, string message) {
        system.out.println("开始通知所有用户... 当前线程: " + thread.currentthread().getname());

        for (user user : users) {
            // 通过自注入的引用调用@async方法
            self.sendnotification(user, message);  // 现在是异步调用!
        }

        system.out.println("通知流程初始化完成!");  // 立即执行,不等待通知完成
    }

    @async
    public void sendnotification(user user, string message) {
        // 实现同前...
    }
}工作原理:当 spring 注入self字段时,它实际上注入的是一个代理对象,而不是原始对象。通过代理调用方法,确保@async 注解能被正确处理。
优点:
- 实现简单,仅需添加一个自引用字段,无需修改方法逻辑
- 不改变原有的类结构
缺点:
- 可能导致循环依赖问题(不过 spring 通常能处理这类循环依赖)
- 代码看起来可能有点奇怪,自注入不是一种常见模式
- 如果服务类需要序列化,代理对象可能导致序列化问题
方案 2:使用 applicationcontext 获取代理对象
通过 spring 的 applicationcontext 手动获取代理对象:
import org.springframework.scheduling.annotation.async;
import org.springframework.stereotype.service;
import org.springframework.beans.factory.annotation.autowired;
import org.springframework.context.applicationcontext;
import java.util.list;

@service
public class notificationservice {

    @autowired
    private applicationcontext applicationcontext;

    public void notifyall(list<user> users, string message) {
        system.out.println("开始通知所有用户... 当前线程: " + thread.currentthread().getname());

        // 获取代理对象
        notificationservice proxy = applicationcontext.getbean(notificationservice.class);

        for (user user : users) {
            // 通过代理对象调用@async方法
            proxy.sendnotification(user, message);  // 异步调用成功
        }

        system.out.println("通知流程初始化完成!");
    }

    @async
    public void sendnotification(user user, string message) {
        // 实现同前...
    }
}工作原理:从 applicationcontext 获取的 bean 总是代理对象(如果应该被代理的话)。通过这个代理调用方法会触发所有 aop 切面,包括@async。
优点:
- 清晰明了,显式获取代理对象
- 不需要添加额外的字段
缺点:
- 增加了对 applicationcontext 的依赖
- 每次调用前都需要获取 bean,略显冗余
方案 3:使用 aopcontext 获取代理对象
利用 spring aop 提供的工具类获取当前代理:
import org.springframework.scheduling.annotation.async;
import org.springframework.stereotype.service;
import org.springframework.context.annotation.configuration;
import org.springframework.scheduling.annotation.enableasync;
import org.springframework.context.annotation.enableaspectjautoproxy;
import org.springframework.aop.framework.aopcontext;
import java.util.list;

@configuration
@enableasync
@enableaspectjautoproxy(exposeproxy = true)  // 重要:暴露代理对象
public class asyncconfig {
    // 异步配置...
}

@service
public class notificationservice {

    public void notifyall(list<user> users, string message) {
        system.out.println("开始通知所有用户... 当前线程: " + thread.currentthread().getname());

        // 获取当前代理对象
        notificationservice proxy = (notificationservice) aopcontext.currentproxy();

        for (user user : users) {
            // 通过代理对象调用@async方法
            proxy.sendnotification(user, message);  // 异步调用成功
        }

        system.out.println("通知流程初始化完成!");
    }

    @async
    public void sendnotification(user user, string message) {
        // 实现同前...
    }
}工作原理:spring aop 提供了aopcontext.currentproxy()方法来获取当前的代理对象。调用方法时,使用这个代理对象而不是this。
注意事项:必须在配置中设置@enableaspectjautoproxy(exposeproxy = true)来暴露代理对象,否则会抛出异常。
优点:
- 无需注入其他对象
- 代码清晰,直接使用 aop 上下文
缺点:
- 需要显式配置
exposeproxy = true - 依赖 spring aop 的特定 api
方案 4:拆分为单独的服务类
将异步方法拆分到单独的服务类中:
import org.springframework.scheduling.annotation.async;
import org.springframework.stereotype.service;
import org.springframework.beans.factory.annotation.autowired;
import java.util.list;

@service
public class asyncnotificationservice {

    @async
    public void sendnotification(user user, string message) {
        // 模拟耗时操作
        try {
            system.out.println("正在发送通知给" + user.getname() +
                    "... 当前线程: " + thread.currentthread().getname());
            thread.sleep(1000);
        } catch (interruptedexception e) {
            thread.currentthread().interrupt();
        }
    }
}

@service
public class notificationservice {

    @autowired
    private asyncnotificationservice asyncservice;

    public void notifyall(list<user> users, string message) {
        system.out.println("开始通知所有用户... 当前线程: " + thread.currentthread().getname());

        for (user user : users) {
            // 调用专门的异步服务
            asyncservice.sendnotification(user, message);  // 正常异步调用
        }

        system.out.println("通知流程初始化完成!");
    }
}工作原理:将需要异步执行的方法移动到专门的服务类中,然后通过依赖注入使用这个服务。这样,调用总是通过 spring 代理对象进行的。
优点:
- 符合单一职责原则,代码组织更清晰
- 避免了所有与代理相关的问题
- 可以更好地对异步操作进行组织和管理
- 更符合依赖倒置原则,便于单元测试和模拟测试
缺点:
- 需要创建额外的类
- 可能导致类的数量增加
方案 5:手动使用 taskexecutor
完全放弃@async 注解,手动使用 spring 的 taskexecutor:
import org.springframework.stereotype.service;
import org.springframework.beans.factory.annotation.autowired;
import org.springframework.core.task.taskexecutor;
import java.util.list;
import java.util.concurrent.completablefuture;

@service
public class notificationservice {

    @autowired
    private taskexecutor taskexecutor;  // spring提供的任务执行器接口

    public void notifyall(list<user> users, string message) {
        system.out.println("开始通知所有用户... 当前线程: " + thread.currentthread().getname());

        for (user user : users) {
            // 手动提交任务到执行器
            taskexecutor.execute(() -> {
                sendnotification(user, message);  // 异步执行
            });

            // 如需获取返回值,可以使用completablefuture
            completablefuture<string> future = completablefuture.supplyasync(() -> {
                return sendnotificationwithresult(user, message);
            }, taskexecutor);

            // 非阻塞处理结果
            future.thenaccept(result -> {
                system.out.println("通知结果: " + result);
            });

            // 链式操作示例:转换结果并组合多个异步操作
            completablefuture<integer> processedfuture = future
                .thenapply(result -> result.length())  // 转换结果
                .thencombine(  // 组合另一个异步操作
                    completablefuture.supplyasync(() -> user.getname().length()),
                    (len1, len2) -> len1 + len2
                );

            // 非阻塞异常处理
            processedfuture.exceptionally(ex -> {
                system.err.println("处理失败: " + ex.getmessage());
                return -1;
            });
        }

        system.out.println("通知流程初始化完成!");
    }

    // 注意:不再需要@async注解
    public void sendnotification(user user, string message) {
        // 实现同前...
    }

    public string sendnotificationwithresult(user user, string message) {
        // 返回通知结果
        return "已通知" + user.getname();
    }
}工作原理:直接使用 spring 的 taskexecutor 提交任务,完全绕过 aop 代理机制。
优点:
- 完全控制异步执行的方式和时机
- 不依赖 aop 代理,更直接和透明
- 可以更细粒度地控制任务执行(如添加超时、错误处理等)
- 支持灵活的返回值处理,结合 completablefuture 实现非阻塞编程
- 支持复杂的异步编排(如链式操作、组合多个异步任务)
缺点:
- 失去了@async 的声明式便利性
- 需要更多的手动编码
- 需要移除@async 注解,修改方法签名和调用逻辑,代码侵入性高
针对返回值的异步方法
如果你的@async 方法有返回值,它应该返回future或completablefuture。在处理内部调用时,上述解决方案同样适用:
import org.springframework.scheduling.annotation.async;
import org.springframework.stereotype.service;
import org.springframework.beans.factory.annotation.autowired;
import java.util.list;
import java.util.arraylist;
import java.util.concurrent.completablefuture;

// 示例业务类
class reportrequest {
    private string id;

    // 默认构造器
    public reportrequest() {}

    public reportrequest(string id) { this.id = id; }
    public string getid() { return id; }
    public void setid(string id) { this.id = id; }
}

class report {
    private string id;
    private string content;

    // 默认构造器
    public report() {}

    public report(string id, string content) {
        this.id = id;
        this.content = content;
    }
}

@service
public class reportservice {

    @autowired
    private reportservice self;  // 使用方案1:自我注入

    public void generatereports(list<reportrequest> requests) {
        list<completablefuture<report>> futures = new arraylist<>();

        for (reportrequest request : requests) {
            // 通过代理调用返回completablefuture的异步方法
            completablefuture<report> future = self.generatereport(request);
            futures.add(future);
        }

        // 等待所有报告生成完成
        completablefuture.allof(futures.toarray(new completablefuture[0])).join();

        // 处理结果
        for (completablefuture<report> future : futures) {
            report report = future.join();
            // 处理报告...
        }
    }

    @async
    public completablefuture<report> generatereport(reportrequest request) {
        // 模拟耗时的报告生成
        try {
            system.out.println("生成报告中... 当前线程: " + thread.currentthread().getname());
            thread.sleep(2000);
            report report = new report(request.getid(), "报告内容...");
            return completablefuture.completedfuture(report);
        } catch (exception e) {
            completablefuture<report> future = new completablefuture<>();
            future.completeexceptionally(e);
            return future;
        }
    }
}
异常处理与实践建议
异步方法的异常处理需要特别注意:异步执行的方法抛出的异常不会传播到调用方,因为异常发生在不同的线程中。
import org.springframework.scheduling.annotation.async;
import org.springframework.stereotype.service;
import org.springframework.beans.factory.annotation.autowired;
import org.slf4j.logger;
import org.slf4j.loggerfactory;
import java.util.list;
import java.util.concurrent.completablefuture;
import java.util.concurrent.future;
import org.springframework.scheduling.annotation.asyncresult;

@service
public class robustnotificationservice {

    @autowired
    private robustnotificationservice self;
    private static final logger logger = loggerfactory.getlogger(robustnotificationservice.class);

    public void notifyall(list<user> users, string message) {
        for (user user : users) {
            // 错误:无法捕获异步方法的异常,因为异常发生在另一个线程
            // try {
            //     self.sendnotification(user, message);
            // } catch (exception e) {
            //     logger.error("failed to send notification to user: " + user.getid(), e);
            // }

            // 正确方式1:使用全局异常处理器(在asyncconfigurer中配置)
            self.sendnotification(user, message);

            // 正确方式2:如果方法返回future,可以通过future捕获异常
            future<"通知发送失败: " + user.getname(), e);
                // 处理失败情况
            }

            // 正确方式3:使用completablefuture的异常处理
            completablefuture<void> cf = self.sendnotificationwithcompletablefuture(user, message);
            cf.exceptionally(ex -> {
                logger.error("通知发送失败: " + user.getname(), ex);
                return null;
            });
        }
    }

    @async
    public void sendnotification(user user, string message) {
        try {
            // 通知逻辑...
            if (user.getname() == null) {
                throw new runtimeexception("用户名不能为空");
            }
        } catch (exception e) {
            // 记录详细的异常信息,但异常不会传播到调用方
            logger.error("通知失败: " + user.getname(), e);
            // 异常会被asyncuncaughtexceptionhandler处理(如果配置了)
            throw e;
        }
    }

    @async
    public future<void> sendnotificationwithfuture(user user, string message) {
        // 实现逻辑...
        return new asyncresult<>(null);
    }

    @async
    public completablefuture<void> sendnotificationwithcompletablefuture(user user, string message) {
        // 实现逻辑...
        return completablefuture.completedfuture(null);
    }
}实践建议:
- 合理配置线程池:默认情况下,spring 使用
simpleasynctaskexecutor,每次调用都会创建新线程,这在生产环境中是不可接受的。应配置适当的线程池:
import org.springframework.context.annotation.configuration;
import org.springframework.scheduling.annotation.enableasync;
import org.springframework.scheduling.annotation.asyncconfigurer;
import org.springframework.scheduling.concurrent.threadpooltaskexecutor;
import org.springframework.aop.interceptor.asyncuncaughtexceptionhandler;
import org.springframework.aop.interceptor.simpleasyncuncaughtexceptionhandler;
import java.util.concurrent.executor;
import java.util.concurrent.threadpoolexecutor;

@configuration
@enableasync
public class asyncconfig implements asyncconfigurer {

    @override
    public executor getasyncexecutor() {
        threadpooltaskexecutor executor = new threadpooltaskexecutor();
        executor.setcorepoolsize(5);       // 核心线程数
        executor.setmaxpoolsize(10);       // 最大线程数
        executor.setqueuecapacity(25);     // 队列容量
        executor.setthreadnameprefix("myasync-");

        // 拒绝策略:当队列满且线程数达到最大时的处理策略
        executor.setrejectedexecutionhandler(new threadpoolexecutor.callerrunspolicy());

        // 允许核心线程超时,适用于负载波动的场景
        executor.setallowcorethreadtimeout(true);

        executor.initialize();
        return executor;
    }

    @override
    public asyncuncaughtexceptionhandler getasyncuncaughtexceptionhandler() {
        return new simpleasyncuncaughtexceptionhandler();
    }
}- 适当使用超时控制:对于需要获取结果的异步方法,添加超时控制,但要注意阻塞问题:
import java.util.concurrent.timeunit;
import java.util.concurrent.timeoutexception;

// 阻塞式超时控制(慎用,会阻塞当前线程)
completablefuture<report> future = reportservice.generatereport(request);
try {
    report report = future.get(30, timeunit.seconds); // 设置30秒超时
} catch (timeoutexception e) {
    logger.error("报告生成超时", e);
    // 处理超时情况
}

// 更好的非阻塞方式:
future.ortimeout(30, timeunit.seconds)
      .thenaccept(report -> processreport(report))
      .exceptionally(ex -> {
          if (ex instanceof timeoutexception) {
              logger.error("报告生成超时");
          } else {
              logger.error("报告生成失败", ex);
          }
          return null;
});- 慎用方案选择:
- 对于简单场景,自我注入(方案 1)最简单直接
- 对于复杂业务逻辑,拆分服务(方案 4)是更好的架构选择
- 如果需要细粒度控制,直接使用 taskexecutor(方案 5)是最灵活的选择
- 注意事务传播: 异步方法执行在单独的线程中,会导致事务传播行为失效。spring 的事务上下文通过
threadlocal与当前线程绑定,异步方法在新线程中执行时,无法访问调用方的threadlocal数据,因此必须在异步方法上单独声明@transactional以创建新事务。
@service
public class transactionservice {

    @autowired
    private transactionservice self;

    @transactional
    public void savewithtransaction(entity entity) {
        // 事务操作...

        // 错误:异步方法在新线程中执行,当前事务不会传播
        self.asyncoperation(entity); // 不会共享当前事务
    }

    @async
    @transactional // 必须单独添加事务注解,会创建新的事务
    public void asyncoperation(entity entity) {
        // 此方法将有自己的事务,而非继承调用方的事务
    }
}- 验证异步执行:
// 在测试类中验证异步执行
@springboottest
public class asyncservicetest {

    @autowired
    private notificationservice service;

    @test
    public void testasyncexecution() throws exception {
        // 记录主线程名称
        string mainthread = thread.currentthread().getname();

        // 保存异步线程名称
        final string[] asyncthread = new string[1];
        countdownlatch latch = new countdownlatch(1);

        user user = new user();
        user.setname("testuser");

        // 重写异步方法以捕获线程名称
        service.sendnotificationwithcompletablefuture(user, "test")
               .thenaccept(v -> {
                   asyncthread[0] = thread.currentthread().getname();
                   latch.countdown();
               });

        // 等待异步操作完成
        latch.await(5, timeunit.seconds);

        // 验证线程不同
        assertthat(mainthread).isnotequalto(asyncthread[0]);
        assertthat(asyncthread[0]).startswith("myasync-");
    }
}
五种方案对比

总结
解决方案 | 实现复杂度 | 代码侵入性 | 额外依赖 | 架构清晰度 | 适用场景 |
自我注入 | 低 | 低 (仅添加一个自注入字段,无方法逻辑修改) | 无 | 中 | 简单项目,快速解决 |
applicationcontext | 中 | 中 | applicationcontext | 中 | 需要明确控制代理获取 |
aopcontext | 中 | 中 | 需开启 exposeproxy | 中 | 不想增加依赖字段 |
拆分服务 | 高 | 低 | 无 | 高 | 大型项目,关注点分离 |
手动 taskexecutor | 高 | 高 (需修改方法注解和调用逻辑) | taskexecutor | 高 | 需要精细控制异步执行 需灵活处理返回值 需要复杂异步编排 |


发表评论