一、版本对应
下表来自 pytorch 的 github 官方文档:pytorch/vision: datasets, transforms and models specific to computer vision
- pytorch 安装官网:start locally | pytorch
- pytorch 之前版本的安装命令:previous pytorch versions | pytorch
- torch、torchvision 等相关库:download.pytorch.org/whl/torch_stable.html
其中,命令中 "-c pytorch" 表示官方源,自己换源可以去掉。
| torch 版本 | torchvision 版本 | torchaudio 版本 | 支持的 python 版本(示例) | cuda 版本 |
|---|---|---|---|---|
| 2.5.1 | 0.20.1 | 2.5.1 | >=3.9, <3.13(3.12)[9/10/11/12] | 12.4/12.1/11.8 |
| 2.5.0 | 0.20.0 | 2.5.0 | >=3.9, <3.13(3.12) | 12.4/12.1/11.8 |
| 2.4.1 | 0.19.1 | 2.4.1 | >=3.8, <3.13(3.12)[8/9/10/11/12] | 12.4/12.1/11.8 |
| 2.4.0 | 0.19.0 | 2.4.0 | >=3.8, <3.13(3.12) | 12.4/12.1/11.8 |
| 2.3.1 | 0.18.1 | 2.3.1 | >=3.8, <3.13(3.12)8/9/10/11/12 | 12.1/11.8 |
| 2.3.0 | 0.18.0 | 2.3.0 | >=3.8, <3.13(3.12) | 12.1/11.8 |
| 2.2.2 | 0.17.2 | 2.2.2 | >=3.8, <3.12 [8/9/10/11] | 12.1/11.8 |
| 2.2.1 | 0.17.1 | 2.2.1 | >=3.8, <3.12 | 12.1/11.8 |
| 2.2.0 | 0.17.0 | 2.2.0 | >=3.8, <3.12 | 12.1/11.8 |
| 2.1.2 | 0.16.2 | 2.1.2 | >=3.8, <3.12(3.10)8/9/10/11 | 12.1/11.8 |
| 2.1.1 | 0.16.1 | 2.1.1 | >=3.8, <3.12(3.10) | 12.1/11.8 |
| 2.1.0 | 0.16.0 | 2.1.0 | >=3.8, <3.12(3.10) | 12.1/11.8 |
| 2.0.0 | 0.15.0 | 2.0.0 | >=3.8, <3.12(3.8)[8/9/10/11] | 11.8/11.7 |
| 1.13.1 | 0.14.1 | 0.13.1 | >=3.7.2, <=3.10(3.8)[7/8/9/10] | 11.7/11.6 |
| 1.13.0 | 0.14.0 | 0.13.0 | >=3.7.2, <=3.10(3.8) | 11.7/11.6 |
| 1.12.1 | 0.13.1 | 1.12.1 | >=3.7, <=3.10(3.8)[7/8/9/10] | 11.6/11.3/10.2 |
| 1.12.0 | 0.13.0 | 1.12.0 | >=3.7, <=3.10(3.8) | 11.6/11.3/10.2 |
| 1.11.0 | 0.12.0 | 1.11.0 | >=3.7, <=3.10(3.8) | 11.3/10.2 |
| 1.10.1 | 0.11.2 | 0.10.1 | >=3.6, <=3.9(3.8)[6/7/8/9] | 11.3/10.2 |
| 1.10.0 | 0.11.0 | 0.10.0 | >=3.6, <=3.9(3.8) | 11.3/10.2 |
| 1.9.1 | 0.10.1 | 0.9.1 | >=3.6, <=3.9(3.8)[6/7/8/9] | 11.1/10.2 |
| 1.9.0 | 0.10.0 | 0.9.0 | >=3.6, <=3.9(3.8) | 11.1/10.2 |
| 1.8.1 | 0.9.1 | 0.8.1 | >=3.6, <=3.9(3.8)[6/7/8/9] | 11.1/10.2 |
| 1.8.0 | 0.9.0 | 0.8.0 | >=3.6, <=3.9(3.8) | 11.1/10.2 |
| 1.7.1 | 0.8.2 | 0.7.2 | >=3.6(3.6) | 11.0/10.2/10.1 |
| 1.7.0 | 0.8.0 | 0.7.0 | >=3.6(3.6) | 11.0/10.2/10.1 |
二、安装命令(pip)
1. 版本
(1)v2.5.1 ~ v2.0.0
# v2.5.1
# cuda 12.4
pip install torch==2.5.1 torchvision==0.20.1 torchaudio==2.5.1 --index-url https://download.pytorch.org/whl/cu124 -i https://pypi.tuna.tsinghua.edu.cn/simple/
# cpu only
pip install torch==2.5.1 torchvision==0.20.1 torchaudio==2.5.1 --index-url https://download.pytorch.org/whl/cpu -i https://pypi.tuna.tsinghua.edu.cn/simple/
(2)v1.13.1 ~ v1.11.0
# v1.13.1
# cuda 11.7
pip install torch==1.13.1+cu117 torchvision==0.14.1+cu117 torchaudio==0.13.1 --extra-index-url https://download.pytorch.org/whl/cu117 -i https://pypi.tuna.tsinghua.edu.cn/simple/
# cpu only
pip install torch==1.13.1+cpu torchvision==0.14.1+cpu torchaudio==0.13.1 --extra-index-url https://download.pytorch.org/whl/cpu -i https://pypi.tuna.tsinghua.edu.cn/simple/
(3)v1.10.1 ~ v1.7.0
# v1.10.1
# cuda 10.2
pip install torch==1.10.1+cu102 torchvision==0.11.2+cu102 torchaudio==0.10.1 -f https://download.pytorch.org/whl/cu102/torch_stable.html -i https://pypi.tuna.tsinghua.edu.cn/simple/
# cpu only
pip install torch==1.10.1+cpu torchvision==0.11.2+cpu torchaudio==0.10.1 -f https://download.pytorch.org/whl/cpu/torch_stable.html -i https://pypi.tuna.tsinghua.edu.cn/simple/
2. 安装全过程
(1)选择版本
| torch 版本 | torchvision 版本 | torchaudio 版本 | 支持的 python 版本(示例) | cuda 版本 |
|---|---|---|---|---|
| 2.1.0 | 0.16.0 | 2.1.0 | >=3.8, <3.12(3.10) | 12.1/11.8 |
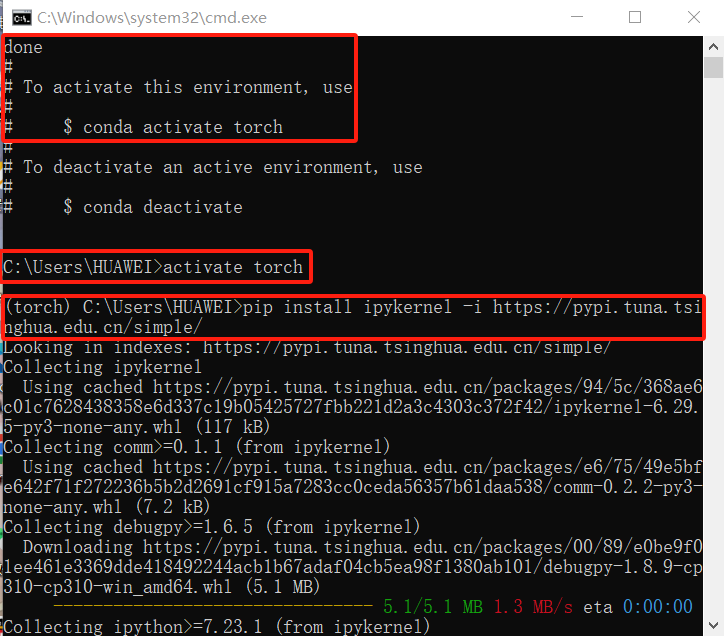
这里选择的框架和环境如下:torch2.1.0 | torchvision0.16.0 | torchaudio2.1.0 | python3.10 | cuda12.1,若需要将创建的虚拟环境添加到 jupyter lab / jupyter notebook 中使用,则需要第 3-6 步,否则不用。
打开 win + r,输入 “cmd”,进入命令行窗口,其他步骤如下:
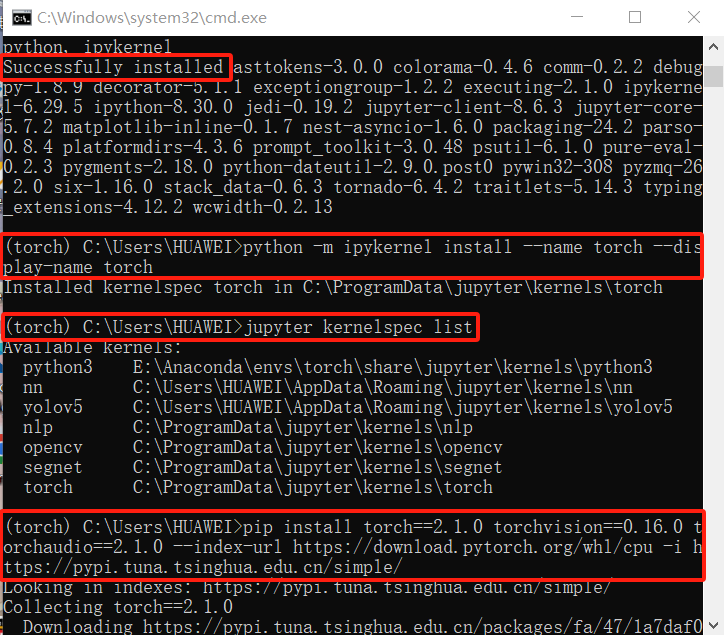
# 1. anaconda 创建虚拟环境
conda create -n torch python=3.10
# 2. 激活并进入虚拟环境
activate torch
# 3. 安装 ipykernel
pip install ipykernel -i https://pypi.tuna.tsinghua.edu.cn/simple/
# 4. 安装ipykernel,将虚拟环境加入 jupyter 内核中
python -m ipykernel install --name torch --display-name torch
# 5. 检查新虚拟环境是否成功加入内核
jupyter kernelspec list
# 6. 从指定文件夹里进入 jupyter
jupyter lab
# 7. 安装 torch 等软件包
pip install torch==2.1.0 torchvision==0.16.0 torchaudio==2.1.0 --index-url https://download.pytorch.org/whl/cpu -i https://pypi.tuna.tsinghua.edu.cn/simple/
注意:此时,因为 numpy 2.x 等其他的相关库 与 pytorch 2.1.0 的不兼容(以 numpy 库为例),所以需要将 numpy 库的版本降级至1.x.x(如 1.24.x 或 1.23.x 版本)才能与 pytorch 2.1.0 是兼容,从而适配以上版本。具体示例步骤如下:
- pip uninstall numpy
- pip install numpy==1.24.3
注意:若在安装途中不小心关闭了命令窗或者发现没有关闭梯子,可先将 anaconda 的环境中删除未完全安装好的虚拟环境(如在 e:\anaconda\envs\torch 此目录下),即可重新进行上述安装步骤。
(2)安装结果
3. 命令相关解释
(1)-i / --index-url
第一条命令:pip install torch==2.5.1 torchvision==0.20.1 torchaudio==2.5.1 --index-url https://download.pytorch.org/whl/cpu -i https://pypi.tuna.tsinghua.edu.cn/simple/
--index-url https://download.pytorch.org/whl/cpu:这个参数指定了主要的包索引源 url,即使用https://download.pytorch.org/whl/cpu作为 pytorch 相关库的包来源。这是 pytorch 官方的 cpu 版本的二进制文件源。-i https://pypi.tuna.tsinghua.edu.cn/simple/:这个参数指定了镜像源,指向清华大学的 pypi 镜像源,以加速从 pypi 安装包的速度。- 当同时使用
--index-url和-i时,--index-url会设置 主索引源(比如官方 pytorch 或其他自定义源),而-i用来指定 一个额外的索引源 / 备用源(如清华镜像)。此时,pip会先从--index-url指定的源查找包,如果找不到,才会去-i指定的额外源查找。
(2)--extra-index-url
第二条命令:pip install torch==1.13.1+cpu torchvision==0.14.1+cpu torchaudio==0.13.1 --extra-index-url https://download.pytorch.org/whl/cpu -i https://pypi.tuna.tsinghua.edu.cn/simple/
--extra-index-url https://download.pytorch.org/whl/cpu:这个参数指定了额外的索引源 url。与--index-url不同,--extra-index-url只是添加额外的索引源,而不是替换原有源。此处指定的是 pytorch 官方 cpu 版本的源。-i https://pypi.tuna.tsinghua.edu.cn/simple/:同样指定了 pypi 镜像源,指向清华大学的 pypi 镜像源。
(3)-f / --find-links
第三条命令:pip install torch==1.10.1+cpu torchvision==0.11.2+cpu torchaudio==0.10.1 -f https://download.pytorch.org/whl/cpu/torch_stable.html -i https://pypi.tuna.tsinghua.edu.cn/simple/
-f https://download.pytorch.org/whl/cpu/torch_stable.html:这个参数用于指定一个包的 url 文件列表(一个.html或.xml文件),其中列出了稳定版本的 pytorch 安装包。-i https://pypi.tuna.tsinghua.edu.cn/simple/:同样指定了 pypi 镜像源,指向清华大学的 pypi 镜像源。
参考文章
[1] pytorch,torchvision与python版本对应关系及安装命令_pytorch python版本-csdn博客
[2] python安装torch(含torch和torchvision对应版本)-csdn博客
到此这篇关于pytorch+torchvision+python版本对应及环境安装的文章就介绍到这了,更多相关pytorch torchvision python版本对应内容请搜索代码网以前的文章或继续浏览下面的相关文章希望大家以后多多支持代码网!


发表评论