一、使用 docker 拉取 mysql 镜像
使用docker默认镜像源
docker pull mysql:5.7	// 拉取指定版本,5.7 版本相对稳定
docker pull mysql		// 拉取最新版本
使用指定镜像仓库拉取
// 假设可用镜像源地址为 "https://dockerpull.org"
docker pull dockerpull.org/mysql:5.7	// 拉取指定仓库的指定版本
使用国内镜像仓库
// 当前国内可用镜像源地址

{
   "registry-mirrors": [
     "https://docker.hpcloud.cloud",
  "https://docker.m.daocloud.io",
  "https://docker.unsee.tech",
  "https://docker.1panel.live",
  "http://mirrors.ustc.edu.cn",
  "https://docker.chenby.cn",
  "http://mirror.azure.cn",
  "https://dockerpull.org",
  "https://dockerhub.icu",
  "https://hub.rat.dev",
  "https://proxy.1panel.live",
  "https://docker.1panel.top",
  "https://docker.m.daocloud.io",
  "https://docker.1ms.run",
  "https://docker.ketches.cn"
   ]
 }
打开 docker 镜像源配置文件
sudo nano /etc/docker/daemon.json

// 进入 nano 的编辑界面。如果文件不存在,nano 会自动创建

// 将上方镜像源地址放入 "registry-mirrors" 下
// 若没有 "registry-mirrors",则将上述 "registry-mirrors" 模块全部放入

// 完成编辑后,按下 ctrl + x 组合键,此时会提示是否保存修改,按下 y 键表示保存,
// 然后按下回车键确认文件名,即可保存修改并退出 nano 编辑器
重启 docker
sudo systemctl restart docker	// 重启 docker
sudo systemctl status docker	// 检查是否已重启,如果服务状态显示为 active (running),则表示 docker 服务已成功重启
二、部署数据库镜像
使用 docker 命令部署
docker run
-p 9096:3306
--name taichu
-v /opt/taichu/mysql/conf/my.cnf:/etc/mysql/my.cnf
-v /opt/taichu/mysql/logs:/log
-v /opt/taichu/mysql/data:/mysql_data
-e mysql_root_password=123456
-d
id


// 以上命令解释
docker run

// 映射端口9096至容器内3306,即通过云端9096端口访问数据库,容器内数据库端口设置为3306
-p 9096:3306

--name taichu 	// 容器名称

-v /opt/taichu/mysql/conf/my.cnf:/etc/mysql/my.cnf 	// 挂载数据库配置文件目录

-v /opt/taichu/mysql/logs:/log			// 挂载数据库log文件目录

-v /opt/taichu/mysql/data:/mysql_data 	// 挂载数据库数据存储目录

-e mysql_root_password=123456 		    // 设置 root 用户密码

-d 					// 让容器以守护进程模式在后台运行

id					// mysql 镜像 id,可仅输入前 2-3 位,通过 docker images 命令查询所有镜像
修改容器时区
docker exec -it 容器名或容器id /bin/bash		// 进入容器内部,id 可只输入前 2-3 位

// 修改时区
rm /etc/localtime
ln -s /usr/share/zoneinfo/asia/shanghai /etc/localtime

exit	// 退出容器内部

docker restart id	// 重新启动该容器,id 可只输入前 2-3 位
导入数据
通过 mysql 可视化工具连接至云端此数据库,端口号为上方映射端口,账号 root,密码为上方设定密码。
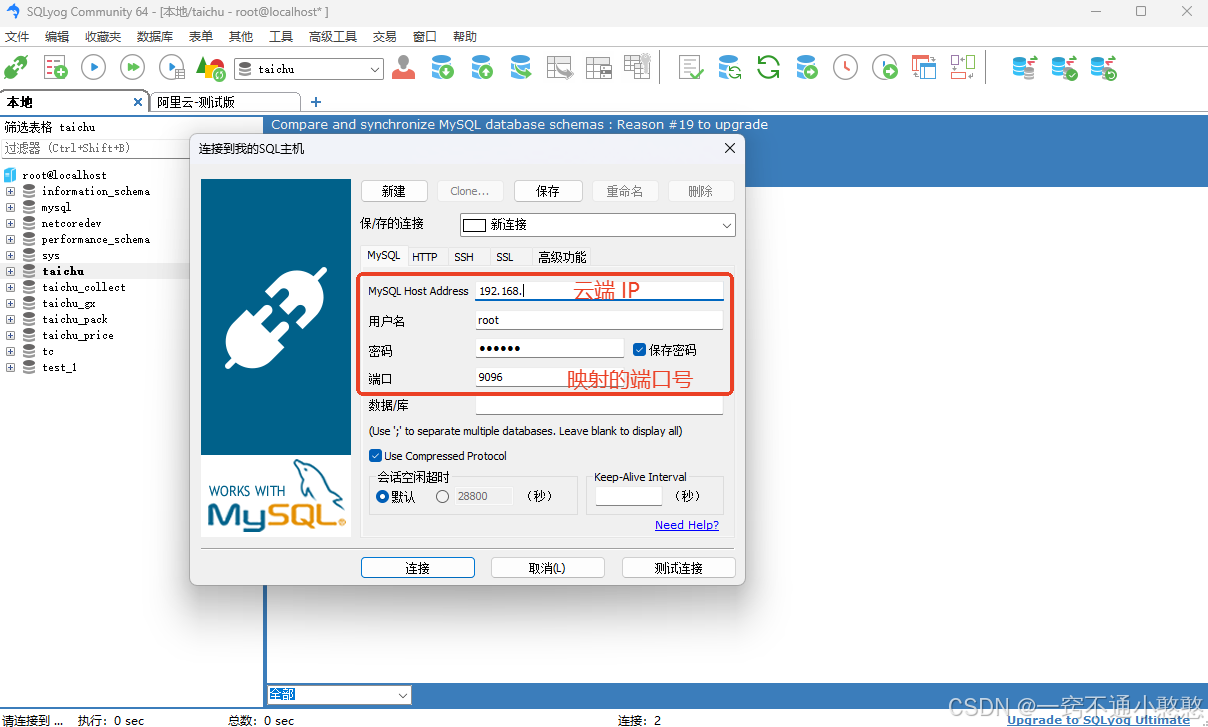
任意可视化工具均可。连接后导入数据。
容器内部导入
假设文件名为 data.sql,且存放在 /opt/taichu/ 目录下

1. 拷贝至容器内部(方法1)

docker exec -it 容器名或容器id /bin/bash		// 进入容器内部,id 可只输入前 2-3 位

// 将数据文件拷贝至容器内部,taichu - 容器名称
docker cp /opt/taichu/data.sql taichu:/tmp/data.sql

mysql -u root -p	// 进入 mysql,输入密码

create database test;		// 创建数据库,若sql文件包含创建语句则跳过

use test;		// 使用数据库 test

source /tmp/data.sql;	// 导入数据

exit;	// 退出数据库

exit	// 退出容器


2. 直接执行(方法2)

docker exec -i id mysql -u root -p password < /opt/taichu/data.sql

// id :容器 id 或名称
// password :数据库 root用户的 密码
总结
到此这篇关于docker部署mysql数据库的文章就介绍到这了,更多相关docker部署mysql数据库内容请搜索代码网以前的文章或继续浏览下面的相关文章希望大家以后多多支持代码网!


发表评论