一、mysql主从同步
- mysql内建的复制功能是构建大型,高性能应用程序的基础
- 通过将mysql的某一台主机(master)的数据复制到其他主机(slaves)上,并重新执行一遍来执行 复制过程中一台服务器充当主服务器,而其他一个或多个其他服务器充当从服务器
1、mysql支持的复制类型
- 基于语句(statement)的复制
- 在主服务器上执行sql语句,在从服务器上执行同样的语句。mysql默认采用基于语句的复制,效率比较高。
- 基于行(row)的复制
- 把改变的内容复制过去,而不是把命令在从服务器上执行一遍。从mysql 5.0开始支持。
- 混合型(mixed)的复制
- 默认采用基于语句的复制,一旦发现基于语句的无法精确复制时,就会采用基于行的复制。
2、为什么要做主从复制
- 灾备
- 数据分布
- 负载平衡
- 读写分离
- 提高并发能力
3、主从复制原理
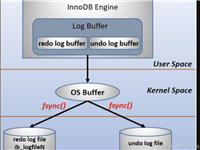
主要基于mysql二进制日志 主要包括三个线程(2个i/o线程,1个sql线程)
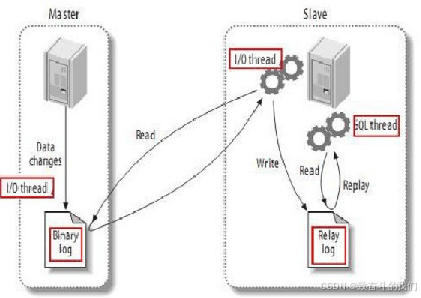
1、mysql将数据变化记录到二进制日志中;
2、slave将mysql的二进制日志拷贝到slave的中继日志中;
3、slave将中继日志中的事件在做一次,将数据变化,反应到自身(slave)的数据库
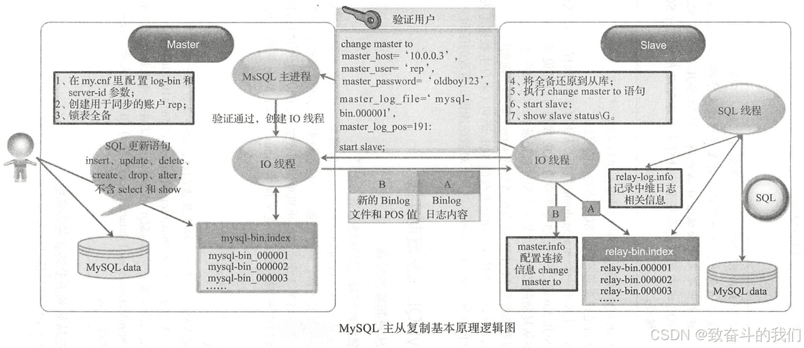
详细步骤:
1、从库通过手工执行change master to 语句连接主库,提供了连接的用户一切条件(user 、password、port、ip),并且让从库知道,二进制日志的起点位置(file名 position 号); start slave
2、从库的io线程和主库的dump线程建立连接。
3、从库根据change master to 语句提供的file名和position号,io线程向主库发起binlog的请求。
4、主库dump线程根据从库的请求,将本地binlog以events的方式发给从库io线程。
5、从库io线程接收binlog events,并存放到本地relay-log中,传送过来的信息,会记录到master.info中
6、从库sql线程应用relay-log,并且把应用过的记录到relay-log.info中,默认情况下,已经应用过的relay 会自动被清理purge
4、mysql复制常用的拓扑结构
- 主从类型(master-slave)
- 主主类型(master-master)
- 级联类型(master-slave-slave)
1、基于binlog的主从同步
主库配置
配置文件:
[root@localhost ~]# tail -1 /etc/my.cnf
server_id=1
[root@localhost ~]# systemctl restart mysqld

备份:
[root@localhost ~]# mysqldump --opt -b db1 it school > db.sql

授权用户:
mysql> create user rep@'172.16.%.%' identified with mysql_native_password by '123456';
mysql> grant replication slave on *.* to rep@'172.16.%.%';

mysql> show master status;
+---------------+----------+--------------+------------------+--------------------------------------------------------------------------------------+
| file          | position | binlog_do_db | binlog_ignore_db | executed_gtid_set                                                                    |
+---------------+----------+--------------+------------------+--------------------------------------------------------------------------------------+
| binlog.000015 |      756 |              |                  | 2db179b1-cf96-11ee-8b00-2e6ff2d90c84:1-14,
d09e219c-cec9-11ee-baf1-2e6ff2d90c84:1-46 |
+---------------+----------+--------------+------------------+--------------------------------------------------------------------------------------+
1 row in set (0.00 sec)
从库配置:
配置文件:
[root@localhost ~]# tail -1 /etc/my.cnf
server_id=2
[root@localhost ~]# systemctl restart mysqld

[root@localhost ~]# tail -1 /etc/my.cnf
server_id=3
[root@localhost ~]# systemctl restart mysqld

还原主库备份:
# scp db.sql 172.16.100.22:/root/
# scp db.sql 172.16.100.23:/root/

mysql -uroot -pmysql@123 < db.sql
mysql> show slave status \g
*************************** 1. row ***************************
               slave_io_state: connecting to source
                  master_host: 192.168.150.21
                  master_user: rep
                  master_port: 3306
                connect_retry: 60
              master_log_file: binlog.000003
          read_master_log_pos: 157
               relay_log_file: localhost-relay-bin.000001
                relay_log_pos: 4
        relay_master_log_file: binlog.000003
             slave_io_running: connecting
            slave_sql_running: yes
...
              last_io_error: error connecting to master 'rep@192.168.150.21:3306' - retry-time: 60 retries: 1 message: can't connect to mysql server on '192.168.150.21:3306' (111)


[root@localhost ~]# mysqladmin -urep -p123456 -h192.168.150.21 ping
mysqladmin: [warning] using a password on the command line interface can be insecure.
mysqld is alive


# 查询日志
[root@localhost ~]# tail /var/log/mysql/mysqld.log
...
2023-12-02t03:17:53.631813z 5 [error] [my-010584] [repl] slave i/o for channel '': error connecting to master 'rep@192.168.150.21:3306' - retry-time: 60 retries: 3 message: authentication plugin 'caching_sha2_password' reported error: authentication requires secure connection. error_code: my-002061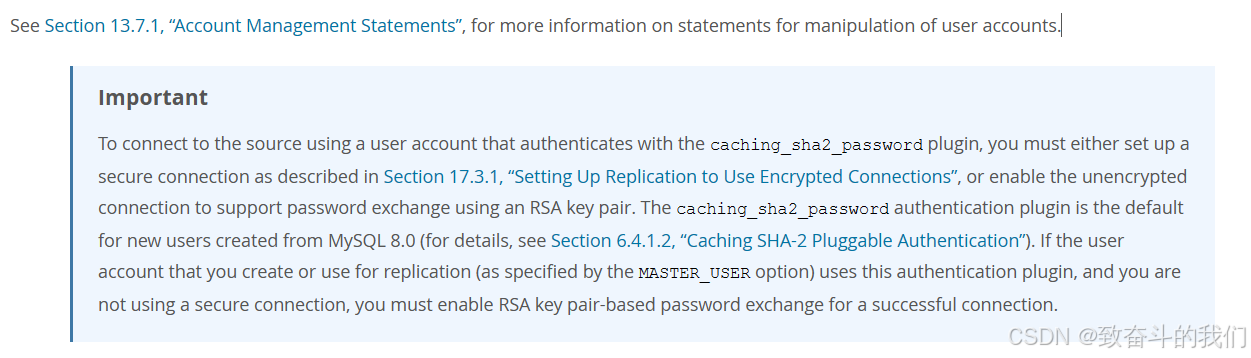
解决方法:
方案一:修改master库的密码加密方式
mysql> alter user 'rep'@'192.168.150.%' identified with mysql_native_password by '123456';
query ok, 0 rows affected (0.01 sec)
方案二:设置从库的change master 时加get_master_public_key=1参数
mysql> stop slave;
query ok, 0 rows affected, 1 warning (0.00 sec)

mysql> change master to
    -> master_host='172.16.100.21',
    -> master_user='rep',
    -> master_password='123456',
    -> master_log_file='binlog.000015',
    -> master_log_pos=756,
    -> get_master_public_key=1;
query ok, 0 rows affected, 9 warnings (0.00 sec)

mysql> start slave;
query ok, 0 rows affected, 1 warning (0.01 sec)
可选配置
#[可选] 0(默认)表示读写(主机),1表示只读(从机)
read-only=0
#设置日志文件保留的时长,单位是秒
binlog_expire_logs_seconds=6000
#控制单个二进制日志大小。此参数的最大和默认值是1gb
max_binlog_size=200m
#[可选]设置不要复制的数据库
binlog-ignore-db=test
#[可选]设置需要复制的数据库,默认全部记录。
binlog-do-db=需要复制的主数据库名字
#[可选]设置binlog格式
binlog_format=statement
2、基于gtid的主从同步配置
开启gtid
gtid_mode=on
enforce-gtid-consistency=on

mysql> change master to
     >     master_host = host,
     >     master_port = port,
     >     master_user = user,
     >     master_password = password,
     >     master_auto_position = 1;

or from mysql 8.0.23:

mysql> change replication source to
     >     source_host = host,
     >     source_port = port,
     >     source_user = user,
     >     source_password = password,
     >     source_auto_position = 1;

mysql> start slave;
or from mysql 8.0.22:
mysql> start replica;
gtid 从库误写入操作处理
查看监控信息:
last_sql_error: error 'can't create database 'db4'; database exists' on query. default database: 'db4'. query: 'create database db4'

retrieved_gtid_set: 71bfa52e-4aae-11e9-ab8c-000c293b577e:1-3
executed_gtid_set:  71bfa52e-4aae-11e9-ab8c-000c293b577e:1-2,
7ca4a2b7-4aae-11e9-859d-000c298720f6:1

注入空事务的方法:

stop slave;
set gtid_next='99279e1e-61b7-11e9-a9fc-000c2928f5dd:3';
begin;commit;
set gtid_next='automatic';

这里的xxxxx:n 也就是你的slave sql thread报错的gtid,或者说是你想要跳过的gtid。
最好的解决方案:重新构建主从环境
二、mysql 主从读写分离实现方案
(1).mysql router:mysql官方提供的轻量级mysql代理(路由),只提供读写分离功能,前身为sql proxy。
(2).proxysql:类似于mysql router,轻量级mysql代理,提供读写分离功能,也支持一些sharding功能。有percona版和官方版两个版本。
(3).maxscale:mariadb的中间件,和mysql router、proxysql类似。
这三者类似,都是轻量级数据库中间件。
(4).amoeba、cobar、mycat:提供很多功能,最主要的功能包括读写分离、sharding。
这三者的渊源较深,都是开源的。amoeba后继无人,于是cobar出来,cobar后继无人,加上2013年出现了一次较严重的问题,于是mycat站在cobar的肩膀上出来了。
( 1 )通过程序实现读写分离(需要程序支持)
php和java 程序都可以通过设置多个连接文件轻松地实现对数据库读写分离,当语句关键字为 select 时,就去连接读库的连接文件,若为 update、 insert、 delete 时,连接写库的连接文件
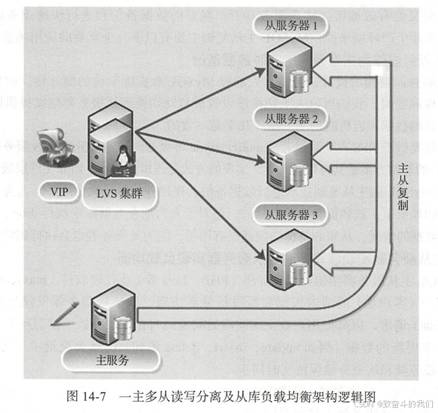
通过程序实现读写分离的缺点就是需要开发人员对程序进行改造,程序本身无法直接支持读写分离
( 2)通过开源的软件实现读写分离
maxscale 、atlas 、mycat 等代理软件也可以实现读写分离的功能,并且无须对应用程序做任何修改,而且它们还支持负载均衡等功能 ;缺点是又引入了单点服务,并且稳定性不如程序实现好
( 3)大型门户独立开发 dal 综合软件
百度、阿里等大型门户都有开发牛人,会花大力气开发适合自己业务的读写分离、负载均衡、监控报警、自动扩容、自动收缩等一系列功能的 dal 层软件
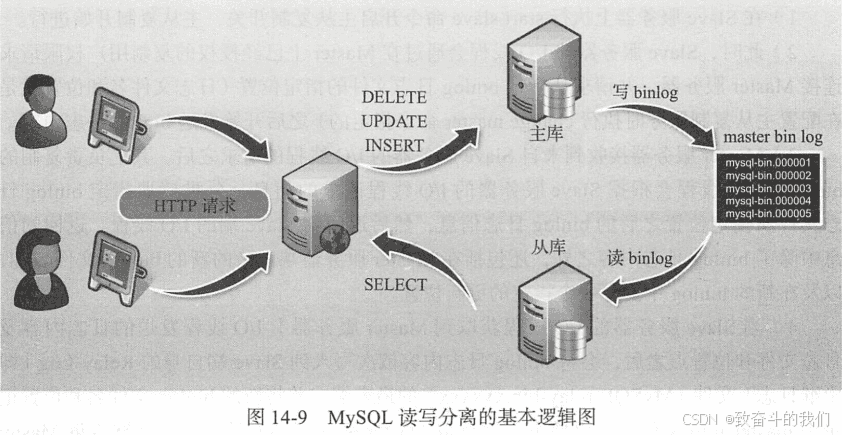
mysql 写分离的基本逻辑图如图
2.1 proxysql实现mysql8主从同步读写分离
1、proxysql基本介绍
1.1 前言
proxysql是 mysql 的高性能、高可用性、协议感知代理。以下为结合主从复制对proxysql读写分离、黑白名单、路由规则等做些基本测试。
1.2 基本介绍
先简单介绍下proxysql及其功能和配置,主要包括:
- 最基本的读/写分离,且方式有多种;
- 可定制基于用户、基于schema、基于语句的规则对sql语句进行路由,规则很灵活;
- 动态加载配置,即绝大部分的配置可以在线修改,但有少部分参数还是需要重启来生效;
- 可缓存查询结果。虽然缓存策略比较简陋,但实现了基本的缓存功能;
- 过滤危险的sql,增加防火墙等功能;
- 提供连接池、日志记录、审计日志等功能;
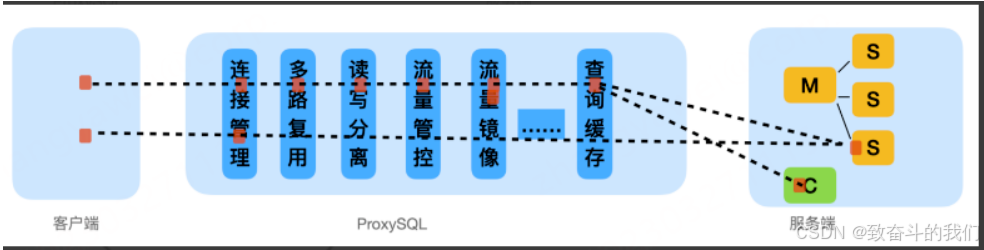
1.2.1 请求流程
流量从客户端发出 → proxysql进行处理转发 → 后端处理 → proxysql的前端连接 → 返回客户端的基本流程
1.2.2 核心功能
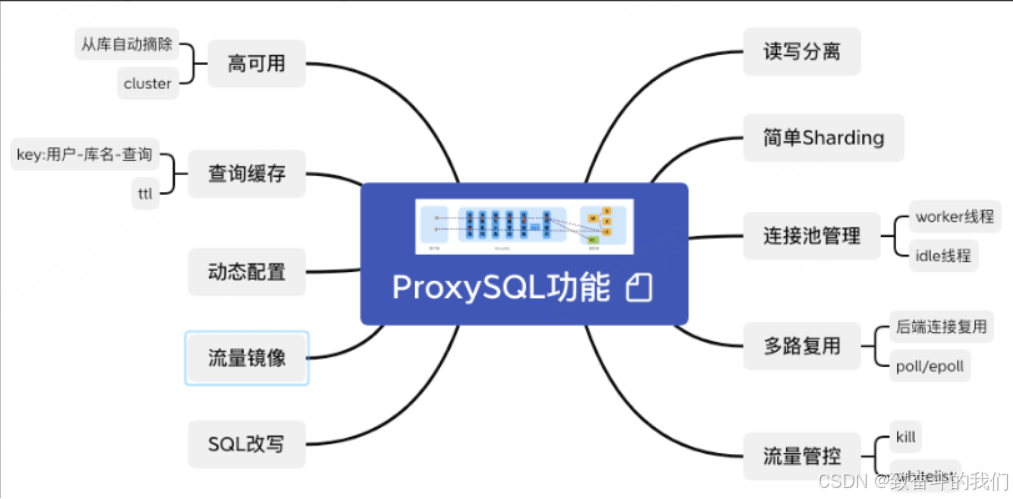
- 读写分离:可查询走从库,写入走主库
- 简单sharding:proxysql的sharding是通过正则匹配来实现的,对于需要拆分sql以及合并sql执行结果的不能支持,所以写了简单sharding
- 连接池管理:常规功能,为了提高sql执行效率。
- 多路复用:主要优化点在后端mysql连接的复用,对比smart client,中间层不仅对前端建连也会对后端建连,可自行控制后端连接的复用逻辑。
- 流量管控:kill连接和kill query;whitelist配置。
- 高可用:底层mysql,如果从库挂了,自动摘除流量;主库挂了暂不处理。proxysql自身高可用提供cluster的功能,cluster内部会自行同步元数据以及配置变更信息。
- 查询缓存:对username+schema+query的key进行缓存,设置ttl过期,不适合写完就查的场景,因为在数据在未过期之前可能是脏数据。
- 动态配置:大部分的配置可动态变更,先load到runtime,在save到disk,通过cluster的功能同步到其他的节点。
- 流量镜像:同一份流量可以多出写入,但是并不保证mirror的流量一定成功。
- sql改写:在query rules中配置replace规则,可以对指定的sql进行改写。
当proxysql启动后,将监听两个端口:
(1).admin管理接口,默认端口为6032。该端口用于查看、配置proxysql。
(2).接收sql语句的接口,默认端口为6033,这个接口类似于mysql的3306端口。
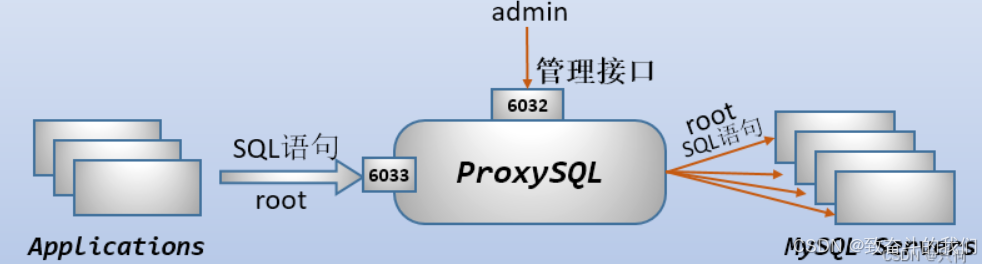
proxysql的admin管理接口是一个使用mysql协议的接口,所以,可以直接使用mysql客户端、navicat等工具去连接这个管理接口
2、proxysql结构
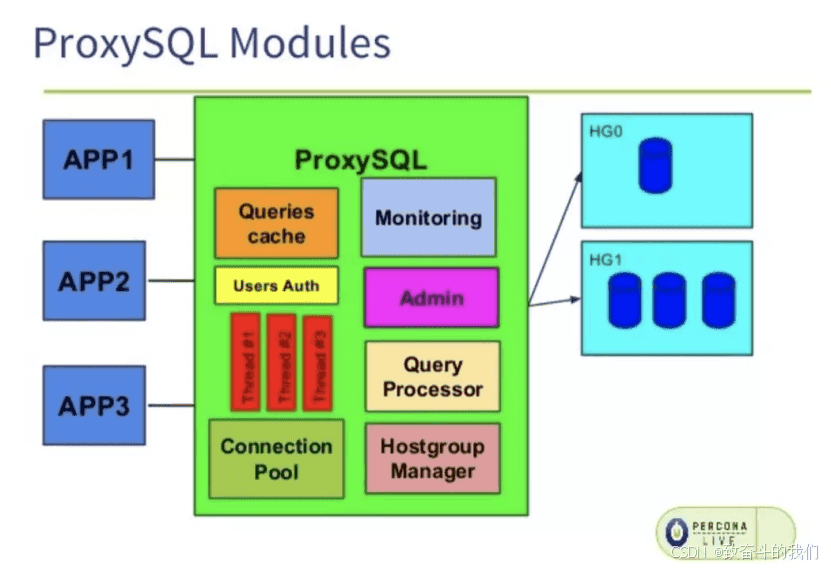
qurey processor 用于匹配查询规则并根据规则决定是否缓存查询或者将查询加入黑名单或者重新路由、重写查询或者镜像查询到其他hostgroup。
user auth 为底层后端数据库认证提供了用户凭证。
hostgroup manager – 负责管理发送sql请求都后端数据库并跟踪sql请求状态。
connection pool – 负责管理后端数据库连接,连接池中建立的连接被所有的前端应用程序共享。
monitoring – 负责监控后端数据库健康状态主从复制延时并临时下线不正常的数据库实例。
1.启动过程
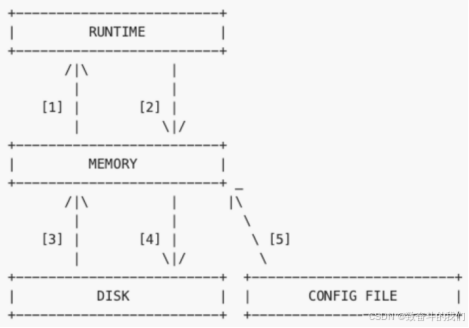
runtime层:代表的是proxysql当前生效的配置,包括 global_variables, mysql_servers, mysql_users, mysql_query_rules。无法直接修改这里的配置,必须要从下一层load进来
memory层:是平时在mysql命令行修改的 main 里头配置,可以认为是sqlite数据库在内存的镜像。该层级的配置在main库中以mysql_开头的表以及global_variables表,这些表的数据可以直接修改;
disk|config filr层:持久存储的那份配置,一般在
$(datadir)/proxysql.db,在重启的时候会从硬盘里加载。/etc/proxysql.cnf文件只在第一次初始化的时候用到,完了后,如果要修改监听端口,还是需要在管理命令行里修改,再 save 到硬盘。
注意:
- 如果找到数据库文件(proxysql.db),proxysql 将从 proxysql.db 初始化其内存中配置。因此,磁盘被加载到 memory 中,然后加载到 runtime 中。
- 如果找不到数据库文件(proxysql.db)且存在配置文件(proxysql.cfg),则解析配置文件并将其内容加载到内存数据库中,然后将其保存在 proxysql.db 中并在加载到 runtime。 请务必注意,
- 如果找到 proxysql.db,则不会解析配置文件。也就是说,在正常启动期间,proxysql 仅从持久存储的磁盘数据库初始化其内存配置。
2.数据库结构
proxysql自身共有5个库,分别为3个保存在内存中的库,和2个保存在磁盘的sqlite库。 通过6032管理端口登入后,默认就是main库,所有的配置更改都必须在这个库中进行,disk存档库不会直接受到影响。
# mysql -uadmin -padmin -h127.0.0.1 -p6032
mysql: [warning] using a password on the command line interface can be insecure.
welcome to the mysql monitor.  commands end with ; or \g.
your mysql connection id is 2
server version: 5.5.30 (proxysql admin module)
mysql> show databases;
+-----+---------------+-------------------------------------+
| seq | name          | file                                |
+-----+---------------+-------------------------------------+
| 0   | main          |                                     |
| 2   | disk          | /var/lib/proxysql/proxysql.db       |
| 3   | stats         |                                     |
| 4   | monitor       |                                     |
| 5   | stats_history | /var/lib/proxysql/proxysql_stats.db |
+-----+---------------+-------------------------------------+
5 rows in set (0.00 sec)
main:内存配置数据库,表里存放后端db实例、用户验证、路由规则等信息。表名以 runtime开头的表示proxysql当前运行的配置内容,不能通过dml语句修改,只能修改对应的不以 runtime 开头的(在内存)里的表,然后 load 使其生效, save 使其存到硬盘以供下次重启加载。
disk:是持久化到硬盘的配置,sqlite数据文件。sqlite3 数据库,默认位置为 $(datadir)/proxysql.db,在重新启动时,未保留的内存中配置将丢失。因此,将配置保留在 disk 中非常重要。(sqlite是一个进程内的库,实现了自给自足的、无服务器的、零配置的、事务性的 sql 数据库引擎)
stats:proxysql运行抓取的统计信息,包括到后端各命令的执行次数、流量、processlist、查询种类汇总/执行时间等等。
monitor:库存储 monitor 模块收集的信息,主要是对后端db的健康/延迟检查。
stats_history:统计信息历史库
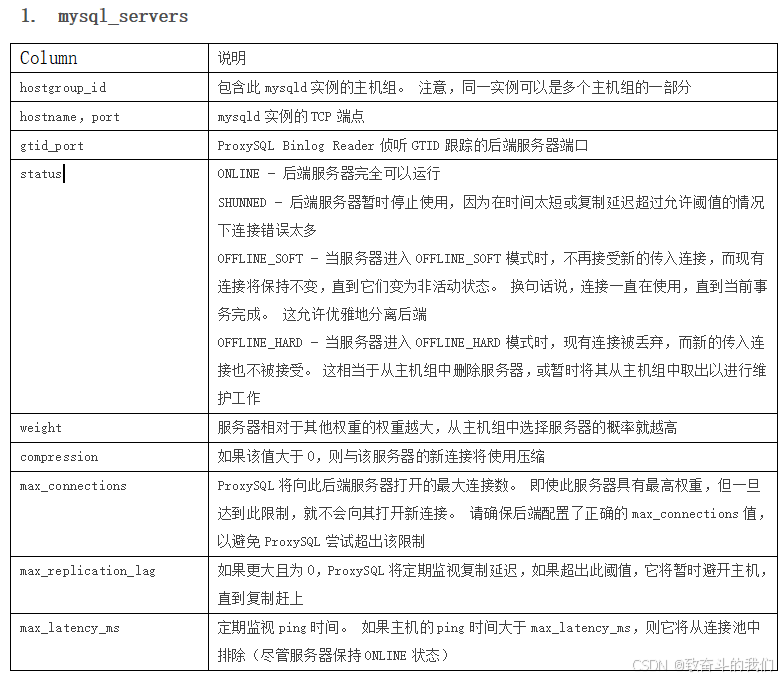
3.核心配置表


4.命令

5.小结
这些数据库的功能实现了实用化内容:
允许轻松动态更新配置,便于运维管理,与mysql兼容的管理界面可用于此目的。
允许尽可能多的配置项目动态修改,而不需要重新启动proxysql进程
可以毫不费力地回滚无效配置
通过多级配置系统实现的,其中设置从运行时移到内存,并根据需要持久保存到磁盘
3、实验环境
| 机器名称 | ip配置 | 服务角色 | 备注 |
|---|---|---|---|
| proxy | 192.168.150.24 | proxysql控制器 | 用于监控管理 |
| master | 192.168.150.21 | 数据库主服务器 | |
| slave1 | 192.168.150.22 | 数据库从服务器 | |
| slave2 | 192.168.150.23 | 数据库从服务器 |
4、实现数据库主从复制
基于gtid实现mysql8.0主从同步,配置过程略。
5、安装proxysql
# 配置yum源
cat > /etc/yum.repos.d/proxysql.repo << eof
[proxysql]
name=proxysql yum repository
baseurl=https://repo.proxysql.com/proxysql/proxysql-2.5.x/centos/\$releasever
gpgcheck=1
gpgkey=https://repo.proxysql.com/proxysql/proxysql-2.5.x/repo_pub_key
eof

# 安装proxysql
yum install -y proxysql
启动 proxysql
[root@proxy ~]# systemctl enable --now proxysql

# 管理员登录
[root@proxy ~]# mysql -uadmin -padmin -h 127.0.0.1 -p 6032
welcome to the mariadb monitor.  commands end with ; or \g.
your mysql connection id is 1
server version: 5.5.30 (proxysql admin module)

copyright (c) 2000, 2018, oracle, mariadb corporation ab and others.

type 'help;' or '\h' for help. type '\c' to clear the current input statement.

mysql [(none)]> show databases;
+-----+---------------+-------------------------------------+
| seq | name          | file                                |
+-----+---------------+-------------------------------------+
| 0   | main          |                                     |
| 2   | disk          | /var/lib/proxysql/proxysql.db       |
| 3   | stats         |                                     |
| 4   | monitor       |                                     |
| 5   | stats_history | /var/lib/proxysql/proxysql_stats.db |
+-----+---------------+-------------------------------------+
5 rows in set (0.00 sec)

可见有五个库: main、disk、stats 、monitor 和 stats_history
main: 内存配置数据库,即 memory,表里存放后端 db 实例、用户验证、路由规则等信息。main 库中有如下信息:

mysql [(none)]> show tables from main;
+----------------------------------------------------+
| tables                                             |
+----------------------------------------------------+
| coredump_filters                                   |
| global_variables                                   |
| mysql_aws_aurora_hostgroups                        |
| mysql_collations                                   |
| mysql_firewall_whitelist_rules                     |
| mysql_firewall_whitelist_sqli_fingerprints         |
| mysql_firewall_whitelist_users                     |
| mysql_galera_hostgroups                            |
| mysql_group_replication_hostgroups                 |
| mysql_hostgroup_attributes                         |
| mysql_query_rules                                  |
| mysql_query_rules_fast_routing                     |
| mysql_replication_hostgroups                       |
| mysql_servers                                      |
| mysql_users                                        |
| proxysql_servers                                   |
| restapi_routes                                     |
| runtime_checksums_values                           |
| runtime_coredump_filters                           |
| runtime_global_variables                           |
| runtime_mysql_aws_aurora_hostgroups                |
| runtime_mysql_firewall_whitelist_rules             |
| runtime_mysql_firewall_whitelist_sqli_fingerprints |
| runtime_mysql_firewall_whitelist_users             |
| runtime_mysql_galera_hostgroups                    |
| runtime_mysql_group_replication_hostgroups         |
| runtime_mysql_hostgroup_attributes                 |
| runtime_mysql_query_rules                          |
| runtime_mysql_query_rules_fast_routing             |
| runtime_mysql_replication_hostgroups               |
| runtime_mysql_servers                              |
| runtime_mysql_users                                |
| runtime_proxysql_servers                           |
| runtime_restapi_routes                             |
| runtime_scheduler                                  |
| scheduler                                          |
+----------------------------------------------------+
36 rows in set (0.00 sec)

库下的主要表:
mysql_servers: 后端可以连接 mysql 服务器的列表
mysql_users: 配置后端数据库的账号和监控的账号。
mysql_query_rules: 指定 query 路由到后端不同服务器的规则列表。

注: 表名以 runtime_开头的表示 proxysql 当前运行的配置内容,不能通过 dml 语句修改。

只能修改对应的不以 runtime 开头的表,然后 “load” 使其生效,“save” 使其存到硬盘以供下次重启加载。
disk :持久化的磁盘的配置
stats: 统计信息的汇总
monitor:一些监控的收集信息,比如数据库的健康状态等
stats_history: 这个库是 proxysql 收集的有关其内部功能的历史指标
配置 proxysql 所需账户
在 master (172.16.100.21) 的mysql 上创建 proxysql 的监控账户和对外访问账户
create user 'monitor'@'172.16.%.%' identified with mysql_native_password by 'monitor@123.com';
grant all privileges on *.* to 'monitor'@'172.16.%.%' with grant option;

#proxysql 的对外访问账户
create user 'proxysql'@'172.16.%.%' identified with mysql_native_password by '123456';
grant all privileges on *.* to 'proxysql'@'172.16.%.%' with grant option;
6、配置proxysql
使用proxysql,主要需要完成以下几项内容的配置:
- 配置监控账号。监控账号用于检测后端mysql实例是否健康(是否能连接、复制是否正常、复制是否有延迟等)。
- 到后端mysql实例创建监控账号。
- 配置后端mysql实例连接信息。实例连接信息存储在mysql_servers表。
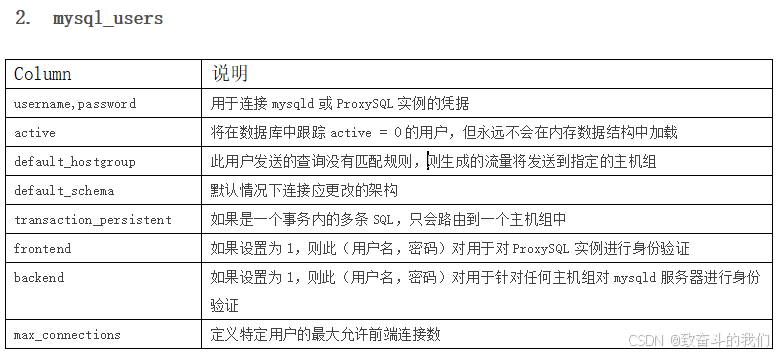
- 配置连接proxysql和后端实例的账号。账号信息存储在mysql_users表。
- 配置查询路由信息。路由信息存储在mysql_query_rules表。
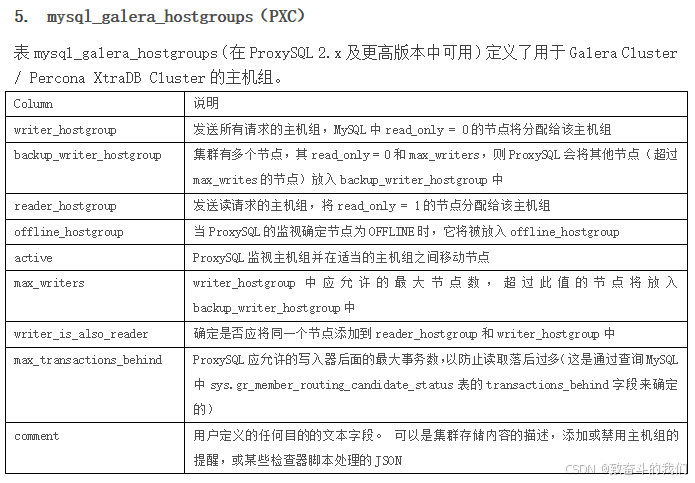
- 配置后端mysql集群信息。根据后端mysql集群架构,配置分别存储在mysql_replication_hostgroups、mysql_group_replication_hostgroups、runtime_mysql_galera_hostgroups、runtime_mysql_aws_aurora_hostgroups等表中。
- 根据具体需要,调优相关参数。参数存储在global_variables表。
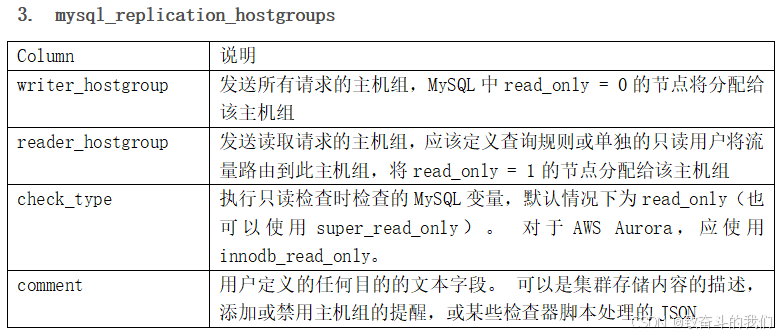
一、配置proxysql主从分组信息
1.用到这个表:mysql_replication_hostgroup,表结构如下:
mysql [(none)]> show create table mysql_replication_hostgroups \g
*************************** 1. row ***************************
       table: mysql_replication_hostgroups
create table: create table mysql_replication_hostgroups (
    writer_hostgroup int check (writer_hostgroup>=0) not null primary key,
    reader_hostgroup int not null check (reader_hostgroup<>writer_hostgroup and reader_hostgroup>=0),
    check_type varchar check (lower(check_type) in ('read_only','innodb_read_only','super_read_only','read_only|innodb_read_only','read_only&innodb_read_only')) not null default 'read_only',
    comment varchar not null default '', unique (reader_hostgroup))
1 row in set (0.00 sec)

注:writer_hostgroup 和reader_hostgroup 写组和读组都要大于等于0且不能相同
2.创建组:(定义写为1,读为0)
mysql [(none)]> insert into mysql_replication_hostgroups (writer_hostgroup,reader_hostgroup,comment) values (1,0,'proxy');
query ok, 1 row affected (0.00 sec)

mysql [(none)]> load mysql servers to runtime;
query ok, 0 rows affected (0.01 sec)

mysql [(none)]> save mysql servers to disk;
query ok, 0 rows affected (0.02 sec)

注意:proxysql会根据server的read_only的取值将服务器进行分组。read_only=0的server,master被分到编号为1的写组,read_only=1的server,slave则分到编号为0的读组

mysql [(none)]> select * from mysql_replication_hostgroups;
+------------------+------------------+------------+---------+
| writer_hostgroup | reader_hostgroup | check_type | comment |
+------------------+------------------+------------+---------+
| 1                | 0                | read_only  | proxy   |
+------------------+------------------+------------+---------+
1 row in set (0.00 sec)
3.添加主从服务器节点:
mysql [(none)]> insert into mysql_servers(hostgroup_id,hostname,port) values (1,'172.16.100.21',3306);
query ok, 1 row affected (0.00 sec)

mysql [(none)]> insert into mysql_servers(hostgroup_id,hostname,port) values (0,'172.16.100.22',3306);
query ok, 1 row affected (0.00 sec)

mysql [(none)]> insert into mysql_servers(hostgroup_id,hostname,port) values (0,'172.16.100.23',3306);
query ok, 1 row affected (0.00 sec)

mysql [(none)]> load mysql servers to runtime;
query ok, 0 rows affected (0.01 sec)

mysql [(none)]> save mysql servers to disk;
query ok, 0 rows affected (0.00 sec)

mysql [(none)]> select * from mysql_servers;
+--------------+----------------+------+-----------+--------+--------+-------------+-----------------+---------------------+---------+----------------+---------+
| hostgroup_id | hostname       | port | gtid_port | status | weight | compression | max_connections | max_replication_lag | use_ssl | max_latency_ms | comment |
+--------------+----------------+------+-----------+--------+--------+-------------+-----------------+---------------------+---------+----------------+---------+
| 1            | 192.168.150.21 | 3306 | 0         | online | 1      | 0           | 1000            | 0                   | 0       | 0              |         |
| 0            | 192.168.150.22 | 3306 | 0         | online | 1      | 0           | 1000            | 0                   | 0       | 0              |         |
| 0            | 192.168.150.23 | 3306 | 0         | online | 1      | 0           | 1000            | 0                   | 0       | 0              |         |
+--------------+----------------+------+-----------+--------+--------+-------------+-----------------+---------------------+---------+----------------+---------+
3 rows in set (0.00 sec)
4.为proxysql监控mysql后端节点
mysql [(none)]> use monitor
reading table information for completion of table and column names
you can turn off this feature to get a quicker startup with -a

database changed
mysql [monitor]> set mysql-monitor_username='monitor';
query ok, 1 row affected (0.00 sec)

mysql [monitor]> set mysql-monitor_password='monitor@123.com';
query ok, 1 row affected (0.00 sec)

上面这两句是修改变量的方式还可以在main库下面用sql语句方式修改
在main下修改:
mysql [monitor]> use main
reading table information for completion of table and column names
you can turn off this feature to get a quicker startup with -a

database changed
mysql [main]> update global_variables set variable_value='monitor' where variable_name='mysql-monitor_username';
query ok, 1 row affected (0.00 sec)

mysql [main]> update global_variables set variable_value='monitor@123.com' where variable_name='mysql-monitor_password';
query ok, 1 row affected (0.00 sec)

修改后,保存到runtime和disk
mysql [monitor]> load mysql variables to runtime;
mysql [monitor]> save mysql variables to disk;

查看监控账号【proxysql】
select * from global_variables where variable_name like 'mysql-monitor_%';
//也可以这样快速定位
mysql [(none)]> select @@mysql-monitor_username;
+--------------------------+
| @@mysql-monitor_username |
+--------------------------+
| monitor                  |
+--------------------------+
1 row in set (0.00 sec)
mysql [(none)]> select @@mysql-monitor_password;
+--------------------------+
| @@mysql-monitor_password |
+--------------------------+
| monitor@123.com          |
+--------------------------+
1 row in set (0.00 sec)


mysql [(none)]> select * from monitor.mysql_server_connect_log;
+----------------+------+------------------+-------------------------+---------------+
| hostname       | port | time_start_us    | connect_success_time_us | connect_error |
+----------------+------+------------------+-------------------------+---------------+
| 192.168.150.21 | 3306 | 1701659547601785 | 2126                    | null          |
| 192.168.150.23 | 3306 | 1701659548266990 | 1883                    | null          |
| 192.168.150.22 | 3306 | 1701659548932828 | 1626                    | null          |
| 192.168.150.21 | 3306 | 1701659607601353 | 1672                    | null          |
| 192.168.150.22 | 3306 | 1701659608066386 | 1649                    | null          |
| 192.168.150.23 | 3306 | 1701659608531392 | 1962                    | null          |
| 192.168.150.21 | 3306 | 1701659667601720 | 1283                    | null          |
| 192.168.150.23 | 3306 | 1701659668394216 | 2033                    | null          |
| 192.168.150.22 | 3306 | 1701659669186458 | 1350                    | null          |
+----------------+------+------------------+-------------------------+---------------+
9 rows in set (0.00 sec)

验证监控信息,proxysql 监控模块的指标都保存在monitor库的log表中
以下是连接是否正常的监控,对connect指标的监控 ,在前面可能会有很多connect_error,这是因为没有配置监控信息时的错误,配置后如果connect_error的结果为null则表示正常
5.对心跳信息的监控:
mysql [(none)]> select * from mysql_server_ping_log limit 10;
+----------------+------+------------------+----------------------+------------+
| hostname       | port | time_start_us    | ping_success_time_us | ping_error |
+----------------+------+------------------+----------------------+------------+
| 192.168.150.21 | 3306 | 1701659547602344 | 460                  | null       |
| 192.168.150.23 | 3306 | 1701659547604095 | 245                  | null       |
| 192.168.150.22 | 3306 | 1701659547604690 | 258                  | null       |
| 192.168.150.23 | 3306 | 1701659557601548 | 471                  | null       |
| 192.168.150.21 | 3306 | 1701659557601738 | 313                  | null       |
| 192.168.150.22 | 3306 | 1701659557601713 | 349                  | null       |
| 192.168.150.22 | 3306 | 1701659567602161 | 572                  | null       |
| 192.168.150.23 | 3306 | 1701659567602361 | 405                  | null       |
| 192.168.150.21 | 3306 | 1701659567602318 | 460                  | null       |
| 192.168.150.22 | 3306 | 1701659577602909 | 434                  | null       |
+----------------+------+------------------+----------------------+------------+
10 rows in set (0.00 sec)
6.查看read_only日志监控:
mysql [(none)]> select * from mysql_server_read_only_log limit 5;
+----------------+------+------------------+-----------------+-----------+-------+
| hostname       | port | time_start_us    | success_time_us | read_only | error |
+----------------+------+------------------+-----------------+-----------+-------+
| 192.168.150.23 | 3306 | 1701659547606174 | 373             | 1         | null  |
| 192.168.150.22 | 3306 | 1701659547606768 | 634             | 1         | null  |
| 192.168.150.21 | 3306 | 1701659547606639 | 858             | 0         | null  |
| 192.168.150.21 | 3306 | 1701659549101574 | 657             | 0         | null  |
| 192.168.150.22 | 3306 | 1701659549101863 | 422             | 1         | null  |
+----------------+------+------------------+-----------------+-----------+-------+
5 rows in set (0.00 sec)

monitor 模块就会开始监控后端的read_only值,当监控到read_only值,就会按照read_only的值将某些节点自动移到读写组
一些监控的状态斗志在log相关,都在monitor库下面的 global_variables 变量。
7.proxysql配置对外访问账号:(要在mysql节点上创建)
前面已经配置:配置proxysql 账户,我创建的对外访问账户是:用户:proxysql,密码:123456
mysql_users表结构如下:
mysql [(none)]> show create table mysql_users\g
*************************** 1. row ***************************
       table: mysql_users
create table: create table mysql_users (
    username varchar not null,
    password varchar,
    active int check (active in (0,1)) not null default 1,
    use_ssl int check (use_ssl in (0,1)) not null default 0,
    default_hostgroup int not null default 0,
    default_schema varchar,
    schema_locked int check (schema_locked in (0,1)) not null default 0,
    transaction_persistent int check (transaction_persistent in (0,1)) not null default 1,
    fast_forward int check (fast_forward in (0,1)) not null default 0,
    backend int check (backend in (0,1)) not null default 1,
    frontend int check (frontend in (0,1)) not null default 1,
    max_connections int check (max_connections >=0) not null default 10000,
    attributes varchar check (json_valid(attributes) or attributes = '') not null default '',
    comment varchar not null default '',
    primary key (username, backend),
    unique (username, frontend))
1 row in set (0.00 sec)
将对外访问账号添加到mysql_users表中:
insert into mysql_users (username,password,default_hostgroup,transaction_persistent) values ('proxysql','123456',1,1);

load mysql users to runtime;
save mysql users to disk;
mysql [(none)]> select * from mysql_users\g
*************************** 1. row ***************************
              username: proxysql
              password: 123456
                active: 1
               use_ssl: 0
     default_hostgroup: 1
        default_schema: null
         schema_locked: 0
transaction_persistent: 1
          fast_forward: 0
               backend: 1
              frontend: 1
       max_connections: 10000
            attributes:
               comment:
1 row in set (0.00 sec)

注:transaction_persistent 如果为1,则一个完整的sql只可能路由到一个节点;这点非常重要,主要解决这种情况:一个事务有混合的读操作和写操作组成,事务未提交前,如果事务中的读操作和写操作路由到不同节点,那么读取到的结果必然是脏数据。所以一般情况下,该值应该设置为1,尤其是业务中使用到事务机制的情况(默认为0)
mysql_users 表有不少字段,最主要的三个字段username,password,default_hostgroup
a.username: 前端链接proxysql ,以及proxysql 将sql 语句路由给mysql所使用的的用户名
b.password:用户名对应的密码,。可以是明文密码,也可以是hash密码。如果想使用hash密码,可以先在某个mysql节点上执行select password(password),然后将加密结果复制到该字段。
c.default_hostgroup:该用户名默认的路由目标。例如,指定root用户的该字段值为1时,则使用 proxysql 用户发送的sql语句默认情况下将路由到hostgroup_id=1 组中的某个
在从库端172.16.100.22上通过对方访问账号proxy连接,测试是否路由能默认到hostgroup_id=1,它是一个写组
[root@slave1 ~]# mysql -h172.16.100.24 -uproxysql -p'123456' -p 6033
mysql: [warning] using a password on the command line interface can be insecure.
welcome to the mysql monitor.  commands end with ; or \g.
your mysql connection id is 3
server version: 5.5.30 (proxysql)

copyright (c) 2000, 2022, oracle and/or its affiliates.

oracle is a registered trademark of oracle corporation and/or its
affiliates. other names may be trademarks of their respective
owners.

type 'help;' or '\h' for help. type '\c' to clear the current input statement.

mysql> show databases;
+--------------------+
| database           |
+--------------------+
| db1                |
| information_schema |
| mysql              |
| performance_schema |
| sys                |
+--------------------+
5 rows in set (0.01 sec)

mysql> select @@server_id;
+-------------+
| @@server_id |
+-------------+
|          21 |
+-------------+
1 row in set (0.00 sec)

#通过proxysql用户,创建一个keme库
mysql> create database keme;
query ok, 1 row affected (0.00 sec)
在slave2:172.16.100.23 上去验证一下,是否同步过去keme这个库
mysql> select @@server_id;
+-------------+
| @@server_id |
+-------------+
|          23 |
+-------------+
1 row in set (0.00 sec)

mysql> show databases;
+--------------------+
| database           |
+--------------------+
| db1                |
| information_schema |
| keme               |
| mysql              |
| performance_schema |
| sys                |
+--------------------+
6 rows in set (0.01 sec)
8.添加读写分离规则(mysql_query_rules)
proxysql支持正则,这里添加两条匹配规则
1) 表示像select * from xxx for update这种语句都会分到到写组
2)表示像select这种语句都会被分配到读组。
insert into mysql_query_rules(rule_id,active,match_pattern,destination_hostgroup,apply) values(1,1,'^select .* for update$',1,1);

insert into mysql_query_rules(rule_id,active,match_pattern,destination_hostgroup,apply) values(2,1,'^select',0,1);

load mysql query rules to runtime;
save mysql query rules to disk;
9.测试读写分离
[root@slave1 ~]# mysql -uproxysql -p123456 -h 172.16.100.24 -p 6033 -e "select @@server_id"
mysql: [warning] using a password on the command line interface can be insecure.
+-------------+
| @@server_id |
+-------------+
|          3 |
+-------------+
[root@slave1 ~]# mysql -uproxysql -p123456 -h 172.16.100.24 -p 6033 -e "select @@server_id"
mysql: [warning] using a password on the command line interface can be insecure.
+-------------+
| @@server_id |
+-------------+
|          2 |
+-------------+
[root@slave1 ~]# mysql -uproxysql -p123456 -h 172.16.100.24 -p 6033 -e "begin;select @@server_id commit;"
mysql: [warning] using a password on the command line interface can be insecure.
+--------+
| commit |
+--------+
|     1 |
+--------+
到此这篇关于mysql主从同步的几种实现方式的文章就介绍到这了,更多相关mysql主从同步内容请搜索代码网以前的文章或继续浏览下面的相关文章希望大家以后多多支持代码网!


发表评论