1 需求说明
使用sharding-jdbc完成对订单表的水平分表,通过快速入门程序的开发,快速体验sharding-jdbc的使用方法。
人工创建两张表,t_order_1和t_order_2,这两张表是订单表拆分后的表,通过sharding-jdbc向订单表插入数据,按照一定的分片规则,主键为偶数的进入t_order_1,另一部分数据进入t_order_2,通过sharding-jdbc 查询数据,根据 sql语句的内容从t_order_1或t_order_2查询数据。
2 环境搭建
2.1 环境说明
- 操作系统: win10
- 数据库: mysql-5.7.25
- jdk :64位 jdk1.8.0_201
- 应用框架: spring-boot-2.1.3.release,mybatis3.5.0
- sharding-jdbc :sharding-jdbc-spring-boot-starter-4.0.0-rc1
2.2 创建数据库
创建订单库 order_db
create database `order_db` character set 'utf8' collate 'utf8_general_ci';
在order_db中创建t_order_1、t_order_2表
drop table if exists `t_order_1`;
create table `t_order_1`  (
  `order_id` bigint(20) not null comment '订单id',
  `price` decimal(10, 2) not null comment '订单价格',
  `user_id` bigint(20) not null comment '下单用户id',
  `status` varchar(50) character set utf8 collate utf8_general_ci not null comment '订单状态',
  primary key (`order_id`) using btree
) engine = innodb character set = utf8 collate = utf8_general_ci row_format = dynamic;
drop table if exists `t_order_2`;
create table `t_order_2`  (
  `order_id` bigint(20) not null comment '订单id',
  `price` decimal(10, 2) not null comment '订单价格',
  `user_id` bigint(20) not null comment '下单用户id',
  `status` varchar(50) character set utf8 collate utf8_general_ci not null comment '订单状态',
  primary key (`order_id`) using btree
) engine = innodb character set = utf8 collate = utf8_general_ci row_format = dynamic;
2.3.引入maven依赖
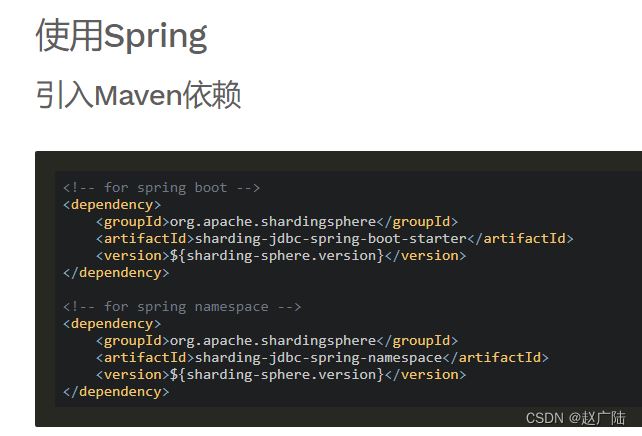
引入 sharding-jdbc和springboot整合的jar包:
<dependency>
  <groupid>org.apache.shardingsphere</groupid>
  <artifactid>sharding‐jdbc‐spring‐boot‐starter</artifactid>
  <version>4.0.0‐rc1</version>
</dependency>
具体spring boot相关依赖及配置请参考资料中dbsharding/sharding-jdbc-simple工程,本指引只说明与sharding-jdbc相关的内容。
3 编写程序
3.1 分片规则配置
分片规则配置是sharding-jdbc进行对分库分表操作的重要依据,配置内容包括:数据源、主键生成策略、分片策略等。
在application.properties中配置
server.port=56081
spring.application.name = sharding‐jdbc‐simple‐demo
server.servlet.context‐path = /sharding‐jdbc‐simple‐demo
spring.http.encoding.enabled = true
spring.http.encoding.charset = utf‐8
spring.http.encoding.force = true
spring.main.allow‐bean‐definition‐overriding = true
mybatis.configuration.map‐underscore‐to‐camel‐case = true
# 以下是分片规则配置
# 定义数据源
spring.shardingsphere.datasource.names = m1
spring.shardingsphere.datasource.m1.type = com.alibaba.druid.pool.druiddatasource
spring.shardingsphere.datasource.m1.driver‐class‐name = com.mysql.jdbc.driver
spring.shardingsphere.datasource.m1.url = jdbc:mysql://localhost:3306/order_db?useunicode=true
spring.shardingsphere.datasource.m1.username = root
spring.shardingsphere.datasource.m1.password = root
# 指定t_order表的数据分布情况,配置数据节点
spring.shardingsphere.sharding.tables.t_order.actual‐data‐nodes = m1.t_order_$‐>{1..2}
# 指定t_order表的主键生成策略为snowflake
spring.shardingsphere.sharding.tables.t_order.key‐generator.column=order_id
spring.shardingsphere.sharding.tables.t_order.key‐generator.type=snowflake
# 指定t_order表的分片策略,分片策略包括分片键和分片算法
spring.shardingsphere.sharding.tables.t_order.table‐strategy.inline.sharding‐column = order_id
spring.shardingsphere.sharding.tables.t_order.table‐strategy.inline.algorithm‐expression =
t_order_$‐>{order_id % 2 + 1}

# 打开sql输出日志
spring.shardingsphere.props.sql.show = true
swagger.enable = true
logging.level.root = info
logging.level.org.springframework.web = info
logging.level.com.itheima.dbsharding  = debug
logging.level.druid.sql = debug- 首先定义数据源m1,并对m1进行实际的参数配置。
- 指定t_order表的数据分布情况,他分布在m1.t_order_1,m1.t_order_2
- 指定t_order表的主键生成策略为snowflake,snowflake是一种分布式自增算法,保证id全局唯一
- 定义t_order分片策略,order_id为偶数的数据落在t_order_1,为奇数的落在t_order_2,分表策略的表达式为t_order_$->{order_id % 2 + 1}
3.2. 数据操作
@mapper
@component
public interface orderdao {
    /**
     * 新增订单
     * @param price 订单价格
     * @param userid 用户id
     * @param status 订单状态
     * @return
     */
    @insert("insert into t_order(price,user_id,status) value(#{price},#{userid},#{status})")
    int insertorder(@param("price") bigdecimal price, @param("userid")long userid,
@param("status")string status);
    /**
     * 根据id列表查询多个订单
     * @param orderids 订单id列表
     * @return
     */
    @select({"<script>" +
            "select " +
            " * " +
            " from t_order t" +
            " where t.order_id in " +
            "<foreach collection='orderids' item='id' open='(' separator=',' close=')'>" +
            " #{id} " +
            "</foreach>"+
            "</script>"})
    list<map> selectorderbyids(@param("orderids")list<long> orderids);
}
3.3 测试
编写单元测试:
@runwith(springrunner.class)
@springboottest(classes = {shardingjdbcsimpledemobootstrap.class})
public class orderdaotest {
    @autowired
    private orderdao orderdao;
    @test
    public void testinsertorder(){
        for (int i = 0 ; i<10; i++){
            orderdao.insertorder(new bigdecimal((i+1)*5),1l,"wait_pay");
        }
    }
     @test
    public void testselectorderbyids(){
        list<long> ids = new arraylist<>();
        ids.add(373771636085620736l);
        ids.add(373771635804602369l);
        list<map> maps = orderdao.selectorderbyids(ids);
        system.out.println(maps);
    }
}
执行 testinsertorder:
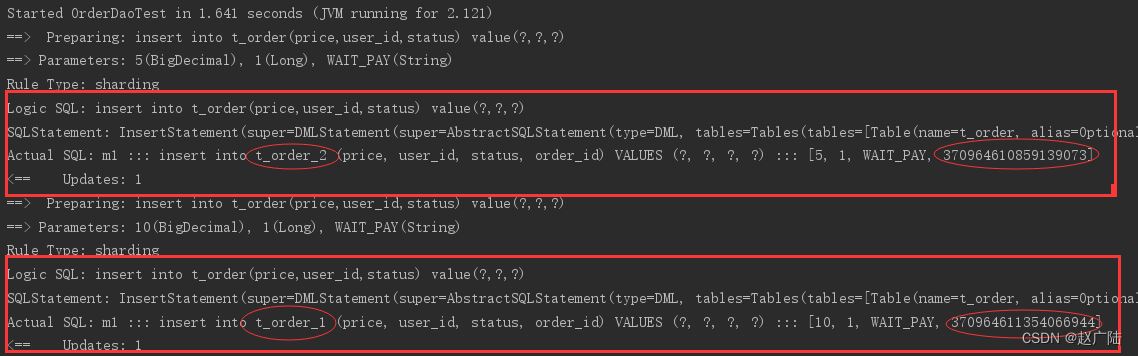
通过日志可以发现order_id为奇数的被插入到t_order_2表,为偶数的被插入到t_order_1表,达到预期目标。
执行testselectorderbyids:

通过日志可以发现,根据传入order_id的奇偶不同,sharding-jdbc分别去不同的表检索数据,达到预期目标。
4 流程分析
通过日志分析,sharding-jdbc在拿到用户要执行的sql之后干了哪些事儿:
(1)解析sql,获取片键值,在本例中是order_id
(2)sharding-jdbc通过规则配置 t_order_$->{order_id % 2 + 1},知道了当order_id为偶数时,应该往t_order_1表插数据,为奇数时,往t_order_2插数据。
(3)于是sharding-jdbc根据order_id的值改写sql语句,改写后的sql语句是真实所要执行的sql语句。
(4)执行改写后的真实sql语句
(5)将所有真正执行sql的结果进行汇总合并,返回。
5 其他集成方式
sharding-jdbc不仅可以与spring boot良好集成,它还支持其他配置方式,共支持以下四种集成方式。
5.1 spring boot yaml 配置
定义application.yml,内容如下:
server:
port: 56081
servlet:
context‐path: /sharding‐jdbc‐simple‐demo
spring:
application:
name: sharding‐jdbc‐simple‐demo
http:
encoding:
enabled: true
charset: utf‐8
force: true
main:
allow‐bean‐definition‐overriding: true
shardingsphere:
datasource:
names: m1
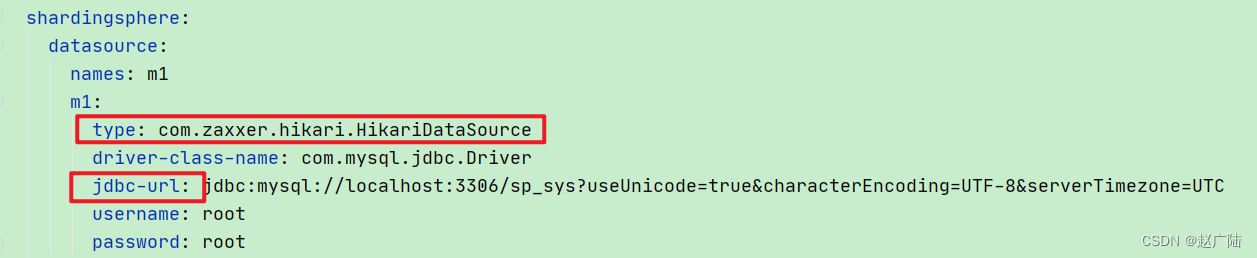
m1:
type: com.alibaba.druid.pool.druiddatasource
driverclassname: com.mysql.jdbc.driver
url: jdbc:mysql://localhost:3306/order_db?useunicode=true
username: root
password: mysql
sharding:
tables:
t_order:
actualdatanodes: m1.t_order_$‐>{1..2}
tablestrategy:
inline:
shardingcolumn: order_id
algorithmexpression: t_order_$‐>{order_id % 2 + 1}
keygenerator:
type: snowflake
column: order_id
props:
sql:
show: true
mybatis:
configuration:
map‐underscore‐to‐camel‐case: true
swagger:
enable: true
logging:
level:
root: info
org.springframework.web: info
com.itheima.dbsharding: debug
druid.sql: debug如果使用 application.yml则需要屏蔽原来的application.properties文件。
5.2 java 配置
添加配置类:
@configuration
public class shardingjdbcconfig {
    // 定义数据源
    map<string, datasource> createdatasourcemap() {
        druiddatasource datasource1 = new druiddatasource();
        datasource1.setdriverclassname("com.mysql.jdbc.driver");
        datasource1.seturl("jdbc:mysql://localhost:3306/order_db?useunicode=true");
        datasource1.setusername("root");
        datasource1.setpassword("root");
        map<string, datasource> result = new hashmap<>();
        result.put("m1", datasource1);
        return result;
    }
    // 定义主键生成策略
    private static keygeneratorconfiguration getkeygeneratorconfiguration() {
        keygeneratorconfiguration result = new
keygeneratorconfiguration("snowflake","order_id");
        return result;
    }
    // 定义t_order表的分片策略
    tableruleconfiguration getordertableruleconfiguration() {
        tableruleconfiguration result = new tableruleconfiguration("t_order","m1.t_order_$‐>
{1..2}");
        result.settableshardingstrategyconfig(new
inlineshardingstrategyconfiguration("order_id", "t_order_$‐>{order_id % 2 + 1}"));
        result.setkeygeneratorconfig(getkeygeneratorconfiguration());
        return result;
    }
    // 定义sharding‐jdbc数据源
    @bean
    datasource getshardingdatasource() throws sqlexception {
        shardingruleconfiguration shardingruleconfig = new shardingruleconfiguration();
        shardingruleconfig.gettableruleconfigs().add(getordertableruleconfiguration());
        //spring.shardingsphere.props.sql.show = true
        properties properties = new properties();
        properties.put("sql.show","true");
        return shardingdatasourcefactory.createdatasource(createdatasourcemap(),
        shardingruleconfig,properties);
    }
}
由于采用了配置类所以需要屏蔽原来 application.properties文件中spring.shardingsphere开头的配置信息。
还需要在springboot启动类中屏蔽使用spring.shardingsphere配置项的类:
@springbootapplication(exclude = {springbootconfiguration.class})
public class shardingjdbcsimpledemobootstrap {....}
5.3 spring boot properties配置
此方式同快速入门程序。
# 定义数据源
spring.shardingsphere.datasource.names = m1
spring.shardingsphere.datasource.m1.type = com.alibaba.druid.pool.druiddatasource
spring.shardingsphere.datasource.m1.driver‐class‐name = com.mysql.jdbc.driver
spring.shardingsphere.datasource.m1.url = jdbc:mysql://localhost:3306/order_db?useunicode=true
spring.shardingsphere.datasource.m1.username = root
spring.shardingsphere.datasource.m1.password = root
# 指定t_order表的主键生成策略为snowflake
spring.shardingsphere.sharding.tables.t_order.key‐generator.column=order_id
spring.shardingsphere.sharding.tables.t_order.key‐generator.type=snowflake
# 指定t_order表的数据分布情况
spring.shardingsphere.sharding.tables.t_order.actual‐data‐nodes = m1.t_order_$‐>{1..2}
# 指定t_order表的分表策略
spring.shardingsphere.sharding.tables.t_order.table‐strategy.inline.sharding‐column = order_id
spring.shardingsphere.sharding.tables.t_order.table‐strategy.inline.algorithm‐expression =
t_order_$‐>{order_id % 2 + 1}
5.4 spring命名空间配置
此方式使用xml方式配置,不推荐使用。
<?xml version="1.0" encoding="utf‐8"?>
<beans xmlns="http://www.springframework.org/schema/beans"
       xmlns:xsi="http://www.w3.org/2001/xmlschema‐instance"
       xmlns:p="http://www.springframework.org/schema/p"
       xmlns:context="http://www.springframework.org/schema/context"
       xmlns:tx="http://www.springframework.org/schema/tx"
       xmlns:sharding="http://shardingsphere.apache.org/schema/shardingsphere/sharding"
       xsi:schemalocation="http://www.springframework.org/schema/beans
                        http://www.springframework.org/schema/beans/spring‐beans.xsd
                        http://shardingsphere.apache.org/schema/shardingsphere/sharding
                        http://shardingsphere.apache.org/schema/shardingsphere/sharding/sharding.xsd
                        http://www.springframework.org/schema/context
                        http://www.springframework.org/schema/context/spring‐context.xsd
                        http://www.springframework.org/schema/tx
                        http://www.springframework.org/schema/tx/spring‐tx.xsd">
    <context:annotation‐config />

    <!‐‐定义多个数据源‐‐>
    <bean id="m1" class="com.alibaba.druid.pool.druiddatasource" destroy‐method="close">
        <property name="driverclassname" value="com.mysql.jdbc.driver" />
        <property name="url" value="jdbc:mysql://localhost:3306/order_db_1?useunicode=true" />
        <property name="username" value="root" />
        <property name="password" value="root" />
    </bean>

   <!‐‐定义分库策略‐‐>
   <sharding:inline‐strategy id="tableshardingstrategy" sharding‐column="order_id" algorithm‐
expression="t_order_$‐>{order_id % 2 + 1}" />


   <!‐‐定义主键生成策略‐‐>
   <sharding:key‐generator id="orderkeygenerator" type="snowflake" column="order_id" />

    <!‐‐定义sharding‐jdbc数据源‐‐>
    <sharding:data‐source id="shardingdatasource">
        <sharding:sharding‐rule data‐source‐names="m1">
            <sharding:table‐rules>
                <sharding:table‐rule logic‐table="t_order"  table‐strategy‐
ref="tableshardingstrategy" key‐generator‐ref="orderkeygenerator" />
            </sharding:table‐rules>
        </sharding:sharding‐rule>
    </sharding:data‐source>
</beans>
6 sharding-jdbc4种分片策略
如果我一部分表做了分库分表,另一部分未做分库分表的表怎么处理?怎么才能正常访问?
这是一个比较典型的问题,我们知道分库分表是针对某些数据量持续大幅增长的表,比如用户表、订单表等,而不是一刀切将全部表都做分片。那么不分片的表和分片的表如何划分,一般有两种解决方案。
- 严格划分功能库,分片的库与不分片的库剥离开,业务代码中按需切换数据源访问
- 设置默认数据源,以
sharding-jdbc为例,不给未分片表设置分片规则,它们就不会执行,因为找不到路由规则,这时我们设置一个默认数据源,在找不到规则时一律访问默认库。
# 配置数据源 ds-0
spring.shardingsphere.datasource.ds-0.type=com.alibaba.druid.pool.druiddatasource
spring.shardingsphere.datasource.ds-0.driverclassname=com.mysql.jdbc.driver
spring.shardingsphere.datasource.ds-0.url=jdbc:mysql://47.94.6.5:3306/ds-0?useunicode=true&characterencoding=utf8&tinyint1isbit=false&usessl=false&servertimezone=gmt
spring.shardingsphere.datasource.ds-0.username=root
spring.shardingsphere.datasource.ds-0.password=root

# 默认数据源,未分片的表默认执行库
spring.shardingsphere.sharding.default-data-source-name=ds-0
这篇我们针对具体的sql使用场景,实践一下4种分片策略的用法,开始前先做点准备工作。
- 标准分片策略
- 复合分片策略
- 行表达式分片策略
- hint分片策略
6.1 准备工作
先创建两个数据库 ds-0、ds-1,两个库中分别建表 t_order_0、t_order_1、t_order_2 、t_order_item_0、t_order_item_1、t_order_item_2 6张表,下边实操看看如何在不同场景下应用 sharding-jdbc 的 4种分片策略。
t_order_n 表结构如下:
create table `t_order_0` (
  `order_id` bigint(200) not null,
  `order_no` varchar(100) default null,
  `user_id` bigint(200) not null,
  `create_name` varchar(50) default null,
  `price` decimal(10,2) default null,
  primary key (`order_id`)
) engine=innodb default charset=utf8 row_format=dynamic;
t_order_item_n 表结构如下:
create table `t_order_item_0` (
  `item_id` bigint(100) not null,
  `order_id` bigint(200) not null,
  `order_no` varchar(200) not null,
  `item_name` varchar(50) default null,
  `price` decimal(10,2) default null,
  primary key (`item_id`)
) engine=innodb default charset=utf8 row_format=dynamic;
分片策略分为分表策略和分库策略,它们实现分片算法的方式基本相同,不同是一个对库ds-0、ds-1,一个对表 t_order_0 ··· t_order_n 等做处理。
6.2 标准分片策略
使用场景:sql 语句中有>,>=, <=,<,=,in 和 between and 操作符,都可以应用此分片策略。
标准分片策略(standardshardingstrategy),它只支持对单个分片健(字段)为依据的分库分表,并提供了两种分片算法 preciseshardingalgorithm(精准分片)和 rangeshardingalgorithm(范围分片)。
在使用标准分片策略时,精准分片算法是必须实现的算法,用于 sql 含有 = 和 in 的分片处理;范围分片算法是非必选的,用于处理含有 between and 的分片处理。
一旦我们没配置范围分片算法,而 sql 中又用到 between and 或者 like等,那么 sql 将按全库、表路由的方式逐一执行,查询性能会很差需要特别注意。
接下来自定义实现 精准分片算法 和 范围分片算法。
6.3 精准分片算法
精准分库算法
实现自定义精准分库、分表算法的方式大致相同,都要实现 preciseshardingalgorithm 接口,并重写 dosharding() 方法,只是配置稍有不同,而且它只是个空方法,得我们自行处理分库、分表逻辑。其他分片策略亦如此。
select * from t_order where order_id = 1 or order_id in (1,2,3);
下边我们实现精准分库策略,通过对分片健 order_id 取模的方式(怎么实现看自己喜欢)计算出 sql 该路由到哪个库,计算出的分片库信息会存放在分片上下文中,方便后续分表中使用。
/**
* @author
* @description 自定义标准分库策略
*/
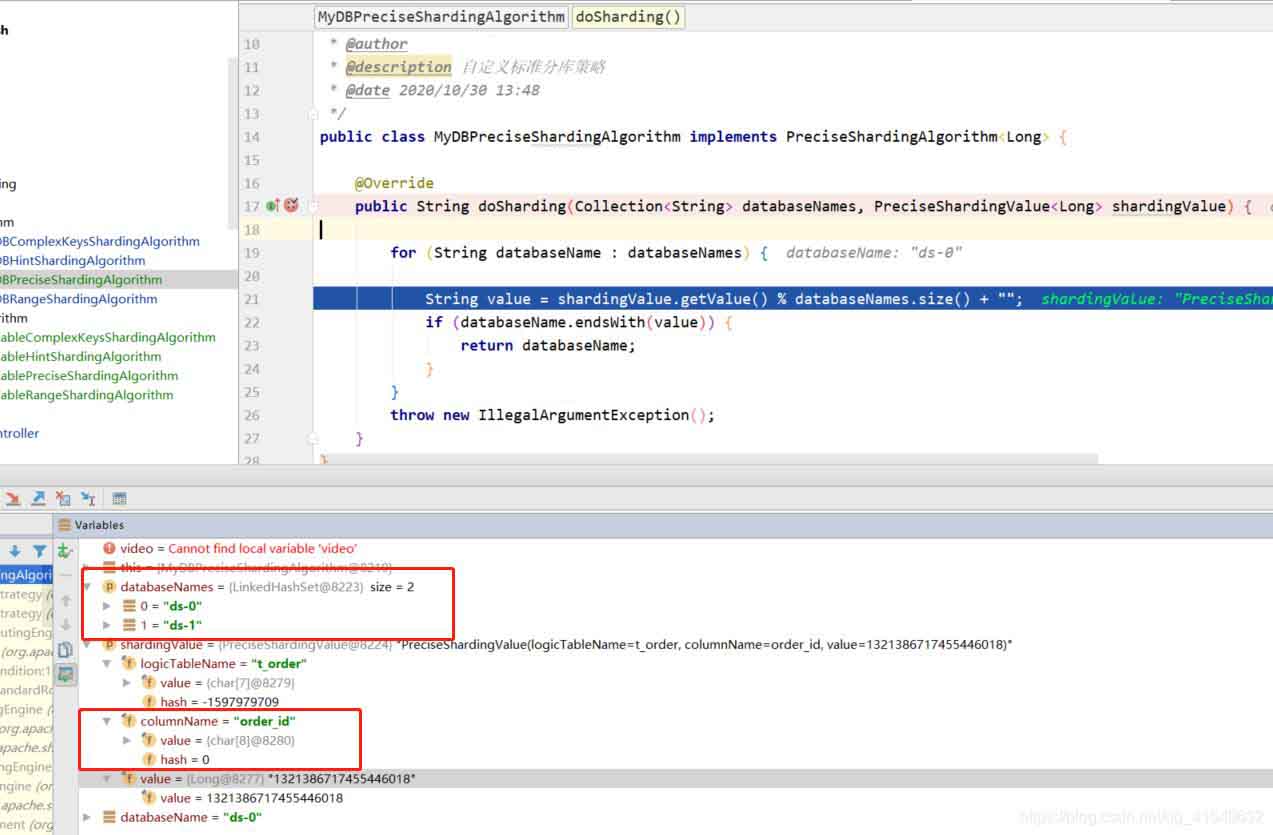
public class mydbpreciseshardingalgorithm implements preciseshardingalgorithm<long> {
@override
public string dosharding(collection<string> databasenames, preciseshardingvalue<long> shardingvalue) {
/**
* databasenames 所有分片库的集合
* shardingvalue 为分片属性,其中 logictablename 为逻辑表,columnname 分片健(字段),value 为从 sql 中解析出的分片健的值
*/
for (string databasename : databasenames) {
string value = shardingvalue.getvalue() % databasenames.size() + "";
if (databasename.endswith(value)) {
return databasename;
}
}
throw new illegalargumentexception();
}
}其中 collection<string> 参数在几种分片策略中使用一致,在分库时值为所有分片库的集合 databasenames,分表时为对应分片库中所有分片表的集合 tablesnames;preciseshardingvalue 为分片属性,其中 logictablename 为逻辑表,columnname 分片健(字段),value 为从 sql 中解析出的分片健的值。
而 application.properties 配置文件中只需修改分库策略名 database-strategy 为标准模式 standard,分片算法 standard.precise-algorithm-class-name 为自定义的精准分库算法类路径。
### 分库策略
# 分库分片健
spring.shardingsphere.sharding.tables.t_order.database-strategy.standard.sharding-column=order_id
# 分库分片算法
spring.shardingsphere.sharding.tables.t_order.database-strategy.standard.precise-algorithm-class-name=com.oldlu.sharding.algorithm.dbalgorithm.mydbpreciseshardingalgorithm
精准分表算法
精准分表算法同样实现 preciseshardingalgorithm 接口,并重写 dosharding() 方法。
/**
 * @description 自定义标准分表策略
 */
public class mytablepreciseshardingalgorithm implements preciseshardingalgorithm<long> {

    @override
    public string dosharding(collection<string> tablenames, preciseshardingvalue<long> shardingvalue) {

        /**
         * tablenames 对应分片库中所有分片表的集合
         * shardingvalue 为分片属性,其中 logictablename 为逻辑表,columnname 分片健(字段),value 为从 sql 中解析出的分片健的值
         */
        for (string tablename : tablenames) {
            /**
             * 取模算法,分片健 % 表数量
             */
            string value = shardingvalue.getvalue() % tablenames.size() + "";
            if (tablename.endswith(value)) {
                return tablename;
            }
        }
        throw new illegalargumentexception();
    }
}
分表时 collection<string> 参数为上边计算出的分片库,对应的所有分片表的集合 tablesnames;preciseshardingvalue 为分片属性,其中 logictablename 为逻辑表,columnname 分片健(字段),value 为从 sql 中解析出的分片健的值。

application.properties 配置文件也只需修改分表策略名 database-strategy 为标准模式 standard,分片算法 standard.precise-algorithm-class-name 为自定义的精准分表算法类路径。
# 分表策略
# 分表分片健
spring.shardingsphere.sharding.tables.t_order.table-strategy.standard.sharding-column=order_id
# 分表算法
spring.shardingsphere.sharding.tables.t_order.table-strategy.standard.precise-algorithm-class-name=com.oldlu.sharding.algorithm.tablealgorithm.mytablepreciseshardingalgorithm
看到这不难发现,自定义分库和分表算法的实现基本是一样的,所以后边我们只演示分库即可
6.4 范围分片算法
使用场景:当我们 sql中的分片健字段用到 between and操作符会使用到此算法,会根据 sql中给出的分片健值范围值处理分库、分表逻辑。
select * from t_order where order_id between 1 and 100;
自定义范围分片算法需实现 rangeshardingalgorithm 接口,重写 dosharding() 方法,下边我通过遍历分片健值区间,计算每一个分库、分表逻辑。
/**
 * @description 范围分库算法
 */
public class mydbrangeshardingalgorithm implements rangeshardingalgorithm<integer> {

    @override
    public collection<string> dosharding(collection<string> databasenames, rangeshardingvalue<integer> rangeshardingvalue) {

        set<string> result = new linkedhashset<>();
        // between and 的起始值
        int lower = rangeshardingvalue.getvaluerange().lowerendpoint();
        int upper = rangeshardingvalue.getvaluerange().upperendpoint();
        // 循环范围计算分库逻辑
        for (int i = lower; i <= upper; i++) {
            for (string databasename : databasenames) {
                if (databasename.endswith(i % databasenames.size() + "")) {
                    result.add(databasename);
                }
            }
        }
        return result;
    }
}
和上边的一样 collection<string> 在分库、分表时分别代表分片库名和表名集合,rangeshardingvalue 这里取值方式稍有不同, lowerendpoint 表示起始值, upperendpoint 表示截止值。

在配置上由于范围分片算法和精准分片算法,同在标准分片策略下使用,所以只需添加上 range-algorithm-class-name 自定义范围分片算法类路径即可。
# 精准分片算法
spring.shardingsphere.sharding.tables.t_order.database-strategy.standard.precise-algorithm-class-name=com.oldlu.sharding.algorithm.dbalgorithm.mydbpreciseshardingalgorithm
# 范围分片算法
spring.shardingsphere.sharding.tables.t_order.database-strategy.standard.range-algorithm-class-name=com.oldlu.sharding.algorithm.dbalgorithm.mydbrangeshardingalgorithm
6.5 复合分片策略
使用场景:sql 语句中有>,>=, <=,<,=,in 和 between and 等操作符,不同的是复合分片策略支持对多个分片健操作。
下面我们实现同时以 order_id、user_id 两个字段作为分片健,自定义复合分片策略。
select * from t_order where user_id =0 and order_id = 1;
我们先修改一下原配置,complex.sharding-column 切换成 complex.sharding-columns 复数,分片健上再加一个 user_id ,分片策略名变更为 complex ,complex.algorithm-class-name 替换成我们自定义的复合分片算法。
### 分库策略
# order_id,user_id 同时作为分库分片健
spring.shardingsphere.sharding.tables.t_order.database-strategy.complex.sharding-column=order_id,user_id
# 复合分片算法
spring.shardingsphere.sharding.tables.t_order.database-strategy.complex.algorithm-class-name=com.oldlu.sharding.algorithm.dbalgorithm.mydbcomplexkeysshardingalgorithm
自定义复合分片策略要实现 complexkeysshardingalgorithm 接口,重新 dosharding()方法。
/**
* @description 自定义复合分库策略
*/
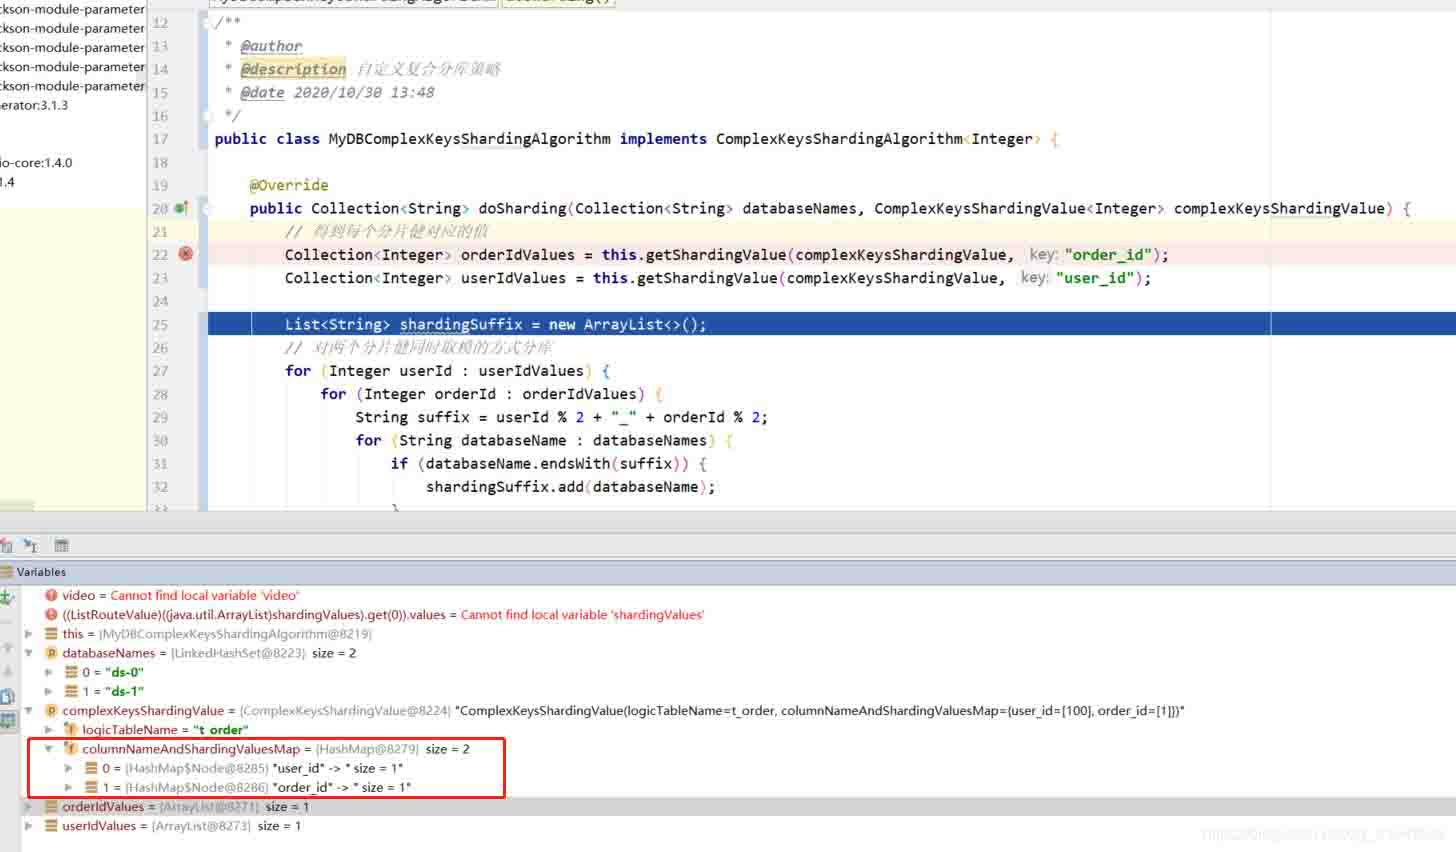
public class mydbcomplexkeysshardingalgorithm implements complexkeysshardingalgorithm<integer> {
@override
public collection<string> dosharding(collection<string> databasenames, complexkeysshardingvalue<integer> complexkeysshardingvalue) {
// 得到每个分片健对应的值
collection<integer> orderidvalues = this.getshardingvalue(complexkeysshardingvalue, "order_id");
collection<integer> useridvalues = this.getshardingvalue(complexkeysshardingvalue, "user_id");
list<string> shardingsuffix = new arraylist<>();
// 对两个分片健同时取模的方式分库
for (integer userid : useridvalues) {
for (integer orderid : orderidvalues) {
string suffix = userid % 2 + "_" + orderid % 2;
for (string databasename : databasenames) {
if (databasename.endswith(suffix)) {
shardingsuffix.add(databasename);
}
}
}
}
return shardingsuffix;
}
private collection<integer> getshardingvalue(complexkeysshardingvalue<integer> shardingvalues, final string key) {
collection<integer> valueset = new arraylist<>();
map<string, collection<integer>> columnnameandshardingvaluesmap = shardingvalues.getcolumnnameandshardingvaluesmap();
if (columnnameandshardingvaluesmap.containskey(key)) {
valueset.addall(columnnameandshardingvaluesmap.get(key));
}
return valueset;
}
}collection<string> 用法还是老样子,由于支持多分片健 complexkeysshardingvalue 分片属性内用一个分片健为 key,分片健值为 value 的 map来存储分片键属性。
6.6 行表达式分片策略
行表达式分片策略(inlineshardingstrategy),在配置中使用 groovy 表达式,提供对 sql语句中的 = 和 in 的分片操作支持,它只支持单分片健。
行表达式分片策略适用于做简单的分片算法,无需自定义分片算法,省去了繁琐的代码开发,是几种分片策略中最为简单的。
它的配置相当简洁,这种分片策略利用inline.algorithm-expression书写表达式。
比如:ds-$->{order_id % 2} 表示对 order_id 做取模计算,$ 是个通配符用来承接取模结果,最终计算出分库ds-0 ··· ds-n,整体来说比较简单。
# 行表达式分片键
sharding.jdbc.config.sharding.tables.t_order.database-strategy.inline.sharding-column=order_id
# 表达式算法
sharding.jdbc.config.sharding.tables.t_order.database-strategy.inline.algorithm-expression=ds-$->{order_id % 2}
6.7 hint分片策略
hint分片策略(hintshardingstrategy)相比于上面几种分片策略稍有不同,这种分片策略无需配置分片健,分片健值也不再从 sql中解析,而是由外部指定分片信息,让 sql在指定的分库、分表中执行。shardingsphere 通过 hint api实现指定操作,实际上就是把分片规则tablerule 、databaserule由集中配置变成了个性化配置。
举个例子,如果我们希望订单表t_order用 user_id 做分片健进行分库分表,但是 t_order 表中却没有 user_id 这个字段,这时可以通过 hint api 在外部手动指定分片健或分片库。
下边我们这边给一条无分片条件的sql,看如何指定分片健让它路由到指定库表。
select * from t_order;
使用 hint分片策略同样需要自定义,实现 hintshardingalgorithm 接口并重写 dosharding()方法。
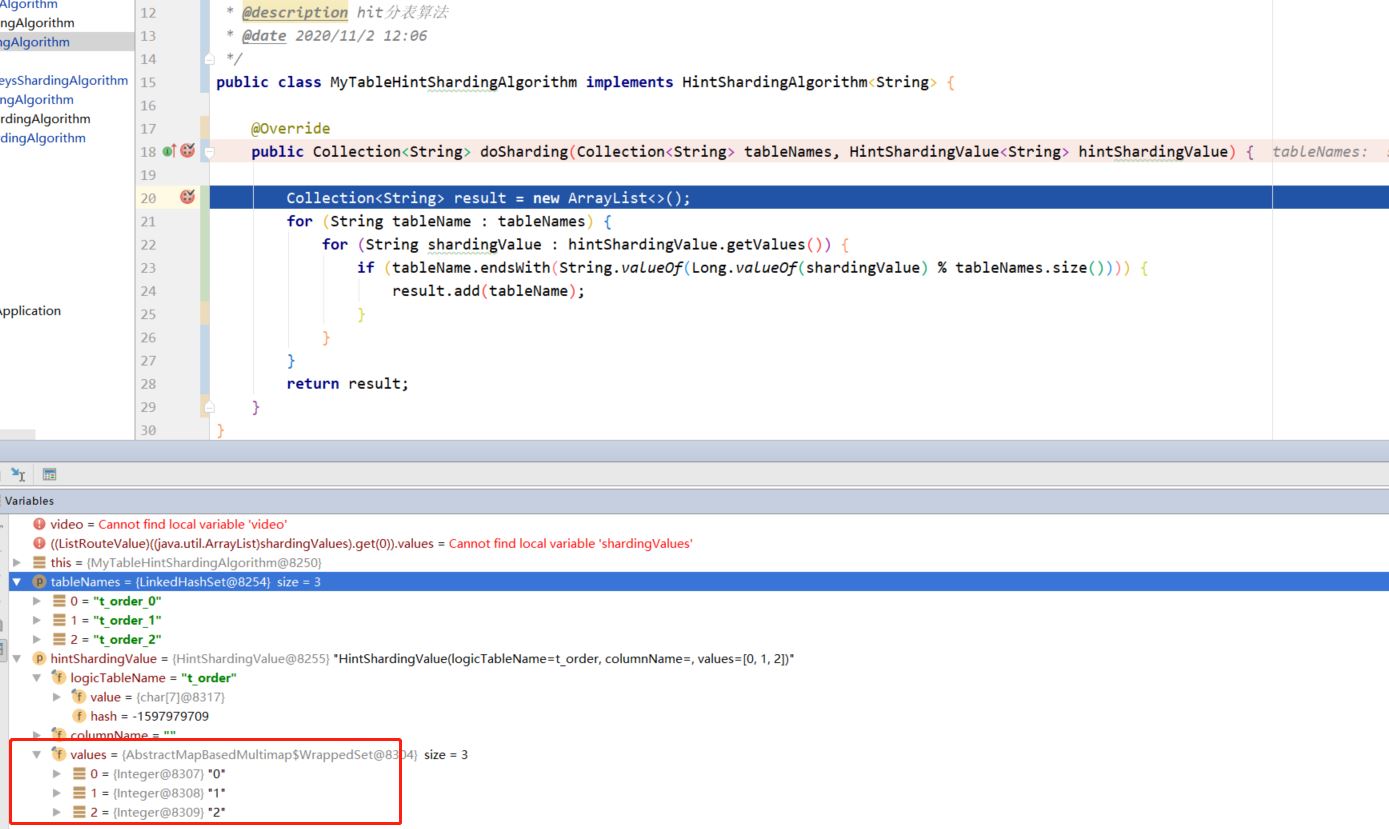
/**
 * @description hit分表算法
 */
public class mytablehintshardingalgorithm implements hintshardingalgorithm<string> {

    @override
    public collection<string> dosharding(collection<string> tablenames, hintshardingvalue<string> hintshardingvalue) {

        collection<string> result = new arraylist<>();
        for (string tablename : tablenames) {
            for (string shardingvalue : hintshardingvalue.getvalues()) {
                if (tablename.endswith(string.valueof(long.valueof(shardingvalue) % tablenames.size()))) {
                    result.add(tablename);
                }
            }
        }
        return result;
    }
}
自定义完算法只实现了一部分,还需要在调用 sql 前通过 hintmanager 指定分库、分表信息。由于每次添加的规则都放在 threadlocal 内,所以要先执行 clear() 清除掉上一次的规则,否则会报错;adddatabaseshardingvalue 设置分库分片健键值,addtableshardingvalue设置分表分片健键值。setmasterrouteonly 读写分离强制读主库,避免造成主从复制导致的延迟。
// 清除掉上一次的规则,否则会报错
hintmanager.clear();
// hintmanager api 工具类实例
hintmanager hintmanager = hintmanager.getinstance();
// 直接指定对应具体的数据库
hintmanager.adddatabaseshardingvalue("ds",0);
// 设置表的分片健
hintmanager.addtableshardingvalue("t_order" , 0);
hintmanager.addtableshardingvalue("t_order" , 1);
hintmanager.addtableshardingvalue("t_order" , 2);

// 在读写分离数据库中,hint 可以强制读主库
hintmanager.setmasterrouteonly();
debug 调试看到,我们对 t_order 表设置分表分片健键值,可以在自定义的算法 hintshardingvalue 参数中成功拿到。
properties 文件中配置无需再指定分片健,只需自定义的 hint分片算法类路径即可。
# hint分片算法
spring.shardingsphere.sharding.tables.t_order.table-strategy.hint.algorithm-class-name=com.oldlu.sharding.algorithm.tablealgorithm.mytablehintshardingalgorithm
7 水平分表
上述案例为水平分表是在同一个数据库内,把同一个表的数据按一定规则拆到多个表中,我们已经对水平分库进行实现,这里不再重复介绍。
8 水平分库
前面已经介绍过,水平分库是把同一个表的数据按一定规则拆到不同的数据库中,每个库可以放在不同的服务器上。接下来看一下如何使用sharding-jdbc实现水平分库,咱们继续对快速入门中的例子进行完善。
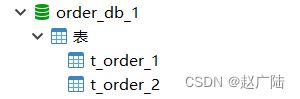
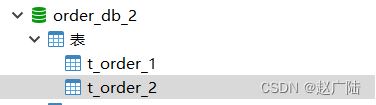
(1)将原有order_db库拆分为order_db_1、order_db_2
(2)分片规则修改
由于数据库拆分了两个,这里需要配置两个数据源。
分库需要配置分库的策略,和分表策略的意义类似,通过分库策略实现数据操作针对分库的数据库进行操作。
# 定义多个数据源
spring.shardingsphere.datasource.names = m1,m2
spring.shardingsphere.datasource.m1.type = com.alibaba.druid.pool.druiddatasource
spring.shardingsphere.datasource.m1.driver‐class‐name = com.mysql.jdbc.driver
spring.shardingsphere.datasource.m1.url = jdbc:mysql://localhost:3306/order_db_1?useunicode=true
spring.shardingsphere.datasource.m1.username = root
spring.shardingsphere.datasource.m1.password = root
spring.shardingsphere.datasource.m2.type = com.alibaba.druid.pool.druiddatasource
spring.shardingsphere.datasource.m2.driver‐class‐name = com.mysql.jdbc.driver
spring.shardingsphere.datasource.m2.url = jdbc:mysql://localhost:3306/order_db_2?useunicode=true
spring.shardingsphere.datasource.m2.username = root
spring.shardingsphere.datasource.m2.password = root
...
# 分库策略,以user_id为分片键,分片策略为user_id % 2 + 1,user_id为偶数操作m1数据源,否则操作m2。
spring.shardingsphere.sharding.tables.t_order.database‐strategy.inline.sharding‐column = user_id
spring.shardingsphere.sharding.tables.t_order.database‐strategy.inline.algorithm‐expression =
m$‐>{user_id % 2 + 1}
分库策略定义方式如下:
#分库策略,如何将一个逻辑表映射到多个数据源
spring.shardingsphere.sharding.tables.<逻辑表名称>.database‐strategy.<分片策略>.<分片策略属性名>= #
分片策略属性值
#分表策略,如何将一个逻辑表映射为多个实际表
spring.shardingsphere.sharding.tables.<逻辑表名称>.table‐strategy.<分片策略>.<分片策略属性名>= #分
片策略属性值
sharding-jdbc支持以下几种分片策略:
不管理分库还是分表,策略基本一样。
standard :标准分片策略,对应standardshardingstrategy。提供对sql语句中的=, in和between and的分片操作支持。standardshardingstrategy只支持单分片键,提供preciseshardingalgorithm和- rangeshardingalgorithm两个分片算法。preciseshardingalgorithm是必选的,用于处理=和in的分片。rangeshardingalgorithm是可选的,用于处理between and分片,如果不配置 rangeshardingalgorithm,sql中的between and将按照全库路由处理。
complex :符合分片策略,对应complexshardingstrategy。复合分片策略。提供对sql语句中的=, in- 和between and的分片操作支持。complexshardingstrategy支持多分片键,由于多分片键之间的关系复杂,因此并未进行过多的封装,而是直接将分片键值组合以及分片操作符透传至分片算法,完全由应用开发者实现,提供最大的灵活度。
inline :行表达式分片策略,对应inlineshardingstrategy。使用groovy的表达式,提供对sql语句中的=和- in的分片操作支持,只支持单分片键。对于简单的分片算法,可以通过简单的配置使用,从而避免繁琐的java代码开发,如: t_user_$ ->{u_id % 8} 表示t_user表根据u_id模8,而分成8张表,表名称为 t_user_0 到t_user_7 。
hint :hint分片策略,对应hintshardingstrategy。通过hint而非sql解析的方式分片的策略。对于分片字段非sql决定,而由其他外置条件决定的场景,可使用sql hint灵活的注入分片字段。例:内部系统,按照员工登录主键分库,而数据库中并无此字段。sql hint支持通过java api和sql注释(待实现)两种方式使用。none :不分片策略,对应noneshardingstrategy。不分片的策略。
(3) 插入测试
修改testinsertorder方法,插入数据中包含不同的user_id
@test
public void testinsertorder(){
    for (int i = 0 ; i<10; i++){
        orderdao.insertorder(new bigdecimal((i+1)*5),1l,"wait_pay");
    }
    for (int i = 0 ; i<10; i++){
        orderdao.insertorder(new bigdecimal((i+1)*10),2l,"wait_pay");
    }
}
执行testinsertorder:
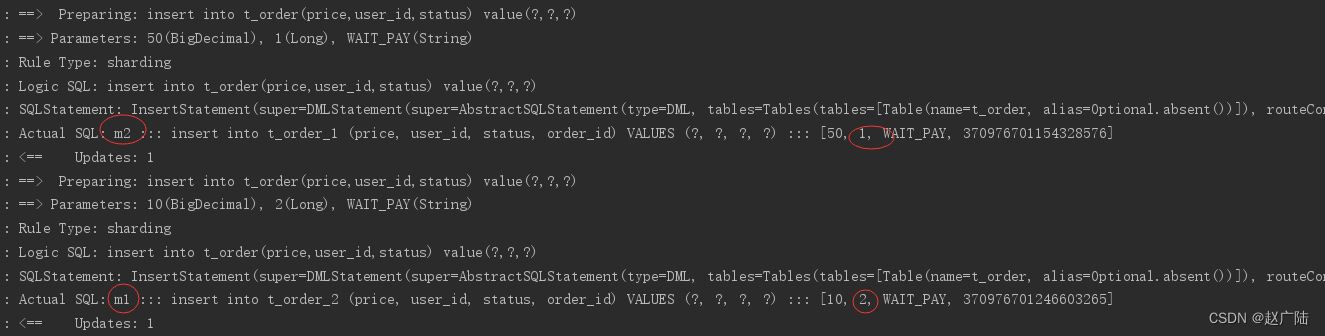
通过日志可以看出,根据user_id的奇偶不同,数据分别落在了不同数据源,达到目标。
(4)查询测试
调用快速入门的查询接口进行测试:
list<map> selectorderbyids(@param("orderids")list<long> orderids); 通过日志发现,sharding-jdbc将sql路由到m1和m2:

问题分析:
由于查询语句中并没有使用分片键user_id,所以sharding-jdbc将广播路由到每个数据结点。
下边我们在sql中添加分片键进行查询。
在orderdao中定义接口:
@select({"<script>",
        " select",
        " * ",
        " from t_order t ",
        "where t.order_id in",
        "<foreach collection='orderids' item='id' open='(' separator=',' close=')'>",
        "#{id}",
        "</foreach>",
        " and t.user_id = #{userid} ",
        "</script>"
})
list<map> selectorderbyuserandids(@param("userid") integer userid,@param("orderids")list<long>
orderids);
编写测试方法:
@test
public void testselectorderbyuserandids(){
    list<long> orderids = new arraylist<>();
    orderids.add(373422416644276224l);
    orderids.add(373422415830581248l);
    //查询条件中包括分库的键user_id
    int user_id = 1;
    list<map> orders = orderdao.selectorderbyuserandids(user_id,orderids);
    jsonarray jsonorders = new jsonarray(orders);
    system.out.println(jsonorders);
}
执行testselectorderbyuserandids:

查询条件user_id为1,根据分片策略m$->{user_id % 2 + 1}计算得出m2,此sharding-jdbc将sql路由到m2,见上图日志。
9 垂直分库
前面已经介绍过,垂直分库是指按照业务将表进行分类,分布到不同的数据库上面,每个库可以放在不同的服务器上,它的核心理念是专库专用。接下来看一下如何使用sharding-jdbc实现垂直分库。
(1)创建数据库
创建数据库user_db
create database user_db character set 'utf8' collate 'utf8_general_ci';
在user_db中创建t_user表
drop table if exists `t_user`;
create table `t_user`  (
  `user_id` bigint(20) not null comment '用户id',
  `fullname` varchar(255) character set utf8 collate utf8_general_ci not null comment '用户姓名',
  `user_type` char(1) default null comment '用户类型',
  primary key (`user_id`) using btree
) engine = innodb character set = utf8 collate = utf8_general_ci row_format = dynamic;
(2)在sharding-jdbc规则中修改
# 新增m0数据源,对应user_db
spring.shardingsphere.datasource.names = m0,m1,m2
...
spring.shardingsphere.datasource.m0.type = com.alibaba.druid.pool.druiddatasource
spring.shardingsphere.datasource.m0.driver‐class‐name = com.mysql.jdbc.driver
spring.shardingsphere.datasource.m0.url = jdbc:mysql://localhost:3306/user_db?useunicode=true
spring.shardingsphere.datasource.m0.username = root
spring.shardingsphere.datasource.m0.password = root
....
# t_user分表策略,固定分配至m0的t_user真实表
spring.shardingsphere.sharding.tables.t_user.actual‐data‐nodes = m$‐>{0}.t_user
spring.shardingsphere.sharding.tables.t_user.table‐strategy.inline.sharding‐column = user_id
spring.shardingsphere.sharding.tables.t_user.table‐strategy.inline.algorithm‐expression = t_user
(3) 数据操作
新增userdao:
@mapper
@component
public interface userdao {
    /**
     * 新增用户
     * @param userid 用户id
     * @param fullname 用户姓名
     * @return
     */
    @insert("insert into t_user(user_id, fullname) value(#{userid},#{fullname})")
    int insertuser(@param("userid")long userid,@param("fullname")string fullname);
    /**
     * 根据id列表查询多个用户
     * @param userids 用户id列表
     * @return
     */
    @select({"<script>",
            " select",
            " * ",
            " from t_user t ",
            " where t.user_id in",
            "<foreach collection='userids' item='id' open='(' separator=',' close=')'>",
            "#{id}",
            "</foreach>",
            "</script>"
    })
    list<map> selectuserbyids(@param("userids")list<long> userids);
}
(4)测试
新增单元测试方法:
@test
public void testinsertuser(){
    for (int i = 0 ; i<10; i++){
        long id = i + 1l;
        userdao.insertuser(id,"姓名"+ id );
    }
}
@test
public void testselectuserbyids(){
    list<long> userids = new arraylist<>();
    userids.add(1l);
    userids.add(2l);
    list<map> users = userdao.selectuserbyids(userids);
    system.out.println(users);
}
执行 testinsertuser:

通过日志可以看出t_user表的数据被落在了m0数据源,达到目标。
执行testselectuserbyids:
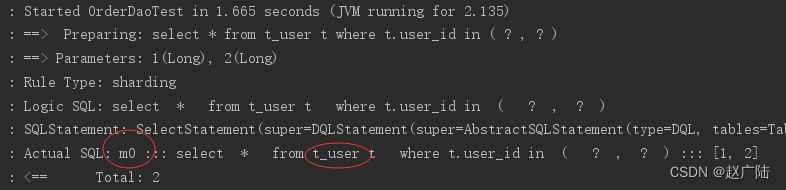
通过日志可以看出t_user表的查询操作被落在了m0数据源,达到目标。
10 公共表
公共表属于系统中数据量较小,变动少,而且属于高频联合查询的依赖表。参数表、数据字典表等属于此类型。可以将这类表在每个数据库都保存一份,所有更新操作都同时发送到所有分库执行。接下来看一下如何使用sharding-jdbc实现公共表。
(1)创建数据库
分别在user_db、order_db_1、order_db_2中创建t_dict表:
create table `t_dict`  (
  `dict_id` bigint(20) not null comment '字典id',
  `type` varchar(50) character set utf8 collate utf8_general_ci not null comment '字典类型',
  `code` varchar(50) character set utf8 collate utf8_general_ci not null comment '字典编码',
  `value` varchar(50) character set utf8 collate utf8_general_ci not null comment '字典值',
  primary key (`dict_id`) using btree
) engine = innodb character set = utf8 collate = utf8_general_ci row_format = dynamic;
(2)在sharding-jdbc规则中修改
# 指定t_dict为公共表
spring.shardingsphere.sharding.broadcast‐tables=t_dict
(3)数据操作
新增dictdao:
@mapper
@component
public interface dictdao {
    /**
     * 新增字典
     * @param type 字典类型
     * @param code 字典编码
     * @param value 字典值
     * @return
     */
    @insert("insert into t_dict(dict_id,type,code,value) value(#{dictid},#{type},#[code],#
{value})")
    int insertdict(@param("dictid") long dictid,@param("type") string type, @param("code")string
code, @param("value")string value);
    /**
     * 删除字典
     * @param dictid 字典id
     * @return
     */
    @delete("delete from t_dict where dict_id = #{dictid}")
    int deletedict(@param("dictid") long dictid);
}
(4)字典操作测试
新增单元测试方法:
@test
public void testinsertdict(){
dictdao.insertdict(1l,"user_type","0","管理员");
dictdao.insertdict(2l,"user_type","1","操作员");
}
@test
public void testdeletedict(){
dictdao.deletedict(1l);
dictdao.deletedict(2l);
}
执行testinsertdict:
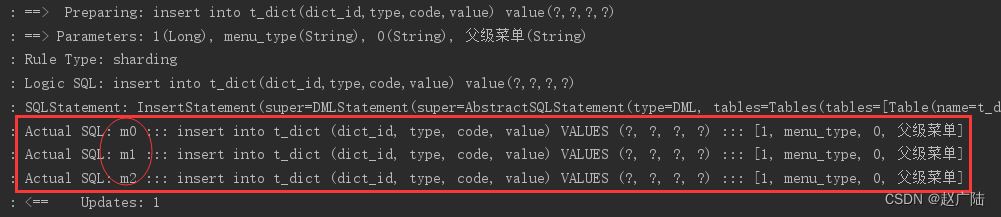
通过日志可以看出,对t_dict的表的操作被广播至所有数据源。
测试删除字典,观察是否把所有数据源中该 公共表的记录删除。
(5)字典关联查询测试
字典表已在各各分库存在,各业务表即可和字典表关联查询。
定义用户关联查询dao:
在userdao中定义:
/**
 * 根据id列表查询多个用户,关联查询字典表
 * @param userids 用户id列表
 * @return
 */
@select({"<script>",
        " select",
        " * ",
        " from t_user t ,t_dict b",
        " where t.user_type = b.code and t.user_id in",
        "<foreach collection='userids' item='id' open='(' separator=',' close=')'>",
        "#{id}",
        "</foreach>",
        "</script>"
})
list<map> selectuserinfobyids(@param("userids")list<long> userids);
定义测试方法:
@test
public void testselectuserinfobyids(){
    list<long> userids = new arraylist<>();
    userids.add(1l);
    userids.add(2l);
    list<map> users = userdao.selectuserinfobyids(userids);
    jsonarray jsonusers = new jsonarray(users);
    system.out.println(jsonusers);
}
执行测试方法,查看日志,成功关联查询字典表:

11 配置中遇到的一些问题
11.1 数据库链接池找不到
springboot2.0之后,采用的默认数据库连接池就是hikari
11.2 错误java.lang.illegalargumentexception: jdbcurl is required with driverclassname.
原因
- hikariconfig校验配置中没有jdbcurl配置
处理方式
- springboot 1.x 版本中,数据源配置是 xxxx.url=
- 在2.x中,更改为 jdbc-url
总结
以上为个人经验,希望能给大家一个参考,也希望大家多多支持代码网。


发表评论