1. 创建日历组件实现步骤:
- 创建日历组件:首先,你需要创建一个日历组件,包含显示日期的逻辑。
- 样式设计:为日历组件设计样式,使其看起来美观。
- 事件处理:添加事件处理程序,以便用户可以选择日期。
2. 代码实现过程
编写calendar.wxml布局
<!-- calendar.wxml -->
<navigation-bar title="日历控件" back="{{false}}" color="#ffffff" background="#e6142c"></navigation-bar>
  <!-- 日历部分 -->
  <view class="calendar">
    <!-- 日历头部 -->
    <view class="calendar-header">
      <view class="arrow" bindtap="prevmonth">〈</view>
      <view class="date-title">{{year}}年{{month}}月</view>
      <view class="arrow" bindtap="nextmonth">〉</view>
    </view>
    <!-- 星期标题 -->
    <view class="weekday-row">
      <view class="weekday" wx:for="{{weekdays}}" wx:key="*this">{{item}}</view>
    </view>
    <!-- 日期格子 -->
    <view class="date-rows">
      <view class="date-row" wx:for="{{datelist}}" wx:for-item="row" wx:key="index">
        <view class="date-cell {{item.currentmonth ? '' : 'other-month'}} {{item.istoday ? 'today' : ''}} {{item.selected ? 'selected' : ''}}" wx:for="{{row}}" wx:key="date" bindtap="selectdate" data-date="{{item.date}}">
          {{item.day}}
        </view>
      </view>
    </view>
  </view>
编写calendar.wxss样式
/* calendar.wxss */
page {
  height: 100vh;
  display: flex;
  flex-direction: column;
  background-color: #f5f5f5;
}
.calendar {
  background: #f5f5f5;
  border-radius: 10rpx;
  padding: 20rpx;
}
.calendar-header {
  display: flex;
  align-items: center;
  justify-content: space-between;
  padding: 20rpx 0;
}
.date-title {
  font-size: 32rpx;
  font-weight: bold;
}
.arrow {
  padding: 10rpx 20rpx;
  color: #666;
}
.weekday-row {
  display: flex;
  border-bottom: 1rpx solid #eee;
  padding-bottom: 10rpx;
  margin-bottom: 10rpx;
}
.weekday {
  flex: 1;
  text-align: center;
  font-size: 28rpx;
  color: #666;
}
.date-rows {
  display: flex;
  flex-direction: column;
}
.date-row {
  display: flex;
  margin: 5rpx 0;
}
.date-cell {
  flex: 1;
  text-align: center;
  padding: 15rpx 0;
  font-size: 28rpx;
  position: relative;
  height: 65rpx;
  line-height: 65rpx;
  margin: 5rpx;
}
.selected {
  background: #e6142c;
  color: #fff !important;
  /* 确保选中时文字颜色为白色 */
  border-radius: 50%;
}
/* 确保今天的样式和选中样式可以共存 */
.today {
  color: #e6142c;
  font-weight: bold;
}
.today.selected {
  color: #fff !important;
  background: #e6142c;
}
/* 其他月份日期的样式 */
.other-month {
  color: #ccc;
}
.other-month.selected {
  background: #1aad19;
  color: #fff !important;
}
编写calendar.js具体逻辑实现
// calendar.js
page({
data: {
year: 2024,
month: 1,
day: 1,
weekdays: ['日', '一', '二', '三', '四', '五', '六'],
datelist: [],
selecteddate: null,
datestr: '',
},
onload() {
// 初始化当前日期
const now = new date()
this.setdata({
year: now.getfullyear(),
month: now.getmonth() + 1,
selecteddate: now // 设置当前日期为选中状态
}, () => {
this.generatedatelist()
})
wx.showtoast({
title: this.data.selecteddate.tolocaledatestring(),
icon:"none"
})
},
// 生成日历数据
generatedatelist() {
const {
year,
month
} = this.data
const datelist = []
// 获取当月第一天和最后一天
const firstday = new date(year, month - 1, 1)
const lastday = new date(year, month, 0)
// 获取当月第一天是星期几
const firstdayweek = firstday.getday()
// 获取上个月的最后几天
const prevmonthlastday = new date(year, month - 1, 0).getdate()
// 当前日期
const today = new date()
const currentdatestr = today.todatestring()
// 填充上个月的日期
let row = []
for (let i = 0; i < firstdayweek; i++) {
const day = prevmonthlastday - firstdayweek + i + 1
const date = new date(year, month - 2, day)
row.push({
day,
date: date,
currentmonth: false,
istoday: date.todatestring() === currentdatestr,
selected: this.data.selecteddate && date.todatestring() === this.data.selecteddate.todatestring()
})
}
// 填充当月日期
for (let day = 1; day <= lastday.getdate(); day++) {
const date = new date(year, month - 1, day)
row.push({
day,
date: date,
currentmonth: true,
istoday: date.todatestring() === currentdatestr,
selected: this.data.selecteddate && date.todatestring() === this.data.selecteddate.todatestring()
})
if (row.length === 7) {
datelist.push(row)
row = []
}
}
// 填充下个月的日期
let nextmonthday = 1
while (row.length < 7) {
const date = new date(year, month, nextmonthday)
row.push({
day: nextmonthday++,
date: date,
currentmonth: false,
istoday: date.todatestring() === currentdatestr,
selected: this.data.selecteddate && date.todatestring() === this.data.selecteddate.todatestring()
})
}
datelist.push(row)
this.setdata({
datelist
})
},
// 选择日期
selectdate(e) {
const selecteddate = new date(e.currenttarget.dataset.date)
this.setdata({
selecteddate: selecteddate
}, () => {
this.generatedatelist()
//格式化日期
const date = new date(selecteddate.tolocaledatestring())
wx.showtoast({
title: selecteddate.tolocaledatestring(),
icon:"none"
})
})
},
// 生成日历数据
generatedatelist() {
const {
year,
month
} = this.data
const datelist = []
// 获取当月第一天和最后一天
const firstday = new date(year, month - 1, 1)
const lastday = new date(year, month, 0)
// 获取当月第一天是星期几
const firstdayweek = firstday.getday()
// 获取上个月的最后几天
const prevmonthlastday = new date(year, month - 1, 0).getdate()
// 当前日期
const today = new date()
const currentdatestr = today.todatestring()
// 选中的日期字符串(用于比较)
const selecteddatestr = this.data.selecteddate ? this.data.selecteddate.todatestring() : ''
// 填充上个月的日期
let row = []
for (let i = 0; i < firstdayweek; i++) {
const day = prevmonthlastday - firstdayweek + i + 1
const date = new date(year, month - 2, day)
const datestr = date.todatestring()
row.push({
day,
date: datestr,
currentmonth: false,
istoday: datestr === currentdatestr,
selected: selecteddatestr && datestr === selecteddatestr
})
}
// 填充当月日期
for (let day = 1; day <= lastday.getdate(); day++) {
const date = new date(year, month - 1, day)
const datestr = date.todatestring()
row.push({
day,
date: datestr,
currentmonth: true,
istoday: datestr === currentdatestr,
selected: selecteddatestr && datestr === selecteddatestr
})
if (row.length === 7) {
datelist.push(row)
row = []
}
}
// 填充下个月的日期
let nextmonthday = 1
while (row.length < 7) {
const date = new date(year, month, nextmonthday)
const datestr = date.todatestring()
row.push({
day: nextmonthday++,
date: datestr,
currentmonth: false,
istoday: datestr === currentdatestr,
selected: selecteddatestr && datestr === selecteddatestr
})
}
if (row.length > 0) {
datelist.push(row)
}
this.setdata({
datelist
})
},
// 上个月
prevmonth() {
let {
year,
month
} = this.data
if (month === 1) {
year--
month = 12
} else {
month--
}
this.setdata({
year,
month
}, () => {
this.generatedatelist()
})
},
// 下个月
nextmonth() {
let {
year,
month
} = this.data
if (month === 12) {
year++
month = 1
} else {
month++
}
this.setdata({
year,
month
}, () => {
this.generatedatelist()
})
}
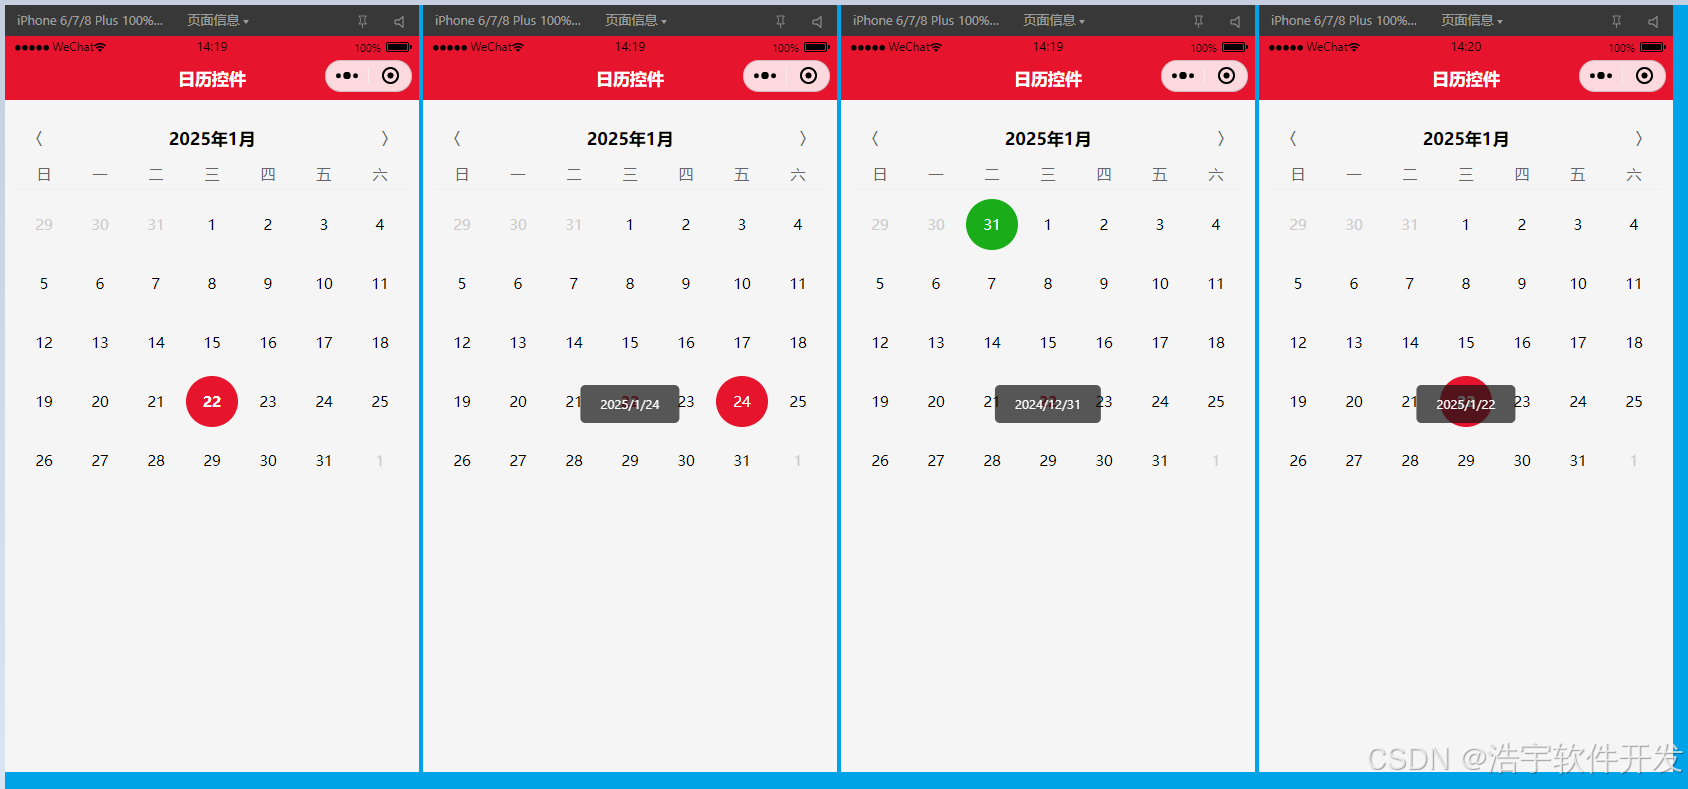
});3. 实现效果图
4. 关于作者其它项目视频教程介绍
android新闻资讯app实战:https://www.bilibili.com/video/bv1ca1vyoead/?vd_source=984bb03f768809c7d33f20179343d8c8
androidstudio开发购物商城实战:https://www.bilibili.com/video/bv1pjhfexe8u/?vd_source=984bb03f768809c7d33f20179343d8c8
android开发备忘录记事本实战:https://www.bilibili.com/video/bv1fj4m1u76g?vd_source=984bb03f768809c7d33f20179343d8c8&spm_id_from=333.788.videopod.sections
androidstudio底部导航栏实现:https://www.bilibili.com/video/bv1xb4y1d7et/?spm_id_from=333.337.search-card.all.click&vd_source=984bb03f768809c7d33f20179343d8c8
android使用tablayout+viewpager2实现左右滑动切换:https://www.bilibili.com/video/bv1mz4y1c7ex/?spm_id_from=333.337.search-card.all.click&vd_source=984bb03f768809c7d33f20179343d8c8
为什么要封装baseactivity?: https://www.bilibili.com/video/bv11s411a7r5/?vd_source=984bb03f768809c7d33f20179343d8c8
为什么要封装basefragment?:https://www.bilibili.com/video/bv1um421g7yc/?vd_source=984bb03f768809c7d33f20179343d8c8
到此这篇关于微信小程序实现自定义日历功能的文章就介绍到这了,更多相关微信小程序自定义日历内容请搜索代码网以前的文章或继续浏览下面的相关文章希望大家以后多多支持代码网!


发表评论