0、测试接口
写两个测试接口,一个get,一个post
@restcontroller
@requestmapping("/svc1")
public class controller {

    @getmapping("/t1")
    public string doget(@requestparam(required = false) string name) {
        return "test" + name;
    }

    @postmapping("/t2")
    public resultvo dopost(@requestbody requestbodydto dto, @requestparam string key) {
        return new resultvo(200, "操作成功", dto.getname() + dto.getchoose() + key);
    }
}
1、jdk的httpurlconnection
原生版,主要依靠jdk的 java.net包,get请求:
import java.net.httpurlconnection;
import java.io.bufferedreader;
import java.io.ioexception;
import java.io.inputstreamreader;
import java.net.url;

@slf4j
public class testdemo {

    public static void main(string[] args) {
        bufferedreader reader = null;
        try {
            // 创建url对象
            url url = new url("http://localhost:8080/svc1/t1");
            // 打开连接
            httpurlconnection connection = (httpurlconnection) url.openconnection();
            connection.setrequestmethod("get");
            // 读取响应
            reader = new bufferedreader(new inputstreamreader(connection.getinputstream()));
            // 处理响应
            string inputline;
            stringbuilder response = new stringbuilder();
            while ((inputline = reader.readline()) != null) {
                response.append(inputline);
            }
            system.out.println(response);

        } catch (exception e) {
            log.error("调用失败");
            e.printstacktrace();
        } finally {
            if (reader != null) {
                try {
                    reader.close();
                } catch (ioexception e) {
                    e.printstacktrace();
                }
            }
        }

    }
}
url类是jdk java.net包下的一个类,表示一个统一资源标识符(uniform resource identifier)引用
post请求:
import java.io.*;
import java.net.httpurlconnection;
import java.net.url;
import java.nio.charset.standardcharsets;
import com.alibaba.fastjson.json;

@slf4j
public class testdemo {

    public static void main(string[] args) {

        try {
            // 创建url对象
            url url = new url("http://localhost:8080/svc1/t2?key=abc");
            // 打开连接
            httpurlconnection connection = (httpurlconnection) url.openconnection();
            connection.setrequestmethod("post");
            // 设置请求头与数据格式
            connection.setrequestproperty("content-type", "application/json; utf-8");
            connection.setrequestproperty("accept", "application/json");
            // 允许向服务器写入数据
            connection.setdooutput(true);
            requestbodydto dto = new requestbodydto("tom", "a");
            string json = json.tojsonstring(dto);
            // 写入json到请求体
            try (outputstream os = connection.getoutputstream()) {
                bufferedoutputstream bos = new bufferedoutputstream(os);
                bos.write(json.getbytes(standardcharsets.utf_8));
                bos.flush();
            }

            // 读取响应
            try (bufferedreader br = new bufferedreader(new inputstreamreader(connection.getinputstream(), "utf-8"))) {
                stringbuilder response = new stringbuilder();
                string responseline;
                while ((responseline = br.readline()) != null) {
                    response.append(responseline.trim());
                }
                system.out.println("response: " + response.tostring());
            }

        } catch (exception e) {
            e.printstacktrace();
        }


    }
}

2、apache的httpclient
后续这些方式,本质上就是对java.net包的一个封装了。先引入apache做http请求的依赖坐标:
<dependency>
    <groupid>org.apache.httpcomponents</groupid>
    <artifactid>httpclient</artifactid>
    <version>4.5.13</version>
</dependency>
<dependency>
    <groupid>org.apache.httpcomponents</groupid>
    <artifactid>httpcore</artifactid>
    <version>4.4.16</version>
</dependency>
public class testdemo {
public static void main(string[] args) {
try (closeablehttpclient httpclient = httpclients.createdefault()) {
// 创建post请求对象
httppost httppost = new httppost("http://localhost:8080/svc1/t2?key=abc");
// 设置请求头
httppost.setheader("content-type", "application/json; utf-8");
httppost.setheader("accept", "application/json");
// 设置请求体
requestbodydto dto = new requestbodydto("tom", "a");
string json = json.tojsonstring(dto);
stringentity entity = new stringentity(json);
httppost.setentity(entity);
// 执行请求并获取响应
closeablehttpresponse response = httpclient.execute(httppost);
httpentity responseentity = response.getentity();
// 处理响应
if (null != responseentity) {
string responsestr = entityutils.tostring(responseentity);
system.out.println(responsestr);
// 也可按需把json串反序列化成java对象,略
}
} catch (ioexception e) {
e.printstacktrace();
}
}
}
3、springboot的resttemplate
使用springboot封装的resttemplate,依赖写web的:
<dependency>
    <groupid>org.springframework.boot</groupid>
    <artifactid>spring-boot-starter-web</artifactid>
</dependency>
把resttemplate的bean放到ioc容器中:
@configuration
public class resttemplateconfig {

    @bean
    public resttemplate resttemplate() {
        return new resttemplate();
    }
}
3.1 get
发送get请求,常用方法:
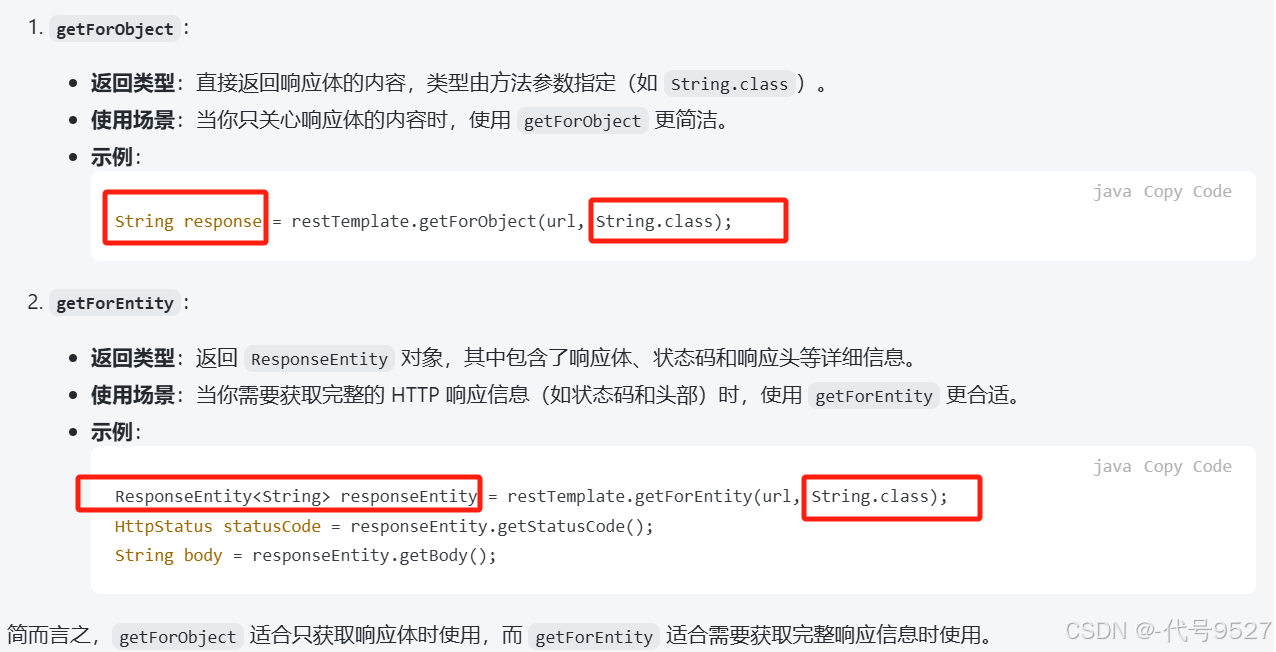
- getforobject
- getforentity
/**
* url为请求的地址
* responsetype为请求响应body的类型
* urlvariables为url中的参数绑定
*
*/
getforentity(stringurl,class responsetype,object…urlvariables)

/**
* uri对象来替代之前getforentity的url和urlvariables参数来指定访问地址和参数绑定
* uri是jdk java.net包下的一个类
*
*/
getforentity(uri url,class responsetype)
示例:
@springboottest
class learningapplicationtests {

    @resource
    private resttemplate resttemplate;

    @test
    void contextloads() {
        string url = "http://localhost:8080/svc1/t1?name={name}";
        // 参数
        map<string, string> parammap = new hashmap<>();
        parammap.put("name", "tom");
        responseentity<string> responseentity = resttemplate.getforentity(url, string.class, parammap);
        // 状态码
        httpstatus statuscode = responseentity.getstatuscode();
        // 响应
        string body = responseentity.getbody();
        system.out.println(statuscode + body);

    }
}
接口路径不用字符串,改为uri对象:
@test
 void testtemplate() {
     string url = "http://localhost:8080/svc1/t1";
     string name = "tom";
     // 使用 uricomponentsbuilder 构建 url
     uri uri = uricomponentsbuilder.fromhttpurl(url)
             .queryparam("name", name)
             .build()
             .touri();
     responseentity<string> responseentity = resttemplate.getforentity(uri, string.class);
     // 状态码
     httpstatus statuscode = responseentity.getstatuscode();
     // 响应
     string body = responseentity.getbody();
     system.out.println(statuscode + body);

 }
最后,getforobject:
getforobject(string url,class responsetype,object...urlvariables)
getforobject(string url,class responsetype,map urlvariables)
getforobject(uri url,class responsetype)
和getforentity的区别是,getforobject只有一个响应的内容,响应码、响应头等没有
3.2 post
常用方法:
- postforentity
- postforobject
- postforlocation
以postforentity为例,其参数可选:(重载)
postforentity(string url,object request,class responsetype,object...  urivariables)
postforentity(string url,object request,class responsetype,map  urivariables)
postforentity(uri url,object request,class responsetype)
示例:
 @test
void testtemplate2() {
    string url = "http://localhost:8080/svc1/t2?key=tom";
    resttemplate resttemplate = new resttemplate();
    // 请求头
    httpheaders headers = new httpheaders();
    headers.add(httpheaders.authorization, "bear xx");
    // headers.set("content-type", "application/x-www-form-urlencoded");
    headers.add(httpheaders.content_type, "application/json");
    // 创建请求体对象并放入数据
    httpentity<requestbodydto> requestdata = new httpentity<>(new requestbodydto("tom", "a"), headers);
    // 和postforentity一个意思
    responseentity<string> responseentity = resttemplate.exchange(
            url,
            httpmethod.post,
            requestdata,
            string.class
    );
    // 获取响应状态码和响应体
    httpstatus statuscode = responseentity.getstatuscode();
    string responsebody = responseentity.getbody();
    system.out.println(statuscode + " " + responsebody);
}
4、springcloud的feign
上面的resttemplate,在调三方接口时挺好用的,但微服务架构下,各个微服务之间调用时,url就不好写,由此,用feign:一个声明式的http客户端
核心思路是声明出:
- 你调谁
- 用什么方式
- 请求参数是啥
- 返回类型是啥
引入依赖:
<dependency>
	<groupid>org.springframework.cloud</groupid>
	<artifactid>spring-cloud-starter-openfeign</artifactid>
</dependency>
启动类上加上@enablefeignclients
//在order的启动类中开启feign
@enablefeignclients
@mapperscan("com.llg.order.mapper")
@springbootapplication
public class orderapplication{

	public static void main(string[] args){
		springapplication.run(orderapplication.class,args);
	}
}- 以order服务调用user服务为例,编写调用方:
// 远程调用userservice服务
@feignclient("userservice")
public interface userclient {
	@getmapping("/user/{id}")
	user findbyid(@pathvariable("id") long id);
	// 后续接口自行添加
}


!!findbyid这个方法名随便起
!!调用的接口路径、调用的服务名、请求参数、返回类型声明正确就行
主要是基于springmvc的注解来声明远程调用的信息,比如:
➢服务名称:userservice
➢请求方式:get
➢请求路径:/user/{id}
➢请求参数:long id
➢返回值类型:user
- 注入上面定义的feignclient类,也就是userclient,直接调用声明的那个方法
@autowired
private userclient userclient;

public order queryorderbyid(long orderid){
	//查询订单
	order order = ordermapper.findbyid(orderid);
	//利用feign发起http请求,查用户
	user user = userclient.findbyid(order.getuserid());
	//封装,对象的某个属性也是个对象,即引用类型
	order.setuser(user);
	return order;
} - 被调用方有多个实例时,负载均衡也不用考虑,feign用了ribbon做负载均衡
- 关于feign请求头的添加,可重写requestinterceptor的apply方法:
@configuration
public class feignconfig implements requestinterceptor {
    @override
    public void apply(requesttemplate requesttemplate) {
        //添加token
        requesttemplate.header("token", "eyj0exaioijkv1qilcjhbgcioijiuzuxmij9.eyj4zgfwyxbwawqioiizndgxmju4odk2oti2oty1nzyilcjlehaioje2njeymjy5mdgsimlhdci6mty2mtixotcwocwiegrhchrlbmfudglkijoimzawotgxnja1mte0mduynja5iiwiegrhchvzzxjpzci6ijewmdm0nzy2mzu4mzm1otc5ntiwmcj9.fzao4kjsv2rsh0rbil1zghdko8npmu_9ufo6wex_ti2q9gsilp7xaw7u9cu7ueweoax4dtdpbfmmpvlutcj_sq");
    }
}
- 要做降级逻辑的话:如下,调用消息中心服务
// @feignclient的fallbackfactory指定下降级逻辑的类
@component
@feignclient(contextid = "remotemessageservice", value = servicenameconstants.message_service, fallbackfactory = remotemessagefallbackfactory.class)
public interface remotemessageservice {

    /**
     * 发送定时消息任务:每分钟扫描发送消息
     *
     * @return 结果
     */
    @getmapping("/inner/message/sendtimingmessage")
    public r<void> sendtimingmessage();

    /**
     * 发送系统消息
     *
     * @return 结果
     */
    @postmapping("/inner/message/sendsystemmessage")
    public r<void> sendsystemmessage(@requestbody messagesendsystemdto messagesendsystemdto);
}
// 降级逻辑
@component
public class remotemessagefallbackfactory implements fallbackfactory<remotemessageservice>{
    private static final logger log = loggerfactory.getlogger(remotemessagefallbackfactory.class);

    @override
    public remotemessageservice create(throwable throwable) {
        throwable.printstacktrace();
        log.error("消息服务调用失败:{}", throwable.getmessage());
        return new remotemessageservice() {
            @override
            public r<void> sendtimingmessage() {
                return r.fail("调用发送定时消息接口失败:" + throwable.getmessage());
            }

            @override
            public r<void> sendsystemmessage(messagesendsystemdto messagesendsystemdto) {
                return r.fail("调用发送消息接口失败:" + throwable.getmessage());
            }

        };
    }
}
5、hutool的httputil
还是对 java.net的封装,引入依赖:
<dependency>
    <groupid>cn.hutool</groupid>
    <artifactid>hutool-all</artifactid>
    <version>5.8.16</version> <!-- 请检查最新版本 -->
</dependency>
处理get和post:
/**
 * @param url           baseurl
 * @param requestmethod 请求方式
 * @param headermap     请求头参数key-value
 * @param parammap      路径参数key-value,形如?name=tom&country=chain
 * @param bodyjsonstr   post的body传参,json字符串
 * @return 响应体
 */
public static string sendrequest(string url, method requestmethod, map<string, string> headermap, map<string, object> parammap, string bodyjsonstr) {
    // 路径参数不为空时,拼接url
    if (parammap != null) {
        urlbuilder urlbuilder = urlbuilder.of(url);
        parammap.foreach((k, v) -> urlbuilder.addquery(k, v));
        url = urlbuilder.tostring();
    }
    //发送请求
    httpresponse httpresponse = httputil.createrequest(requestmethod, url)
            .addheaders(headermap)
            .body(bodyjsonstr)
            .execute();

    return httpresponse.body();

}
测试下:
@test
void testhutool() {
    string url = "http://localhost:8080/svc1/t1";
    map<string, object> parammap = new hashmap<>();
    parammap.put("name", "tom");
    map<string, string> headermap = new hashmap<>();
    headermap.put("authorization", "bear xx");
    string response = sendrequest(url, method.get, headermap, parammap, null);
    system.out.println(response);
}

@test
void testhutool2() {
    string url = "http://localhost:8080/svc1/t2";
    map<string, object> parammap = new hashmap<>();
    parammap.put("key", "tom");
    map<string, string> headermap = new hashmap<>();
    headermap.put("authorization", "bear xx");
    requestbodydto dto = new requestbodydto("tom", "a");
    string bodyjsonstr = json.tojsonstring(dto);
    string response = sendrequest(url, method.post, headermap, parammap, bodyjsonstr);
    system.out.println(response);
}
6、失败后重试
考虑到远程调用可能失败,失败后重试三次,以上面的hutool为例来实现,其余的都一样,主要还是一个是否成功标记位 + 一个计数,successflag不用voilate,并发安全也不用考虑,线程内部调用的,用到的数存栈里了都。
/**
  * @param url           baseurl
  * @param requestmethod 请求方式
  * @param headermap     请求头参数key-value
  * @param parammap      路径参数key-value,形如?name=tom&country=chain
  * @param bodyjsonstr   post的body传参,json字符串
  * @return 响应体
  */
 public static string sendrequest(string url, method requestmethod, map<string, string> headermap, map<string, object> parammap, string bodyjsonstr) {
     // 是否成功标记位
     boolean successflag = false;
     // 重试次数累计
     int retrycount = 1;
     httpresponse httpresponse = null;
     while (!successflag && retrycount <= 3) {
         try {
             // 路径参数不为空时,拼接url
             if (parammap != null) {
                 urlbuilder urlbuilder = urlbuilder.of(url);
                 parammap.foreach((k, v) -> urlbuilder.addquery(k, v));
                 url = urlbuilder.tostring();
             }
             // 发送请求
             httpresponse = httputil.createrequest(requestmethod, url)
                     .addheaders(headermap)
                     .body(bodyjsonstr)
                     .execute();
             if (httpresponse.getstatus() != 200) {
                 retrycount++;
             } else {
                 successflag = true;
             }
         } catch (exception e) {
             e.printstacktrace();
             retrycount++;
         }
     }

     return httpresponse == null ? null : httpresponse.body();

 }
总结
到此这篇关于java中调用第三方接口的文章就介绍到这了,更多相关java调用第三方接口内容请搜索代码网以前的文章或继续浏览下面的相关文章希望大家以后多多支持代码网!


发表评论