python网络自动化运维华为设备
本文将讲述使用python实现华为设备的网络自动化运维。
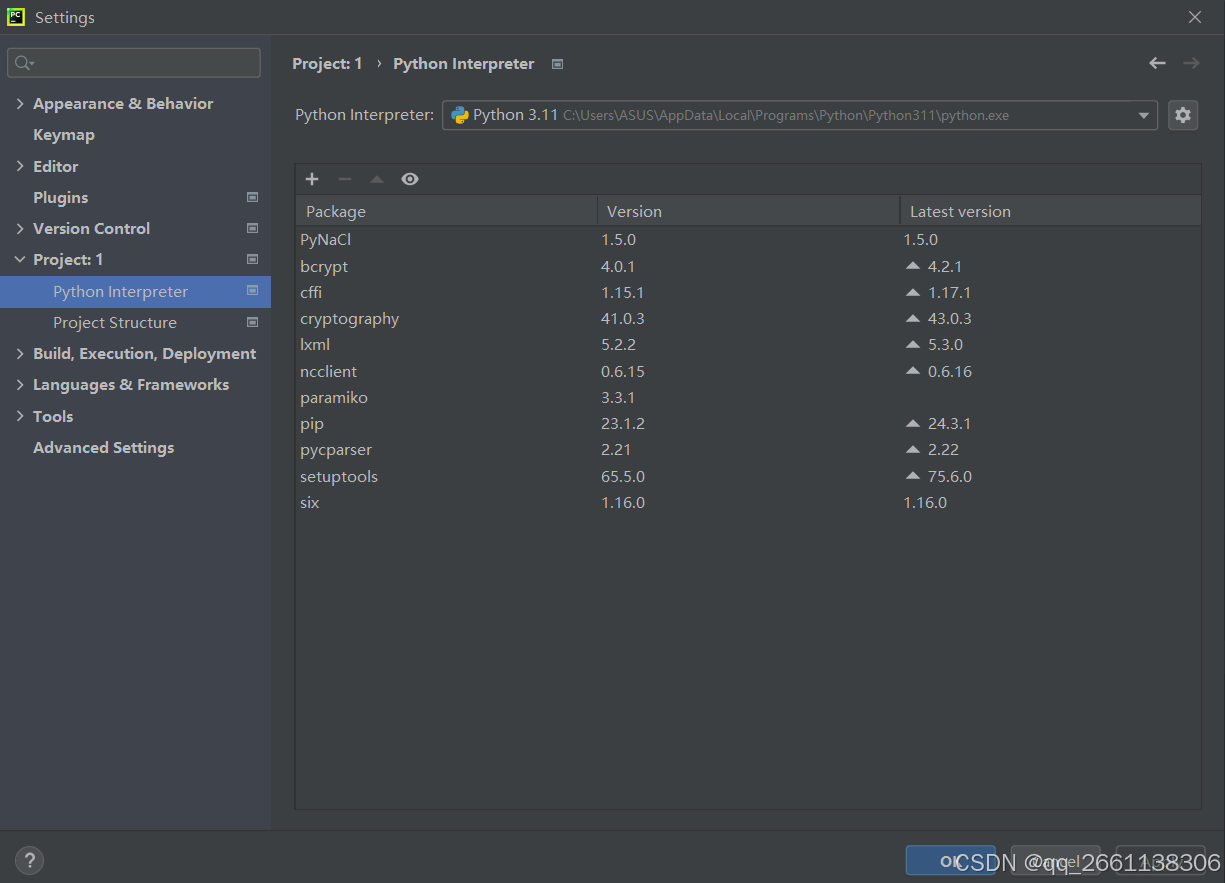
本次运维是基于python 3.11环境,需要提前安装paramiko和ncclient第三方库。
使用ensp仿真模拟器来模拟真实环境的拓扑图
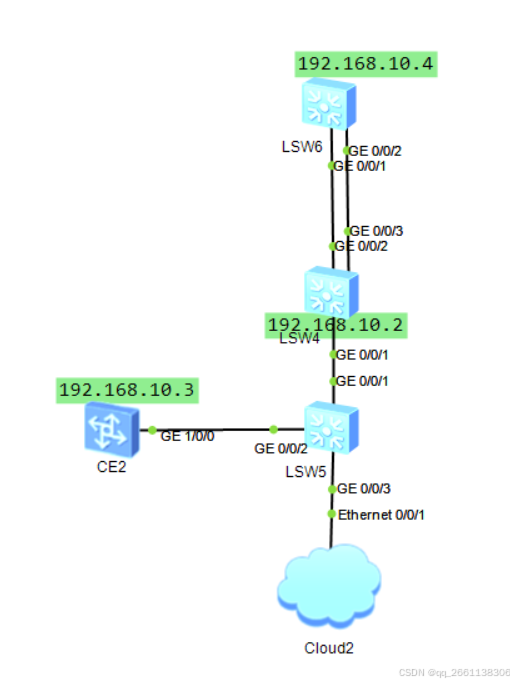
首先需要保证宿主机与模拟器内的网络互通
我这里使用了192.168.10.0/24的本地适配器作为桥接网卡
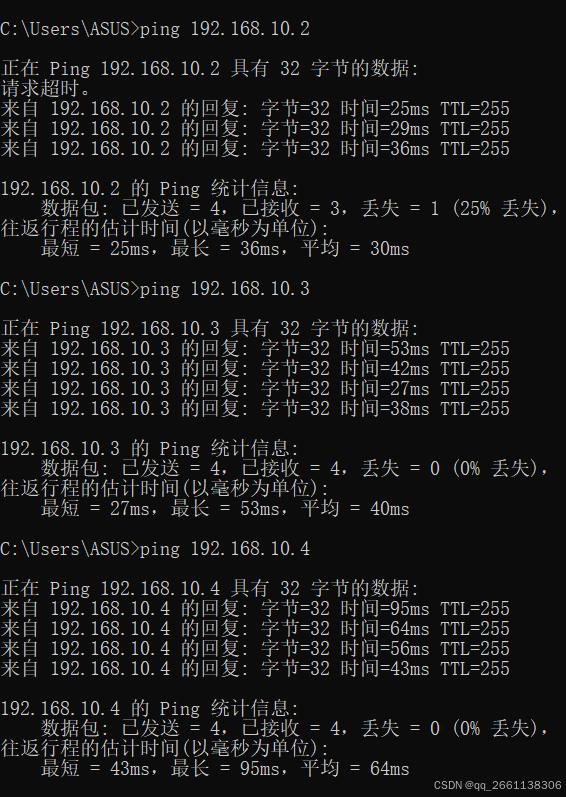
测试互通性效果如下:
接下来配置登录lsw4交换机设备的本地账户
int vlan 1
ip add 192.168.10.2 24    //配置vlanif 1的地址用来连接设备
user-interface vty 0 4
authentication-mode aaa    //将虚拟远程登录的模式设置为aaa认证
protocol inbound ssh        //使能ssh协议连接功能
user privilege level 15    //用户权限为15,这是最高权限
quit
stelnet server enable        //使能设备stelnet服务的功能
ssh user test                //配置ssh用户test
ssh user test service-type stelnet     //将用户的服务类型改为stelnet
ssh user test authentication-type password    //将ssh用户test的登录模式改为密码模式
aaa                                            //进入aaa视图
local-user test password cipher  huawei@123    //配置test账户的密码
local-user test privilege level 15            //配置test账号的权限为15
local-user test service-type ssh             //配置ssh账户的权限为ssh
//以上是connect和command模块

sftp server enable                            //使能sftp服务
ssh user test service-type  all                 //开启test全部的服务
ssh user test sftp-directory flash:            //将用户test的sftp下载目录指定为flash:下
//以上是download模块
配置lsw6的聚合链路和ospf协议用以测试
int eth-tr 1
mode lacp
trunkport g0/0/1
trunkport g0/0/2
//配置聚合链路

int vlan 1
ip add 192.168.10.4 24
//使用该地址登录设备

ospf
area 0
net 0.0.0.0 0.0.0.0
//与lsw4建立ospf邻居关系
lsw4上也要进行相应ospf和聚合链路的配置
interface eth-trunk1
 mode lacp-static
#
interface gigabitethernet0/0/2
 eth-trunk 1
#
interface gigabitethernet0/0/3
 eth-trunk 1
//聚合链路

ospf 1
 area 0.0.0.0
  network 0.0.0.0 255.255.255.255
//配置ospf协议
接下来进行ce2设备的配置
该设备主要用来进行netconf的功能测试
int vlan 1
ip add 192.168.10.3 24
//配置登录地址

int g1/0/0
undo shut
//开启接口

stelnet server enable    //使能stelnet服务

user-interface vty 0 4
authentication-mode aaa
protocol inbound ssh
//将远程登录模式设置为aaa模式,开启ssh登录功能

aaa
 local-user netconf password cipher huawei@123
 local-user netconf service-type ssh
 local-user netconf level 3
//创建一个netconf账户,密码为huawei@123,服务类型为ssh,权限为3
#
ssh user netconf
ssh user netconf authentication-type password
ssh user netconf service-type snetconf
//将用户netconf的认证类型改为密码类型,服务类型改为snetconf
将
#
netconf
protocol inbound ssh port 830
//netconf的端口号为830,允许netconf通过830号端口连接
q
#
snetconf server enable
//使能snetconf服务
下载好第三方库
ncclient,paramiko
在pycharm环境内引入对应的库
import re,time,paramiko
from datetime import datetime
from config import parameter_dict,netconf1
from ncclient import manager
from ncclient.xml_ import to_ele
from threading import thread
创建一个类
里面定义并实现六个功能模块:
class sw:
    def __init__(self):    //初始化,建立起与设备的ssh连接。
        self.session = paramiko.sshclient()
        self.session.set_missing_host_key_policy(paramiko.autoaddpolicy())
        self.session.connect(hostname='192.168.10.2',password='huawei@123',username='test',port=22,allow_agent=false,look_for_keys=false)
        self.vty = self.session.invoke_shell()
        self.command('sc 0 te')
        print('连接成功')
    def command(self,command):    //向网络设备终端输入变量并输出回显,回显字符上限为999999,类型为utf-8
        self.vty.send(command+'\n')
        time.sleep(1)
        return self.vty.recv(999999).decode('utf-8')
    def parameter_info(self):    //定义监控数据参数方法,每个5分钟输出一次设备参数
        parameter_list = []
        while true:
            for i in parameter_dict.keys():
                pat = self.command(parameter_dict[i]['command'])
                print(pat)
                res = re.compile(parameter_dict[i]['re']).findall(pat)
                print(res)
                if i == 'fan': res = res if res else "all are fans faulty"
                parameter_list.append(f'{i}:{res}')
            print('\n'.join(parameter_list))
            time.sleep(60 * 5)
    def download(self):        //通过sftp功能下载flash:/vrpcfg.zip文件,并每隔一天保存在本地w:\\testpython文件夹内
        while true:
            with paramiko.transport(('192.168.10.2',22)) as t:
                t.connect(username='test',password='huawei@123')
                sftp = paramiko.sftpclient.from_transport(t)
                sftp.get('/vrpcfg.zip',f'w:\\testpython\\{datetime.now().strftime("%y_%m_%d_%h_%m_%s")}.zip')
            print('下载成功')
            time.sleep(60 * 60 * 24)
    def netconf(self,xml):        //最后配置日志文件地址为10.1.60.2
        manager.connect(host='192.168.10.3',port=22,username='netconf',password="huawei@123",allow_agent=false,hostkey_verify=false,device_params={"name":"huawei"}).rpc(to_ele(xml))
        print("设置成功")
    def start(self):            //定义多进程模块
        thread(target=self.download).start()
        thread(target=self.parameter_info).start()
if __name__ == "__main__":        //满足条件则运行该文件
    for i in netconf1.values():
        sw().start()
        sw().netconf(i)
需要配置一个名为config的xml文件
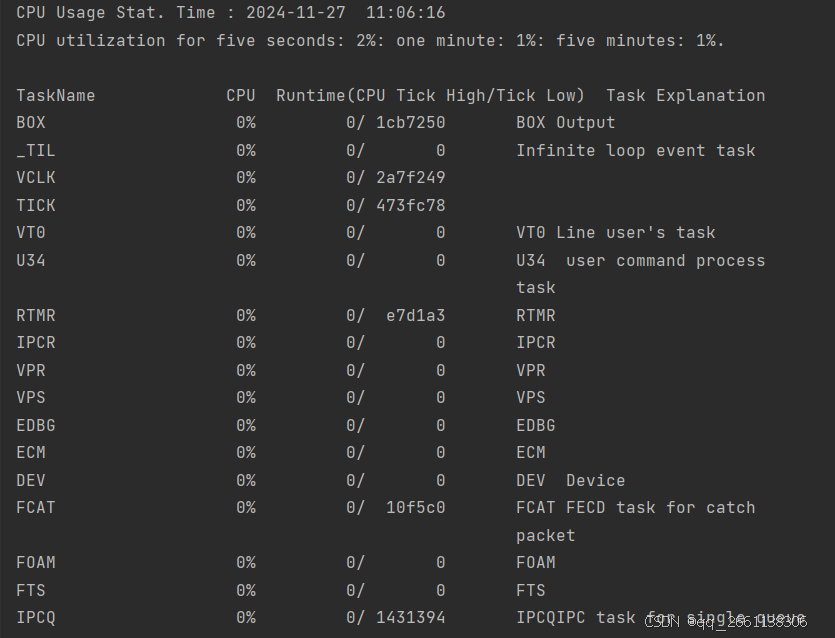
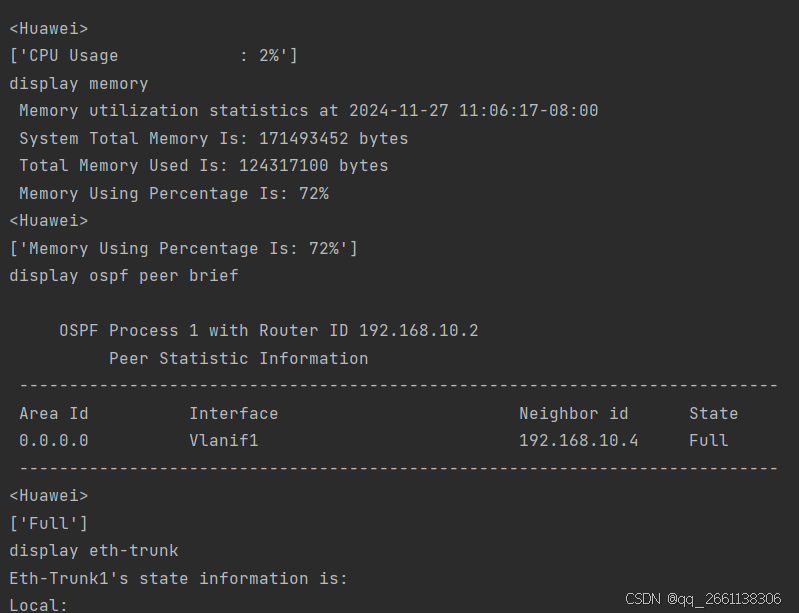
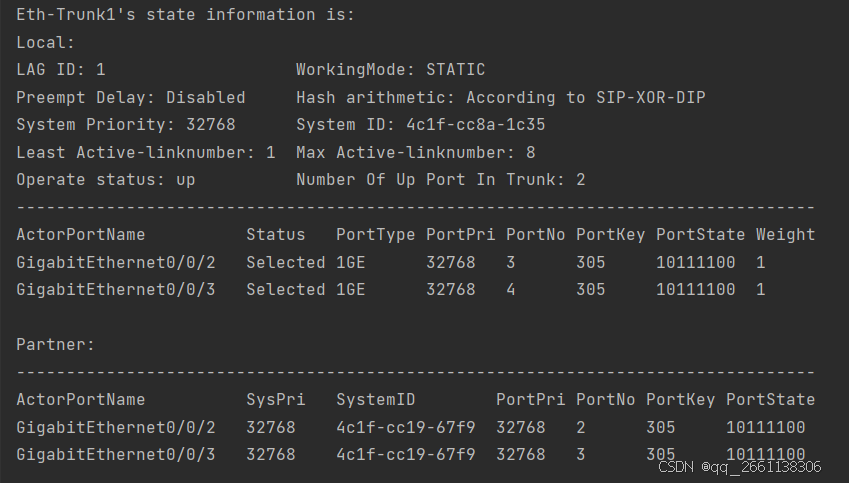
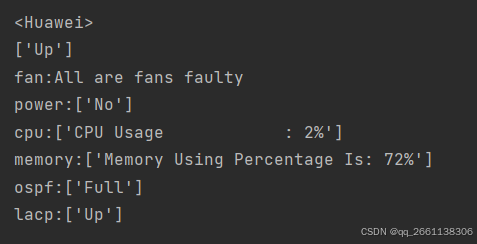
内容如下所示,运行后会查看该设备的风扇状态,电源状态,cpu利用率,内存使用率,ospf邻居状态,以及聚合链路状态。
parameter_dict = {
"fan" : {"command":"display fan","re":"normal"},
"power" : {"command":"display power","re":"supply|notsupply|sleep|no"},
"cpu" : {"command":"display cpu-usage","re":"cpu usage            : .+?%"},
"memory" : {"command":"display memory","re":"memory using percentage is: .+?%"},
"ospf" : {"command":"display ospf peer brief","re":"down|init|2-way|exstart|exchange|loading|full"},
"lacp" : {"command":"display eth-trunk","re":"up|down"}
}

netconf1 = {
    'host_log': '''
            <edit-config>
    <target>
      <running/>
    </target>
    <default-operation>merge</default-operation>
    <error-option>rollback-on-error</error-option>
    <config>
      <syslog xmlns="http://www.huawei.com/netconf/vrp" content-version="1.0" format-version="1.0">
        <syslogservers>
          <syslogserver operation="merge">
            <iptype>ipv4</iptype>
            <serverip>10.1.60.2</serverip>
            <isdefaultvpn>false</isdefaultvpn>
            <vrfname>_public_</vrfname>
            <timestamp>utc</timestamp>
            <transportmode>tcp</transportmode>
          </syslogserver>
        </syslogservers>
      </syslog>
    </config>
  </edit-config>
'''}
运行后就可以输出网络设备终端的回显内容了
以下是回显截图:
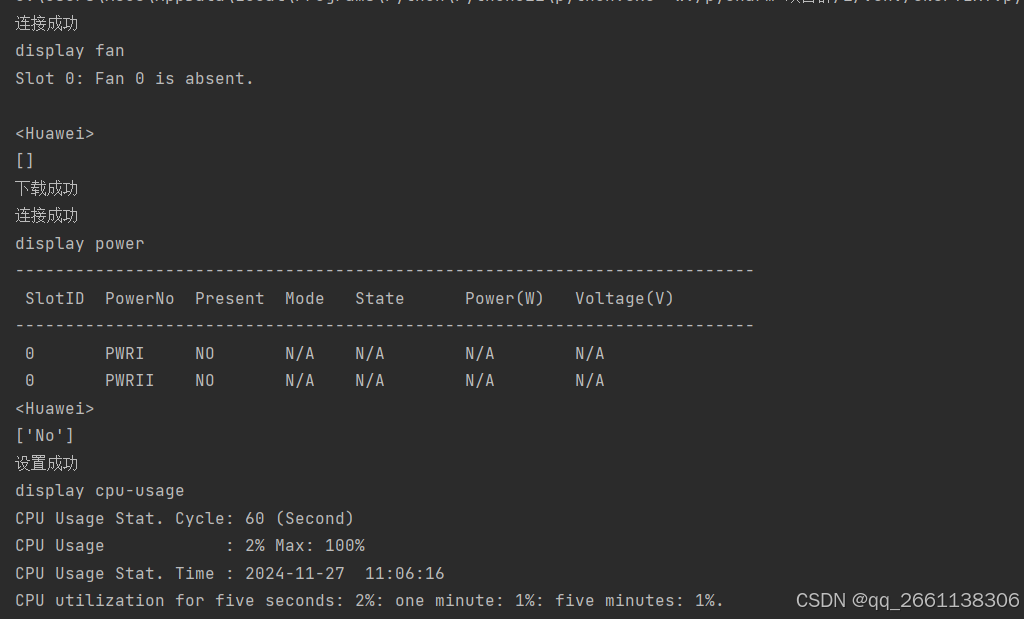
sftp本地下载设备状态到指定路径测试

总结
以上为个人经验,希望能给大家一个参考,也希望大家多多支持代码网。


发表评论