前言
在学习完javascript之后,我们就可以使用javascript来实现一下好玩的效果了,本篇文章讲解的是如何纯使用javascript来实现一个网页中的电子蜘蛛。
在开始学习如何编写一个网页蜘蛛之前,先让我们看一下这个电子蜘蛛长什么样:
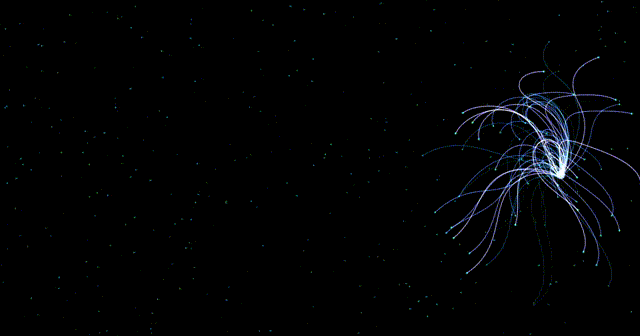
——我们可以看到,其会跟随着我们的鼠标进行移动,那么我们如何实现这样的效果呢?接下来让我们开始讲解。
html代码
我们的html代码十分的简单,就是创建一个画布,而我们接下来的操作,都是在此上边进行操作的:
<!doctype html>
<html lang="en">
<head>
    <meta charset="utf-8">
    <meta http-equiv="x-ua-compatible" content="ie=edge">
    <meta name="viewport" content="width=device-width, initial-scale=1.0">
    <title>秋刀鱼不做梦</title>
    <!-- 引入外部的javascript文件 -->
    <script src="./test.js"></script>
    <style>
        /* 移除body的默认外边距和内边距 */
        body {
            margin: 0px;
            padding: 0px;
            position: fixed;
            /* 设置网页背景颜色为黑色 */
            background: rgb(0, 0, 0);
        }
    </style>
</head>
<body>
    <!-- 创建一个画布用于图形绘制 -->
    <canvas id="canvas"></canvas>
</body>
</html>
可以看到我们的html代码非常的简单,接下来让我们开始在其上边进行操作!
javascript代码
在开始编写javascript代码之前,先让我们理清一下思路:
总体流程
- 页面加载时,
canvas元素和绘图上下文初始化。 - 定义触手对象,每条触手由多个段组成。
- 监听鼠标移动事件,实时更新鼠标的位置。
- 通过动画循环绘制触手,触手根据鼠标的位置动态变化,形成流畅的动画效果。
大致的流程就是上边的步骤,但是我相信读者在没用自己完成此代码的编写之前,可能不能理解上边的流程,不过没关系,现在让我们开始我们的网页小蜘蛛的编写:
写在前面:为了让读者可以更好的理解代码的逻辑,我们给没一句代码都加上了注释,希望读者可以根据注释的帮助一点一点的理解代码:
javascript代码:
// 定义requestanimframe函数
window.requestanimframe = function () {
    // 检查浏览器是否支持requestanimframe函数
    return (
        window.requestanimationframe ||
        window.webkitrequestanimationframe ||
        window.mozrequestanimationframe ||
        window.orequestanimationframe ||
        window.msrequestanimationframe ||
        // 如果所有这些选项都不可用,使用设置超时来调用回调函数
        function (callback) {
            window.settimeout(callback)
        }
    )
}
// 初始化函数,用于获取canvas元素并返回相关信息
function init(elemid) {
    // 获取canvas元素
    let canvas = document.getelementbyid(elemid)
    // 获取2d绘图上下文,这里d是小写的
    c = canvas.getcontext('2d')
    // 设置canvas的宽度为窗口内宽度,高度为窗口内高度
    w = (canvas.width = window.innerwidth)
    h = (canvas.height = window.innerheight)
    // 设置填充样式为半透明黑
    c.fillstyle = "rgba(30,30,30,1)"
    // 使用填充样式填充整个canvas
    c.fillrect(0, 0, w, h)
    // 返回绘图上下文和canvas元素
    return { c: c, canvas: canvas }
}
// 等待页面加载完成后执行函数
window.onload = function () {
    // 获取绘图上下文和canvas元素
    let c = init("canvas").c,
        canvas = init("canvas").canvas,
        // 设置canvas的宽度为窗口内宽度,高度为窗口内高度
        w = (canvas.width = window.innerwidth),
        h = (canvas.height = window.innerheight),
        // 初始化鼠标对象
        mouse = { x: false, y: false },
        last_mouse = {}
    // 定义计算两点距离的函数
    function dist(p1x, p1y, p2x, p2y) {
        return math.sqrt(math.pow(p2x - p1x, 2) + math.pow(p2y - p1y, 2))
    }
    // 定义 segment 类
    class segment {
        // 构造函数,用于初始化 segment 对象
        constructor(parent, l, a, first) {
            // 如果是第一条触手段,则位置坐标为触手顶部位置
            // 否则位置坐标为上一个segment对象的nextpos坐标
            this.first = first
            if (first) {
                this.pos = {
                    x: parent.x,
                    y: parent.y,
                }
            } else {
                this.pos = {
                    x: parent.nextpos.x,
                    y: parent.nextpos.y,
                }
            }
            // 设置segment的长度和角度
            this.l = l
            this.ang = a
            // 计算下一个segment的坐标位置
            this.nextpos = {
                x: this.pos.x + this.l * math.cos(this.ang),
                y: this.pos.y + this.l * math.sin(this.ang),
            }
        }
        // 更新segment位置的方法
        update(t) {
            // 计算segment与目标点的角度
            this.ang = math.atan2(t.y - this.pos.y, t.x - this.pos.x)
            // 根据目标点和角度更新位置坐标
            this.pos.x = t.x + this.l * math.cos(this.ang - math.pi)
            this.pos.y = t.y + this.l * math.sin(this.ang - math.pi)
            // 根据新的位置坐标更新nextpos坐标
            this.nextpos.x = this.pos.x + this.l * math.cos(this.ang)
            this.nextpos.y = this.pos.y + this.l * math.sin(this.ang)
        }
        // 将 segment 回执回初始位置的方法
        fallback(t) {
            // 将位置坐标设置为目标点坐标
            this.pos.x = t.x
            this.pos.y = t.y
            this.nextpos.x = this.pos.x + this.l * math.cos(this.ang)
            this.nextpos.y = this.pos.y + this.l * math.sin(this.ang)
        }
        show() {
            c.lineto(this.nextpos.x, this.nextpos.y)
        }
    }
    // 定义 tentacle 类
    class tentacle {
        // 构造函数,用于初始化 tentacle 对象
        constructor(x, y, l, n, a) {
            // 设置触手的顶部位置坐标
            this.x = x
            this.y = y
            // 设置触手的长度
            this.l = l
            // 设置触手的段数
            this.n = n
            // 初始化触手的目标点对象
            this.t = {}
            // 设置触手的随机移动参数
            this.rand = math.random()
            // 创建触手的第一条段
            this.segments = [new segment(this, this.l / this.n, 0, true)]
            // 创建其他的段
            for (let i = 1; i < this.n; i++) {
                this.segments.push(
                    new segment(this.segments[i - 1], this.l / this.n, 0, false)
                )
            }
        }
        // 移动触手到目标点的方法
        move(last_target, target) {
            // 计算触手顶部与目标点的角度
            this.angle = math.atan2(target.y - this.y, target.x - this.x)
            // 计算触手的距离参数
            this.dt = dist(last_target.x, last_target.y, target.x, target.y)
            // 计算触手的目标点坐标
            this.t = {
                x: target.x - 0.8 * this.dt * math.cos(this.angle),
                y: target.y - 0.8 * this.dt * math.sin(this.angle)
            }
            // 如果计算出了目标点,则更新最后一个segment对象的位置坐标
            // 否则,更新最后一个segment对象的位置坐标为目标点坐标
            if (this.t.x) {
                this.segments[this.n - 1].update(this.t)
            } else {
                this.segments[this.n - 1].update(target)
            }
            // 遍历所有segment对象,更新它们的位置坐标
            for (let i = this.n - 2; i >= 0; i--) {
                this.segments[i].update(this.segments[i + 1].pos)
            }
            if (
                dist(this.x, this.y, target.x, target.y) <=
                this.l + dist(last_target.x, last_target.y, target.x, target.y)
            ) {
                this.segments[0].fallback({ x: this.x, y: this.y })
                for (let i = 1; i < this.n; i++) {
                    this.segments[i].fallback(this.segments[i - 1].nextpos)
                }
            }
        }
        show(target) {
            // 如果触手与目标点的距离小于触手的长度,则回执触手
            if (dist(this.x, this.y, target.x, target.y) <= this.l) {
                // 设置全局合成操作为lighter
                c.globalcompositeoperation = "lighter"
                // 开始新路径
                c.beginpath()
                // 从触手起始位置开始绘制线条
                c.moveto(this.x, this.y)
                // 遍历所有的segment对象,并使用他们的show方法回执线条
                for (let i = 0; i < this.n; i++) {
                    this.segments[i].show()
                }
                // 设置线条样式
                c.strokestyle = "hsl(" + (this.rand * 60 + 180) +
                    ",100%," + (this.rand * 60 + 25) + "%)"
                // 设置线条宽度
                c.linewidth = this.rand * 2
                // 设置线条端点样式
                c.linecap = "round"
                // 设置线条连接处样式
                c.linejoin = "round"
                // 绘制线条
                c.stroke()
                // 设置全局合成操作为“source-over”
                c.globalcompositeoperation = "source-over"
            }
        }
        // 绘制触手的圆形头的方法
        show2(target) {
            // 开始新路径
            c.beginpath()
            // 如果触手与目标点的距离小于触手的长度,则回执白色的圆形
            // 否则绘制青色的圆形
            if (dist(this.x, this.y, target.x, target.y) <= this.l) {
                c.arc(this.x, this.y, 2 * this.rand + 1, 0, 2 * math.pi)
                c.fillstyle = "whith"
            } else {
                c.arc(this.x, this.y, this.rand * 2, 0, 2 * math.pi)
                c.fillstyle = "darkcyan"
            }
            // 填充圆形
            c.fill()
        }
    }
    // 初始化变量
    let maxl = 400,//触手的最大长度
        minl = 50,//触手的最小长度
        n = 30,//触手的段数
        numt = 600,//触手的数量
        tent = [],//触手的数组
        clicked = false,//鼠标是否被按下
        target = { x: 0, y: 0 }, //触手的目标点
        last_target = {},//上一个触手的目标点
        t = 0,//当前时间
        q = 10;//触手每次移动的步长
    // 创建触手对象
    for (let i = 0; i < numt; i++) {
        tent.push(
            new tentacle(
                math.random() * w,//触手的横坐标
                math.random() * h,//触手的纵坐标
                math.random() * (maxl - minl) + minl,//触手的长度
                n,//触手的段数
                math.random() * 2 * math.pi,//触手的角度
            )
        )
    }
    // 绘制图像的方法
    function draw() {
        // 如果鼠标移动,则计算触手的目标点与当前点的偏差
        if (mouse.x) {
            target.errx = mouse.x - target.x
            target.erry = mouse.y - target.y
        } else {
            // 否则,计算触手的目标点的横坐标
            target.errx =
                w / 2 +
                ((h / 2 - q) * math.sqrt(2) * math.cos(t)) /
                (math.pow(math.sin(t), 2) + 1) -
                target.x;
            target.erry =
                h / 2 +
                ((h / 2 - q) * math.sqrt(2) * math.cos(t) * math.sin(t)) /
                (math.pow(math.sin(t), 2) + 1) -
                target.y;
        }
        // 更新触手的目标点坐标
        target.x += target.errx / 10
        target.y += target.erry / 10
        // 更新时间
        t += 0.01;
        // 绘制触手的目标点
        c.beginpath();
        c.arc(
            target.x,
            target.y,
            dist(last_target.x, last_target.y, target.x, target.y) + 5,
            0,
            2 * math.pi
        );
        c.fillstyle = "hsl(210,100%,80%)"
        c.fill();
        // 绘制所有触手的中心点
        for (i = 0; i < numt; i++) {
            tent[i].move(last_target, target)
            tent[i].show2(target)
        }
        // 绘制所有触手
        for (i = 0; i < numt; i++) {
            tent[i].show(target)
        }
        // 更新上一个触手的目标点坐标
        last_target.x = target.x
        last_target.y = target.y
    }
    // 循环执行绘制动画的函数
    function loop() {
        // 使用requestanimframe函数循环执行
        window.requestanimframe(loop)
        // 清空canvas
        c.clearrect(0, 0, w, h)
        // 绘制动画
        draw()
    }
    // 监听窗口大小改变事件
    window.addeventlistener("resize", function () {
        // 重置canvas的大小
        w = canvas.width = window.innerwidth
        w = canvas.height = window.innerheight
        // 循环执行回执动画的函数
        loop()
    })
    // 循环执行回执动画的函数
    loop()
    // 使用setinterval函数循环
    setinterval(loop, 1000 / 60)
    // 监听鼠标移动事件
    canvas.addeventlistener("mousemove", function (e) {
        // 记录上一次的鼠标位置
        last_mouse.x = mouse.x
        last_mouse.y = mouse.y
        // 更新点前的鼠标位置
        mouse.x = e.pagex - this.offsetleft
        mouse.y = e.pagey - this.offsettop
    }, false)
    // 监听鼠标离开事件
    canvas.addeventlistener("mouseleave", function (e) {
        // 将mouse设为false
        mouse.x = false
        mouse.y = false
    })
}
这里我们在大致的梳理一下上述代码的流程:
初始化阶段
init函数:当页面加载时,init函数被调用,获取canvas元素并设置其宽高为窗口的大小。获取到的 2d 绘图上下文(context)用于后续绘制。window.onload:页面加载完成后,初始化canvas和context,并设置鼠标初始状态。
触手对象的定义
segment类:这是触手的一段,每个段有起始点(pos)、长度(l)、角度(ang),并通过角度计算出下一段的位置(nextpos)。tentacle类:代表完整的触手,由若干个segment组成。触手的起始点在屏幕中心,并且每个触手包含多个段。tentacle的主要方法有:move:根据鼠标位置更新每一段的位置。show:绘制触手的路径。
事件监听
canvas.addeventlistener("mousemove", ...):当鼠标移动时,捕捉鼠标的位置并存储在 mouse 变量中。每次鼠标移动会更新 mouse 和 last_mouse 的坐标,用于后续的动画。
动画循环
draw函数:这是一个递归的函数,用于创建动画效果。 首先,它会在每一帧中为画布填充半透明背景,使得之前绘制的内容逐渐消失,产生拖影效果。- 然后,遍历所有触手(
tentacles),调用它们的move和show方法,更新位置并绘制每一帧。 - 最后,使用
requestanimframe(draw)不断递归调用draw,形成一个动画循环。
触手的行为
- 触手的运动是通过
move函数实现的,触手的最后一个段首先更新位置,然后其他段依次跟随。 - 触手的绘制通过
show函数,遍历所有段并绘制线条,最后显示在屏幕上。
——这样我们就完成了电子小蜘蛛的制作了!!!
最后,在让我们看一下最终效果:
到此这篇关于javascript实现一个电子小蜘蛛的文章就介绍到这了,更多相关javascript电子蜘蛛内容请搜索代码网以前的文章或继续浏览下面的相关文章希望大家以后多多支持代码网!


发表评论