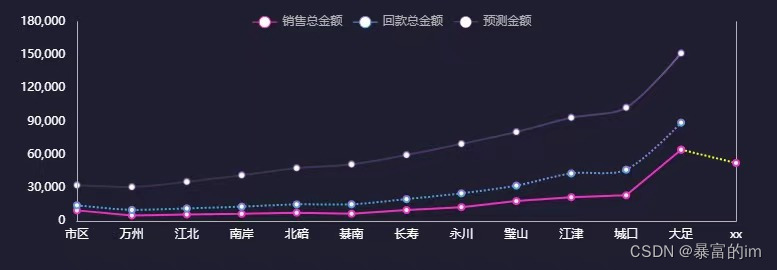
场景:
折线图一般都是实线为准,但是由于最后一个数据是预测。所以想要实现最后一段为虚线。
效果图:

具体实现:
series:[

        {
            name: "销售总金额",
            type: "line",
            smooth: true,
            barwidth: 10,
            stack: 'total',
            itemstyle: {
              normal: {
                color: "#f02fc2",
                linestyle: {
                  width: 2,
                  type: 'solid'  //'dotted'虚线 'solid'实线
                }
              },
              // 强调最后一个数据点的样式
            },
            data: [1213,232132,4324,2,23,42323,4234,4243223,424334,4324,423423,64456]

    ps:重点虚线的那一段的开头数据需要与实线的最后一个数据对应

          },
          {
            name: "销售总金额",
            type: "line",
            smooth: true,
            barwidth: 10,
            itemstyle: {
              normal: {
                color: "#f02fc2",
                // 最后一个点的边框颜色
                borderwidth: 2,
                linestyle: {
                  width: 2,
                  type: 'dotted',
                  color: "yellow"//'dotted'虚线 'solid'实线
                }
              }
            },
            data: ["-", "-", "-", "-", "-", "-", "-", "-", "-", "-", "-", 64456, 52435]
          },

]
同理:如果中间段的数据需要虚线也按这个方法即可。
数据处理:
let datavalue = [1, 2, 3, 4, 5, 6];
let datavalue1 = [ ...new array(datavalue.length - 1).fill('-'), datavalue[datavalue.length - 1]
多条线点重合的处理方法
防止多个点以及值为空的情况
 this.options = {
          tooltip: {
            trigger: "axis",
            backgroundcolor: "rgba(255,255,255,0.8)",
            formatter: function (params, ticket, callback) {
              var htmlstr = '';
              var valmap = {};
              for (var i = 0; i < params.length; i++) {
                var param = params[i];
                var xname = param.name;//x轴的名称
                var seriesname = param.seriesname;//图例名称
                var value = param.value;//y轴值
                var color = param.color;//图例颜色

                //过滤无效值
                if (value == '-') {
                  continue;
                }

                //过滤重叠值
                if (valmap[seriesname] == value) {
                  continue;
                }

                if (i === 0) {
                  htmlstr += xname + '<br/>';//x轴的名称
                }
                htmlstr += '<div>';
                //为了保证和原来的效果一样,这里自己实现了一个点的效果
                htmlstr += '<span style="margin-right:5px;display:inline-block;width:10px;height:10px;border-radius:5px;background-color:' + color + ';"></span>';

                //圆点后面显示的文本
                htmlstr += seriesname + ':' + value;

                htmlstr += '</div>';
                valmap[seriesname] = value;
              }
              return htmlstr;
            },
            axispointer: {
              type: "shadow",
              label: {
                show: true,
                backgroundcolor: "#7b7ddc"
              }
            }
          },
          legend: {
            data: ["销售总金额", "回款总金额"],
            textstyle: {
              color: "#b4b4b4"
            },
            top: "0%"
          },
          grid: {
            left: '0%',
            right: '3%',
            bottom: '8%',
            width: "96%",
            containlabel: true
          },
          xaxis: {
            data: this.cdata.category,
            axisline: {
              linestyle: {
                color: "#b4b4b4"
              }
            },
            type: 'category',
            boundarygap: true,
          },
          yaxis: [
            {
              splitline: { show: false },
              axisline: {
                linestyle: {
                  color: "#b4b4b4"
                }
              },

              axislabel: {
                formatter: "{value} "
              }
            },
            {
              splitline: { show: false },
              axisline: {
                linestyle: {
                  color: "#b4b4b4"
                }
              },
              axislabel: {
                formatter: "{value} "
              }
            }
          ],
          series: [
            {
              name: "销售总金额",
              type: "line",
              smooth: true,
              barwidth: 10,
              // stack: 'total',  这个不去掉会出现多个点
              itemstyle: {
                normal: {
                  color: "#f02fc2",
                  linestyle: {
                    width: 2,
                    type: 'solid'  //'dotted'虚线 'solid'实线
                  }
                },
                // 强调最后一个数据点的样式
              },
              data: this.cdata.ratedata
            },
            {
              name: "销售总金额",
              type: "line",
              smooth: true,
              barwidth: 10,
              itemstyle: {
                normal: {
                  color: "#f02fc2",
                  // 最后一个点的边框颜色
                  // borderwidth: 2,
                  linestyle: {
                    width: 2,
                    type: 'dotted',
                    // color: "yellow"//'dotted'虚线 'solid'实线
                  }
                }
              },
              data: this.cdata.mockratedata
            },
            {
              name: "回款总金额",
              type: "line",
              barwidth: 10,
              smooth: true,
              itemstyle: {
                normal: {
                  barborderradius: 5,
                  color: "#7e8be9",
                  linestyle: {
                    width: 2,
                    type: 'solid'  //'dotted'虚线 'solid'实线
                  }
                }
              },
              data: this.cdata.bardata  [1,2,3,4,'-']
            },
            {
              name: "回款总金额",
              type: "line",
              barwidth: 10,
              smooth: true,
              smooth: false,
              itemstyle: {
                normal: {
                  // barborderradius: 5,
                  color: "#7e8be9",
                  // color: "#7e8be9",
                  linestyle: {
                    width: 2,
                    type: 'dotted'  //'dotted'虚线 'solid'实线
                  }
                }
              },
              data: this.cdata.mockbardata  ['-','-','-',4,5]
            },
          ]
        }
总结
到此这篇关于echarts折线图实现部分虚线部分实线效果的文章就介绍到这了,更多相关echarts折线图部分虚线内容请搜索代码网以前的文章或继续浏览下面的相关文章希望大家以后多多支持代码网!


发表评论