下载minio
基于docker拉取minio镜像
docker pull minio/minio
创建minio容器
先创建/root/minio/data 和 /root/minio/conf
docker run -d -p 9000:9000 -p 9001:9001 --name minio \
-e "minio_root_user=htsdg" \
-e "minio_root_password=12345678" \
-v /root/minio/data:/data \
-v /root/minio/conf:/root/.minio \
minio/minio server --console-address ":9001" /data
解释:
9000为映射端口,9001为控制台访问的端口(端口号可以随意设置),控制台访问路径:
http://服务器ip地址:9001/login
接下来就是用户和密码,如何就是minio的数据和配置文件所挂载的目录(可以自己设置成/../....../data 和 /../....../conf)
具体使用
导入需要的依赖
        <dependency>
            <groupid>io.minio</groupid>
            <artifactid>minio</artifactid>
            <version>8.2.2</version>
        </dependency>
        <dependency>
            <groupid>javax.servlet</groupid>
            <artifactid>javax.servlet-api</artifactid>
            <version>3.1.0</version>
            <scope>provided</scope>
        </dependency>
在yml文件中配置:
minio:
  endpoint: http://********:9000 #minio服务所在地址
  accesskey: htsdg                #连接minio用户名
  secretkey: 12345678               #连接minio密码
  bucketname: bt01              #minio数据桶名称
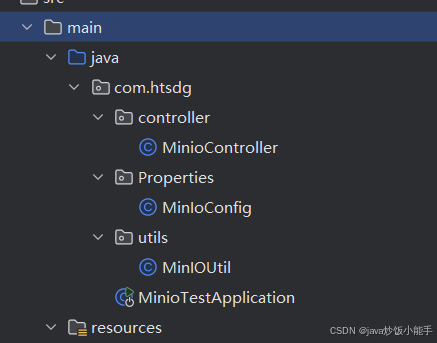
创建好文件和类。

minioconfig类:
package com.htsdg.properties;
import io.minio.minioclient;
import lombok.data;
import org.springframework.beans.factory.annotation.value;
import org.springframework.boot.context.properties.configurationproperties;
import org.springframework.context.annotation.bean;
import org.springframework.context.annotation.configuration;
@data
@configuration
@configurationproperties(prefix = "minio")
public class minioconfig {
    /**
     * 访问用户
     */
    @value("${minio.accesskey}")
    private string accesskey;
    /**
     * 密钥
     */
    @value("${minio.secretkey}")
    private string secretkey;
    /**
     * 访问api url
     */
    @value("${minio.endpoint}")
    private string endpoint;
    /**
     * 桶名称
     */
    @value("${minio.bucketname}")
    private string bucketname;
    /**
     * 创建minio客户端
     *
     * @return
     */
    @bean
    public minioclient minioclient() {
        return minioclient.builder()
                .endpoint(endpoint)
                .credentials(accesskey, secretkey)
                .build();
    }
}
minioutil类:
这里我就使用了一个bucket,你需要先去控制台创建一个bucket,我这里创建的是bt01。我的上传之后的文件路径是 xycj/原文件名
package com.htsdg.utils;
import io.minio.getobjectargs;
import io.minio.minioclient;
import io.minio.putobjectargs;
import io.minio.errors.*;
import org.springframework.beans.factory.annotation.autowired;
import org.springframework.beans.factory.annotation.value;
import org.springframework.stereotype.component;
import org.springframework.util.stringutils;
import org.springframework.web.multipart.multipartfile;
import javax.servlet.http.httpservletresponse;
import java.io.ioexception;
import java.io.inputstream;
import java.io.outputstream;
import java.net.urlencoder;
import java.security.invalidkeyexception;
import java.security.nosuchalgorithmexception;
@component
public class minioutil {
    @autowired
    private minioclient minioclient;
    /**
     *  桶名称
     */
    @value("${minio.bucketname}")
    private string bucketname;
    /**
     * putobject上传文件
     *
     * @param file 文件
     * @return filepath
     */
    public string putobject(multipartfile file) throws ioexception, serverexception, insufficientdataexception, internalexception, invalidresponseexception, invalidkeyexception, nosuchalgorithmexception, xmlparserexception, errorresponseexception {
        //文件名
        string originalfilename = file.getoriginalfilename();
        //文件流
        inputstream inputstream = file.getinputstream();
        //文件大小
        long size = file.getsize();
        //文件路径
        string filepath = createfilepath(originalfilename);
        system.out.println(filepath+"\t文件路径");
        //存储方法 putobject
        minioclient.putobject(putobjectargs.builder()
                .bucket(bucketname)
                .object(filepath)
                .stream(inputstream, size, -1)
                .contenttype(file.getcontenttype())
                .build());
        return filepath;
    }
    /**
     * 下载文件
     *
     * @param filepath 文件路径
     */
    public void getobject(httpservletresponse httpservletresponse, string filepath) throws ioexception, invalidkeyexception, invalidresponseexception, insufficientdataexception, nosuchalgorithmexception, serverexception, internalexception, xmlparserexception, errorresponseexception {
        string filename = getfilename(filepath);
        inputstream inputstream = minioclient.getobject(getobjectargs.builder()
                .bucket(bucketname)
                .object(filepath)
                .build());
        downloadfile(httpservletresponse, inputstream, filename);
    }
    /**
     * 获取文件路径
     *
     * @param originalfilename 原始文件名称
     * @return filepath
     */
    public string createfilepath(string originalfilename) {
        return "xycj/" + originalfilename;
    }
    /**
     * 根据文件路径获取文件名称
     *
     * @param filepath 文件路径
     * @return 文件名
     */
    public string getfilename(string filepath) {
        string[] split = stringutils.split(filepath, "/");
        return split[split.length - 1];
    }
    /**
     * 下载文件
     *
     * @param httpservletresponse httpservletresponse
     * @param inputstream         inputstream
     * @param filename            文件名
     * @throws ioexception ioexception
     */
    public void downloadfile(httpservletresponse httpservletresponse, inputstream inputstream, string filename) throws ioexception {
        //设置响应头信息,告诉前端浏览器下载文件
        httpservletresponse.setcontenttype("application/octet-stream;charset=utf-8");
        httpservletresponse.setcharacterencoding("utf-8");
        httpservletresponse.setheader("content-disposition", "attachment;filename=" + urlencoder.encode(filename, "utf-8"));
        //获取输出流进行写入数据
        outputstream outputstream = httpservletresponse.getoutputstream();
        // 将输入流复制到输出流
        byte[] buffer = new byte[4096];
        int bytesread = -1;
        while ((bytesread = inputstream.read(buffer)) != -1) {
            outputstream.write(buffer, 0, bytesread);
        }
        // 关闭流资源
        inputstream.close();
        outputstream.close();
    }
}
controller层:
这里就演示个上传吧。
package com.htsdg.controller;
import com.htsdg.utils.minioutil;
import org.springframework.beans.factory.annotation.autowired;
import org.springframework.web.bind.annotation.postmapping;
import org.springframework.web.bind.annotation.restcontroller;
import org.springframework.web.multipart.multipartfile;
@restcontroller
public class miniocontroller {
    @autowired
    private minioutil minioutil;
    /**
     * 通用上传请求
     */
    @postmapping("/upload")
    public void uploadfile(multipartfile file) throws exception {
        minioutil.putobject(file);
        system.out.println("yes");
    }
    @getmapping("/download")
    public void download(httpservletresponse response, @requestparam(value = "filepath") string filepath) throws ioexception {
        try {
            minioutil.getobject(response, filepath);
        } catch (exception e) {
            e.printstacktrace();
        }finally {
            system.out.println("出错了!!!!!");
        }
    }
}
到此这篇关于minio的下载和springboot整合minio使用方法的文章就介绍到这了,更多相关springboot整合minio使用内容请搜索代码网以前的文章或继续浏览下面的相关文章希望大家以后多多支持代码网!


发表评论