前言
本文主要介绍在uniapp中页面与webview组件内页面的双向通信问题。
准备
uniapp项目
调用webview组件
<web-view src="/hybrid/html/index.html"></web-view>
web项目
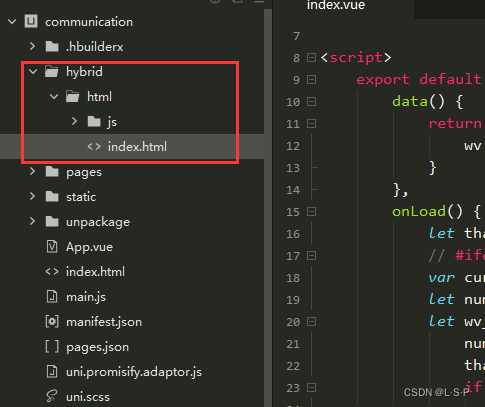
项目目录
在uniapp项目根目录下新建hybrid/html目录,web项目文件放在hybrid/html目录下,否则web-view无法调用项目文件。
引入官方库
在web项目中引入官方库uni.webview.js,可以从uniapp官方示例库中下载,下载后放入web项目目录下即可,本文放在js文件夹中,然后在web项目页面中引入。
<script type="text/javascript" src="js/uni.webview.1.5.2.js"></script>
通信
uniapp传webview
接收消息(webview)
uniapp发送消息实际上就是调用webview组件内页面方法实现通信,所以我们需要现在webview组件内页面index.html中定义一个接收消息的方法:
function webreceivedata (data) {
    var parsedata = json.parse(data)
	document.getelementbyid('msg').innertext = `接收到的消息:${parsedata.msg}`
}
发送消息(uniapp)
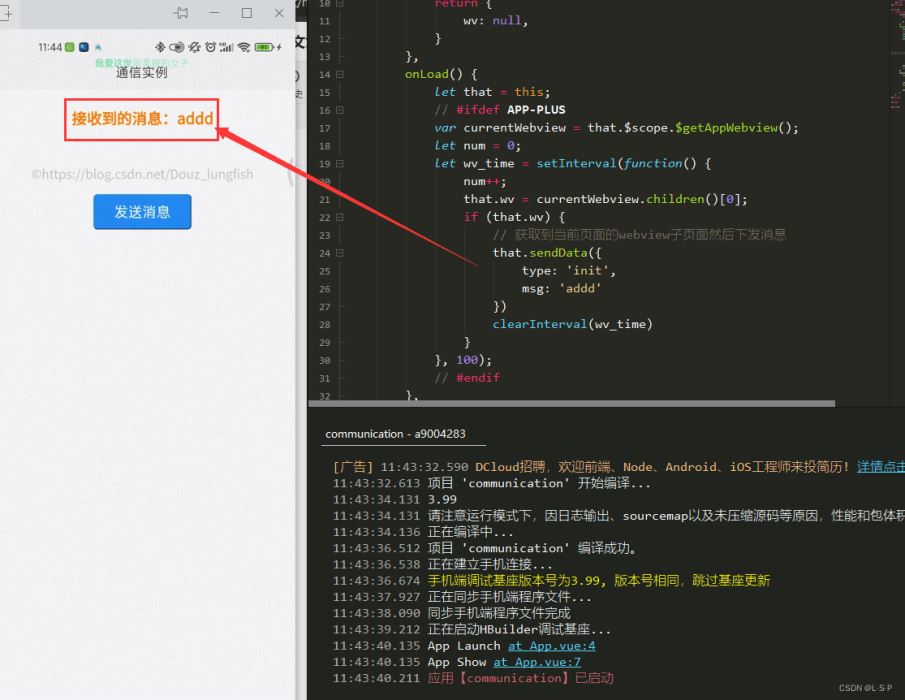
要向webview中传递消息,首先需要获取到当前页面中的webview组件,然后调用webview页面中定义的接收方法就好;如下代码,获取到当前页面中的webview保存在wv中,并在获取成功后调用senddata方法向webview发送消息,在senddata方法中实现了webview组件内方法的调用。
onload() {
	let that = this;
	// #ifdef app-plus
	var currentwebview = that.$scope.$getappwebview();
	let num = 0;
	let wv_time = setinterval(function() {
		num++;
		that.wv = currentwebview.children()[0];
		if (that.wv) {
			// 获取到当前页面的webview子页面然后下发消息
			that.senddata({
				type: 'init',
				msg: 'addd'
			})
			clearinterval(wv_time)
		}
	}, 100);
	// #endif
},
methods: {
	senddata (data) {
		let that = this
		that.wv.evaljs("webreceivedata('" + json.stringify(data) + "')");
	},
}
webview传uniapp
接收消息(uniapp)
在uniapp中为web-view组件添加上@message事件
<web-view src="/hybrid/html/index.html" @message="receivedata"></web-view>
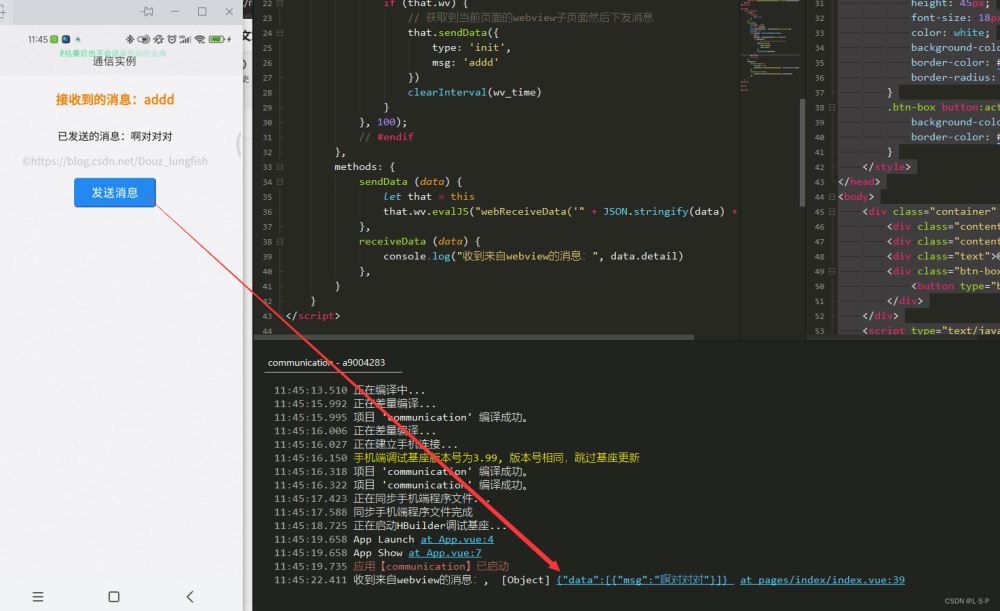
处理@message事件的方法receivedata方法
receivedata (data) {
    console.log("收到来自webview的消息:", data.detail)
}
发送消息(webview)
在webview页面中调用uni.postmessage 方法实现消息发送。
function websenddata () {
	document.getelementbyid('send').innertext = `已发送的消息:啊对对对`
	uni.postmessage({
		data: {
			msg: '啊对对对'
		}
	});
}
完整代码
uniapp端
<template>
	<view class="content">
		<web-view src="/hybrid/html/index.html" @message="receivedata"></web-view>
	</view>
</template>
<script>
	export default {
		data() {
			return {
				wv: null,
			}
		},
		onload() {
			let that = this;
			// #ifdef app-plus
			var currentwebview = that.$scope.$getappwebview();
			let num = 0;
			let wv_time = setinterval(function() {
				num++;
				that.wv = currentwebview.children()[0];
				if (that.wv) {
					// 获取到当前页面的webview子页面然后下发消息
					that.senddata({
						type: 'init',
						msg: 'addd'
					})
					clearinterval(wv_time)
				}
			}, 100);
			// #endif
		},
		methods: {
			senddata (data) {
				let that = this
				that.wv.evaljs("webreceivedata('" + json.stringify(data) + "')");
			},
			receivedata (data) {
				console.log("收到来自webview的消息:", data)
			},
		}
	}
</script>
<style>
</style>
web端
<!doctype html>
<html lang="zh">
<head>
	<meta charset="utf-8">
	<meta name="viewport" content="width=device-width, initial-scale=1.0">
	<title>通信实例</title>
	<style type="text/css">
		.container {
			display: flex;
			flex-direction: column;
		}
		.content {
			text-align: center;
			margin: 15px 0;
		}
		#msg {
			font-size: 1.2rem;
			font-weight: bold;
			color: #ff7d00;
		}
		.text {
			text-align: center;
			color: #c5c8ce;
		}
		.btn-box {
			text-align: center;
			margin: 15px 0;
		}
		.btn-box button {
			width: 125px;
			height: 45px;
			font-size: 18px;
			color: white;
			background-color: #1989fa;
			border-color: #2b85e4;
			border-radius: 5px;
		}
		.btn-box button:active {
			background-color: #88c1fa;
			border-color: #5cadff;
		}
	</style>
</head>
<body>
	<div class="container" id="lauwen">
		<div class="content" id="msg"></div>
		<div class="content" id="send"></div>
		<div class="text">©https://blog.csdn.net/douz_lungfish</div>
		<div class="btn-box">
			<button type="button" onclick="websenddata()">发送消息</button>
		</div>
	</div>
	<script type="text/javascript" src="js/uni.webview.1.5.2.js"></script>
	<script type="text/javascript">
		function webreceivedata (data) {
			var parsedata = json.parse(data)
			document.getelementbyid('msg').innertext = `接收到的消息:${parsedata.msg}`
		}
		function websenddata () {
			document.getelementbyid('send').innertext = `已发送的消息:啊对对对`
			uni.postmessage({
				data: {
					msg: '啊对对对'
				}
			});
		}
	</script>
</body>
</html>
到此这篇关于uniapp web-view组件双向通信的文章就介绍到这了,更多相关uniapp web-view组件内容请搜索代码网以前的文章或继续浏览下面的相关文章希望大家以后多多支持代码网!


发表评论