1. 背景
使用docker运行带有nginx服务的容器。容器启动后,每次都需要手动进入容器内启动nginx服务。修改容器,让nginx服务随容器自动启动。
2. 准备工作
- 使用原nginx-sj: latest镜像文件运行一个容器
nginx-sj: latest 是我之前使用,已修改的官方nginx镜像文件。
[root@centos7-10 ~]# docker run -it nginx-sj:latest /bin/bash
root@4eb5280856a3:/#
- 查看用户目录下.bashrc文件
root@4eb5280856a3:~# pwd
/root
root@4eb5280856a3:~# ls -a
.  ..  .bash_history  .bashrc  .profile  .viminfo
3. 方式一,直接修改.bashrc文件(简单粗暴)
- 直接将服务启动命名写入.bashrc文件,见下
root@4eb5280856a3:~# vim /root/.bashrc
# ~/.bashrc: executed by bash(1) for non-login shells.

# note: ps1 and umask are already set in /etc/profile. you should not
# need this unless you want different defaults for root.
# ps1='${debian_chroot:+($debian_chroot)}\h:\w\$ '
# umask 022

# you may uncomment the following lines if you want 'ls' to be colorized:
# export ls_options='--color=auto'
# eval "$(dircolors)"
# alias ls='ls $ls_options'
# alias ll='ls $ls_options -l'
# alias l='ls $ls_options -la'
#
# some more alias to avoid making mistakes:
# alias rm='rm -i'
# alias cp='cp -i'
# alias mv='mv -i'

############################################
# start nginx
if [ -f /etc/init.d/nginx ]; then
        /etc/init.d/nginx start
fi
4. 方式二,编写启动脚本加入.bashrc文件(文明一点)
- 编辑一个start_nginx.sh文件
root@4eb5280856a3:/# vim /root/start_nginx.sh
- 写入以下内容,并保存
#!/bin/bash

service nginx start
#service mysql start    //也可以添加其它服务
- 添加start_nginx.sh脚本执行权限
root@4eb5280856a3:/# chmod +x /root/start_nginx.sh
- 将启动脚本写入.bashrc文件
root@4eb5280856a3:~# vim /root/.bashrc
# ~/.bashrc: executed by bash(1) for non-login shells.

# note: ps1 and umask are already set in /etc/profile. you should not
# need this unless you want different defaults for root.
# ps1='${debian_chroot:+($debian_chroot)}\h:\w\$ '
# umask 022

# you may uncomment the following lines if you want 'ls' to be colorized:
# export ls_options='--color=auto'
# eval "$(dircolors)"
# alias ls='ls $ls_options'
# alias ll='ls $ls_options -l'
# alias l='ls $ls_options -la'
#
# some more alias to avoid making mistakes:
# alias rm='rm -i'
# alias cp='cp -i'
# alias mv='mv -i'

############################################
# start nginx
if [ -f /root/start_nginx.sh ]; then
        /root/start_nginx.sh
fi
5. 导出容器制作镜像
- 将当前容器(4eb5280856a3)导出成文件nginx-sj_20240222.tar
root@4eb5280856a3:~# exit
exit
[root@centos7-10 ~]# docker ps -a
container id   image             command       created          status          ports     names
4eb5280856a3   nginx-sj:latest   "/bin/bash"   32 minutes ago   up 30 minutes             vibrant_mcnulty
[root@centos7-10 ~]# docker export -o nginx-sj_20240222.tar 4eb5280856a3
[root@centos7-10 ~]#
- 删除当前容器(4eb5280856a3)
[root@centos7-10 ~]# docker ps -a
container id   image             command       created          status          ports     names
4eb5280856a3   nginx-sj:latest   "/bin/bash"   34 minutes ago   up 32 minutes             vibrant_mcnulty
[root@centos7-10 ~]# docker stop 4eb5280856a3
4eb5280856a3
[root@centos7-10 ~]# docker container prune
warning! this will remove all stopped containers.
are you sure you want to continue? [y/n] y
deleted containers:
4eb5280856a32b83046e8e3be0393028a1a3f328887a11c0ccff15384660f86e

total reclaimed space: 7.293kb
[root@centos7-10 ~]#
- 删除旧nginx-sj:latest镜像
[root@centos7-10 ~]# docker images
repository   tag       image id       created             size
nginx-sj     latest    3e97da40406a   about an hour ago   216mb
ubuntu22     latest    caac235feb32   about an hour ago   338mb
busybox      latest    beae173ccac6   2 years ago         1.24mb
redis        latest    7614ae9453d1   2 years ago         113mb
[root@centos7-10 ~]# docker rmi nginx-sj:latest
untagged: nginx-sj:latest
deleted: sha256:3e97da40406a0daaa4d8c0d948b4c3a8a3d099b3aadb0d9fe8a2be4389bd52e6
[root@centos7-10 ~]#
- 导入创建新nginx-sj: latest镜像,新镜像id:283bb24f8ff4
[root@centos7-10 ~]# docker import nginx-sj_20240222.tar nginx-sj:latest
sha256:283bb24f8ff40c67a5ff9d33386847182567f688d7b1b4b109c17054e661b947
[root@centos7-10 ~]# docker images -a nginx-sj:latest
repository   tag       image id       created              size
nginx-sj     latest    283bb24f8ff4   about a minute ago   216mb
[root@centos7-10 ~]#
6. 测试导出容器,nginx服务随容器自动启动
- 启动容器,宿主机发布端口:9090,容器内服务端口:80
[root@centos7-10 ~]# docker run -itd --rm  -p 9090:80 nginx-sj:latest /bin/bash
562e64af48bbb26f95f3bf3fd01a3550898ca05292f8d95b9bf604c2000d2953
container id   image             command       created         status         ports                                   names
562e64af48bb   nginx-sj:latest   "/bin/bash"   3 minutes ago   up 3 minutes   0.0.0.0:9090->80/tcp, :::9090->80/tcp   nervous_golick
[root@centos7-10 ~]#
- 宿主机已监听端口9090
- 宿主机ip 10.211.55.10
[root@centos7-10 ~]# netstat -ntlp | grep 9090
tcp        0      0 0.0.0.0:9090            0.0.0.0:*               listen      17044/docker-proxy
tcp6       0      0 :::9090                 :::*                    listen      17050/docker-proxy
[root@centos7-10 ~]# ip a show enp0s5
2: enp0s5: <broadcast,multicast,up,lower_up> mtu 1500 qdisc pfifo_fast state up group default qlen 1000
    link/ether 00:1c:42:ae:b6:41 brd ff:ff:ff:ff:ff:ff
    inet 10.211.55.10/24 brd 10.211.55.255 scope global noprefixroute dynamic enp0s5
       valid_lft 1140sec preferred_lft 1140sec
    inet6 fdb2:2c26:f4e4:0:233e:38df:2cbd:cec1/64 scope global noprefixroute dynamic
       valid_lft 2591662sec preferred_lft 604462sec
    inet6 fe80::7e0c:1902:e1ca:4324/64 scope link tentative noprefixroute dadfailed
       valid_lft forever preferred_lft forever
    inet6 fe80::567a:248b:5e94:5d19/64 scope link noprefixroute
       valid_lft forever preferred_lft forever
- 访问宿主机http://10.211.55.10:9090,成功!

7. 方式三,修改镜像默认值,commit生成新镜像(正规方式)
修改镜像默认值,方式详见官方文档:overriding image defaults
- 修改镜像cmd默认值(之前是null)
- nginx -g “daemon off;”
[root@centos7-10 ~]# docker run -itd -p 9090:80 nginx-sj:latest  nginx -g "daemon off;"
c90c3a7d8e56ea15017fdfa2dfe9b88d398dcfe16f76b9723f0eb884208d6999
- 提交生成新镜像:nginx-sj:1
[root@centos7-10 ~]# docker commit -m "nginx start" c9 nginx-sj:1
sha256:94fa4087e73dd3c5440f7538d57dcd2f80938e0f9e8f87d48a866f7542f3d685
[root@centos7-10 ~]# docker images
repository   tag       image id       created          size
nginx-sj     1         94fa4087e73d   12 seconds ago   216mb
nginx-sj     2         355dbfe22182   30 minutes ago   216mb
nginx-sj     latest    283bb24f8ff4   25 hours ago     216mb
- 查看新镜像nginx-sj:1信息
- “cmd”: [ “nginx”, “-g”, “daemon off;” ],
[root@centos7-10 ~]# docker image inspect nginx-sj:1
[
    {
        "id": "sha256:94fa4087e73dd3c5440f7538d57dcd2f80938e0f9e8f87d48a866f7542f3d685",
        "repotags": [
            "nginx-sj:1"
        ],
        "repodigests": [],
        "parent": "sha256:283bb24f8ff40c67a5ff9d33386847182567f688d7b1b4b109c17054e661b947",
        "comment": "nginx start",
        "created": "2024-02-23t09:55:38.972444927z",
        "container": "c90c3a7d8e56ea15017fdfa2dfe9b88d398dcfe16f76b9723f0eb884208d6999",
        "containerconfig": {
            "hostname": "c90c3a7d8e56",
......
        "config": {
            "hostname": "c90c3a7d8e56",
            "domainname": "",
            "user": "",
            "attachstdin": false,
            "attachstdout": false,
            "attachstderr": false,
            "exposedports": {
                "80/tcp": {}
            },
            "tty": true,
            "openstdin": true,
            "stdinonce": false,
            "env": null,
            "cmd": [
                "nginx",
                "-g",
                "daemon off;"
            ],
            "image": "nginx-sj:latest",
            "volumes": null,
            "workingdir": "",
            "entrypoint": null,
            "onbuild": null,
            "labels": {}
        },
 ......
        }
    }
]
- 运行容器进行验证
[root@centos7-10 ~]# docker run -itd -p 9000:80 nginx-sj:1
eae91339bf57739cec9fbbd63890afd8949977eae0a561226109b1f02fd66051
[root@centos7-10 ~]# docker ps -a
container id   image        command                   created         status         ports                                   names
eae91339bf57   nginx-sj:1   "nginx -g 'daemon of…"   5 seconds ago   up 4 seconds   0.0.0.0:9000->80/tcp, :::9000->80/tcp   modest_cartwright
- 宿主机已经监听9000端口–>容器内nginx服务80端口
[root@centos7-10 ~]# netstat -ntlp | grep 9000
tcp        0      0 0.0.0.0:9000            0.0.0.0:*               listen      14995/docker-proxy
tcp6       0      0 :::9000                 :::*                    listen      15001/docker-proxy
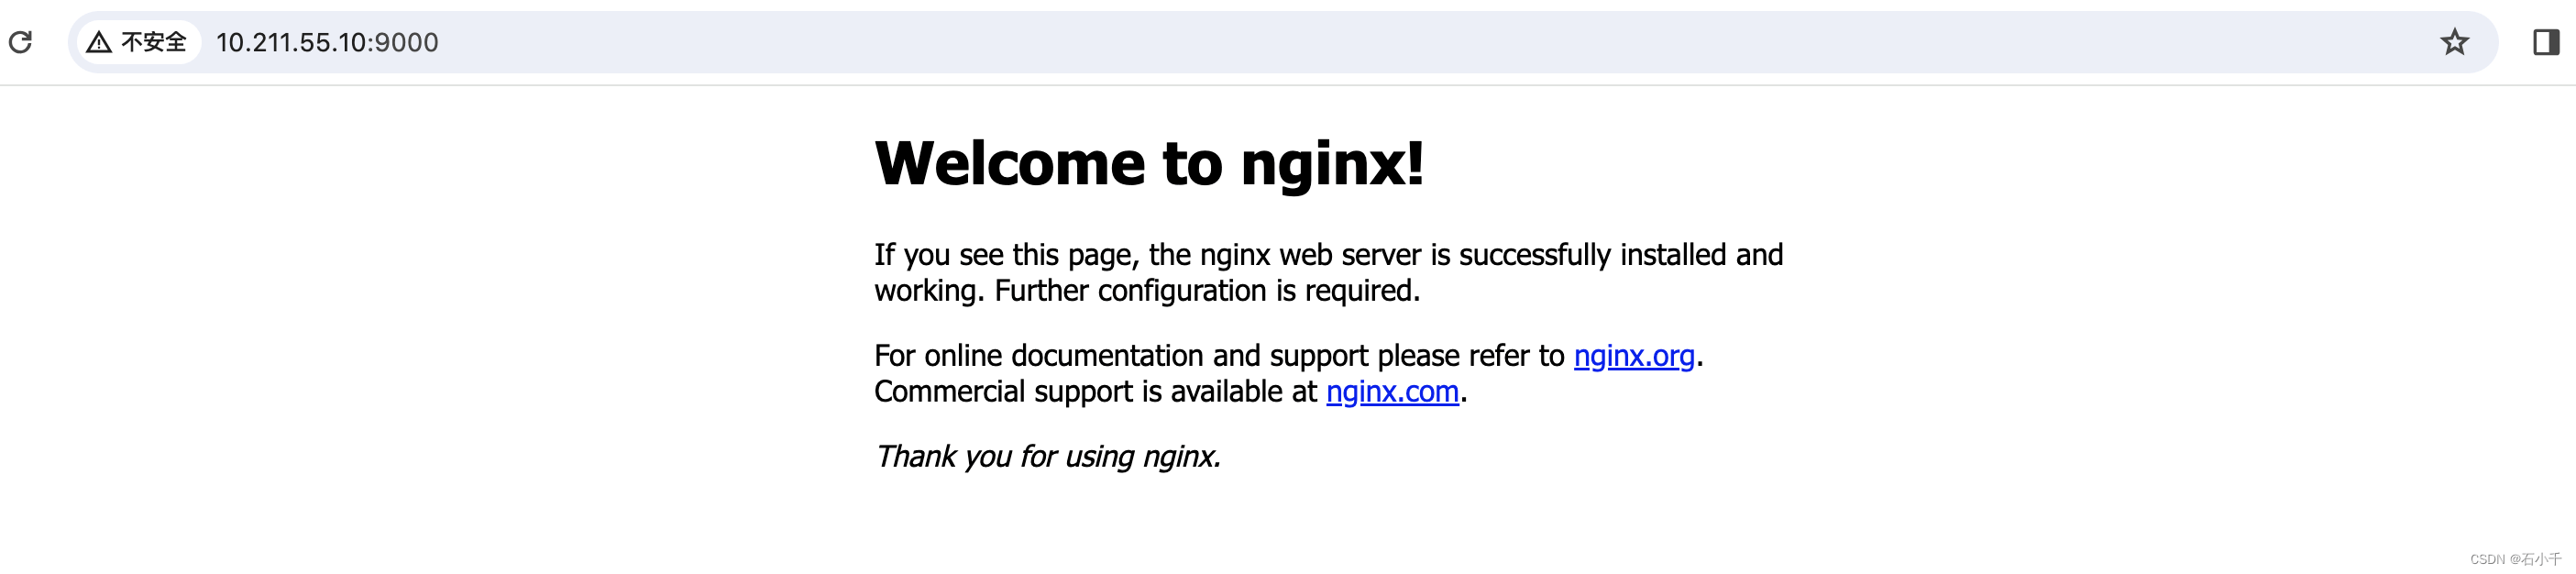
- 外部访问http://10.211.55.10:9000,成功。
8. 方式四,与方案三类似
- 修改镜像默认值,也可以组合修改entrypoint 和 cmd。修改方式如下:
[root@centos7-10 ~]# docker run -itd --entrypoint /usr/sbin/nginx nginx-sj:latest -g "daemon off;"
entrypoint 与 cmd 关系及使用方式详见官方文档:understand how cmd and entrypoint interact
- 生存新镜像方式同方案三
说明:因为docker run 命令中–entrypoint 只支持string,所以建议将服务启动命令写成shell脚本(同方案二),然后使用–entrypoint 引入更合理
9. 方式五,使用dockerfile重新builtd新镜像(永久使用方式)
- 创建一个dockerfile文件
[root@centos7-10 ~]# mkdir nginx-sj
[root@centos7-10 ~]# cd nginx-sj
[root@centos7-10 ~]# vim dockerfile-nginx
- 输入以下内容并保存
- from nginx-sj:latest # 基础镜像
- maintainer # 维护信息
- cmd [“nginx”,“-g”,“daemon off;”] # 容器启动执行的默认命令
from nginx-sj:latest
maintainer shijin
cmd ["nginx","-g","daemon off;"]
~
~
wq!
- 使用dockerfile文件创建新镜像
- -f dockerfile-nginx dockerfile文件名称(注意路径,测试在当前目录下)
- -t nginx-sj:2024022601 镜像的名称与tag
- . 指定镜像构建过程中的上下文环境
[root@centos7-10 ~]# docker build -f dockerfile-nginx -t nginx-sj:2024022601 .
- 查看构建镜像结果
[root@centos7-10 nginx-sj]# docker images
repository   tag          image id       created          size
nginx-sj     2024022601   64b3c38d4483   36 minutes ago   216mb
[root@centos7-10 nginx-sj]# docker history  nginx-sj:2024022601
image          created          created by                         size      comment
64b3c38d4483   53 minutes ago   cmd ["nginx" "-g" "daemon off;"]   0b        buildkit.dockerfile.v0
<missing>      53 minutes ago   maintainer shijin                  0b        buildkit.dockerfile.v0
<missing>      53 minutes ago                                      216mb     imported from -
总结:
- 如果临时使用,可以采用方式一、二,从容器中导出;
- 如果不频繁变更,可以采用方式三、四,直接commit生成新镜像;
- 如果要长期或永久使用,建议采用方式五,彻底重新build新镜像。
到此这篇关于docker容器内服务随容器自动启动的几种方案的文章就介绍到这了,更多相关docker容器服务随容器自动启动内容请搜索代码网以前的文章或继续浏览下面的相关文章希望大家以后多多支持代码网!


发表评论