依赖与配置
在 pom.xml 中引入 rabbitmq 相关依赖
<!-- amqp 依赖, rabbitmq -->
<dependency>
    <groupid>org.springframework.boot</groupid>
    <artifactid>spring-boot-starter-amqp</artifactid>
    <version>3.2.7</version>
</dependency>
在 application.yml 中添加配置
spring:
  rabbitmq:
    host: 127.0.0.1
    port: 5672
    username: guest
    password: guest
rabbitmq使用
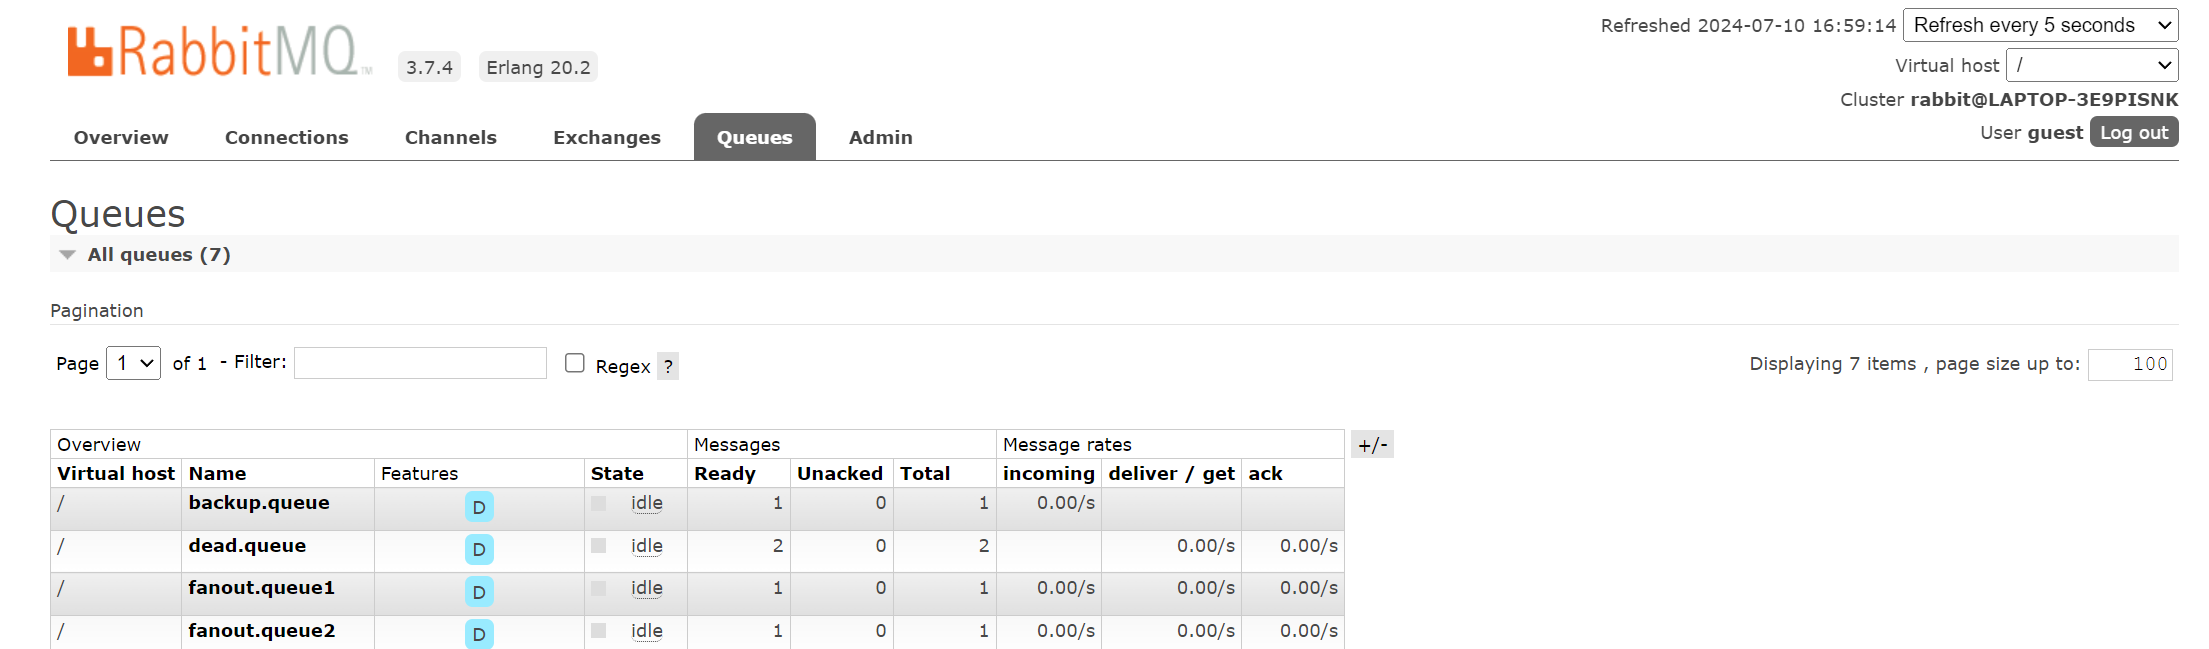
扇形交换机
扇形交换机,顾名思义,就是像一把扇子一样,一个交换器可以绑定多个队列,只要交换机接收到消息就会发送给所有和它绑定的队列。
假设扇形交换机 fanoutexchange 绑定了队列 fanoutqueue1 和 fanoutqueue2 ,那么我们往 fanoutexchange 发送一条消息,fanoutqueue1 和 fanoutqueue2 都会收到一条相同的消息,如果消息未被消费我们可以在 rabbitmq 管理端看到这两个队列和队列内积压的一条相同的消息。
@configuration
public class fanoutexchangeconfig {

    public static final string fanout_queue1 = "fanout.queue1";
    public static final string fanout_queue2 = "fanout.queue2";
    public static final string fanout_exchange = "fanout.exchange";

    //声明队列q1
    @bean("fanoutq1")
    public queue fanoutq1() {
        return new queue(fanout_queue1);
    }

    //声明队列q1
    @bean("fanoutq2")
    public queue fanoutq2() {
        return new queue(fanout_queue2);
    }

    //声明扇形交换机
    @bean
    public fanoutexchange fanoutexchange() {
        return new fanoutexchange(fanout_exchange);
    }

    //队列q1绑定扇形交换机
    @bean("bindfanoutq1")
    public binding bindfanoutq1() {
        return bindingbuilder.bind(fanoutq1()).to(fanoutexchange());
    }

    //队列q2绑定扇形交换机
    @bean("bindfanoutq2")
    public binding bindfanoutq2() {
        return bindingbuilder.bind(fanoutq2()).to(fanoutexchange());
    }

}
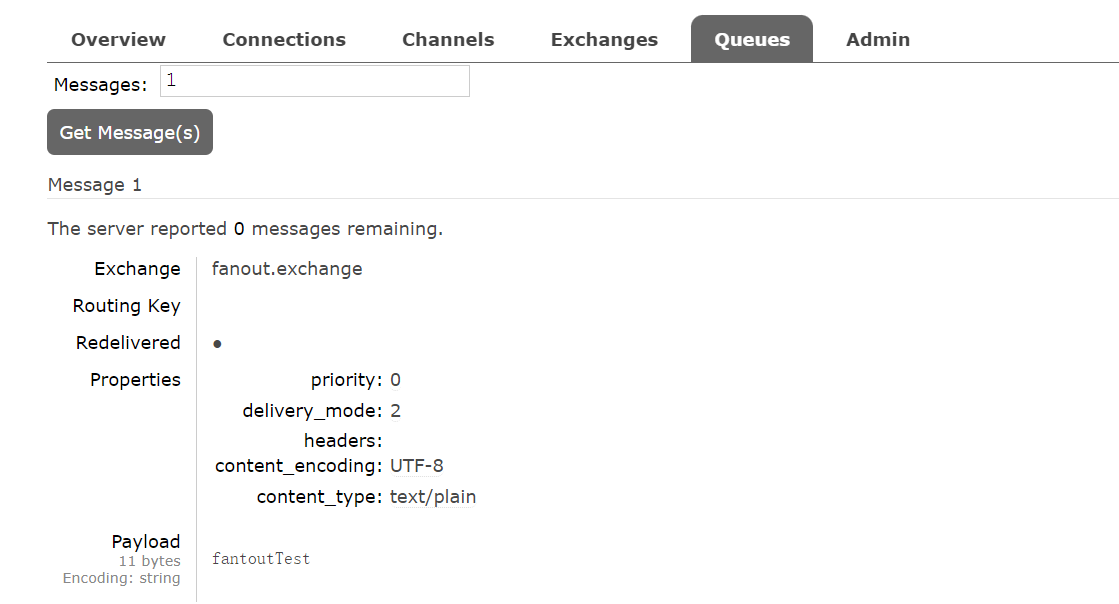
编写 junit 测试, 发送消息
@test
public void fanouttest() {
    rabbittemplate.convertandsend(fanoutexchangeconfig.fanout_exchange, "", "fantouttest");
}
发送消息后由于没有消费者,可以在管理端看到积压在队列中的消息。
直连交换机
一个直连交换机可以有多个队列,但每个队列都有一个路由一一匹配,交换机根据路由将消息投递到对应队列中。当同一个队列有多个消费者时,消息不会被重复消费,直连交换机能够轮询公平的将消息分发给每个消费者。
假设直连交换机 directexchange 与队列 directqueue1 通过路由 directroute1 绑定, 与directqueue2 通过路由 directroute2 绑定。当生产者发送路由为 directroute1 的消息给 directexchange 时,消息会被投递到 directqueue1 ,directqueue2 则接收不到消息。
@configuration
public class directexchangeconfig {

    public static final string direct_queue1 = "direct.queue1";
    public static final string direct_queue2 = "direct.queue2";
    public static final string direct_exchange = "direct.exchange";

    public static final string direct_route_key1 = "direct.route.key1";

    //声明队列q1
    @bean("directq1")
    public queue directq1() {
        return new queue(direct_queue1);
    }

    //声明队列q1
    @bean("directq2")
    public queue directq2() {
        return new queue(direct_queue2);
    }

    //声明直连交换机
    @bean
    public directexchange directexchange() {
        return new directexchange(direct_exchange);
    }

    //队列q1绑定直连交换机
    @bean("binddirectq1")
    public binding binddirectq1() {
        return bindingbuilder.bind(directq1()).to(directexchange()).with(direct_route_key1);
    }

    //队列q2绑定直连交换机
    @bean("binddirectq2")
    public binding binddirectq2() {
        return bindingbuilder.bind(directq2()).to(directexchange()).with("");
    }

}
编写 junit 测试,投递消息给交换机。
@test
public void directtest() {
    //消息被投递给 binddirectq2
    rabbittemplate.convertandsend(directexchangeconfig.direct_exchange, "", "directtest");
    //消息被投递给 binddirectq1
    rabbittemplate.convertandsend(directexchangeconfig.direct_exchange, direct_route_key1, "directtest-key1");
    //没有匹配的路由,binddirectq1 和 binddirectq2 都无法接收
    rabbittemplate.convertandsend(directexchangeconfig.direct_exchange, "test", "directtest-test");
}
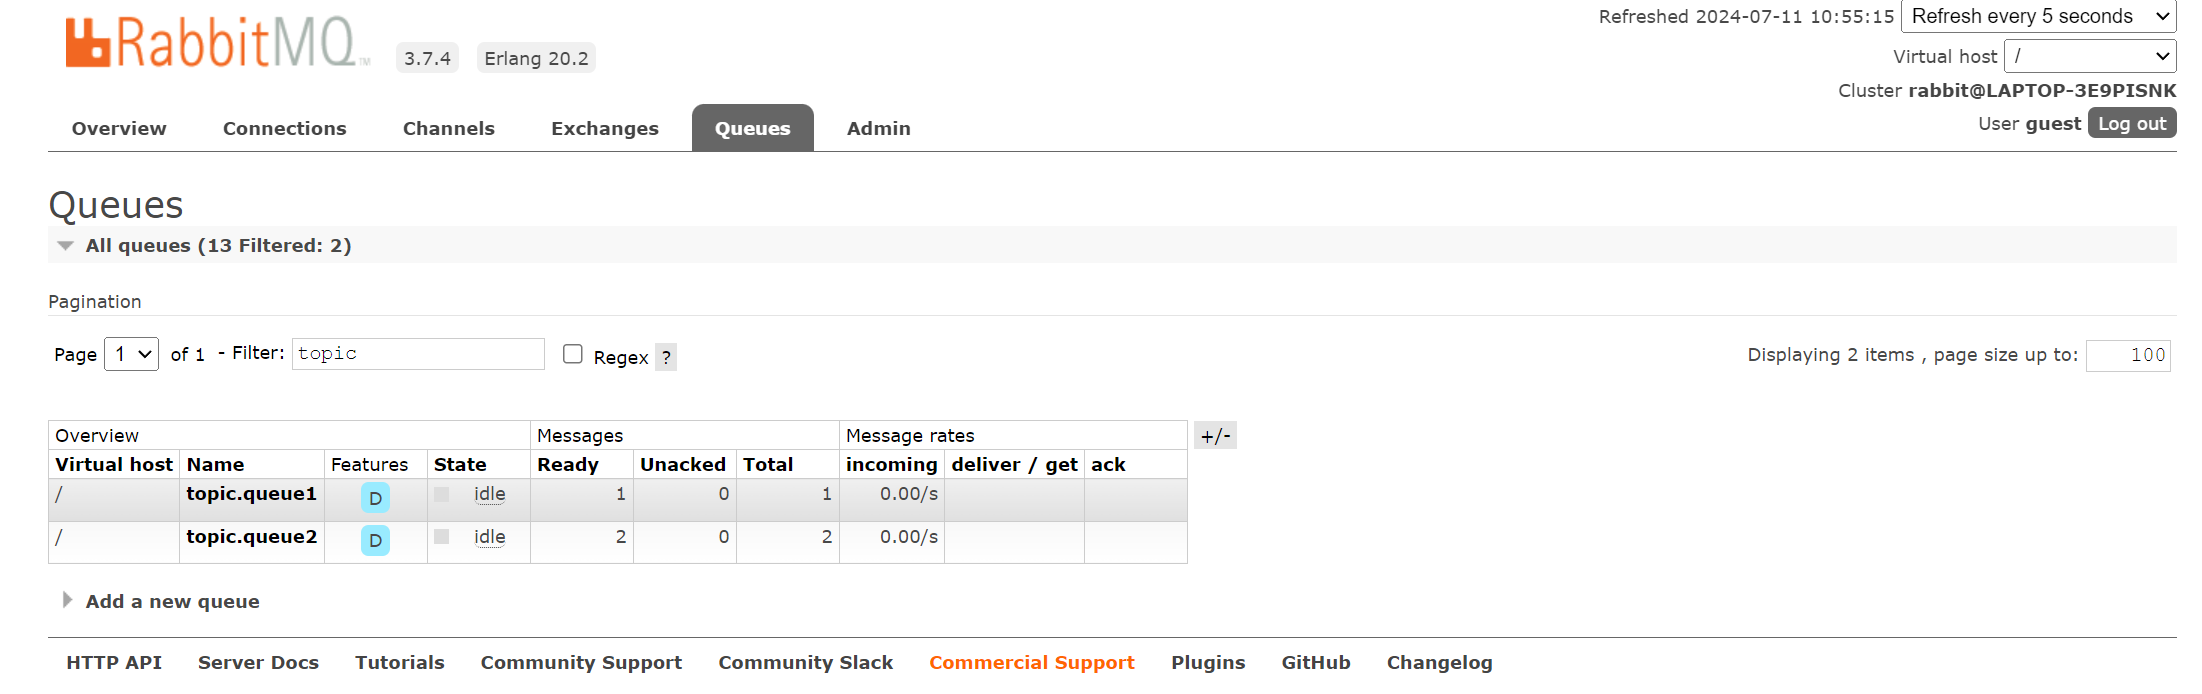
主题交换机
一个主题交换机可以有多个绑定队列,支持路由模糊匹配,可以使用星号(*)和井号(#)作为通配符进行匹配。其中,* 可以代替一个单词,# 可以代替任意个单词。
假设主题交换机 topicexchange 通过路由 topic.route.* 绑定队列 topicqueue1 , 通过路由 topic.route.# 绑定队列 topicqueue2。当生产者通过路由 topic.route.1 和 topic.route.1.1 投递消息给 topicexchange 时, topicqueue2 会接收到两条不同路由的消息, 而 topicqueue1 仅能接收到路由为 topic.route.1 的消息。
@configuration
public class topicexchangeconfig {

    public static final string topic_queue1 = "topic.queue1";
    public static final string topic_queue2 = "topic.queue2";
    public static final string topic_exchange = "topic.exchange";

    public static final string topic_route_key1 = "topic.route.*";
    public static final string topic_route_key2 = "topic.route.#";

    //声明队列q1
    @bean("topicq1")
    public queue topicq1() {
        return new queue(topic_queue1);
    }

    //声明队列q1
    @bean("topicq2")
    public queue topicq2() {
        return new queue(topic_queue2);
    }

    //声明主题交换机
    @bean
    public topicexchange topicexchange() {
        return new topicexchange(topic_exchange);
    }

    //队列q1绑定主题交换机
    @bean("bindtopicq1")
    public binding bindtopicq1() {
        return bindingbuilder.bind(topicq1()).to(topicexchange()).with(topic_route_key1);
    }

    //队列q2绑定主题交换机
    @bean("bindtopicq2")
    public binding bindtopicq2() {
        return bindingbuilder.bind(topicq2()).to(topicexchange()).with(topic_route_key2);
    }

}
编写 junit 测试,投递两条不同路由的消息给主题交换机
@test
public void topictest(){
    //消息被投递给 topicq1 和 topicq2
    rabbittemplate.convertandsend(topicexchangeconfig.topic_exchange, "topic.route.1", "topictest-*");
    //消息仅投递给 topicq2
    rabbittemplate.convertandsend(topicexchangeconfig.topic_exchange, "topic.route.1.1", "topictest-#");
}
可以从管理端看到 topicqueue2 由于绑定的是通配符#,故此两条消息都有被投递到队列中,topicqueue1 由于绑定的是通配符* 只匹配到一条消息,故此只有一条消息被投递到队列中。
首部交换机
首部交换机通过设置消息的头部信息来进行绑定队列的分发,它不依赖于路由键的匹配规则来分发消息,而是根据发送的消息内容中的headers属性进行匹配。当消息投递到首部交换器时,rabbitmq会获取到该消息的headers(一个键值对的形式),并且对比其中的键值对是否完全匹配队列和交换器绑定时指定的键值对。如果完全匹配,则消息会路由到该队列,否则不会路由到该队列。
@configuration
public class headexchangeconfig {

    public static final string header_queue1 = "header.queue1";
    public static final string header_queue2 = "header.queue2";
    public static final string header_queue3 = "header.queue3";
    public static final string header_exchange = "header.exchange";

    public static final string header_key1 = "headerkey1";
    public static final string header_key2 = "headerkey2";

    //声明queue
    @bean("headerqueue1")
    public queue headerqueue1() {
        return new queue(header_queue1);
    }

    @bean("headerqueue2")
    public queue headerqueue2() {
        return new queue(header_queue2);
    }

    @bean("headerqueue3")
    public queue headerqueue3() {
        return new queue(header_queue3);
    }

    //声明首部交换机
    @bean
    public headersexchange headerexchange() {
        return new headersexchange(header_exchange);
    }

    //声明binding,绑定header(消息头部参数)中 header_key1 = a的队列。header的队列匹配可以用mathces和exisits
    @bean
    public binding bindheaderqueue1() {
        return bindingbuilder.bind(headerqueue1()).to(headerexchange()).where(header_key1).matches("a");
    }

    //绑定header中 header_key2 =1的队列。
    @bean
    public binding bindheaderbustyp1() {
        return bindingbuilder.bind(headerqueue2()).to(headerexchange()).where(header_key2).matches("b");
    }

    //绑定header中 header_key1 = a 或者 header_key2 = b 的队列。
    @bean
    public binding bindheadertxbustyp1() {
        map<string, object> condmap = new hashmap<>();
        condmap.put(header_key1, "a");
        condmap.put(header_key2, "b");
        return bindingbuilder.bind(headerqueue3()).to(headerexchange()).whereany(condmap).match();
    }

}
编写 junit 测试, 往首部交换机投递信息
@test
public void headertest(){
    messageproperties properties = new messageproperties();
    properties.setheader(headexchangeconfig.header_key1, "a");

    //消息被投递到 headerqueue1 和 headerqueue3
    rabbittemplate.convertandsend(headexchangeconfig.header_exchange, "", new message("headertest-a".getbytes(), properties));
    properties.setheader(headexchangeconfig.header_key1, "");
    properties.setheader(headexchangeconfig.header_key2, "b");

    //消息被投递到 headerqueue2 和 headerqueue3
    rabbittemplate.convertandsend(headexchangeconfig.header_exchange, "", new message("headertest-b".getbytes(), properties));

}
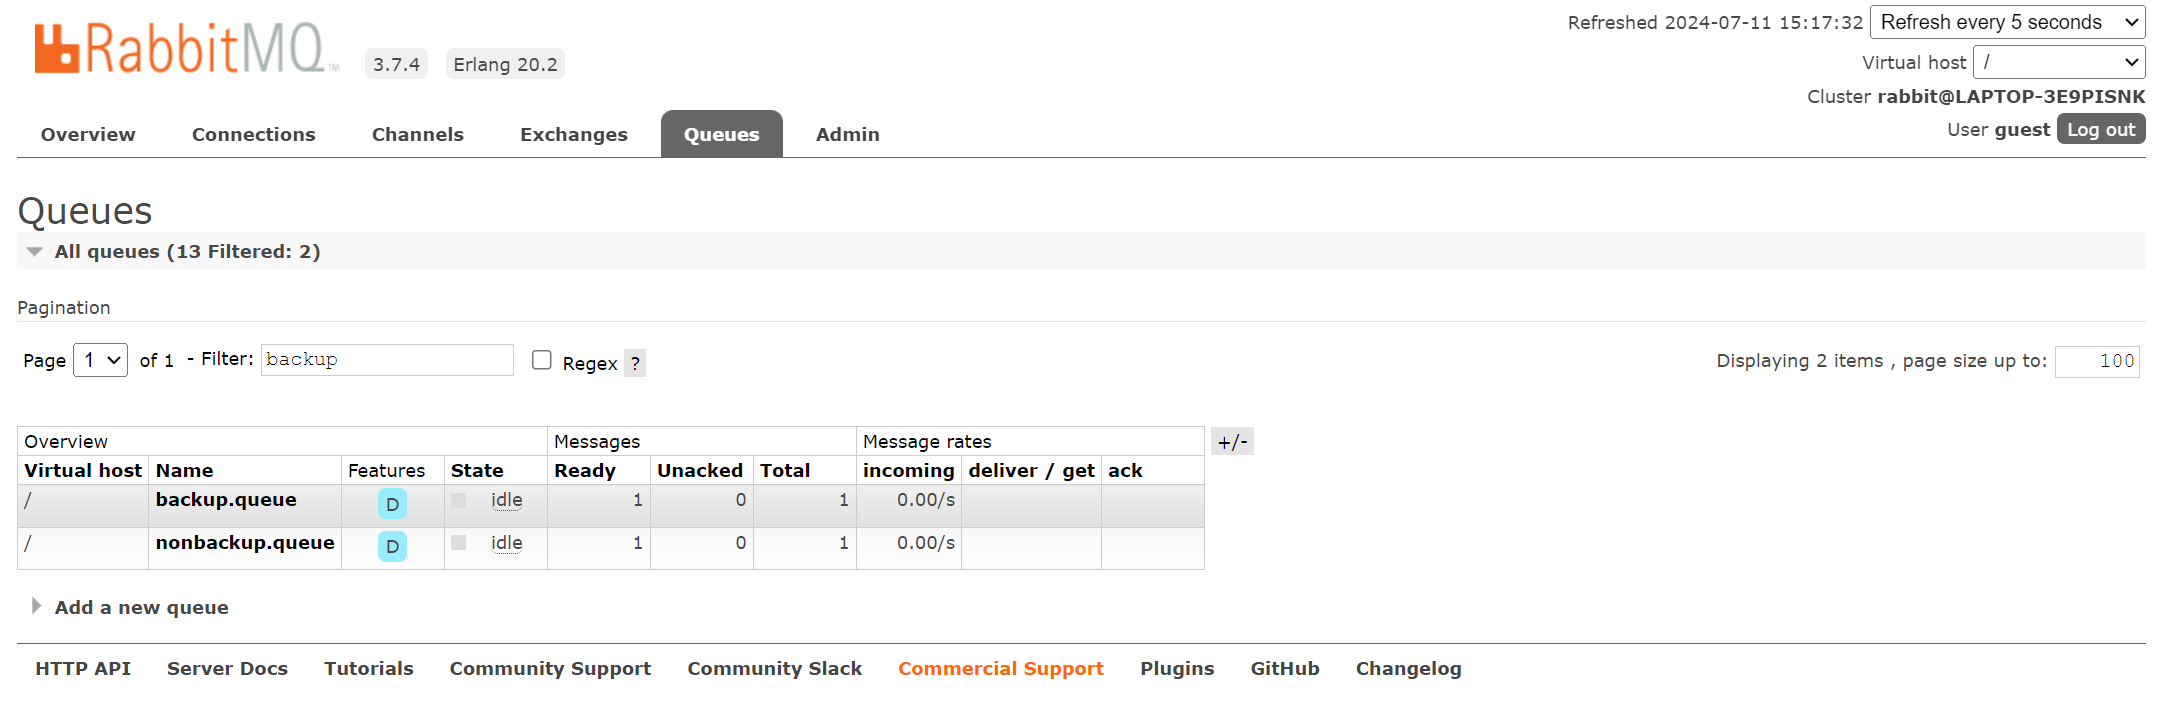
备份交换机
通过设置交换机的alternate-exchange的参数设置备份交换机,当消息路由无法在当前交换机匹配到合适的队列投递时,将消息转到备份交换机,分发到其绑定的备份队列中。
@configuration
public class backupexchangeconfig {

    public static final string backup_queue = "backup.queue";
    public static final string backup_exchange = "backup.exchange";
    public static final string backup_route_key = "backup.key";

    public static final string non_backup_queue = "nonbackup.queue";
    public static final string non_backup_exchange = "nonbackup.exchange";
    public static final string non_backup_route_key = "nonbackup.key";

    @bean("backupqueue")
    public queue backupqueue(){
        return new queue(backup_queue, true, false, false);
    }

    @bean("nonbackupqueue")
    public queue nonbackupqueue(){
        return new queue(non_backup_queue, true, false, false);
    }

    @bean("nonbackupexchange")
    public directexchange nonbackupexchange(){
        map<string, object> args = new hashmap<>(2);
        args.put("alternate-exchange", backup_exchange);
        return new directexchange(non_backup_exchange,true,false, args);
    }

    @bean("backupexchange")
    public fanoutexchange backupexchange(){
        return new fanoutexchange(backup_exchange,true,false);
    }

    @bean("bindnonbackupqueue")
    public binding bindnonbackupqueue(){
        return bindingbuilder.bind(nonbackupqueue()).to(nonbackupexchange()).with(non_backup_route_key);
    }

    @bean("bindbackupqueue")
    public binding bindbackupqueue(){
        return bindingbuilder.bind(backupqueue()).to(backupexchange());
    }

}
编写测试用例, 投递消息给备份交换机
@test
public void backuptest() {
    //路由正确匹配,消息投递到非备份队列中
    rabbittemplate.convertandsend(backupexchangeconfig.non_backup_exchange, backupexchangeconfig.non_backup_route_key, "nonbackuptest");
    //路由无法匹配,消息投递到备份队列中
    rabbittemplate.convertandsend(backupexchangeconfig.non_backup_exchange, backupexchangeconfig.non_backup_route_key + "123", "backuptest");
}
可以看到备份队列和非备份队列中各有一条消息。
死信交换机
死信交换机其实可以理解成一个拥有特殊意义的直连交换机,正常队列通过设置队列中的x-dead-letter-exchange 和 x-dead-letter-routing-key 参数来设置绑定死信交换机,当消费者拒绝消费、消息积压队列达到最大长度或者消息过期时,消息从正常队列转到死信队列。
死信在转移到死信队列时,它的路由也会保存下来。但是如果配置了x-dead-letter-routing-key参数的话,路由就会被替换为配置的这个值。另外,死信在转移到死信队列的过程中,是没有经过消息发送者确认的,所以并不能保证消息的安全性。
消息被作为死信转移到死信队列后,会在header当中增加一些消息。比如时间、原因(rejected,expired,maxlen)、队列等。另外header中还会加上第一次成为死信的三个属性(x-first-death-reason, x-first-death-queue, x-first-death-exchange),并且这三个属性在以后的传递过程中都不会更改。
死信队列也可以向其它队列一样被消费者正常订阅消费。
@configuration
public class deadletterexchangeconfig {

    public static final string dead_queue = "dead.queue";
    public static final string dead_exchange = "dead.exchange";
    public static final string dead_route_key = "dead.key";

    public static final string non_dead_queue = "nondead.queue";
    public static final string non_dead_exchange = "nondead.exchange";
    public static final string non_dead_route_key = "nondead.key";

    @bean("deadqueue")
    public queue deadqueue(){
        return new queue(dead_queue, true, false, false);
    }

    @bean("nondeadqueue")
    public queue nondeadqueue(){
        map<string, object> args = new hashmap<>(2);
        args.put("x-message-ttl",10000);
        args.put("x-dead-letter-exchange",dead_exchange);
        args.put("x-dead-letter-routing-key",dead_route_key);
        return new queue(non_dead_queue, true, false, false, args);
    }

    @bean("deadexchange")
    public directexchange deadexchange(){
        return new directexchange(dead_exchange,false,false);
    }

    @bean("nondeadexchange")
    public directexchange nondeadexchange(){
        return new directexchange(non_dead_exchange,true,false);
    }

    @bean("binddeadqueue")
    public binding binddeadqueue(){
        return bindingbuilder.bind(deadqueue()).to(deadexchange()).with(dead_route_key);
    }

    @bean("bindnondeadqueue")
    public binding bindnondeadqueue(){
        return bindingbuilder.bind(nondeadqueue()).to(nondeadexchange()).with(non_dead_route_key);
    }

}
编写 junit 测试, 投递一条10秒过期的消息,刚投递时消息存在于正常队列,10秒过期后转到死信队列。 投递消息和队列同时设置过期时间时,以时间更短的为准。
@test
public void deadtest() {
    rabbittemplate.convertandsend(deadletterexchangeconfig.non_dead_exchange, deadletterexchangeconfig.non_dead_route_key, "deadtest 1");
}
延时队列
通过ttl+死信队列实现延时队列,与上述死信交换机使用大同小异,核心就是创建队列的时候设置如下三个参数:
x-message-ttl (必要):当前队列消息多久未消费进入死信队列x-dead-letter-exchange (必要):消息过期后进入的死信队列交换机x-dead-letter-routing-key (非必要):消息的路由, 未设置时保留原队列的路由
ttl 消息可以通过以下方式创建
方式一:在队列中设置 x-message-ttl 参数
@bean("nondeadqueue")
public queue nondeadqueue(){
    map<string, object> args = new hashmap<>(2);
    args.put("x-message-ttl",10000);
    args.put("x-dead-letter-exchange",dead_exchange);
    args.put("x-dead-letter-routing-key",dead_route_key);
    return new queue(non_dead_queue, true, false, false, args);
}
方式二: 在投递消息时设置消息的过期时间
messageproperties properties = new messageproperties();
properties.setexpiration("10000");
rabbittemplate.convertandsend(deadletterexchangeconfig.non_dead_exchange, deadletterexchangeconfig.non_dead_route_key, new message("ttl test".getbytes(), properties));
两种方式同时都有设置时,时间短的设置生效。
动态创建队列、交换机及绑定关系
spring boot 封装了一些类用于对 rabbitmq 的管理
-
amqpadmin
用于管理队列、交换机及绑定关系 。 -
rabbittemplate
对消息操作的一些封装。
@autowired
private amqpadmin amqpadmin;

public void createcomponents(){

	string queuename = "amqp.queue";
	string exchangename = "amqp.exchange";

	//声明(创建)队列
	queue queue = new queue(queuename, false, false, false, null);
	amqpadmin.declarequeue(queue);

	//声明交换机
	fanoutexchange fanoutexchange = new fanoutexchange(exchangename, false, false, null);
	amqpadmin.declareexchange(fanoutexchange);

	//声明绑定
	amqpadmin.declarebinding(new binding(queuename, binding.destinationtype.queue, exchangename, "", null));
}
消息监听
启动类添加@enablerabbit注解启用rabbitmq ,通过注解 @rabbitlistener 和 @rabbithandler 进行消息的消费
@component
@rabbitlistener(queues = "fanout.queue1")
public class fanoutqueuerecever {

    @rabbithandler
    public void handle(string msg){
        system.out.println("收到来自 fanout.queue1 的消息 :" + msg);
    }
}
消息确认
保证发送方消息不丢失
开启生产端确认, 消息发送成功后回调,获得预期结果后才认为消息发送成功。
-
交换机收到消息进行回调,confirmcallback
spring.rabbitmq.publisher-confirm-type: correlated (高版本spring使用)
spring.rabbitmq.publisher-confirms: true(低版本spring使用) -
消息正确抵达队列进行回调,returnscallback
spring.rabbitmq.publisher-returns: true
spring.rabbitmq.template.mandatory: true, 只要抵达队列,以异步形式优先发送回调 returncallback
保证消费者消息不丢失
开启消费端确认(保证每个消息都被正确消费,此时才可以删除这个消息)
-
手动ack消息
spring.rabbitmq.listener.simple.acknowledge-mode: manual-
acknowledgemode.none:自动确认
自动确认会在消息发送给消费者后立即确认,但存在丢失消息的可能,如果消费端消费逻辑抛出异常,也就是消费端没有处理成功这条消息,那么就相当于丢失了消息。
如果消息已经被处理,但后续出现异常导致事务回滚,也同样造成了实际意义的消息丢失。 -
acknowledgemode.auto:根据情况确认
-
acknowledgemode.manual:手动确认
如果手动确认则当消费者调用 ack、nack、reject 几种方法进行确认,手动确认可以在业务失败后进行一些操作,如果消息未被 ack 则会发送到下一个消费者。
如果某个服务忘记 ack 了,则 rabbitmq 不会再发送数据给它,因为 rabbitmq 认为该服务的处理能力有限,不足以处理后续投递的消息。
-
-
ack的几种方法
-
channel.basicnack(deliverytag, multiple, requeue); 拒绝消费。
deliverytag(唯一标识 id):当一个消费者向 rabbitmq 注册后,会建立起一个 channel ,rabbitmq 会用 basic.deliver 方法向消费者推送消息,这个方法携带了一个 delivery tag, 它代表了 rabbitmq 向该 channel 投递的这条消息的唯一标识 id,是一个单调递增的正整数,delivery tag 的范围仅限于 channel。multiple:为了减少网络流量,手动确认可以被批处理,当该参数为 true 时,则可以一次性确认 delivery_tag 小于等于传入值的所有消息。
requeue: 是否重新入队
-
channel.basicack(deliverytag, multiple); 确认消费,参数解释同上。
-
channel.basicreject(deliverytag, requeue); 拒绝消费,不支持批量操作,用法与basicnack()类似。
-
代码实现
yaml 文件配置
spring:
  rabbitmq:
    host: 127.0.0.1
    port: 5672
    username: guest
    password: guest
    # 开启发送端确认
    #publisher-confirms: true
    publisher-confirm-type: correlated
    #开启发送端消息抵达确认
    publisher-returns: true
    #只要抵达队列。以异步发送优先回调returnconfirm
    template:
      mandatory: true
    # 手动ack消息
    listener:
      simple:
        acknowledge-mode: manual
配置rabbitmq, 设置发送者消息确认逻辑
@configuration
public class rabbitmqconfig implements rabbittemplate.confirmcallback, rabbittemplate.returnscallback{

    @autowired
    rabbittemplate rabbittemplate;

    @postconstruct
    public void init(){
        rabbittemplate.setreturnscallback(this);
        rabbittemplate.setconfirmcallback(this);
    }

    /**
     * 发送消息触发confirmcallback回调, 无论是否到达队列,只要有到达交换机都会触发这个回调
     * @param correlationdata:当前消息的唯一关联数据(如果发送消息时未指定此值,则回调时返回null)
     * @param ack:消息是否成功收到(ack=true,消息抵达broker)
     * @param cause:失败的原因
     */
    @override
    public void confirm(correlationdata correlationdata, boolean ack, string cause) {
        system.out.println("发送消息触发confirmcallback回调");
        system.out.println(string.format("correlationdata:%s\nack:%s\ncause:%s", correlationdata, ack, cause));
    }

    /**
     * 消息未到达队列触发returncallback回调,只要消息没有投递给指定的队列,就触发这个失败回调
     * @param returnedmessage 返回的消息,包含
     *                        message:投递失败的消息详细信息
     *                        replycode:回复的状态码
     *                        replytext:回复的文本内容
     *                        exchange:接收消息的交换机
     *                        routingkey:接收消息的路由键
     */
    @override
    public void returnedmessage(returnedmessage returnedmessage) {
        system.out.println("消息未到达队列触发returncallback回调");
        system.out.println(returnedmessage.tostring());
    }
}
实现消费者确认
@component
@rabbitlistener(queues = "fanout.queue1")
public class fanoutqueuerecever {

    @rabbithandler
    public void handle(string msg, channel channel, @headers map<string, object> headers){
        system.out.println("收到来自 fanout.queue1 的消息 :" + msg);
        system.out.println("tag:" + headers.get(amqpheaders.delivery_tag));
        try {
            if("ack".equalsignorecase(msg)){
                channel.basicack((long)headers.get(amqpheaders.delivery_tag), false);
            }
            if("nack".equalsignorecase(msg)){
                channel.basicnack((long)headers.get(amqpheaders.delivery_tag), false, true);
            }
            if("reject".equalsignorecase(msg)){
                channel.basicreject((long)headers.get(amqpheaders.delivery_tag), false);
            }

        } catch (ioexception e) {
            e.printstacktrace();
        }
    }

    /**
     * @payload 注解的对象需要实现序列化
     * @headers 获取所有头部信息
     * @header  获取单个头部信息
     */
    @rabbithandler(isdefault = true)
    public void handlemap(@payload mymessage message, channel channel, @headers map<string, object> headers){
        system.out.println("收到来自 fanout.queue1 的消息 :" + message.tostring());
        system.out.println("tag:" + headers.get(amqpheaders.delivery_tag));
        try {
            channel.basicack((long)headers.get(amqpheaders.delivery_tag), false);
        } catch (ioexception e) {
            e.printstacktrace();
        }
    }

}
编写 junit 测试, 发送测试消息
@data
@allargsconstructor
@noargsconstructor
@equalsandhashcode
public class mymessage implements serializable {

    private string id;

    private string name;

}
@test
public void confirmtest(){
    //未知交换机, 触发 confirmcallback 回调
    //rabbittemplate.convertandsend("unknow", "unknow", "confirmtest");
    //未知路由, 消息到达交换机但是无法到达队列, 触发 confirmcallback 回调和 returncallback 回调
    //rabbittemplate.convertandsend(topicexchangeconfig.topic_exchange, "topic", "topictest-*");

    //正常到达队列,触发confirmcallback回调
    rabbittemplate.convertandsend(fanoutexchangeconfig.fanout_exchange, "", "fantouttest", new correlationdata("1"));
    rabbittemplate.convertandsend(fanoutexchangeconfig.fanout_exchange, "", new mymessage("1", "张三"), new correlationdata("2"));

}

发表评论