angular 从零开始,快速上手

一、angularjs 简介
1.1 angularjs 的背景
angularjs诞生于2009年,由 misko hevery 等人创建,后为google所收购。是一款由google开发优秀的前端js框架,于2010年首次发,已经被用于google的多款产品当中。angularjs有着诸多特性,最为核心的是:mvvm、模块化、自动化双向数据绑定、语义化标签、依赖注入等等。
angularjs 的核心思想是使用mvc(model-view-controller)架构模式来构建web应用程序。
在 angularjs 出现之前,web开发中存在许多挑战。传统的 javascript 开发方式需要手动管理dom元素、处理事件、实现数据绑定等,这使得代码复杂、难以维护,并且在大型应用程序中容易出现问题。此外,前端开发和后端开发之间的协作也不够紧密,导致开发过程中出现了许多矛盾和冲突。
angularjs 的出现改变了这种情况。它引入了许多新概念和技术,以提供更高效、更一致的开发体验。总之,angularjs的背景可以追溯到对传统前端开发模式的不满和对更好的开发体验的追求。它引入了许多创新的概念和技术,帮助开发者构建更高效、可维护的web应用程序。
angularjs官网:https://angularjs.org/
angularjs中文网:https://www.angularjs.net.cn/
angularjs 是由 google 开发的一款前端框架,而 angular 是其后续版本的重写和升级。以下是它们之间的一些主要区别:
- 语言: angularjs 使用 javascript,而angular使用typescript。typescript是javascript的超集,为开发大型应用提供了更强大的工具和类型检查。
- 模块化: angularjs没有原生支持模块化开发,而angular使用模块化的方式来组织代码。angular中的模块提供了更好的可维护性和可扩展性。
- 指令: 在angularjs中,指令比较灵活且是核心概念之一。而在angular中,很多原本内置的指令被废弃或者重新实现。
- 性能: angular相对于angularjs有更好的性能表现,这部分得益于对变化检测和渲染管道的改进。
- 移动端支持: angular为移动端开发提供了更好的支持,并且引入了一些移动端特有的功能。
- 依赖注入: angular的依赖注入系统进行了调整和优化,更易于理解和使用。
总体来说,angular是对angularjs的全面改进和升级,提供了更现代化、高性能、易维护的前端开发体验。
从 2016 年开始,angularjs 开始被称为 angular。这是因为 angular 团队在这个时候发布了 angular 2,这是对 angularjs 的全面重写和升级。为了避免混淆,angularjs 框架通常被称为 angular 1,而新的版本则简称为 angular。
1.2 angularjs 的简介

angularjs 是一个开发动态 web 应用的 js 框架。它是为了扩展 html 在构建应用时本应具备的能力而设计的。
angular通过指令(directive)扩展html的语法。例如:
- 通过
{{}}进行数据绑定。 - 使用dom控制结构来进行迭代或隐藏dom片段。
- 支持表单和表单验证。
- 将逻辑代码关联到dom元素上。
- 将一组html做成可重用的组件。
1.3 angularjs 概念概述
| 概念 | 说明 |
|---|---|
| 模板(template) | 带有angular扩展标记的html |
| 指令(directive) | 用于通过自定义属性和元素扩展html的行为 |
| 模型(model) | 用于显示给用户并且与用户互动的数据 |
| 作用域(scope) | 用来存储模型(model)的语境(context)。模型放在这个语境中才能被控制器、指令和表达式等访问到 |
| 表达式( expression) | 模板中可以通过它来访问作用域(scope)中的变量和函数 |
| 编译器(compiler) | 用于编译模板(template),并且对其中包含的指令(directive)和表达式(expression)进行实例化 |
| 过滤器(filter) | 负责格式化表达式(expression)的值,以便呈现给用户 |
| 视图(view) | 用户看到的内容(即dom) |
| 数据绑定(data binding) | 自动同步模型(model)中的数据和视图(view)表现 |
| 控制器(controller) | 视图(view)背后的业务逻辑 |
| 依赖注入(dependency injection) | 负责创建和自动装配对象或函数 |
| 注入器(injector) | 用来实现依赖注入(injection)的容器 |
| 模块(module) | 用来配置注入器 |
| 服务(service) | 独立于视图(view)的、可复用的业务逻辑 |
1.4 angularjs 特性

- 双向数据绑定:angularjs引入了双向数据绑定的概念,使得数据模型和视图之间保持同步。当数据模型发生变化时,视图会自动更新,反之亦然。这简化了数据管理和界面更新的过程。
- mvvm架构:angularjs采用了mvvm(
model-view-viewmodel)架构模式,将应用程序分为模型、视图和视图模型三个部分。视图模型负责处理视图的逻辑和状态,将数据从模型传递给视图,并监听视图中的变化。 - 模块化设计:angularjs支持将应用程序拆分为多个模块,每个模块负责特定的功能。模块化的设计使得代码更易于组织、测试和维护,并促进了团队协作。
- 强大的模板系统:angularjs使用基于html的模板系统,使开发者能够以声明式的方式定义应用程序的视图。模板中可以包含angularjs的指令、表达式和过滤器,以及自定义的html标签和属性。
- 强大的指令系统:angularjs的指令系统允许开发者创建自定义的指令,扩展html的功能。指令可以用于操作dom元素、处理事件、实现数据绑定等,从而使开发更加灵活和高效。
- 依赖注入:angularjs使用依赖注入的概念来管理组件之间的依赖关系。通过依赖注入,开发者可以声明一个组件所依赖的其他组件或服务,并由框架负责解析和注入这些依赖。这种解耦的方式使得代码更具可测试性、可维护性,并且促进了模块化和复用。
- 测试友好:angularjs提供了丰富的测试工具和框架,使得开发者可以轻松地编写单元测试、集成测试和端到端测试来确保应用程序的质量和稳定性性
1.5 angularjs 和 jquery 比较
实现效果:
-
jquery
<!doctype html> <html lang="en"> <head> <meta charset="utf-8"> <title>title</title> </head> <body> 用户名:<input id="username" type="text"> <br> 你输入的内容是:<span id="content"></span> <script src="https://cdn.bootcss.com/jquery/3.4.1/jquery.min.js"></script> <script> $(function () { $('#username').keyup(function () { var value = $(this).val(); $('#content').html(value) }) }) </script> </body> </html> -
angularjs
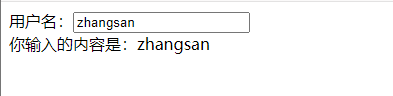
<!doctype html>
<html lang="en" ng-app>
<head>
    <meta charset="utf-8">
</head>
<body>
用户名:<input id="username" ng-model="username" type="text">
<br>
你输入的内容是:<span id="content">{{username}}</span>
<script src="http://code.angularjs.org/1.2.25/angular.min.js"></script>
</body>
</html>
二、安装 angularjs
2.1 方式一:使用在线 cdn
<!-- 1. 引入在线地址 -->
<script src="http://code.angularjs.org/1.2.25/angular.min.js"></script>

<!-- 2. 下载到本地,引入文件 -->
<script src="../js/angular.js"></script>
2.2 方式二:使用依赖管理工具 npm
-
安装 nodejs
-
安装angular
# 默认下载最新版本 npm i -g @angular/cli # 下载指定版本 16.0.3 npm i -g @angular/cli@16.0.3 -
创建项目
ng new 项目名 -
文件结构
e2e:测试目录 src: { index.html:网站主页面 main.ts:应用主入口 } src-app: //模块和组件 { app.component.css //模块/组件的css样式 app.component.html //模块/组件的html页面 app.component.ts //模块/组件的程序文件 } src-assets: 存放静态资源文件 src-environments :环境配置 src-favicon.ico 图标 src-index.html 整个应用的根html main.ts 整个web应用的入口点,脚本执行的入口点 polyfills.ts导入一些必要的库 styless.css全局样式文件 angular-cli.json 命令行工具的配置文件, karma ,protractor.conf.js 单元测试的追踪器 package.json npm配置文件,列明了当前应用所使用的依赖包 tslint.json tslint的配置文件 -
运行
ng serve --open 或者npm start
三、angularjs 的生命周期
3.1 使用步骤
// 1. 要使用哪个钩子函数,就先引入
import { oninit } from ...
// 2. 再实现
export class 组件名 implements onint...
// 3. 再使用
ngoninit(){
....
}
3.2 生命周期钩子函数

-
ngonchanges()
- 当输入属性的值发生变化时调用。
- 在组件被创建并且输入属性绑定发生变化时调用。首次调用一定会发生在
ngoninit()之前。
-
ngoninit()
- 在组件初始化时调用。
- 通常用于执行初始化逻辑,例如获取初始数据。在第一轮
ngonchanges()完成之后调用,只调用一次。
-
ngdocheck()
- 当 angular 安排检查时调用。
- 用于自定义的变更检测逻辑,通常与 changedetectorref 结合使用。在
ngonchanges()和ngoninit()之后。
-
ngaftercontentinit()
- 在组件内容投影完成后调用。
- 用于执行需要在组件内容初始化后执行的逻辑。第一次
ngdocheck()之后调用,只调用一次,只适用于组件。
-
ngaftercontentchecked()
- 在每次 angular 完成对组件内容的检查之后调用。
- 用于执行在内容检查之后需要执行的逻辑。
ngaftercontentinit()和每次ngdocheck()之后调用,只适用于组件。
-
ngafterviewinit()
- 在组件视图初始化完成后调用。
- 用于执行需要访问视图的初始化逻辑。第一次
ngaftercontentchecked()之后调用,只调用一次,只适合组件。
-
ngafterviewchecked()
- 在每次 angular 完成对组件视图的检查之后调用。
- 用于执行在视图检查之后需要执行的逻辑。
ngafterviewinit()和每次ngaftercontentchecked()之后调用,只适合组件。
-
ngondestroy()
- 在组件销毁时调用。
- 通常用于清理资源,取消订阅等。
四、angular 的基础语法
3.1 模块和组件
项目根模块:app.module.ts
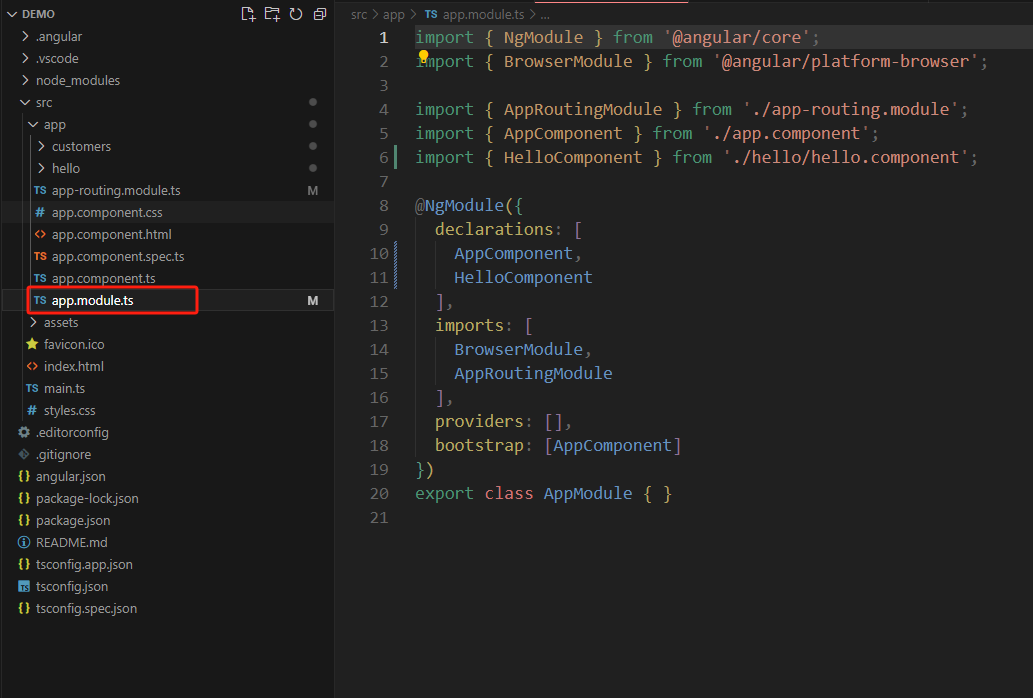
定义的组件都需要在app.module.ts 文件里先进行 import 引入,然后再@ngmodule({deckartions:[]}) 声明
- 定义组件模板的两种方式:
- 使用
templateurl引用一个html文件 - 使用
template + es6的模板字符串
- 使用
- 定义组件样式的两种方式:
- 使用
styleurls引入一个css文件 - 使用
style + es6的模板字符串
- 使用
- 元数据:通过装饰器描述组件
3.1.1 使用命令创建模块
-
生成模块
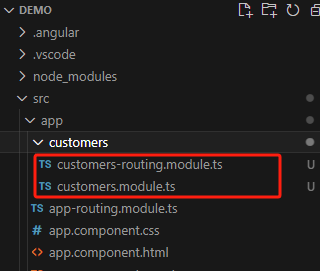
ng g module customers --routing=true # customers 为模块名称, --routing=true 是否包含路由 -
文件解析
生成的模块文件有个路由文件(
customers-routing.modules.ts)和(customers.modules.ts)
-
在项目的根路由文件引入模块
const routes: routes = [
  { path: '', pathmatch: 'full', redirectto: 'customersmodule' }, //重定向
  { path: 'customersmodule',loadchildren:()=>import('./customers/customers.module').then(m=>m.customersmodule)}
];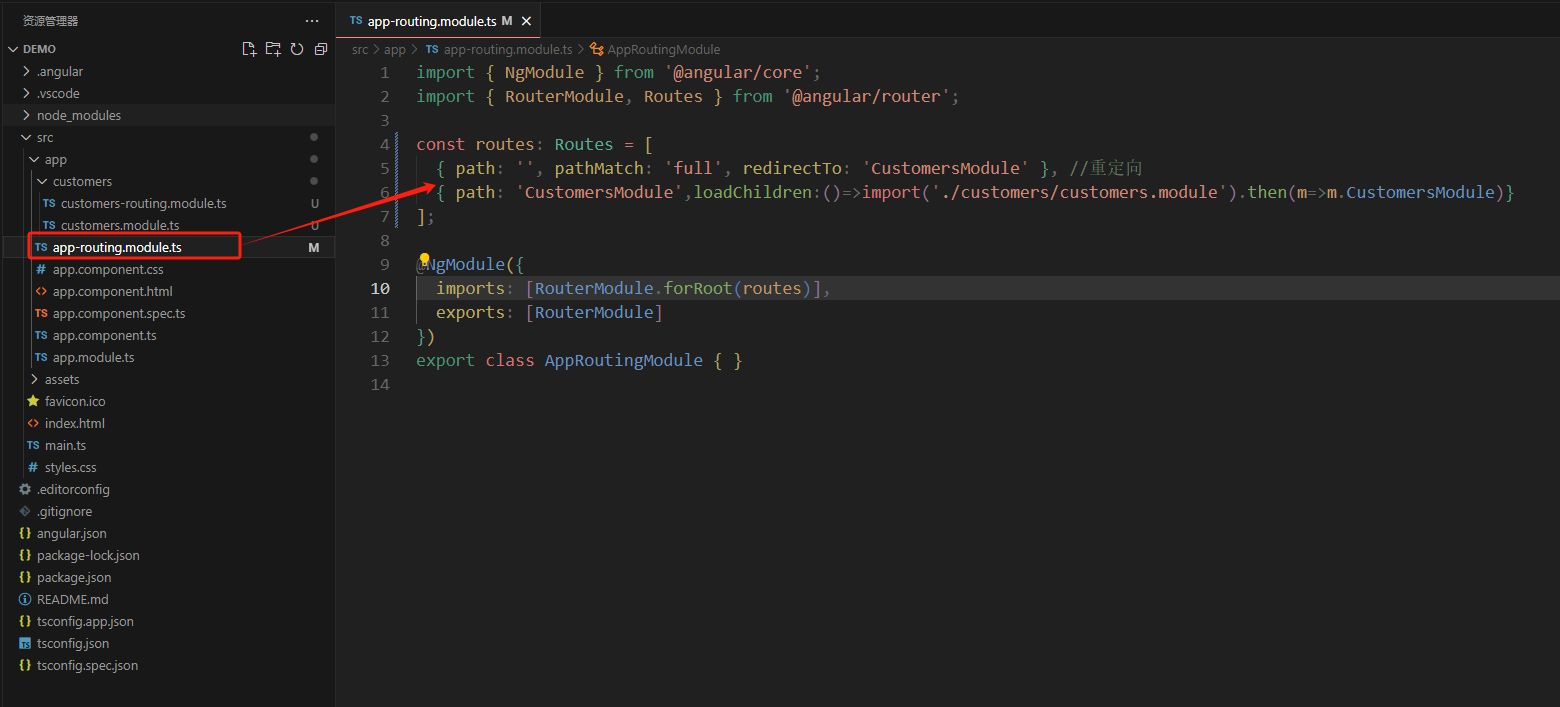
3.1.2 使用命令创建组件
-
生成组件
先打开需要创建组件的模块,然后进入到模块命令行中,使用命令
ng generate component 组件名 # (组件名只能小写,不能大写)或者缩写ng g c 组件 # 创建 hello 组件 ng g c hello -
文件解析
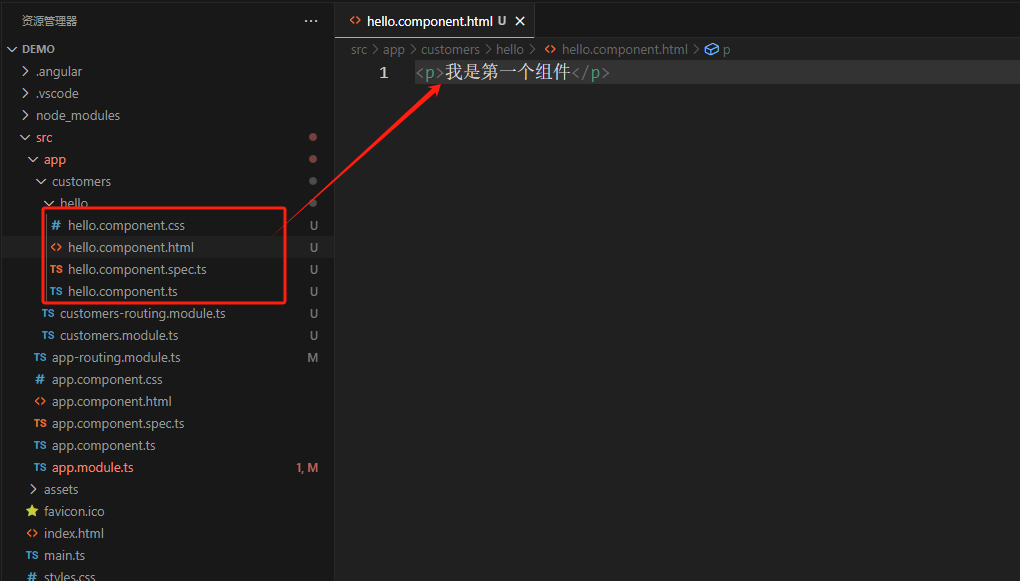
会生成一个hello的文件夹,里面有几个文件,我们可以在
hello.component.html写一段文字<p>我是第一个组件</p>
-
引入组件
在模块的路由文件里引入组件
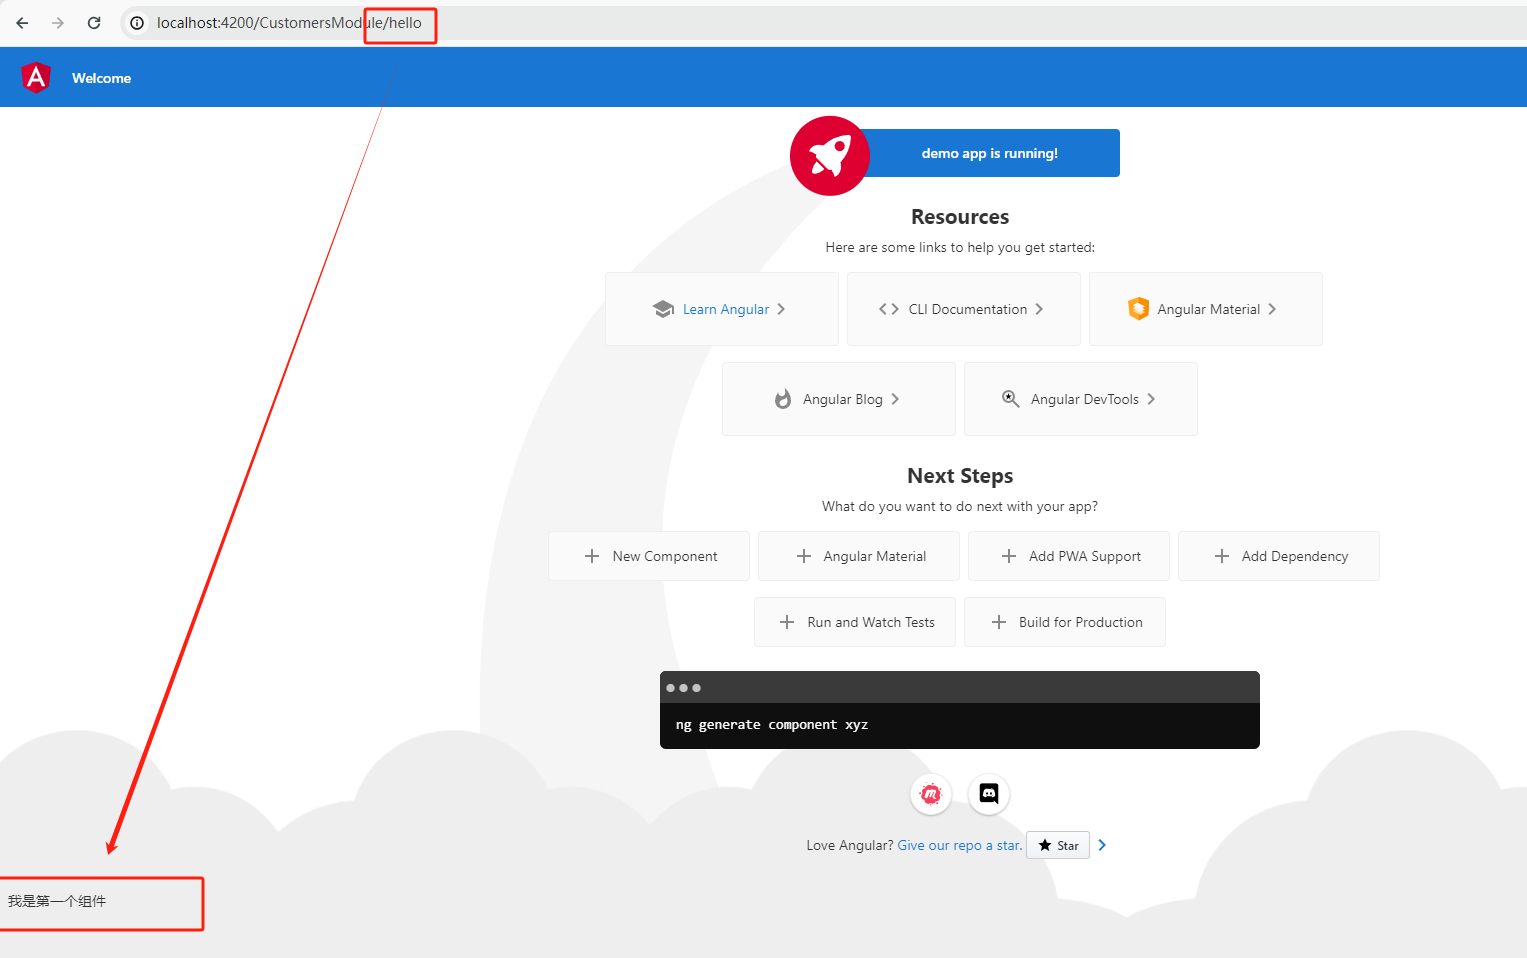
import { hellocomponent } from './hello/hello.component';

const routes: routes = [
  {path:"hello",component:hellocomponent}
];
然后保存,等编译器重新编译之后,输入刚才的模块的路由,就可以显示出来了
http://localhost:4200/customersmodule //url地址/模块名称 http://localhost:4200/customersmodule/hello //url地址/模块名称/模块里的组件 -
效果
3.2 指令
angularjs 通过被称为 指令 的新属性来扩展 html
angularjs 通过内置的指令来为应用添加功能
angularjs 允许你自定义指令
3.2.1 anguarjs 指令
angularjs 指令是扩展的 html 属性,带有前缀 ng-。
ng-app 指令初始化一个 angularjs 应用程序。
ng-init 指令初始化应用程序数据。
ng-model 指令把元素值(比如输入域的值)绑定到应用程序。
<!-- angularjs -->
<div ng-app="" ng-init="firstname='john'">

  <p>在输入框中尝试输入:</p>
  <p>姓名:<input type="text" ng-model="firstname"></p>
  <p>你输入的为: {{ firstname }}</p>

</div>

<!-- angular -->
<!-- html -->
<div>

  <p>在输入框中尝试输入:</p>
  <p>姓名:<input type="text" [(ngmodel)]="firstname"></p>
  <p>你输入的为: {{ firstname }}</p>

</div>
<!-- ts -->
export class parentcomponent {
  firstname: string = 'john doe';
}
ng-app 指令告诉 angularjs,
3.2.2 数据绑定
上面实例中的 {{ firstname }} 表达式是一个 angularjs 数据绑定表达式。angularjs 中的数据绑定,同步了 angularjs 表达式与 angularjs 数据。{{ firstname }} 是通过 ng-model=“firstname” 进行同步。
在下一个实例中,两个文本域是通过两个 ng-model 指令同步的:
<!-- angularjs -->
<div ng-app="" ng-init="quantity=1;price=5">

  <h2>价格计算器</h2>

  数量: <input type="number"    ng-model="quantity">
  价格: <input type="number" ng-model="price">

  <p><b>总价:</b> {{ quantity * price }}</p>

</div>

<!-- angular -->
<div>

  <h2>价格计算器</h2>

  数量: <input type="number" [(ngmodel)]="quantity">
  价格: <input type="number" [(ngmodel)]="price">

  <p><b>总价:</b> {{ quantity * price }}</p>

</div>
<!-- ts -->
export class parentcomponent {
  quantity: number = 1;
  price: number = 5;
}
3.2.3 判断指令
-
ngif
<!-- 如果isavailable为true,那么段落元素会被渲染出来;如果isavailable为false,它将被移除。 -->

<!-- angularjs -->
<p ng-if="isabailable">该商品现在可供购买。</p>

<!-- angular -->
<p *ngif="isabailable">该商品现在可供购买。</p>
ng-show和ng-hide指令也可以根据条件来显示或隐藏元素,但是它们实际上是通过控制元素的display属性来实现的,而不是真正地移除元素。
<p ng-show="isvisible">这个元素会根据isvisible的值进行显示/隐藏。</p> <p ng-hide="ishidden">这个元素会根据ishidden的值进行显示/隐藏。</p> -
ngswitch
根据color的值,会显示不同的段落内容。如果color为’red’,则显示"红色";如果color为’blue’,则显示"蓝色";否则,显示"其他颜色"。
<!-- angularjs --> <div ng-switch on="color"> <p ng-switch-when="'red'">红色</p> <p ng-switch-when="'green'">绿色</p> <p ng-switch-when="'blue'">蓝色</p> <p ng-switch-default>其他颜色</p> </div> <!-- angular --> <div [ngswitch]="color"> <p *ngswitchcase="'red'">红色</p> <p *ngswitchcase="'green'">绿色</p> <p *ngswitchcase="'blue'">蓝色</p> <p *ngswitchdefault>其他颜色</p> </div> -
*和[]的区别在
angular中,*号是结构型指令的标志,用于表示对dom结构进行操作。而[...]则是属性型指令的标志,用于修改html元素的属性。因此,
ngswitch实际上是一个语法糖,它是angular为了简化代码书写所提供的一种便利方式。当我们使用*ngswitch时,angular实际上会将其转换为[ngswitch],这是因为ngswitch是一个属性型指令,用于控制元素的属性,而不是直接控制dom结构。
3.2.4 循环指令
该指令可以用来遍历集合中的每个项,并为每个项生成相应的 dom 元素。
<!-- angularjs,只能使用in来遍历对象的属性 -->
<ul>
  <li ng-repeat="item in items">{{ item.name }}</li>
</ul>

<!-- augular, 既可以用in来遍历又可以使用of来遍历,let用来接受局部变量 -->
<ul>
  <li *ngfor="let item of items">{{ item.name }}</li>
</ul>
3.2.5 事件处理
-
ng-click
用于处理元素的点击事件
<!-- angularjs --> <button ng-click="dosomething()">点击我</button> <!-- 在控制器中通过$scope绑定事件处理函数 --> $scope.dosomething = function() { // 处理点击事件的逻辑 } <!-- angular --> <button (click)="dosomething()">点击我</button> <!-- 组件类方法, 在组件类中定义方法来处理事件,然后在模板中进行调用 --> export class mycomponent { dosomething() { // 处理点击事件的逻辑 } handleinputchange(event: any) { // 处理输入框改变事件的逻辑 } submitform() { // 处理表单提交事件的逻辑 } } -
ng-change
用于处理输入框内容改变时的事件
<!-- angularjs --> <input type="text" ng-model="inputvalue" ng-change="handleinputchange()"> <!-- angular --> <input type="text" (change)="handleinputchange($event)"> -
ng-submit
用于处理表单提交事件
<!-- angularjs --> <form ng-submit="submitform()"> <input type="text" ng-model="formdata.username"> <button type="submit">提交</button> </form> <!-- angular --> <form (ngsubmit)="submitform()"> <input type="text" [(ngmodel)]="formdata.username"> <button type="submit">提交</button> </form> -
其他事件指令
鼠标悬停事件: ng-mouseover / (mouseover)
鼠标移出事件: ng-mouseout / (mouseout)
输入框获得焦点时: ng-focus / (focus)
3.2.6 自定义指令
-
创建自定义指令
使用命令
ng generate directive 指令名或者在文件夹(module下)中创建一个以.directive.ts结尾的文件。 -
实现自定义指令
在生成的
custom-directive.directive.ts文件中,你可以实现自定义指令import { directive, elementref } from '@angular/core' @directive({ selector: '[appcustomdirective]' }) export class appcustomdirective { constructor(private elementref: elementref) { this.elementref.nativeelement.style.backgroundcolor = 'yellow' } } -
在模块中声明和导入
在你的 angular 模块中,确保将自定义指令声明并导入:
import { ngmodule } from '@angular/core'; import { browsermodule } from '@angular/platform-browser'; import { appcustomdirective } from './custom-directive.directive'; @ngmodule({ declarations: [ appcustomdirective, // 其他组件、指令等 ], imports: [browsermodule], bootstrap: [/* 主应用组件 */] }) export class appmodule { } -
在模板中使用
<div appcustomdirective>
  this is a div with a custom directive.
</div>
@directive装饰器是angular框架中用来创建自定义指令的装饰器之一。装饰器是一种特殊类型的声明,它可以附加到类、方法、属性或参数上,以提供额外的元数据和行为。
在angular中,@directive装饰器用于标记一个类作为自定义指令,并提供该指令的配置信息。通常情况下,@directive装饰器会包含一个对象作为参数,该对象用于描述指令的各种属性,如选择器、输入输出属性、链接函数等。
3.3 组件交互
在angular中,组件之间的交互可以通过多种方式来实现,包括输入属性、服务的使用、事件广播等。
3.3.1 父组件->子组件
-
输入属性(
@input)父组件可以把数据通过属性绑定的方式传递给子组件。
// 通过输入属性将父组件的 message 传递给子组件 @component({ selector: 'app-child', template: '{{ message }}' }) export class childcomponent { // 子组件接收,@input() 只能取值,不能监听值的变化 @input() message: string; } @component({ selector: 'app-parent', template: '<app-child [message]="parentmessage"></app-child>' }) export class parentcomponent { parentmessage = 'hello world'; } -
服务(
service)服务是一种可注入的类,用于共享数据和功能。通过在提供商列表中注册服务,多个组件可以共享该服务实例并相互通信。
@injectable({ providedin: 'root' }) export class dataservice { data: string; setdata(data: string) { this.data = data; } getdata() { return this.data; } } @component({ selector: 'app-child', template: '{{ data }}' }) export class childcomponent { data: string; constructor(private dataservice: dataservice) {} ngoninit() { this.data = this.dataservice.getdata(); } } @component({ selector: 'app-parent', template: '<app-child></app-child>' }) export class parentcomponent { constructor(private dataservice: dataservice) {} ngoninit() { this.dataservice.setdata('hello world'); } } -
事件广播
父组件可以通过
broadcast或emit广播事件,然后子组件可以通过scope.on来监听事件并获取数据。app.controller('parentcontroller', ['$scope', function($scope) { $scope.$broadcast('dataevent', 'data from parent'); }]); app.controller('childcontroller', ['$scope', function($scope) { $scope.$on('dataevent', function(event, data) { // 使用data来访问父组件传递的数据 }); }]); -
模板引用变量
使用模板引用变量,一个组件可以获取到另一个组件或 html 元素的引用,并直接操作其属性和方法。模板引用变量可以通过在html标签中使用#号来声明,并且可以在模板中的任何地方使用。
// html 其中#nameinput就是一个模板变量,它引用了input元素
<form>
  <label for="name">name:</label>
  <input #nameinput id="name" type="text">
  <button (click)="submitform()">submit</button>
</form>

// js
@component({
  selector: 'app-form',
  template: './form.component.html'
})
export class formcomponent {
  @viewchild('nameinput') nameinput: elementref<htmlinputelement>;

  submitform() {
    // 聚焦到 input 元素
    this.nameinput.nativeelement.focus();
  }
}
除了用在普通的html元素上,模板引用变量也可以用在组件上,以获取对组件实例的引用。
<app-child #childcomponent></app-child>
<!-- #childcomponent引用了子组件实例,然后在父组件中可以直接调用子组件的方法。 -->
<button (click)="childcomponent.dosomething()">call child component method</button>
3.3.2 子组件->父组件
-
输出属性(
**@output**)@component({ selector: 'app-child', template: '<button (click)="sendmessage()">send message</button>' }) export class childcomponent { @output() messageevent = new eventemitter<string>(); sendmessage() { this.messageevent.emit('hello from child'); } } @component({ selector: 'app-parent', template: '<app-child (messageevent)="receivemessage($event)"></app-child>{{ message }}' }) export class parentcomponent { message: string; receivemessage(message: string) { this.message = message; } } -
服务(
service)与父组件到子组件一样
-
事件广播
与父组件到子组件一样
-
模板引用变量
与父组件到子组件一样
3.4 控制器
3.4.1 控制器
控制器是angularjs中的一个重要概念,用于处理业务逻辑和管理数据。通过控制器,你可以将数据模型添加到作用域(scope)中,并定义处理数据的函数。
app.controller('myctrl', function($scope) {
  $scope.name = "john doe";
});
在上述示例中,我们创建了一个名为myctrl的控制器,并将name变量添加到作用域中。在html中,我们可以使用ng-controller指令将控制器与特定的html元素关联起来。
<div ng-controller="myctrl">
  <p>hello, {{ name }}!</p>
</div>
ng-controller指令定义了应用程序控制器。控制器是javascript 对象,由标准的 javascript 对象的构造函数 创建。angularjs 使用$scope 对象来调用控制器。在 angularjs 中, $scope是一个应用对象(属于应用变量和函数)。
控制器的 $scope(相当于作用域、控制范围)用来保存angularjs model(模型)的对象。控制器在作用域中创建了一个属性 (name),然后使用条件表达式{{ name }}使用。
3.4.2 组件
在 angular 中,控制器的概念被组件(component)所取代。组件是 angular 应用中的基本构建块,负责管理视图和业务逻辑。
组件:在 angular 中,组件是一种带模板的指令,它包含了与视图相关联的数据和行为逻辑。每个组件都有自己的模板、样式和行为,它们可以嵌套使用,形成应用程序的整体结构。
-
定义组件类
import { component } from '@angular/core';

@component({
  selector: 'my-component',
  template: `<h1>{{ title }}</h1>`,
})
export class mycomponent {
  title = 'hello, world!';
}
上面的代码定义了一个名为 mycomponent 的组件,它包含了一个属性 title 和一个模板,模板中显示了 title 的值。
-
引入到模块中
import { ngmodule } from '@angular/core';
import { browsermodule } from '@angular/platform-browser';
import { mycomponent } from './my.component';

@ngmodule({
  imports: [browsermodule],
  declarations: [mycomponent],
  bootstrap: [mycomponent]
})
  export class myappmodule {}
这段代码将 mycomponent 引入到模块中,并声明为该模块的一部分。
-
在模板中使用组件
<!-- app.component.html -->
<my-component></my-component>
在模板文件中使用 my-component 标签来引入刚刚定义的组件。
3.5 装饰器(注解)
angular 中的装饰器是一种特殊类型的声明,用于添加元数据和修改类声明。angular 中的装饰器主要用于标识和配置组件、指令、服务等各种 angular 元素。
3.5.1 @component
用于将一个类标记为 angular 组件,并提供该组件的元数据信息,包括模板、样式、选择器等。
@component({
  selector: 'app-root',
  templateurl: './app.component.html',
  styleurls: ['./app.component.css']
})
export class appcomponent {}
属性
- selector:指定组件在html中的选择器,用于标识该组件应该被插入到哪个位置。
- template/templateurl:指定组件的模板内容或模板文件的路径。
- style/styleurls:指定组件的样式内容或样式文件的路径。
- providers: 用于配置该组件所需的服务提供者。
- 其他属性:https://angular.io/api/core/component
3.5.2 @directive
用于定义指令,给 html 元素附加行为或样式。
@directive({
  selector: '[apphighlight]'
})
export class highlightdirective {}
属性
- selector:指令在html中的选择器,用于标识该指令应该被应用到哪些元素上。
- inputs: 用于配置指令接受的输入。
- outputs: 用于配置指令发出的输出。
- 其他属性:https://angular.io/api/core/directive
3.5.3 @injectable
用于注入服务(service),使其可以被其他组件或服务所依赖和使用。
@injectable({
  providedin: 'root'
})
export class dataservice {}
属性
- providedin:指定服务的提供者,可以是 ‘root’、‘any’ 或一个特定的模块。
- providedin: ‘root’:将服务注册为根注入器的提供者。
- 其他属性:https://angular.io/api/core/injectable
3.5.4 @pipe
用于创建自定义管道,用于对模板中的数据进行转换。
@pipe({
  name: 'mycustompipe'
})
export class mycustompipe implements pipetransform {}
属性
- name:指定管道的名称,用于在模板中引用该管道。
- pure: 是否是纯管道。
- 其他属性:https://angular.io/api/core/pipe
3.6 服务
在 angular 中,服务是有一种用于封装可重用功能和数据的类。通过服务,可以将应用程序中的公共功能提取出来,以便在组件之间共享代码、数据和业务逻辑。
3.6.1 创建服务
在 angular 中,可以使用 @injectable装饰器来创建服务。这个装饰器标记一个类可以作为依赖注入的对象,并且允许其他类依赖它。
import { injectable } from '@angular/core';

@injectable({
  providedin: 'root'
})
export class dataservice {
  // 服务逻辑
}
providedin
3.6.2 注入服务
要在组件或其他服务中使用服务,需要在构造函数中引入该服务并将其声明为私有属性。
import { component } from '@angular/core';
import { dataservice } from './data.service';

@component({
  selector: 'app-my-component',
  template: '<p>{{ data }}</p>'
})
export class mycomponent {
  constructor(private dataservice: dataservice) {
    this.data = this.dataservice.getdata();
  }
}
3.6.3 提供服务
服务可以在跟模块或特定模块中提供,也可以在组件级别提供。使用providedin属性或模块的provides数组来指定服务的提供者。
@injectable({
  providedin: 'root'
})
export class dataservice {
  // 服务逻辑
}
或者在模块中提供:
@ngmodule({
  providers: [dataservice],
  // 其他模块配置
})
export class mymodule { }
- 生命周期:angular 服务的生命周期由 angular 的依赖注入系统管理。通常情况下,服务是单例的,即在整个应用程序中只会创建一个实例。
3.7 管道
在绑定之前,表达式的结果可能需要一些转换。例如,可能希望把数字显示成金额、强制文本变成大写,或者过滤列表以及进行排序。angular 管道对象对这样的小型转换来说是个很方便的选择。
管道是一个简单的函数,它接受一个输入值,并返回转换结果。
3.7.1 常用的内置管道函数
- datepipe:事件管道,根据区域设置规则格式化日期值
{{ value | currency [ : currencycode [ : display [ : digitsinfo [ : locale ] ] ] ] }}
- uppercasepipe:大写管道,将文本转为全部大写
- lowercasepipe:小写管道,将文本全部转为小写
- slicepipe:首字母转换为大写
- currencypipi:货币管道,将数字转换成货币字符串
- deprecatedpercentpipe:百分比管道,将数字格式化为百分比
- titlecasepipe :将文本转为标题大小写,单词首字母大写,其余部分小写
- jsonpipe:json管道,将值转换为json格式
- decimalpipe:字符串管道,将数字转换为字符串
它们用于模块表达式中,只要使用管道操作符| 就可以了
管道操作符会把它左侧的表达式结果传给它右侧的管道函数,还可以通过多个管道串联表达式。
<div class="alert alert-warning">
  <p>{{ title|uppercase }}</p>
  <p>{{ title|uppercase|lowercase }}</p>  // 链式管道
  <p>{{ this|json }}</p>
  <p>{{ time|date:'yyyy-mm-dd'}}</p>
  <p>{{ number|percent }}</p>
  <p>{{ number|currency:'cny' }}</p>
  <p>{{ birthday| date:format }}</p>
</div>

export class appcomponent {
  title = 'app';
  name = '张三丰';

  time = new date();
  number = 1.123;
  birthday = new date(2017,11,11)
  flag = true;
  format(){
    return this.flag?'yyy-mm-dd':'mm-dd'
  }
  show(str: string) {
    str += '---测试';
    return str;
  }
}
3.7.2 自定义管道
import { pipe, pipetransform } form '@angular/core';


@pipe({ name: 'sexreform' }) // name属性值惯用小驼峰是写法, name的值为html中| 后面的名称
export class sexreformpipe implements pipetransform {
    transform(value: string, args?: any): string {
        switch(value){
            case 'male': return '男';
            case 'female': return '女';
            default: return '雌雄同体';
        }
    }
}

// 在组件中使用自定义管道
// demo.component.ts
export class democomponent {
    sexvalue = 'male';
}

// demo.component.html
<span>{{ sexvalue | sexreform }}</span>
3.8 httpclient
-
根目录的module.ts里引入httpclient
import { httpclientmodule } from '@angular/common/http'; imports: [ browsermodule, approutingmodule, httpclientmodule // 加载httpclient ], -
在组件的component.ts文件里导入httpclient,如果有post请求,还需要导入httpheaders
import { httpclient, httpheaders } from "@angular/common/http"; -
在组件的构造器里定义一个http
constructor( private http: httpclient, ) { } -
设置headers
headers = { headers: new httpheaders({ "content-type": "application/x-www-form-urlencoded;charset=utf-8", }), }; -
使用http请求
this.http
  	.get<any>("接口地址", {
        headers: {},
        params: {},
     })
    .subscribe((res) => {
      		//请求成功的回调
        }
    }),
    (err: any) => {
      // 请求失败的回调
      console.log(err);
    };
-
在项目的根目录里新增一个proxy.conf.json文件
-
在proxy.conf.json里设置代理
{ "/api": { "target": "请求的接口地址", "secure": false, "changeorigin": true } } -
在package.json里配置启动代理
-
重新运行项目,就可以正常请求到接口了
npm start
3.9 路由
{ path: "home", compont: home }
<a routerlink='home'></a>   // 等同于vue的 router-link to=''
<router-outlet></router-outlet>  // 路由出口
// 重定向路由
{ path: "",redirectto: "home", pathmath: "full" }
// 参数路由
{ path: "home/:id", compont: home }
// 使用
<a routerlink='home/12'></a>
// 在组件里获取参数,router-params.component.ts
// 先引入docheck钩子函数和路由核心库
import { docheck } from '@angular/core'
import { router, parammap } from '@angular/router'
// 获取参数snapshot.parammap.get('路由里定义的变量名')
export class routerparamscomponent implements oninit,docheck{
    id;
    constructor(private route:activatedroute,private router:router){}
    ngdocheck():void{
        this.id = this.route.snapshot.parammap.get('id')
    }
}
配置子路由
{
	path: "home",
  compont: home,
	children:[
    { path: "homea", compont:homea },    // 子路由地址:/home/homea
    { path: "homeb/:id", compont:homeb }, // /home/homeb/1
	]
}
注意:子路由需要在他的父路由的html中添加路由出口,否则会跳转无响应
函数路由
// 通过事件跳转路由
this.router.navigatebyurl('路由地址')
// 还可以设置属性{ skiplocationchange:true },实现页面跳转但路由不发生变化
this.router.navigatebyurl('home',{skiplocationchange:true})
// 还可以使用navigate进行路由跳转
this.router.navigate(['home'])
// 传参
this.router.navigatebyurl('home/1')
this.router.navigate(['home','1'])
五、总结
angularjs是一个功能丰富的javascript框架,提供了许多强大的特性和工具,用于构建现代化的web应用程序。本文提供了一个简单、全面、容易上手的入门指南,帮助你开始学习和使用angularjs。我们介绍了安装和设置angularjs的步骤,以及数据绑定、控制器、指令和服务等核心概念。希望这篇文章能够帮助你快速入门angularjs,并开始构建令人惊艳的web应用程序。
![ApiError(406, ‘Content-Type header [application/vnd.elasticsearch+json; compatible-with=8] is not su](https://images.3wcode.com/3wcode/20240802/s_0_202408020425541919.png)


发表评论