常见的消息队列很多,主要包括 rabbitmq、kafka、rocketmq 和 activemq,相关的选型可以看我之前的系列,这篇文章只讲 rabbitmq,先讲原理,后搞实战。
1. 消息队列
1.1 消息队列模式
消息队列目前主要 2 种模式,分别为“点对点模式”和“发布/订阅模式”。
1.1.1 点对点模式
一个具体的消息只能由一个消费者消费,多个生产者可以向同一个消息队列发送消息,但是一个消息在被一个消息者处理的时候,这个消息在队列上会被锁住或者被移除并且其他消费者无法处理该消息。
需要额外注意的是,如果消费者处理一个消息失败了,消息系统一般会把这个消息放回队列,这样其他消费者可以继续处理。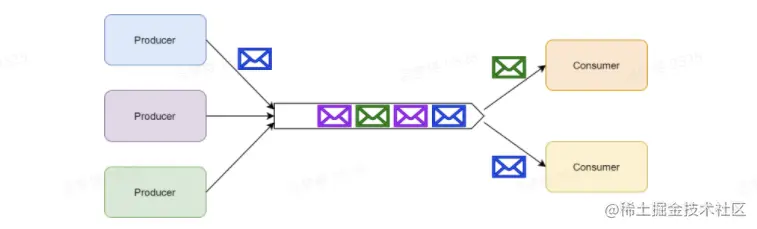
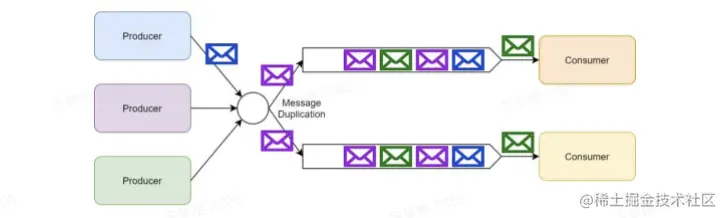
1.1.2 发布/订阅模式
单个消息可以被多个订阅者并发的获取和处理。一般来说,订阅有两种类型:
- 临时(ephemeral)订阅: 这种订阅只有在消费者启动并且运行的时候才存在。一旦消费者退出,相应的订阅以及尚未处理的消息就会丢失。
- 持久(durable)订阅: 这种订阅会一直存在,除非主动去删除。消费者退出后,消息系统会继续维护该订阅,并且后续消息可以被继续处理。
1.2 衡量标准
对消息队列进行技术选型时,需要通过以下指标衡量你所选择的消息队列,是否可以满足你的需求:
- 消息顺序: 发送到队列的消息,消费时是否可以保证消费的顺序,比如a先下单,b后下单,应该是a先去扣库存,b再去扣,顺序不能反。
- 消息路由: 根据路由规则,只订阅匹配路由规则的消息,比如有a/b两者规则的消息,消费者可以只订阅a消息,b消息不会消费。
- 消息可靠性: 是否会存在丢消息的情况,比如有a/b两个消息,最后只有b消息能消费,a消息丢失。
- 消息时序: 主要包括“消息存活时间”和“延迟/预定的消息”,“消息存活时间”表示生产者可以对消息设置ttl,如果超过该ttl,消息会自动消失;“延迟/预定的消息”指的是可以延迟或者预订消费消息,比如延时5分钟,那么消息会5分钟后才能让消费者消费,时间未到的话,是不能消费的。
- 消息留存: 消息消费成功后,是否还会继续保留在消息队列。
- 容错性: 当一条消息消费失败后,是否有一些机制,保证这条消息是一种能成功,比如异步第三方退款消息,需要保证这条消息消费掉,才能确定给用户退款成功,所以必须保证这条消息消费成功的准确性。
- 伸缩: 当消息队列性能有问题,比如消费太慢,是否可以快速支持库容;当消费队列过多,浪费系统资源,是否可以支持缩容。
- 吞吐量: 支持的最高并发数。
2. rabbitmq 原理初探
rabbitmq 2007 年发布,是使用 erlang 语言开发的开源消息队列系统,基于 amqp 协议来实现。
2.1 基本概念
提到rabbitmq,就不得不提amqp协议。amqp协议是具有现代特征的二进制协议。是一个提供统一消息服务的应用层标准高级消息队列协议,是应用层协议的一个开放标准,为面向消息的中间件设计。
先了解一下amqp协议中间的几个重要概念:
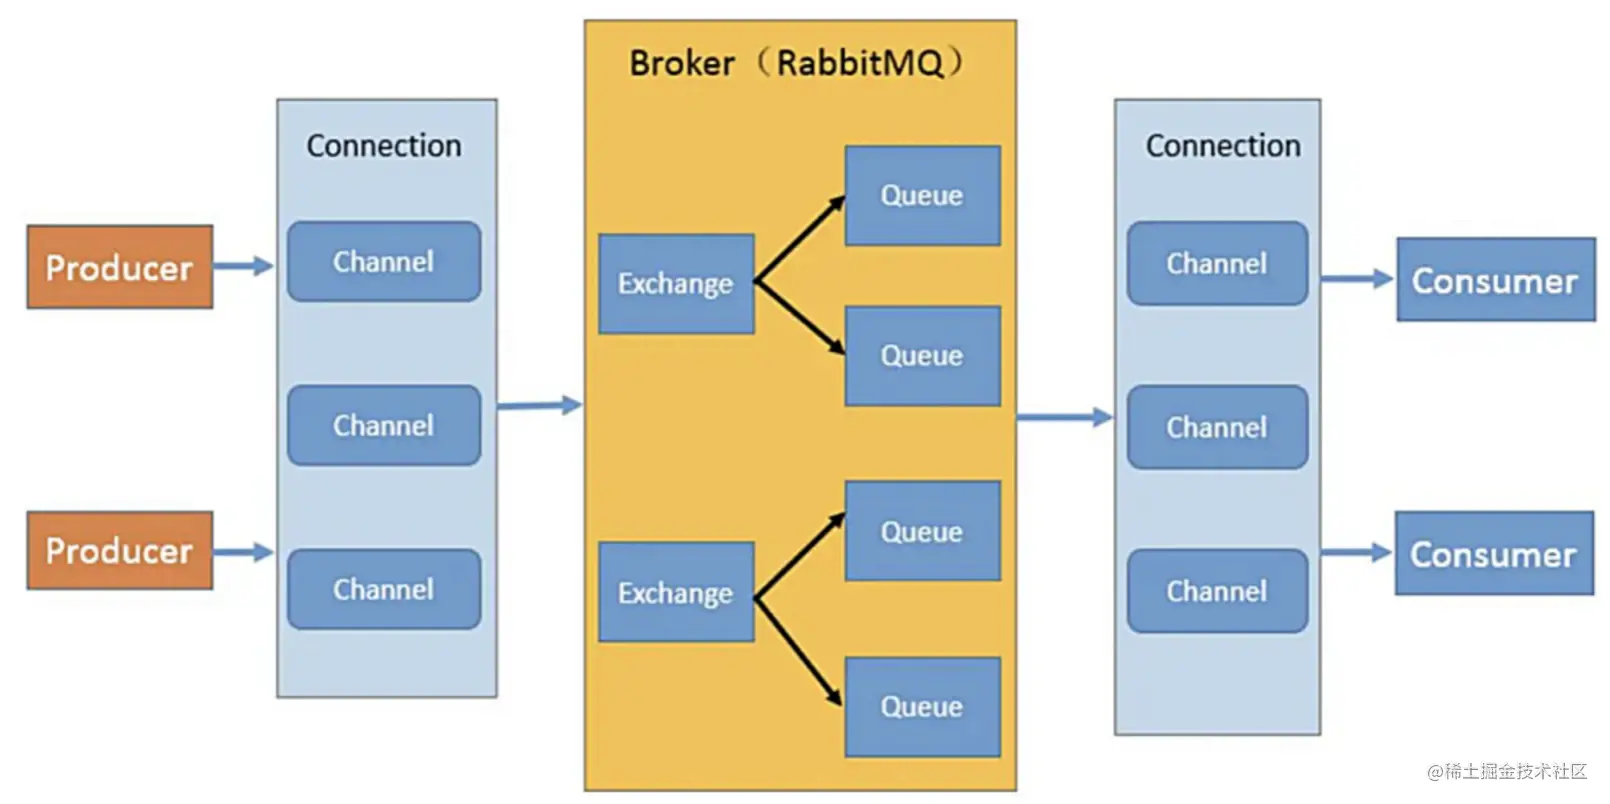
- server: 接收客户端的连接,实现amqp实体服务。
- connection: 连接,应用程序与server的网络连接,tcp连接。
- channel: 信道,消息读写等操作在信道中进行。客户端可以建立多个信道,每个信道代表一个会话任务。
- message: 消息,应用程序和服务器之间传送的数据,消息可以非常简单,也可以很复杂。由properties和body组成。properties为外包装,可以对消息进行修饰,比如消息的优先级、延迟等高级特性;body就是消息体内容。
- virtual host: 虚拟主机,用于逻辑隔离。一个虚拟主机里面可以有若干个exchange和queue,同一个虚拟主机里面不能有相同名称的exchange或queue。
- exchange: 交换器,接收消息,按照路由规则将消息路由到一个或者多个队列。如果路由不到,或者返回给生产者,或者直接丢弃。rabbitmq常用的交换器常用类型有direct、topic、fanout、headers四种,后面详细介绍。
- binding: 绑定,交换器和消息队列之间的虚拟连接,绑定中可以包含一个或者多个routingkey。
- routingkey: 路由键,生产者将消息发送给交换器的时候,会发送一个routingkey,用来指定路由规则,这样交换器就知道把消息发送到哪个队列。路由键通常为一个“.”分割的字符串,例如“com.rabbitmq”。
- queue: 消息队列,用来保存消息,供消费者消费。
2.2 工作原理
amqp 协议模型由三部分组成:生产者、消费者和服务端,执行流程如下:
- 生产者是连接到 server,建立一个连接,开启一个信道。
- 生产者声明交换器和队列,设置相关属性,并通过路由键将交换器和队列进行绑定。
- 消费者也需要进行建立连接,开启信道等操作,便于接收消息。
- 生产者发送消息,发送到服务端中的虚拟主机。
- 虚拟主机中的交换器根据路由键选择路由规则,发送到不同的消息队列中。
- 订阅了消息队列的消费者就可以获取到消息,进行消费。
2.3 常用交换机
rabbitmq常用的交换器类型有direct、topic、fanout、headers四种:
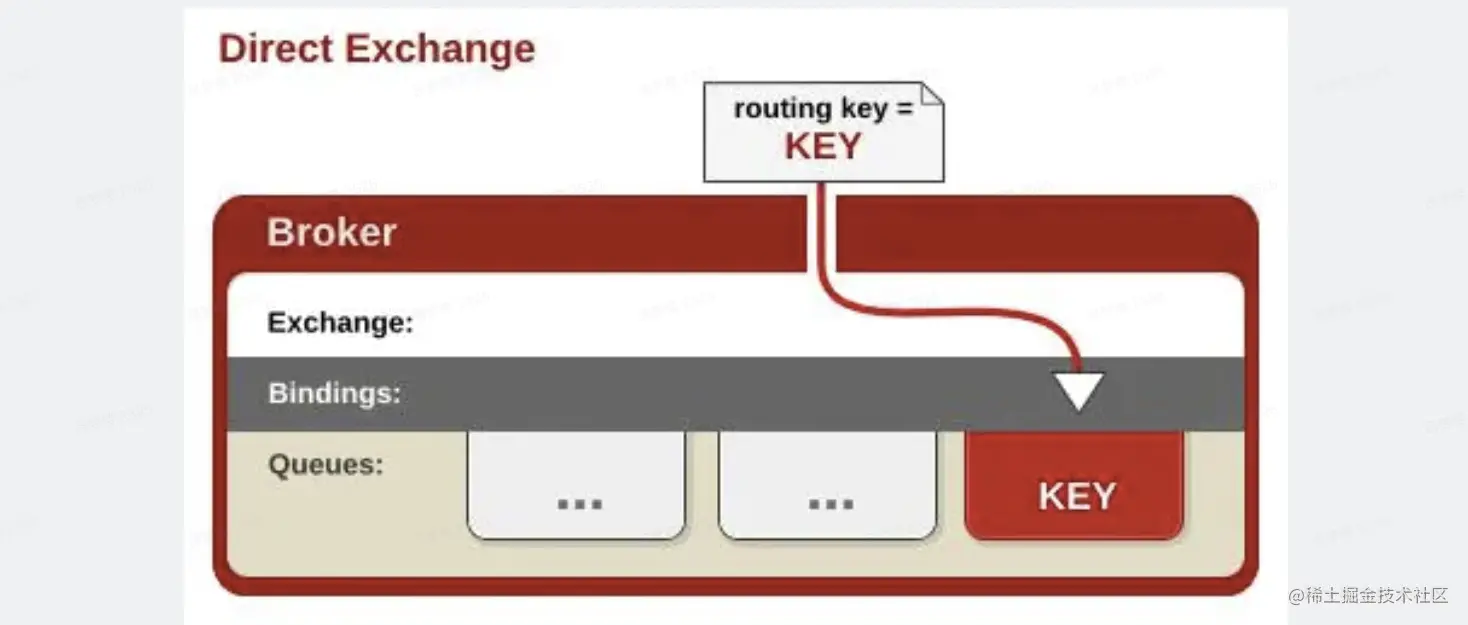
- **direct exchange:**见文知意,直连交换机意思是此交换机需要绑定一个队列,要求该消息与一个特定的路由键完全匹配。简单点说就是一对一的,点对点的发送。
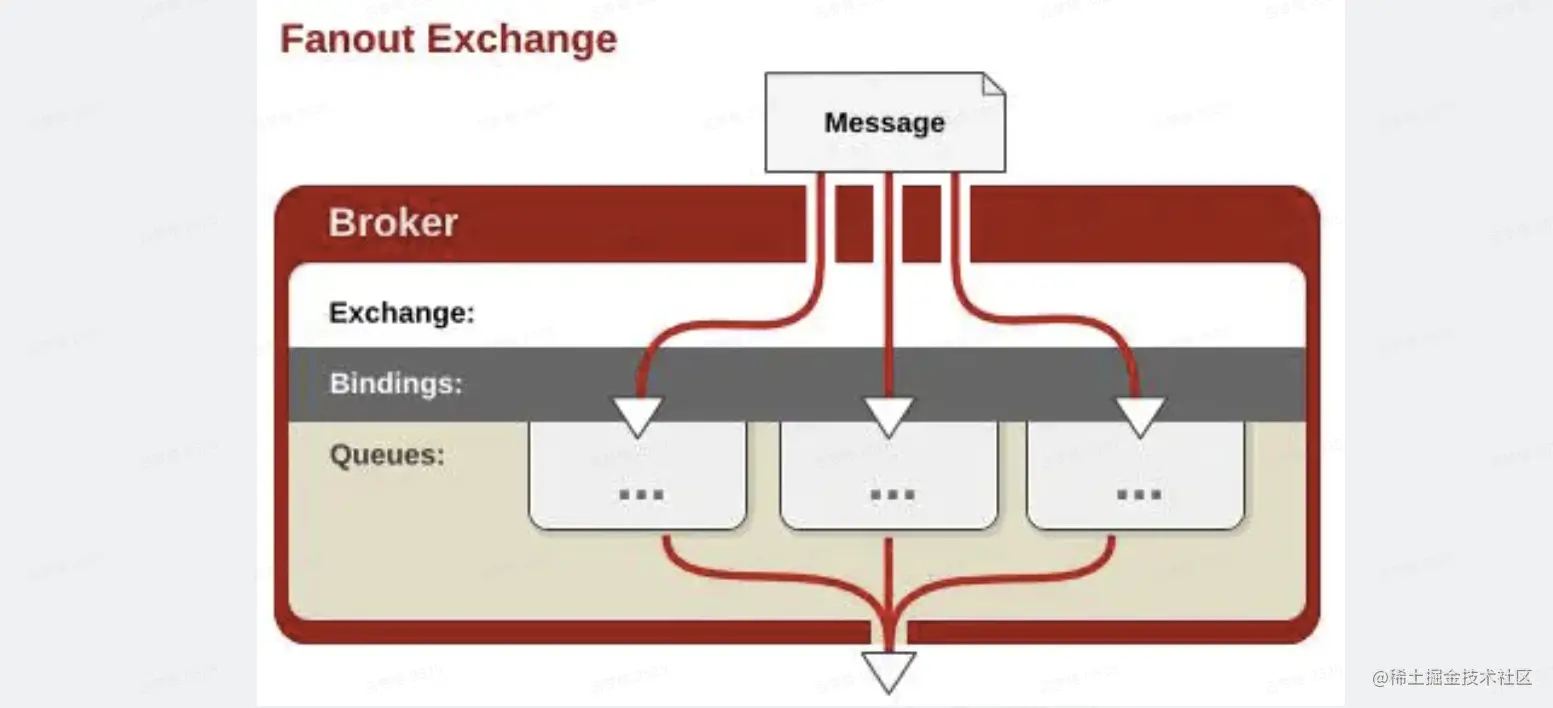
- fanout exchange:这种类型的交换机需要将队列绑定到交换机上。一个发送到交换机的消息都会被转发到与该交换机绑定的所有队列上。很像子网广播,每台子网内的主机都获得了一份复制的消息。简单点说就是发布订阅。
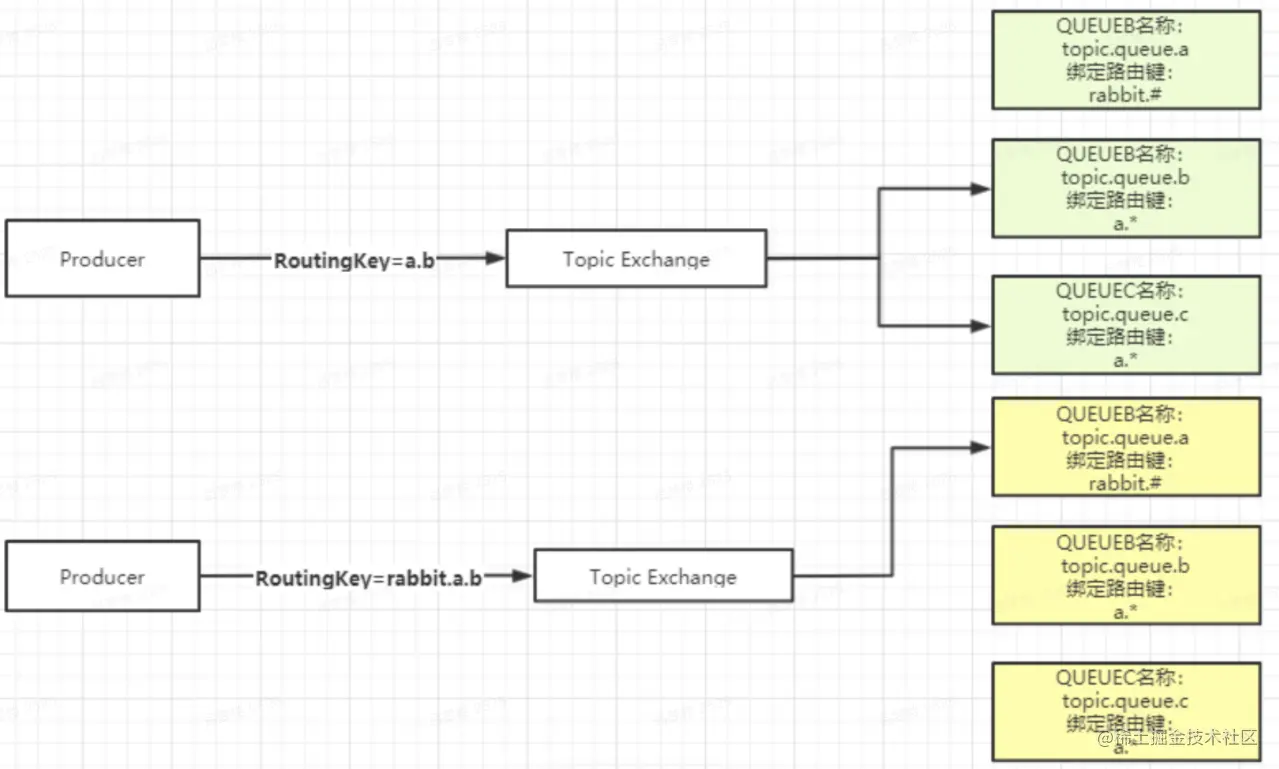
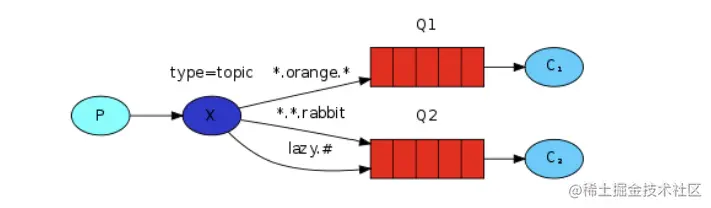
- topic exchange:直接翻译的话叫做主题交换机,如果从用法上面翻译可能叫通配符交换机会更加贴切。这种交换机是使用通配符去匹配,路由到对应的队列。通配符有两种:“*” 、 “#”。需要注意的是通配符前面必须要加上"."符号。
- “_”“符号:有且只匹配一个词。比如 a._可以匹配到"a.b”、“a.c”,但是匹配不了"a.b.c"。
- "#“符号:匹配一个或多个词。比如"rabbit.#“既可以匹配到"rabbit.a.b”、“rabbit.a”,也可以匹配到"rabbit.a.b.c”。
- headers exchange:这种交换机用的相对没这么多。它跟上面三种有点区别,它的路由不是用routingkey进行路由匹配,而是在匹配请求头中所带的键值进行路由。创建队列需要设置绑定的头部信息,有两种模式:全部匹配和部分匹配。如上图所示,交换机会根据生产者发送过来的头部信息携带的键值去匹配队列绑定的键值,路由到对应的队列。

2.4 消费原理
我们先看几个基本概念:
- broker: 每个节点运行的服务程序,功能为维护该节点的队列的增删以及转发队列操作请求。
- master queue: 每个队列都分为一个主队列和若干个镜像队列。
- mirror queue: 镜像队列,作为master queue的备份。在master queue所在节点挂掉之后,系统把mirror queue提升为-- master queue,负责处理客户端队列操作请求。注意,mirror queue只做镜像,设计目的不是为了承担客户端读写压力。
集群中有两个节点,每个节点上有一个broker,每个broker负责本机上队列的维护,并且borker之间可以互相通信。集群中有两个队列a和b,每个队列都分为master queue和mirror queue(备份)。那么队列上的生产消费怎么实现的呢?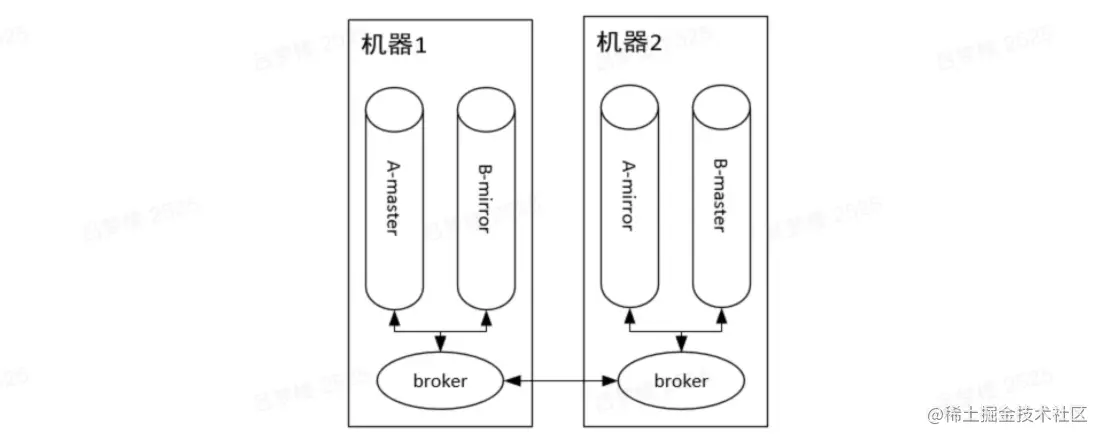
对于消费队列,如下图有两个consumer消费队列a,这两个consumer连在了集群的不同机器上。rabbitmq集群中的任何一个节点都拥有集群上所有队列的元信息,所以连接到集群中的任何一个节点都可以,主要区别在于有的consumer连在master queue所在节点,有的连在非master queue节点上。
因为mirror queue要和master queue保持一致,故需要同步机制,正因为一致性的限制,导致所有的读写操作都必须都操作在master queue上(想想,为啥读也要从master queue中读?和数据库读写分离是不一样的),然后由master节点同步操作到mirror queue所在的节点。即使consumer连接到了非master queue节点,该consumer的操作也会被路由到master queue所在的节点上,这样才能进行消费。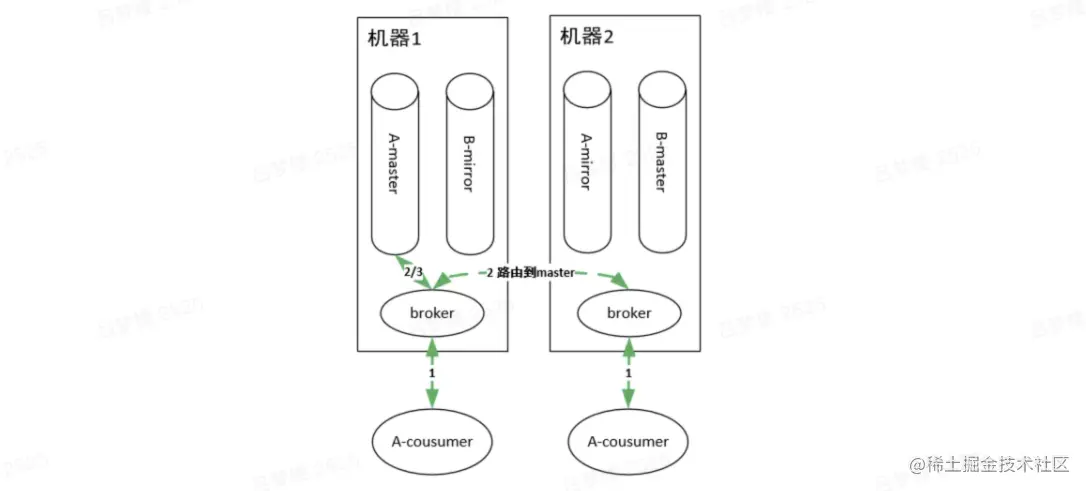
对于生成队列,原理和消费一样,如果连接到非 master queue 节点,则路由过去。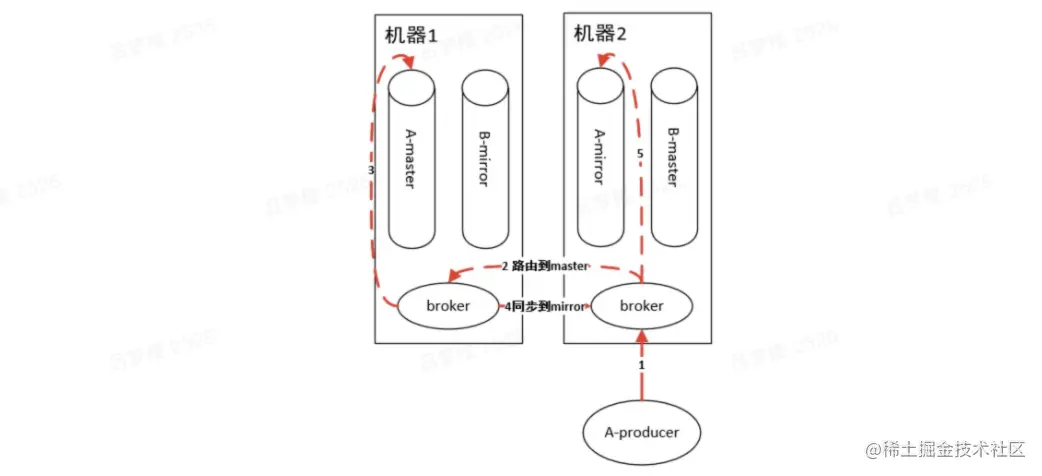
2.5 高级特性
2.5.1 过期时间
time to live,也就是生存时间,是一条消息在队列中的最大存活时间,单位是毫秒,下面看看rabbitmq过期时间特性:
- rabbitmq可以对消息和队列设置ttl。
- rabbitmq支持设置消息的过期时间,在消息发送的时候可以进行指定,每条消息的过期时间可以不同。
- rabbitmq支持设置队列的过期时间,从消息入队列开始计算,直到超过了队列的超时时间配置,那么消息会变成死信,自动清除。
- 如果两种方式一起使用,则过期时间以两者中较小的那个数值为准。
- 当然也可以不设置ttl,不设置表示消息不会过期;如果设置为0,则表示除非此时可以直接将消息投递到消费者,否则该消息将被立即丢弃。
2.5.2 消息确认
为了保证消息从队列可靠地到达消费者,rabbitmq提供了消息确认机制。
消费者订阅队列的时候,可以指定autoack参数,当autoack为true的时候,rabbitmq采用自动确认模式,rabbitmq自动把发送出去的消息设置为确认,然后从内存或者硬盘中删除,而不管消费者是否真正消费到了这些消息。
当autoack为false的时候,rabbitmq会等待消费者回复的确认信号,收到确认信号之后才从内存或者磁盘中删除消息。
消息确认机制是rabbitmq消息可靠性投递的基础,只要设置autoack参数为false,消费者就有足够的时间处理消息,不用担心处理消息的过程中消费者进程挂掉后消息丢失的问题。
2.5.3 持久化
消息的可靠性是rabbitmq的一大特色,那么rabbitmq是如何保证消息可靠性的呢?答案就是消息持久化。持久化可以防止在异常情况下丢失数据。rabbitmq的持久化分为三个部分:交换器持久化、队列持久化和消息的持久化。
交换器持久化可以通过在声明队列时将durable参数设置为true。如果交换器不设置持久化,那么在rabbitmq服务重启之后,相关的交换器元数据会丢失,不过消息不会丢失,只是不能将消息发送到这个交换器了。
队列的持久化能保证其本身的元数据不会因异常情况而丢失,但是不能保证内部所存储的消息不会丢失。要确保消息不会丢失,需要将其设置为持久化。队列的持久化可以通过在声明队列时将durable参数设置为true。
设置了队列和消息的持久化,当rabbitmq服务重启之后,消息依然存在。如果只设置队列持久化或者消息持久化,重启之后消息都会消失。
当然,也可以将所有的消息都设置为持久化,但是这样做会影响rabbitmq的性能,因为磁盘的写入速度比内存的写入要慢得多。
对于可靠性不是那么高的消息可以不采用持久化处理以提高整体的吞吐量。鱼和熊掌不可兼得,关键在于选择和取舍。在实际中,需要根据实际情况在可靠性和吞吐量之间做一个权衡。
2.5.4 死信队列
当消息在一个队列中变成死信之后,他能被重新发送到另一个交换器中,这个交换器成为死信交换器,与该交换器绑定的队列称为死信队列。
消息变成死信有下面几种情况:
消息被拒绝。
消息过期
队列达到最大长度
dlx也是一个正常的交换器,和一般的交换器没有区别,他能在任何的队列上面被指定,实际上就是设置某个队列的属性。当这个队列中有死信的时候,rabbitmq会自动将这个消息重新发送到设置的交换器上,进而被路由到另一个队列,我们可以监听这个队列中消息做相应的处理。
死信队列有什么用?当发生异常的时候,消息不能够被消费者正常消费,被加入到了死信队列中。后续的程序可以根据死信队列中的内容分析当时发生的异常,进而改善和优化系统。
2.5.5 延迟队列
一般的队列,消息一旦进入队列就会被消费者立即消费。延迟队列就是进入该队列的消息会被消费者延迟消费,延迟队列中存储的对象是的延迟消息,“延迟消息”是指当消息被发送以后,等待特定的时间后,消费者才能拿到这个消息进行消费。
延迟队列用于需要延迟工作的场景。最常见的使用场景:淘宝或者天猫我们都使用过,用户在下单之后通常有30分钟的时间进行支付,如果这30分钟之内没有支付成功,那么订单就会自动取消。
除了延迟消费,延迟队列的典型应用场景还有延迟重试。比如消费者从队列里面消费消息失败了,可以延迟一段时间以后进行重试。
2.6 特性分析
这里才是内容的重点,不仅需要知道rabbit的特性,还需要知道支持这些特性的原因:
- 消息路由(支持) : rabbitmq可以通过不同的交换器支持不同种类的消息路由;
- 消息有序(不支持) : 当消费消息时,如果消费失败,消息会被放回队列,然后重新消费,这样会导致消息无序;
- 消息时序(非常好) : 通过延时队列,可以指定消息的延时时间,过期时间ttl等;
- 容错处理(非常好) : 通过交付重试和死信交换器(dlx)来处理消息处理故障;
- 伸缩(一般) : 伸缩其实没有非常智能,因为即使伸缩了,master queue还是只有一个,负载还是只有这一个master queue去抗,所以我理解rabbitmq的伸缩很弱(个人理解)。
- 持久化(不太好) : 没有消费的消息,可以支持持久化,这个是为了保证机器宕机时消息可以恢复,但是消费过的消息,就会被马上删除,因为rabbitmq设计时,就不是为了去存储历史数据的。
- 消息回溯(支持) : 因为消息不支持永久保存,所以自然就不支持回溯。
- 高吞吐(中等) : 因为所有的请求的执行,最后都是在master queue,它的这个设计,导致单机性能达不到十万级的标准。
3. rabbitmq环境搭建
因为我用的是mac,所以直接可以参考官网:
https://www.rabbitmq.com/install-homebrew.html
执行:
brew update && brew install rabbitmq
但是在执行“brew install rabbitmq”,会自动安装其它的程序,如果你使用源码安装rabbitmq,因为启动该服务依赖erlang环境,所以你还需手动安装erlang,但是目前官方已经一键给你搞定,会自动安装rabbitmq依赖的所有程序,是不是很棒!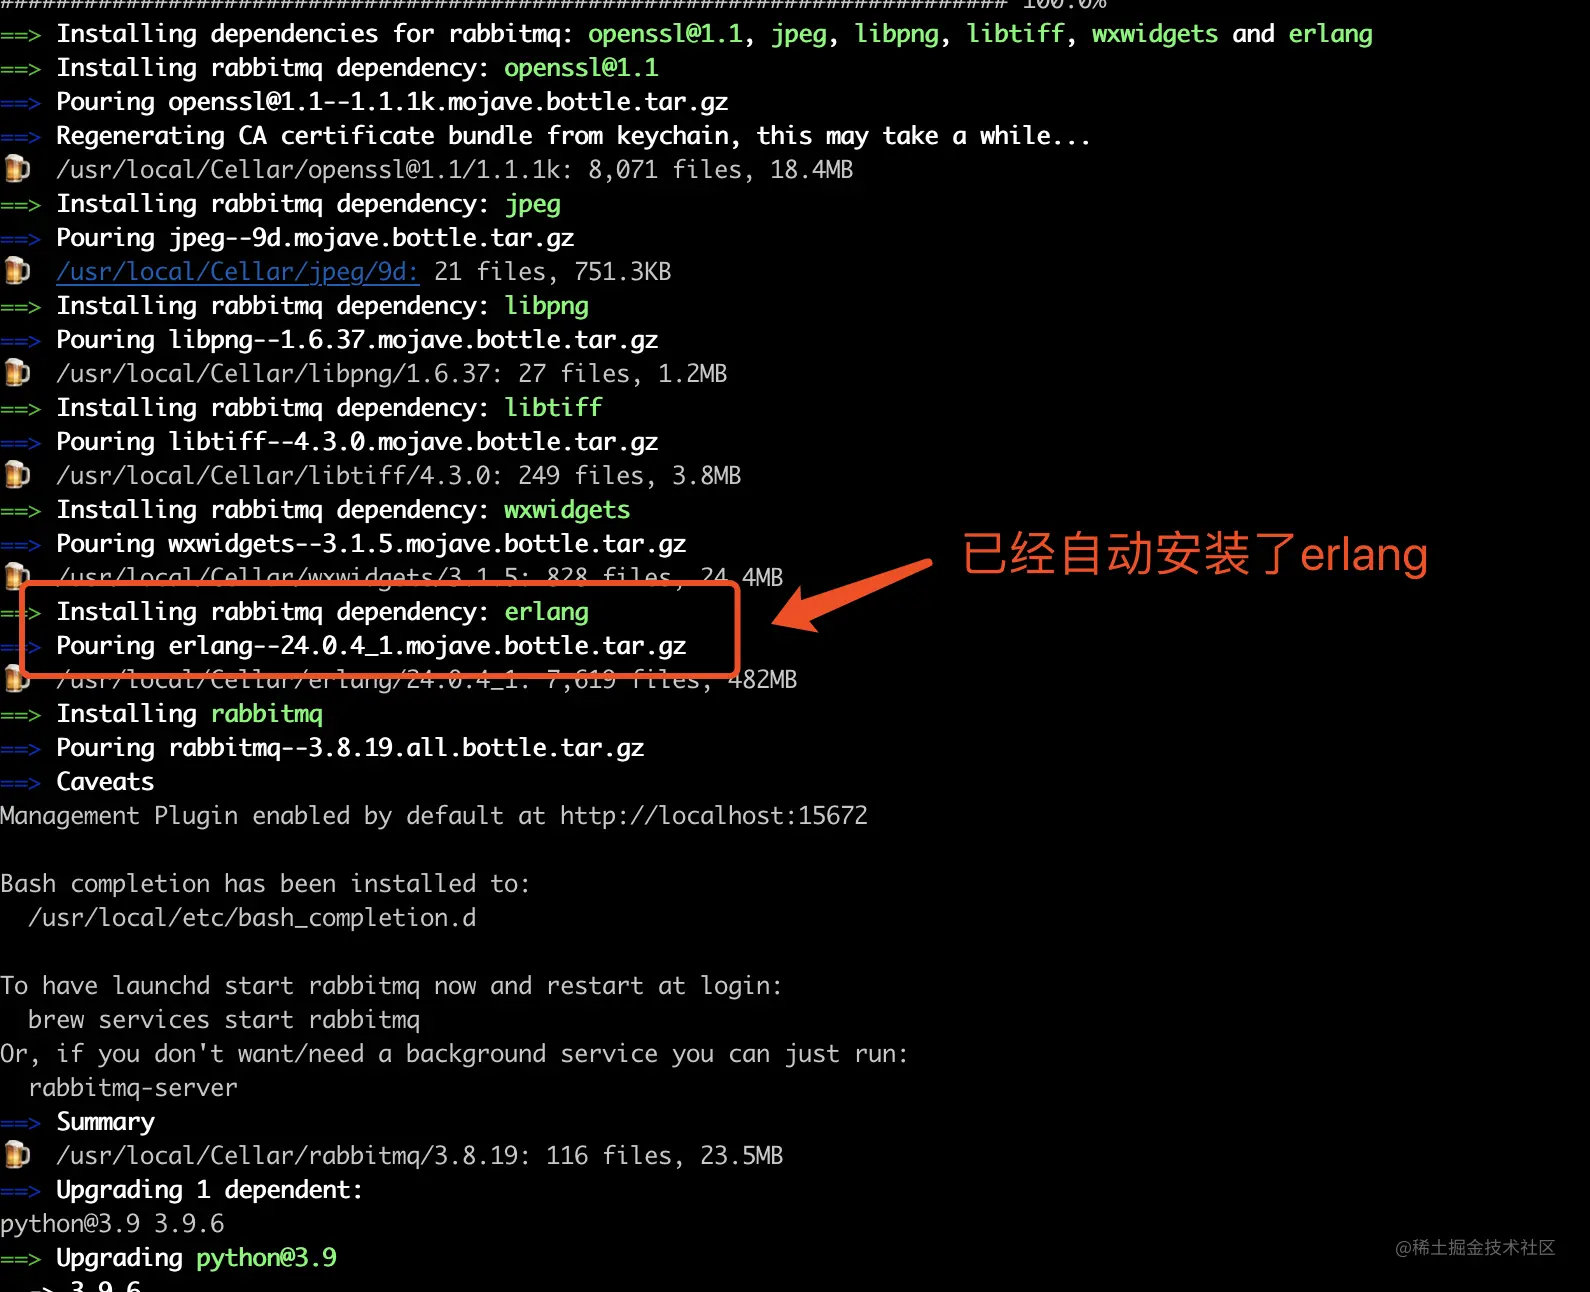
执行成功输出: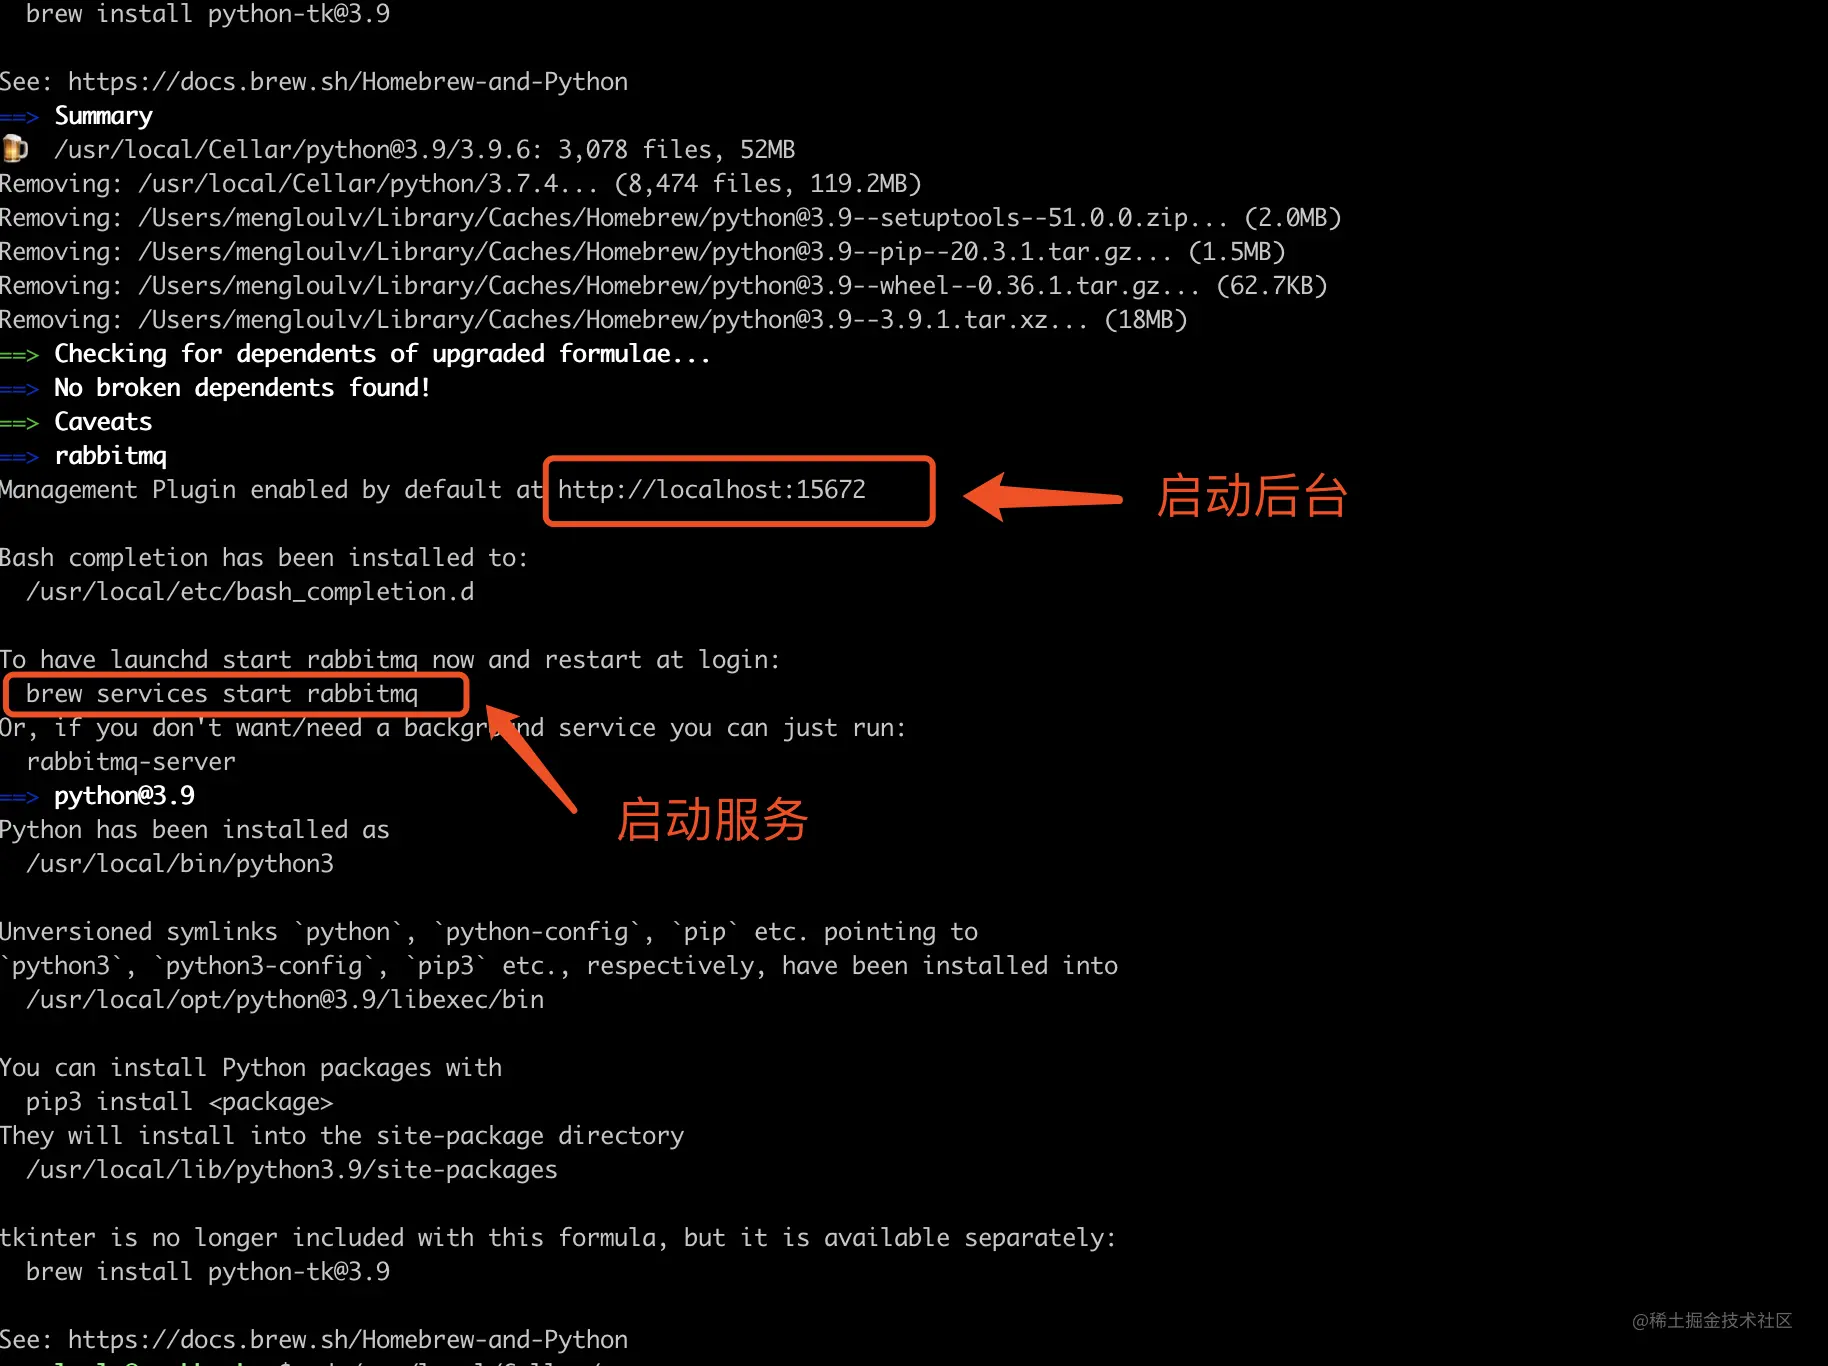
启动服务:
# 启动方式1:后台启动
brew services start rabbitmq
# 启动方式2:当前窗口启动
cd /usr/local/cellar/rabbitmq/3.8.19
rabbitmq-server
在浏览器输入:
http://localhost:15672/
会出现rabbitmq后台管理界面(用户名和密码都为guest):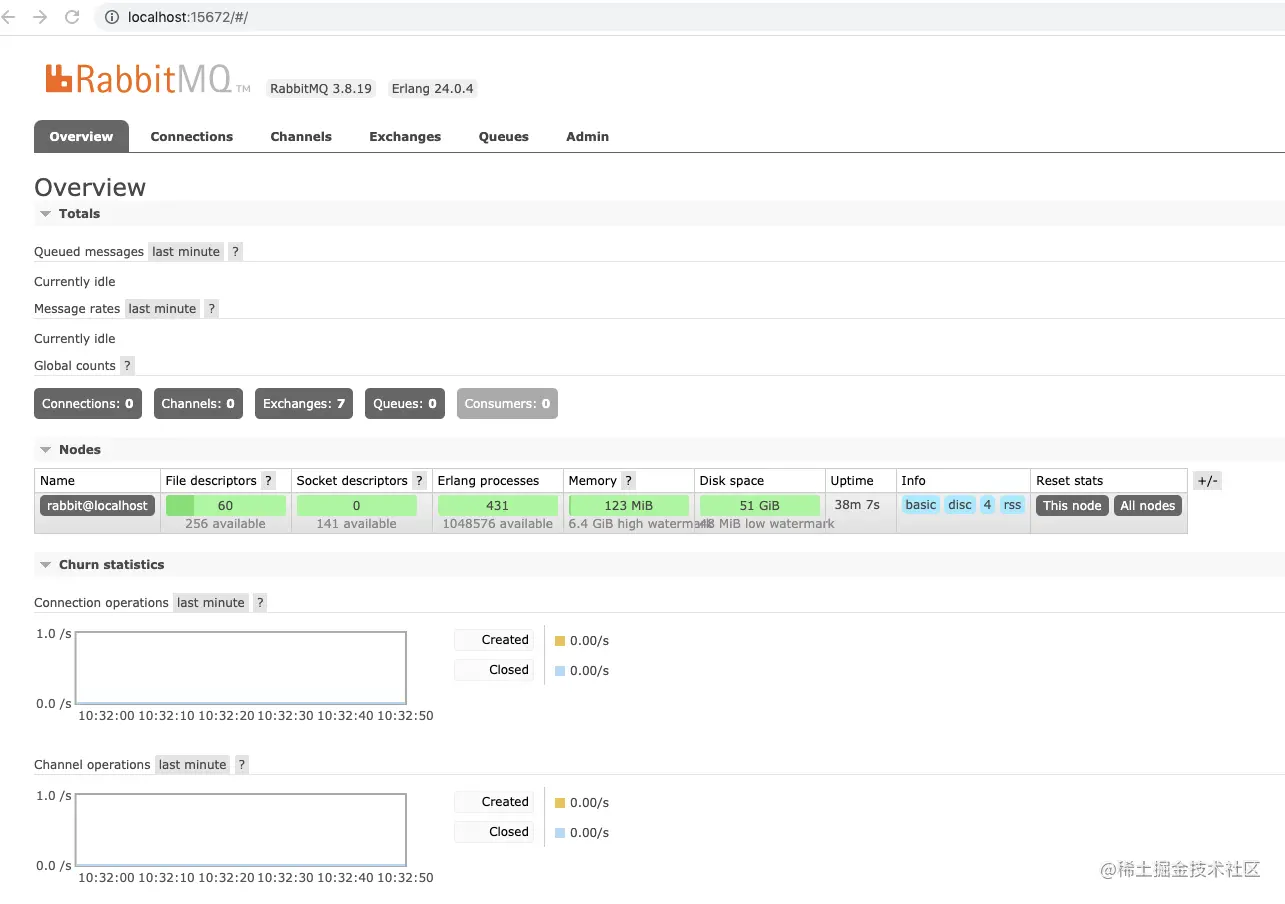
通过brew安装,一行命令搞定,真香!
4. rabbitmq测试
4.1 添加账号
首先得启动mq
## 添加账号
rabbitmqctl add_user admin admin
## 添加访问权限
rabbitmqctl set_permissions -p "/" admin ".*" ".*" ".*"
## 设置超级权限
rabbitmqctl set_user_tags admin administrator
4.2 java代码示例
因为代码中引入了java 8的特性,pom引入依赖:
<dependency>
  <groupid>com.rabbitmq</groupid>
  <artifactid>amqp-client</artifactid>
  <version>5.5.1</version>
</dependency>

<plugins>
  <plugin>
    <groupid>org.apache.maven.plugins</groupid>
    <artifactid>maven-compiler-plugin</artifactid>
    <configuration>
      <source>8</source>
      <target>8</target>
    </configuration>
  </plugin>
</plugins>
测试代码
public class rabbitmqtest {
    //消息队列名称
    private final static string queue_name = "hello";

    @test
    public void send() throws java.io.ioexception, timeoutexception {
        //创建连接工程
        connectionfactory factory = new connectionfactory();
        factory.sethost("127.0.0.1");
        factory.setport(5672);
        factory.setusername("admin");
        factory.setpassword("admin");
        //创建连接
        connection connection = factory.newconnection();
        //创建消息通道
        channel channel = connection.createchannel();
        //生成一个消息队列
        channel.queuedeclare(queue_name, true, false, false, null);

        for (int i = 0; i < 10; i++) {
            string message = "hello world rabbitmq count: " + i;
            //发布消息,第一个参数表示路由(exchange名称),为""则表示使用默认消息路由
            channel.basicpublish("", queue_name, null, message.getbytes());
            system.out.println(" [x] sent '" + message + "'");
        }
        //关闭消息通道和连接
        channel.close();
        connection.close();
    }

    @test
    public void consumer() throws java.io.ioexception, timeoutexception {
        //创建连接工厂
        connectionfactory factory = new connectionfactory();
        factory.sethost("127.0.0.1");
        factory.setport(5672);
        factory.setusername("admin");
        factory.setpassword("admin");
        //创建连接
        connection connection = factory.newconnection();
        //创建消息信道
        final channel channel = connection.createchannel();
        //消息队列
        channel.queuedeclare(queue_name, true, false, false, null);
        system.out.println("[*] waiting for message. to exist press ctrl+c");

        delivercallback delivercallback = (consumertag, delivery) -> {
            string message = new string(delivery.getbody(), "utf-8");
            system.out.println(" [x] received '" + message + "'");
        };
        channel.basicconsume(queue_name, true, delivercallback, consumertag -> {});
    }
}
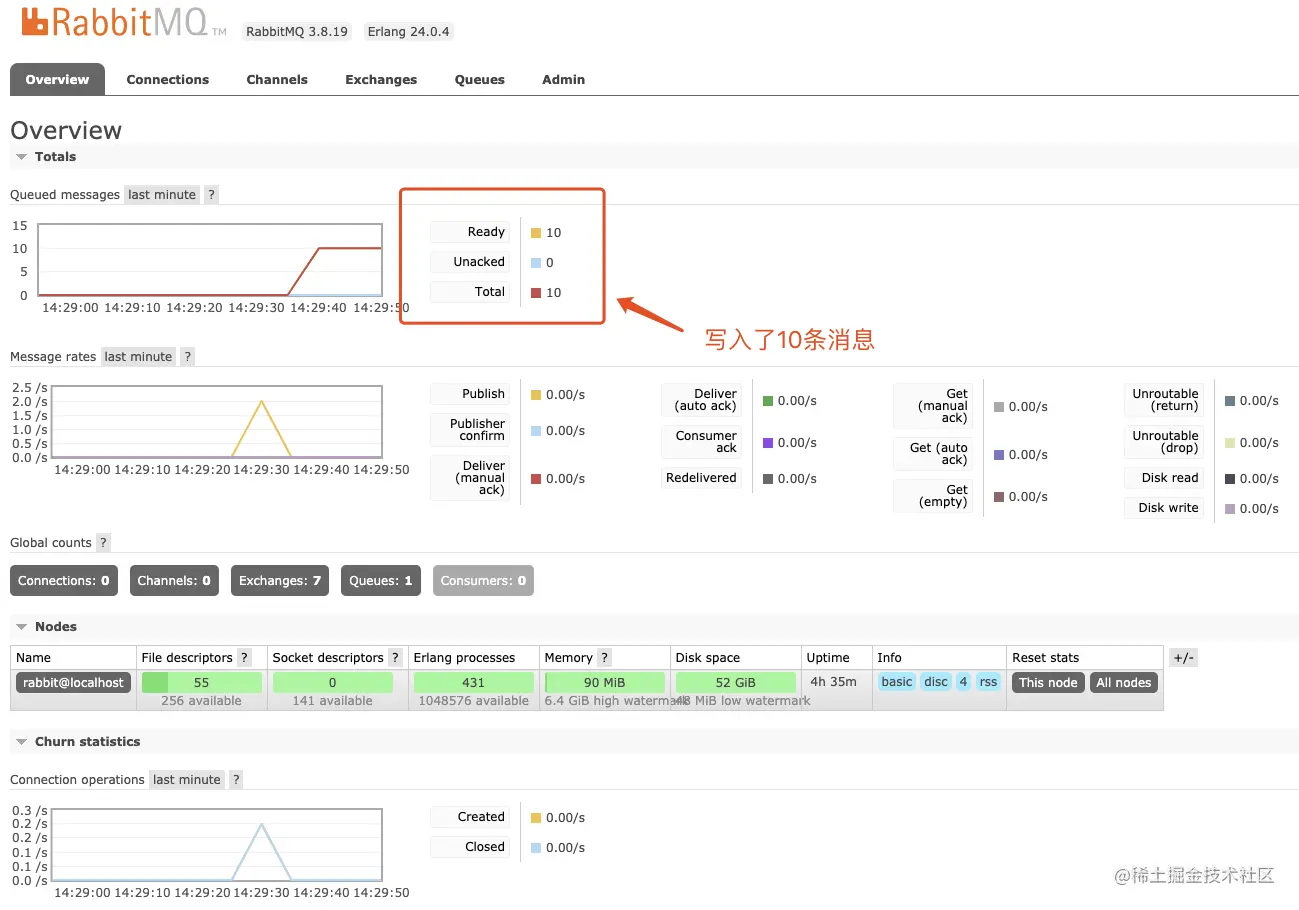
执行send()后控制台输出:
[x] sent 'hello world rabbitmq count: 0'
[x] sent 'hello world rabbitmq count: 1'
[x] sent 'hello world rabbitmq count: 2'
[x] sent 'hello world rabbitmq count: 3'
[x] sent 'hello world rabbitmq count: 4'
[x] sent 'hello world rabbitmq count: 5'
[x] sent 'hello world rabbitmq count: 6'
[x] sent 'hello world rabbitmq count: 7'
[x] sent 'hello world rabbitmq count: 8'
[x] sent 'hello world rabbitmq count: 9'
执行consumer()后: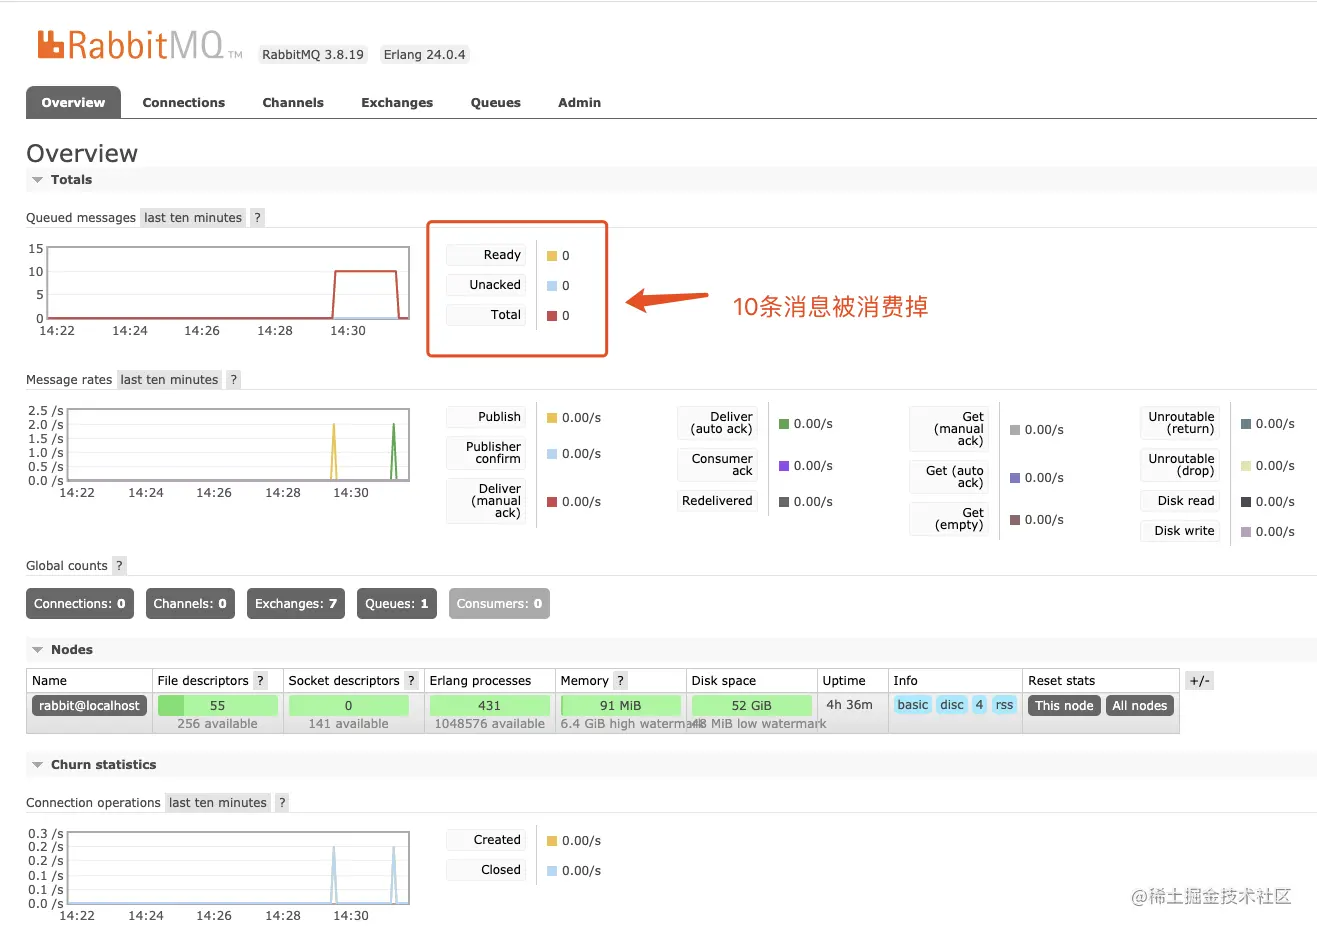
5. 基本使用姿势
5.1 公共代码封装
封装工厂类:
public class rabbitutil {
    public static connectionfactory getconnectionfactory() {
        //创建连接工程,下面给出的是默认的case
        connectionfactory factory = new connectionfactory();
        factory.sethost("127.0.0.1");
        factory.setport(5672);
        factory.setusername("admin");
        factory.setpassword("admin");
        factory.setvirtualhost("/");
        return factory;
    }
}
封装生成者:
public class msgproducer {
    public static void publishmsg(string exchange, builtinexchangetype exchangetype, string toutingkey, string message) throws ioexception, timeoutexception {
        connectionfactory factory = rabbitutil.getconnectionfactory();
        //创建连接
        connection connection = factory.newconnection();
        //创建消息通道
        channel channel = connection.createchannel();
        // 声明exchange中的消息为可持久化,不自动删除
        channel.exchangedeclare(exchange, exchangetype, true, false, null);
        // 发布消息
        channel.basicpublish(exchange, toutingkey, null, message.getbytes());
        system.out.println("sent '" + message + "'");
        channel.close();
        connection.close();
    }
}
5.2 direct方式

5.2.1 direct示例
生产者:
public class directproducer {
    private static final string exchange_name = "direct.exchange";
    public void publishmsg(string routingkey, string msg) {
        try {
            msgproducer.publishmsg(exchange_name, builtinexchangetype.direct, routingkey, msg);
        } catch (exception e) {
            e.printstacktrace();
        }
    }
    public static void main(string[] args) throws interruptedexception {
        directproducer directproducer = new directproducer();
        string[] routingkey = new string[]{"aaa", "bbb", "ccc"};
        string msg = "hello >>> ";
        for (int i = 0; i < 10; i++) {
            directproducer.publishmsg(routingkey[i % 3], msg + i);
        }
        system.out.println("----over-------");
        thread.sleep(1000 * 60 * 100);
    }
}
执行生产者,往消息队列中放入10条消息,其中key分别为“aaa”、“bbb”和“ccc”,分别放入qa、qb、qc三个队列: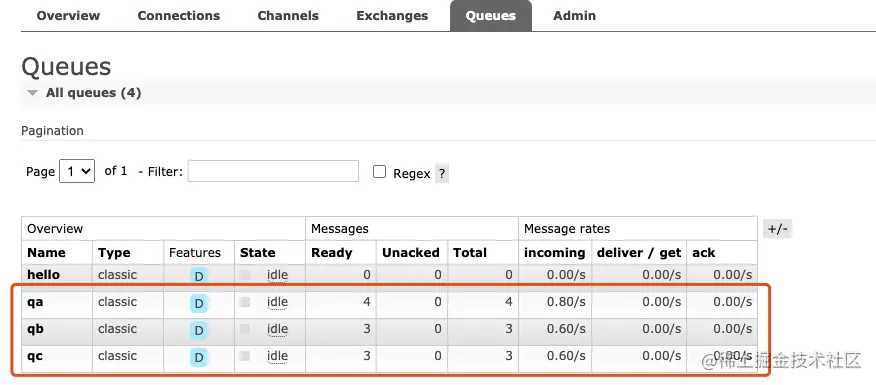
下面是qa队列的信息: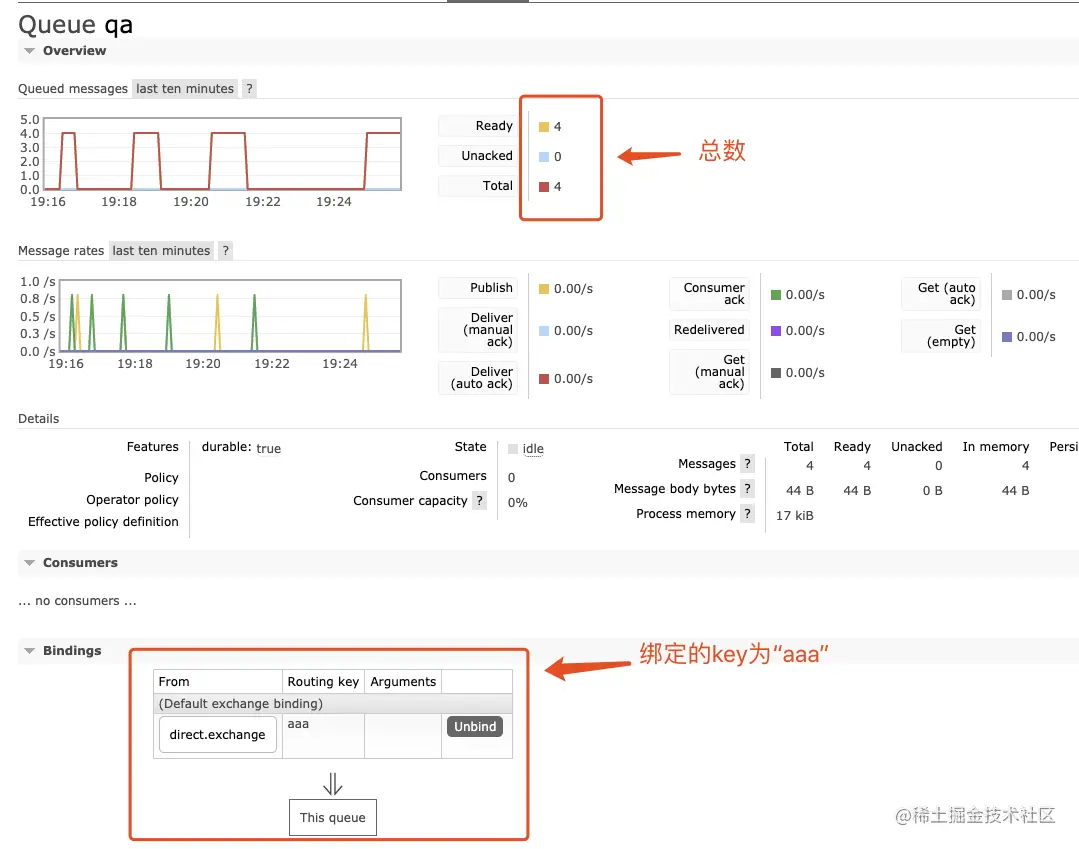
消费者:
public class directconsumer {
    private static final string exchangename = "direct.exchange";
    public void msgconsumer(string queuename, string routingkey) {
        try {
            msgconsumer.consumermsg(exchangename, queuename, routingkey);
        } catch (ioexception e) {
            e.printstacktrace();
        } catch (timeoutexception e) {
            e.printstacktrace();
        }
    }
    public static void main(string[] args) throws interruptedexception {
        directconsumer consumer = new directconsumer();
        string[] routingkey = new string[]{"aaa", "bbb", "ccc"};
        string[] queuenames = new string[]{"qa", "qb", "qc"};

        for (int i = 0; i < 3; i++) {
            consumer.msgconsumer(queuenames[i], routingkey[i]);
        }
        thread.sleep(1000 * 60 * 100);
    }
}
执行后输出
[*] waiting for message. to exist press ctrl+c
 [x] received 'hello >>> 0
 [x] done
 [x] received 'hello >>> 3
 [x] done
 [x] received 'hello >>> 6
 [x] done
 [x] received 'hello >>> 9
 [x] done
[*] waiting for message. to exist press ctrl+c
 [x] received 'hello >>> 1
 [x] done
 [x] received 'hello >>> 4
 [x] done
 [x] received 'hello >>> 7
 [x] done
[*] waiting for message. to exist press ctrl+c
 [x] received 'hello >>> 2
 [x] done
 [x] received 'hello >>> 5
 [x] done
 [x] received 'hello >>> 8
 [x] done
可以看到,分别从qa、qb、qc中将不同的key的数据消费掉。
5.2.2 问题探讨
我做了个简单的实验,我把消费者代码修改了一下:
public static void main(string[] args) throws interruptedexception {
    directconsumer consumer = new directconsumer();
    string[] routingkey = new string[]{"aaa", "bbb", "ccc"};
    string[] queuenames = new string[]{"qa", "qb", "qc1"}; // 将qc修改为qc1

    for (int i = 0; i < 3; i++) {
        consumer.msgconsumer(queuenames[i], routingkey[i]);
    }
    thread.sleep(1000 * 60 * 100);
}
执行后如下图所示: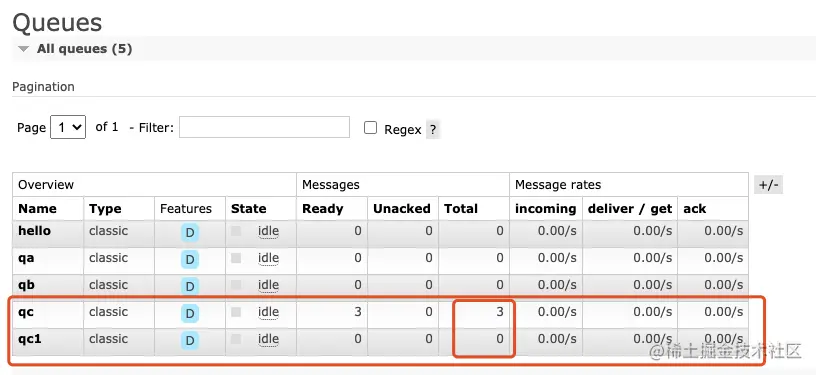
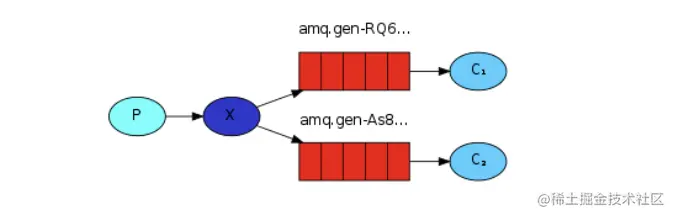
我们可以发现,多了一个qc1,所以可以判断这个界面中的queues,是消费者执行时,会将消费者指定的队列名称和direct.exchange绑定,绑定的依据就是key。
当我们把队列中的数据全部消费掉,然后重新执行生成者后,会发现qc和qc1中都有3条待消费的数据,因为绑定的key都是“ccc”,所以两者的数据是一样的: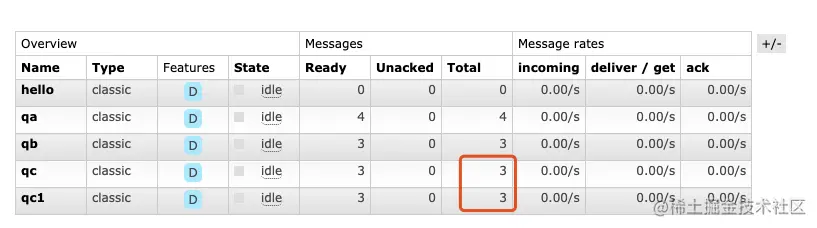
绑定关系如下: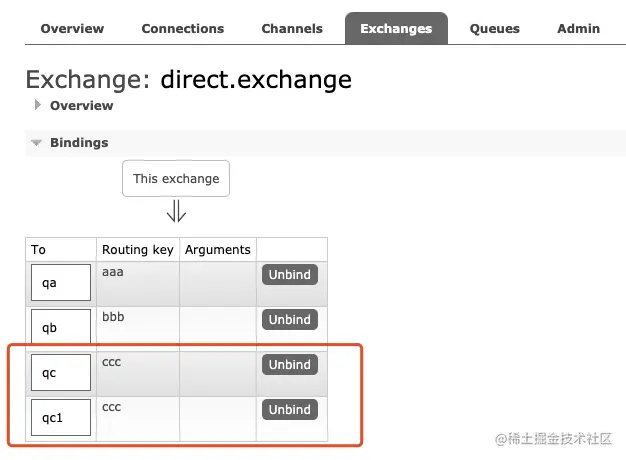
5.3 fanout方式(指定队列)
 生产者封装:
public class fanoutproducer {
    private static final string exchange_name = "fanout.exchange";
    public void publishmsg(string routingkey, string msg) {
        try {
            msgproducer.publishmsg(exchange_name, builtinexchangetype.fanout, routingkey, msg);
        } catch (exception e) {
            e.printstacktrace();
        }
    }
    public static void main(string[] args) {
        fanoutproducer directproducer = new fanoutproducer();
        string msg = "hello >>> ";
        for (int i = 0; i < 10; i++) {
            directproducer.publishmsg("", msg + i);
        }
    }
}
消费者:
public class fanoutconsumer {
    private static final string exchange_name = "fanout.exchange";
    public void msgconsumer(string queuename, string routingkey) {
        try {
            msgconsumer.consumermsg(exchange_name, queuename, routingkey);
        } catch (ioexception e) {
            e.printstacktrace();
        } catch (timeoutexception e) {
            e.printstacktrace();
        }
    }
    public static void main(string[] args) {
        fanoutconsumer consumer = new fanoutconsumer();
        string[] queuenames = new string[]{"qa-2", "qb-2", "qc-2"};
        for (int i = 0; i < 3; i++) {
            consumer.msgconsumer(queuenames[i], "");
        }
    }
}
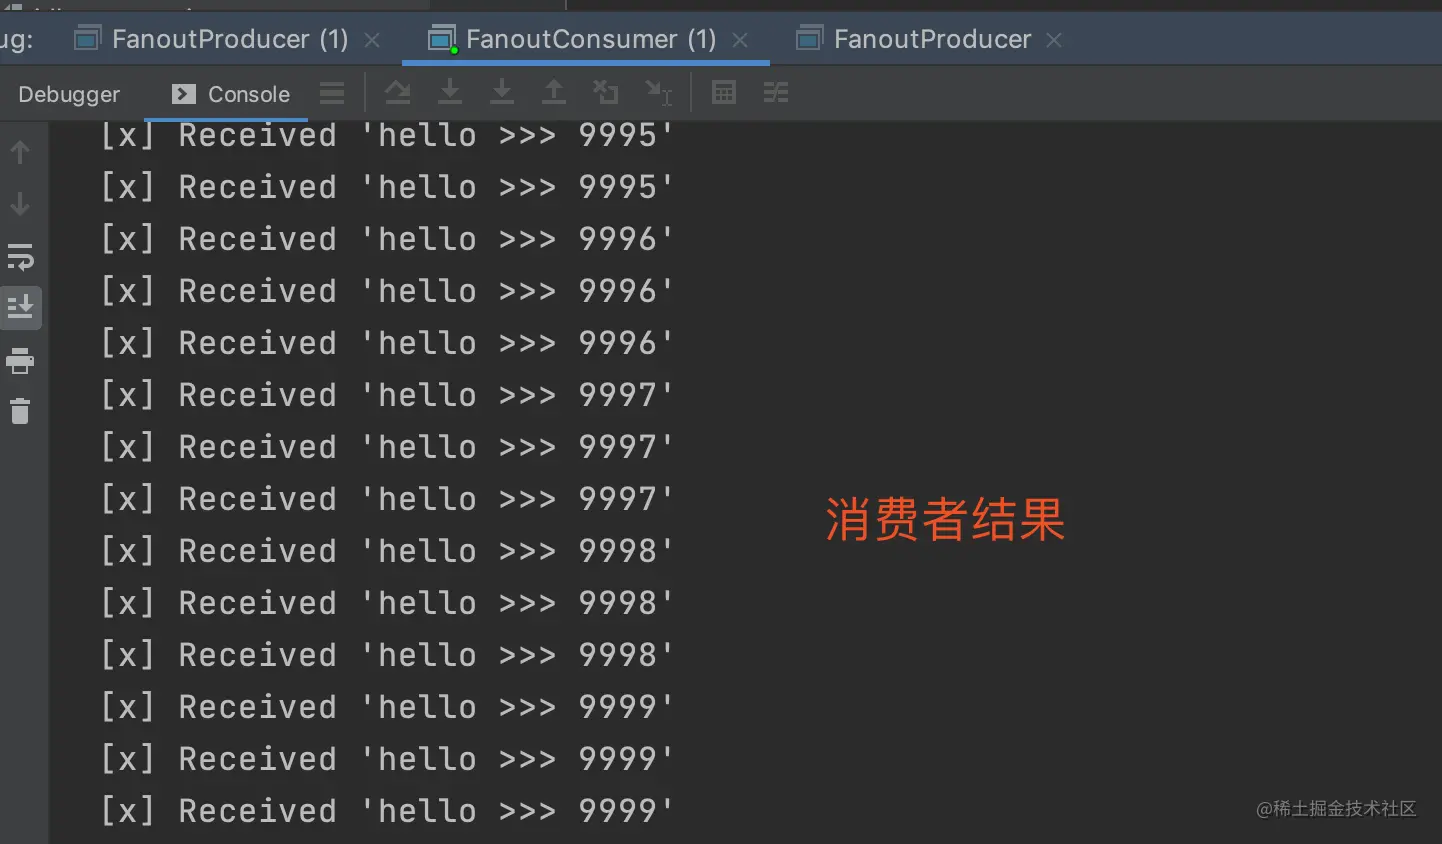
执行生成者,结果如下: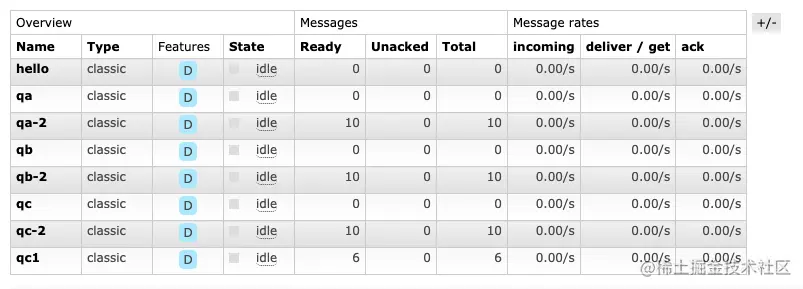 我们发现,生产者生产的10条数据,在每个消费者中都可以消费,这个是和direct不同的地方,但是使用fanout方式时,有几个点需要注意一下:
- 生产者的routkey可以为空,因为生产者的所有数据,会下放到每一个队列,所以不会通过routkey去路由;
- 消费者需要指定queues,因为消费者需要绑定到指定的queues才能消费。
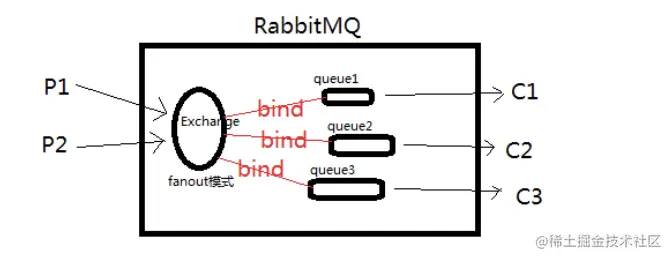
这幅图就画出了fanout的精髓之处,exchange会和所有的queue进行绑定,不区分路由,消费者需要绑定指定的queue才能发起消费。
5.4 fanout方式(随机获取队列)
上面我们是指定了队列,这个方式其实很不友好,比如对于fanout,我其实根本无需关心队列的名字,如果还指定对应队列进行消费,感觉这个很冗余,所以我们这里就采用随机获取队列名字的方式,下面代码直接copy官网。
生成者封装:
public static void publishmsgv2(string exchange, builtinexchangetype exchangetype, string message) throws ioexception, timeoutexception {
    connectionfactory factory = rabbitutil.getconnectionfactory();
    //创建连接
    connection connection = factory.newconnection();
    //创建消息通道
    channel channel = connection.createchannel();

    // 声明exchange中的消息
    channel.exchangedeclare(exchange, exchangetype);

    // 发布消息
    channel.basicpublish(exchange, "", null, message.getbytes("utf-8"));

    system.out.println("sent '" + message + "'");
    channel.close();
    connection.close();
}
消费者封装
public static void consumermsgv2(string exchange) throws ioexception, timeoutexception {
    connectionfactory factory = rabbitutil.getconnectionfactory();
    connection connection = factory.newconnection();
    final channel channel = connection.createchannel();

    channel.exchangedeclare(exchange, "fanout");
    string queuename = channel.queuedeclare().getqueue();
    channel.queuebind(queuename, exchange, "");

    system.out.println(" [*] waiting for messages. to exit press ctrl+c");

    delivercallback delivercallback = (consumertag, delivery) -> {
        string message = new string(delivery.getbody(), "utf-8");
        system.out.println(" [x] received '" + message + "'");
    };
    channel.basicconsume(queuename, true, delivercallback, consumertag -> { });
}
生产者:
public class fanoutproducer {
    private static final string exchange_name = "fanout.exchange.v2";
    public void publishmsg(string msg) {
        try {
            msgproducer.publishmsgv2(exchange_name, builtinexchangetype.fanout, msg);
        } catch (exception e) {
            e.printstacktrace();
        }
    }
    public static void main(string[] args) {
        fanoutproducer directproducer = new fanoutproducer();
        string msg = "hello >>> ";
        for (int i = 0; i < 10000; i++) {
            directproducer.publishmsg(msg + i);
        }
    }
}
消费者:
public class fanoutconsumer {
    private static final string exchange_name = "fanout.exchange.v2";
    public void msgconsumer() {
        try {
            msgconsumer.consumermsgv2(exchange_name);
        } catch (ioexception e) {
            e.printstacktrace();
        } catch (timeoutexception e) {
            e.printstacktrace();
        }
    }
    public static void main(string[] args) {
        fanoutconsumer consumer = new fanoutconsumer();
        for (int i = 0; i < 3; i++) {
            consumer.msgconsumer();
        }
    }
}
执行后,管理界面如下: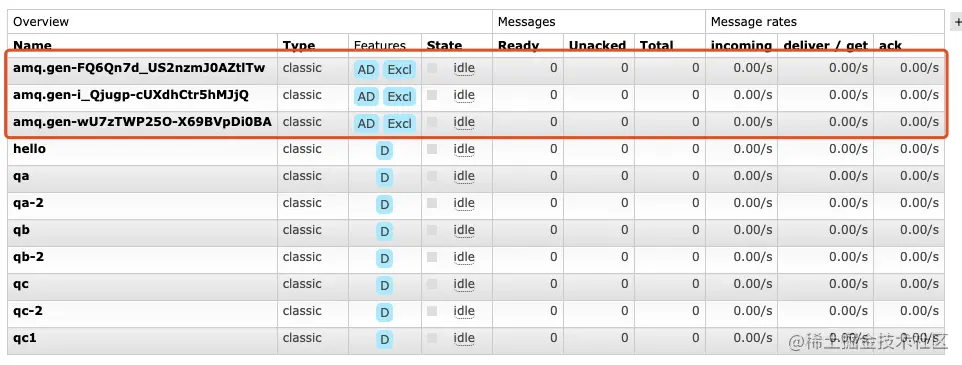
5.5 topic方式
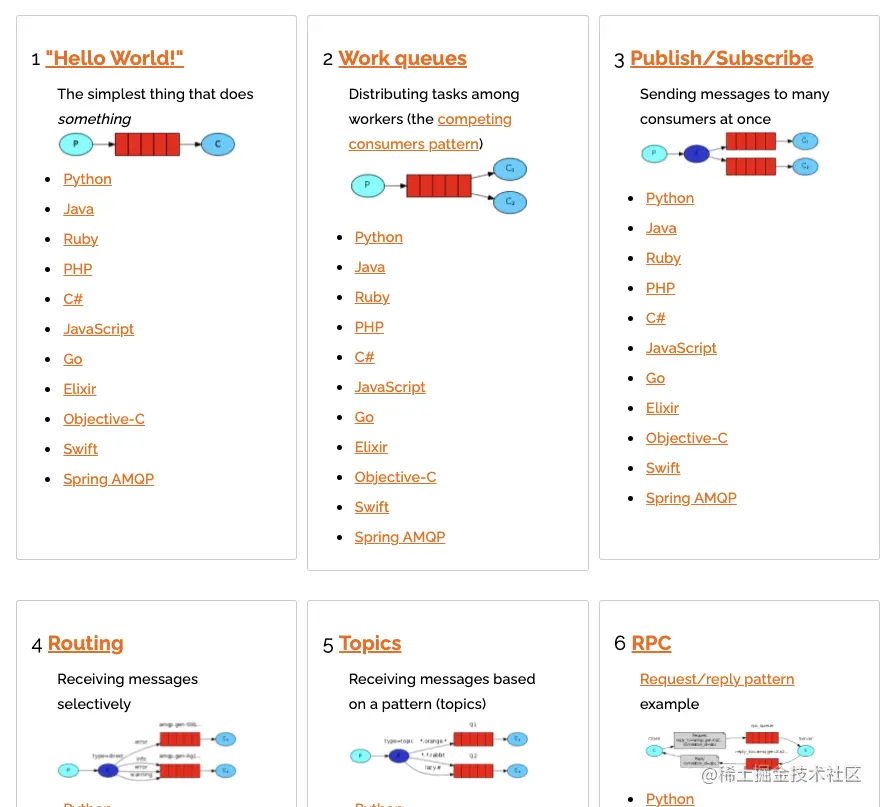
代码详见官网:https://www.rabbitmq.com/tutorials/tutorial-five-java.html
6. rabbitmq 进阶
6.1 durable 和 autodeleted
在定义queue时,可以指定这两个参数:
/**
 * declare an exchange.
 * @see com.rabbitmq.client.amqp.exchange.declare
 * @see com.rabbitmq.client.amqp.exchange.declareok
 * @param exchange the name of the exchange
 * @param type the exchange type
 * @param durable true if we are declaring a durable exchange (the exchange will survive a server restart)
 * @param autodelete true if the server should delete the exchange when it is no longer in use
 * @param arguments other properties (construction arguments) for the exchange
 * @return a declaration-confirm method to indicate the exchange was successfully declared
 * @throws java.io.ioexception if an error is encountered
 */
exchange.declareok exchangedeclare(string exchange, builtinexchangetype type, boolean durable, boolean autodelete,
                                   map<string, object> arguments) throws ioexception;

/**
* declare a queue
* @see com.rabbitmq.client.amqp.queue.declare
* @see com.rabbitmq.client.amqp.queue.declareok
* @param queue the name of the queue
* @param durable true if we are declaring a durable queue (the queue will survive a server restart)
* @param exclusive true if we are declaring an exclusive queue (restricted to this connection)
* @param autodelete true if we are declaring an autodelete queue (server will delete it when no longer in use)
* @param arguments other properties (construction arguments) for the queue
* @return a declaration-confirm method to indicate the queue was successfully declared
* @throws java.io.ioexception if an error is encountered
*/
queue.declareok queuedeclare(string queue, boolean durable, boolean exclusive, boolean autodelete,
                             map<string, object> arguments) throws ioexception;
6.1.1 durable
持久化,保证rabbitmq在退出或者crash等异常情况下数据没有丢失,需要将queue,exchange和message都持久化。
若是将queue的持久化标识durable设置为true,则代表是一个持久的队列,那么在服务重启之后,会重新读取之前被持久化的queue。
虽然队列可以被持久化,但是里面的消息是否为持久化,还要看消息的持久化设置。即重启queue,但是queue里面还没有发出去的消息,那队列里面还存在该消息么?这个取决于该消息的设置。
6.1.2 autodeleted
自动删除,如果该队列没有任何订阅的消费者的话,该队列会被自动删除。这种队列适用于临时队列。
当一个queue被设置为自动删除时,当消费者断掉之后,queue会被删除,这个主要针对的是一些不是特别重要的数据,不希望出现消息积累的情况。
6.1.3 小节
- 当一个queue已经声明好了之后,不能更新durable或者autodelted值;当需要修改时,需要先删除再重新声明
- 消费的queue声明应该和投递的queue声明的 durable,autodelted属性一致,否则会报错
- 对于重要的数据,一般设置 durable=true, autodeleted=false
- 对于设置 autodeleted=true 的队列,当没有消费者之后,队列会自动被删除
6.2 ack
执行一个任务可能需要花费几秒钟,你可能会担心如果一个消费者在执行任务过程中挂掉了。一旦rabbitmq将消息分发给了消费者,就会从内存中删除。在这种情况下,如果正在执行任务的消费者宕机,会丢失正在处理的消息和分发给这个消费者但尚未处理的消息。
但是,我们不想丢失任何任务,如果有一个消费者挂掉了,那么我们应该将分发给它的任务交付给另一个消费者去处理。
为了确保消息不会丢失,rabbitmq支持消息应答。消费者发送一个消息应答,告诉rabbitmq这个消息已经接收并且处理完毕了。rabbitmq就可以删除它了。
因此手动ack的常见手段:
// 接收消息之后,主动ack/nak
consumer consumer = new defaultconsumer(channel) {
    @override
    public void handledelivery(string consumertag, envelope envelope, amqp.basicproperties properties,
                               byte[] body) throws ioexception {
        string message = new string(body, "utf-8");
        try {
            system.out.println(" [ " + queue + " ] received '" + message);
            channel.basicack(envelope.getdeliverytag(), false);
        } catch (exception e) {
            channel.basicnack(envelope.getdeliverytag(), false, true);
        }
    }
};
// 取消自动ack
channel.basicconsume(queue, false, consumer);

发表评论