一、背景
从 web 诞生之日起,ui 自动化就成了测试的难点,到现在近 30 年,一直没有有效的手段解决web ui测试的问题,尽管发展了很多的 webdriver 驱动,图片 diff 驱动的工具,但是这些工具的投入产出比一直被质疑,自动化率越多维护成本越高,大部分都做着就放弃了,还有一部分在做与不做间纠结。
本文结合一些开源的项目探索使用gpt 自动做 ui 测试的可能性。
二、方案选型
当前ui 的主要问题:一个是通过 webdriver 控制浏览器执行,这些工具都需要先查找到对应元素的 elements,无论是录制的还是自己编写的在面对 ui 变化,元素变化时都需要耗费很大的精力去重新识别,解析 dom 查找,这个工作乏味且没有效率;另一种是通过图像进行点击,比如 sikuli 这种工具,主要的问题也是复用性较差,换个分辨率的机器或者图片发生少的改动就不可用。
使用 gpt 做 ui 测试尝试了两种方案:
第一种将 html 元素投喂给 gpt,主要方法获取 html代码,对 html 做初步缩减处理,再做向量化,然后喂给 gpt4 自动生成 webdriver 驱动脚本,效果一般,而且因为 html 比较大,token 的消耗很大。
第二种思路是让 gpt 像人一样思考和测试,比如一个人打开一个网页后,他通过眼睛看到的页面文字或图标,然后用手完成点击和输入的操作,最后通过页面的弹窗或者文字来识别是否有错误,这几个动作通过大脑统一协调。
这里主要介绍第二种.
三、新方案实践
1.新方案简介
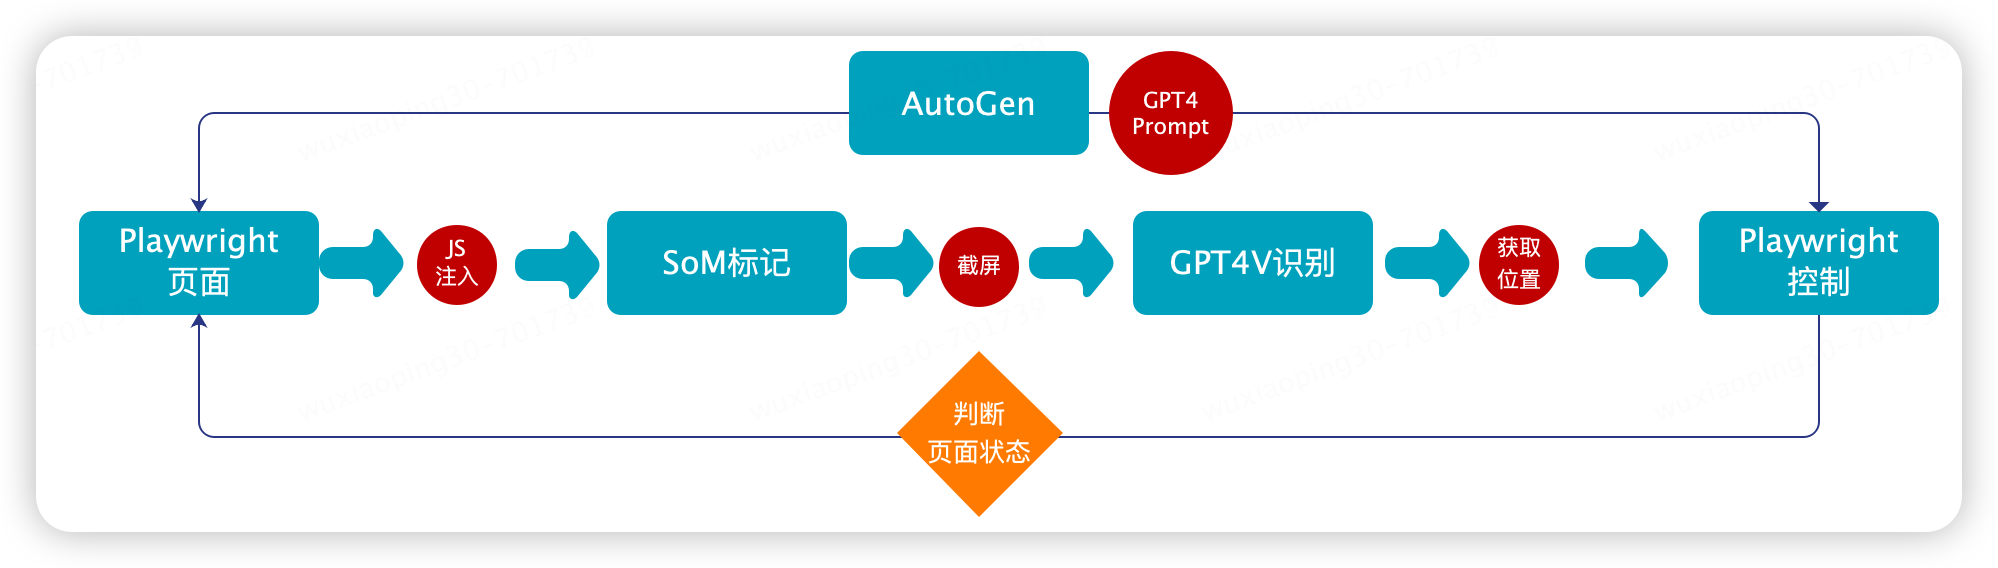
新的方案主要结合 playwright,som视觉标记,gpt4vison,gpt4,autogen来实现。主要的原理
通过 playwright进行浏览器操作,包括页面图像的获取、浏览器的各种操作,相当于‘‘手’’;
进行som 视觉数据标记,因为 gpt4vison 在进行页面原始识别时并不是很准确,参考微软的论文可以通过视觉标记的手段来辅助 gpt4v 识别,相当于“眼睛”。
通过gpt4+autogen 将这些步骤串起来实现协调控制,相当于“大脑”。
2.主要架构
3.实现步骤
3.1 使用 playwright 注入 js
-
browser = playwright.chromium.launch(channel="chrome",headless=false) -
context = browser.new_context() -
page = context.new_page() -
page.goto("http://oa.jd.com/") -
inject_js ="./pagemark.js" -
withopen(inject_js,'r')asfile: -
content =file.read() -
page.evaluate(f"{content}")
3.2 som 视觉提示标记
如前文提到的 gpt4v 并不能有效的识别 web 的元素,所以在使用 gpt4v 之前进行图像标记,图像标记现在有两种方式,一种是通过 ai 识别图片进行标记,这种主要利用在对静态图片图像的识别,对于 web 页面的标记,我们可以采用注入 js 修改页面元素的方式来标记。这里通过在浏览器中注入 pagemark.js,利用 playwright 执行 js 函数来完成页面的标记,该 js 能够完成标准的coco annotation的标注。
-
// dom labelerlet labels =[];functionunmarkpage(){ -
for(const label of labels){ -
document.body.removechild(label); -
} -
labels =[]; -
} -
functionmarkpage(){ -
unmarkpage(); -
var bodyrect = document.body.getboundingclientrect(); -
var items =array.prototype.slice.call( -
document.queryselectorall('*') -
).map(function(element){ -
var vw = math.max(document.documentelement.clientwidth ||0, window.innerwidth ||0); -
var vh = math.max(document.documentelement.clientheight ||0, window.innerheight ||0); -
var rects =[...element.getclientrects()].filter(bb=>{ -
var center_x = bb.left + bb.width /2; -
var center_y = bb.top + bb.height /2; -
var elatcenter = document.elementfrompoint(center_x, center_y); -
return elatcenter === element || element.contains(elatcenter) -
}).map(bb=>{ -
const rect ={ -
left: math.max(0, bb.left), -
top: math.max(0, bb.top), -
right: math.min(vw, bb.right), -
bottom: math.min(vh, bb.bottom) -
}; -
return{ -
...rect, -
width: rect.right - rect.left, -
height: rect.bottom - rect.top -
} -
}); -
var area = rects.reduce((acc, rect)=> acc + rect.width * rect.height,0); -
return{ -
element: element, -
include: -
(element.tagname ==="input"|| element.tagname ==="textarea"|| element.tagname ==="select")|| -
(element.tagname ==="button"|| element.tagname ==="a"||(element.onclick !=null)|| window.getcomputedstyle(element).cursor =="pointer")|| -
(element.tagname ==="iframe"|| element.tagname ==="video") -
, -
area, -
rects, -
text: element.textcontent.trim().replace(/\s{2,}/g,' ') -
}; -
}).filter(item=> -
item.include &&(item.area >=20) -
); -
// only keep inner clickable items -
items = items.filter(x=>!items.some(y=> x.element.contains(y.element)&&!(x == y))) -
// function to generate random colors -
functiongetrandomcolor(){ -
var letters ='0123456789abcdef'; -
var color ='#'; -
for(var i =0; i <6; i++){ -
color += letters[math.floor(math.random()*16)]; -
} -
return color; -
} -
// lets create a floating border on top of these elements that will always be visible -
items.foreach(function(item, index){ -
item.rects.foreach((bbox)=>{ -
newelement = document.createelement("div"); -
var bordercolor =getrandomcolor(); -
newelement.style.outline =`2px dashed ${bordercolor}`; -
newelement.style.position ="fixed"; -
newelement.style.left = bbox.left +"px"; -
newelement.style.top = bbox.top +"px"; -
newelement.style.width = bbox.width +"px"; -
newelement.style.height = bbox.height +"px"; -
newelement.style.pointerevents ="none"; -
newelement.style.boxsizing ="border-box"; -
newelement.style.zindex =2147483647; -
// newelement.style.background = `${bordercolor}80`; -
// add floating label at the corner -
var label = document.createelement("span"); -
label.textcontent = index; -
label.style.position ="absolute"; -
label.style.top ="-19px"; -
label.style.left ="0px"; -
label.style.background = bordercolor; -
label.style.color ="white"; -
label.style.padding ="2px 4px"; -
label.style.fontsize ="12px"; -
label.style.borderradius ="2px"; -
newelement.appendchild(label); -
document.body.appendchild(newelement); -
labels.push(newelement); -
console.log(index) -
}); -
}) -
}
以某系统为例,标注后的效果如下图:
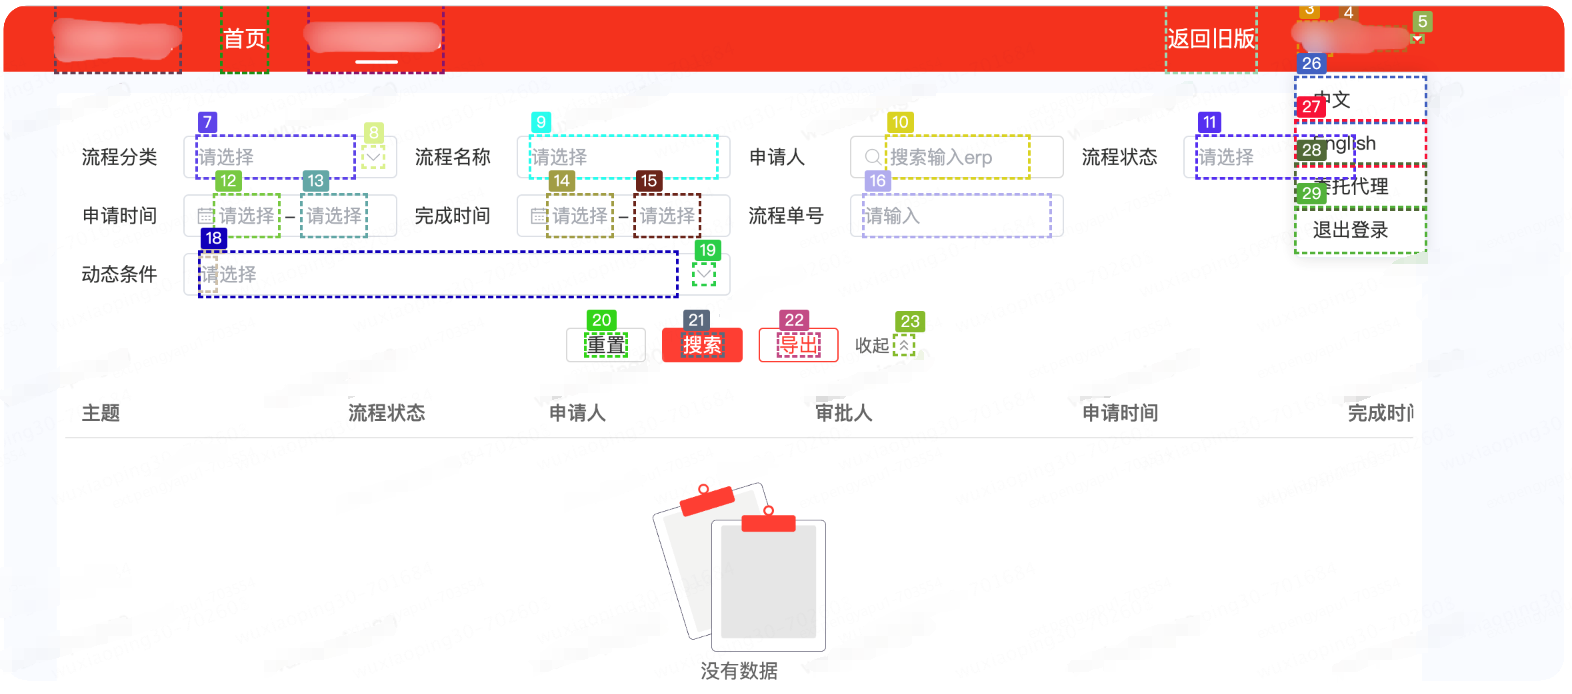
将标记元素的位置编号保存到本地coco.json
-
{ -
"1":{"x":"10","y":"40","w":"8","h":"10","center_x":"30","center_y":"13"}, -
"2":{"x":"20","y":"40","w":"16","h":"10","center_x":"30","center_y":"21"}, -
"10":{"x":"40","y":"80","w":"16","h":"10","center_x":"80","center_y":"21"}}
其中 center_x, center_y 为元素的中心点坐标
3.3 gpt4v 识别
prompt
-
我上传了一张网页截图,页面元素已经使用coco annotator进行了数字标记。 -
请分析这张图片,并识别出网页的用途以及各个标记元素的功能。基于你的分析,请生成一个规划路径来完成以下任务: -
- 输入erp搜索。 -
- 检查列表是否为空 -
请使用图片中的数字标记来描述完成任务的具体步骤。
gpt4v response
-
这张图片显示的是一个具有多个数字标记的网页截图。根据这些标记,我们可以推测出网页的用途以及各个元素的功能。 -
为了完成您提出的任务,我们可以按照以下步骤操作: -
\n\n1. 使用标记为10的搜索框输入erp搜索词。这个搜索框的标签显示为“搜索框输入erp”,表明它用于输入搜索词。 -
\n\n2. 点击标记为17的搜索按钮。这个按钮的标签是“搜索”,表明它用于提交搜索请求。 -
\n\n3. 检查列表是否为空。这个步骤可能需要查看标记为19的区域,这个区域被标记为“列表内容”,如果这个区域没有显示任何内容或者有提示信息显示列表为空,则说明搜索结果为空。 -
\n\n以 上步骤基于图片中的数字标记和元素标签来描述完成任务的具体操作。"
提取元素坐标
利用正则表达式从gpt4v 的 response 中提取查询到的元素的 bbox id= 10,17,19, 结合在 som 标记中记录的 json 文件,找到编号 10 的元素坐标"10":{"x":"40","y":"80","w":"16","h","10","center_x":"80","center_y":"21"}
-
class gpt4vrecognize -
def get_location(self, query): -
coco_json='./coco.json' -
withopen(coco_json,'r') as file: -
content =file.read() -
matches=re.findall(r'\d+',gpt4v_response_content) -
num=-1 -
iflen(matches)>0: -
num=matches[0] -
data = json.loads(json_str) -
center_x = data[num]["center_x"] -
center_y = data[num]["center_y"] -
return center_x,center_y
3.4 playwright操作页面
playwright是一个非常强大的操作浏览器的工具,这里因为前面已经通过 gpt4v 识别了图片,所以我们主要通过 坐标 的方式来控制元素,不再需要解析dom 来控制,主要的包括,点击,双击,鼠标拖动,输入,截图等:
-
class actions: -
page=none -
__init__(self,url): -
global page -
browser = playwright.chromium.launch(channel="chrome",headless=false) -
context = browser.new_context() -
page = context.new_page() -
page.goto("http://oa.jd.com/") -
def mouse_move(self,x,y): -
page.mouse.move(self,x,y) -
def screenshot(self): -
page.screenshot() -
def mouse_click(self,x,y): -
page.mouse.click(self,x,y) -
def input_text(self,x,y,text): -
page.mouse.click(self,x,y) -
page.keyboard.type(text) -
def mouse_db_click(self,x,y): -
def select_option(self,x,y,option): -
......
3.5 使用 autogen编排
autogen是一个代理工具,它能够代理多个 llm在不同会话间切换,能够自动的调用预定的函数,并协调这些 llm 完成任务。
在上面的程序中,实现了:眼睛:通过 gpt4v 来识别元素;手:通过 playwright 来做各种操作;后面需要通过一个大脑来协调手、眼完成任务,这里通过 gpt4+autogen 来实现大脑的协同调度。
-
config_list = config_list_from_json(env_or_file="oai_config_list") -
assistant= autogen.assistantagent( -
name="assistant", -
system_message= -
""" -
you are the orchestrator responsible for completing a task involving the ui window. -
utilize the provided functions to take a screenshot after each action. -
remember to only use the functions you have been given and focus on the task at hand. -
""", -
llm_config={"config_list": config_list}, -
) -
user_proxy = autogen.userproxyagent( -
name="brain_proxy", -
human_input_mode="never", -
code_execution_config={"work_dir":"coding"}, -
max_consecutive_auto_reply=10, -
llm_config={"config_list": config_list},) -
action = actions(url) -
gpt4v=gpt4vrecognize() -
user_proxy.register_function( -
function_map={ -
"get_location": gpt4v.get_location, -
"mouse_move":action.mouse_move, -
"screenshot":action.screenshot, -
"mouse_click":action.mouse_click, -
"mouse_dbclick":action.mouse_dbclick, -
"select_option":action.select_option -
}) -
def run(message_ask): -
user_proxy.initiate_chat(assistant,message=message_ask) -
if __name__ =="__main__": -
run("通过 输入erp 'wwww30' 搜索结果,并检查是否返回空列表")
四、问题和后续
1.当前的主要问题
本文主要抛砖引玉,通过一种完全按人类思维进行 ui测试的方式,在实验过程中还有很多问题待解决。
- gpt 在中文语境下识别的不太友好,在实验过程中对中文的 prompt 理解有误,需要不断的优化 prompt,尤其是页面中的中文元素。
- autogen 对于处理预定义的动作也会有问题,需要不断调优。
- gpt4v 真的很贵。
2.未来的想法
- 将每次向 gpt4v请求的图像识别做本地化处理,结合现有的一些测试方法,从而减少 token,缩短执行耗时。
- 面向业务的 gpt需要不断训练,将系统使用手册和一有的 prd 文档投喂给 gpt,增强 gpt 的系统识别和测试能力。
总结:
感谢每一个认真阅读我文章的人!!!
作为一位过来人也是希望大家少走一些弯路,如果你不想再体验一次学习时找不到资料,没人解答问题,坚持几天便放弃的感受的话,在这里我给大家分享一些自动化测试的学习资源,希望能给你前进的路上带来帮助。
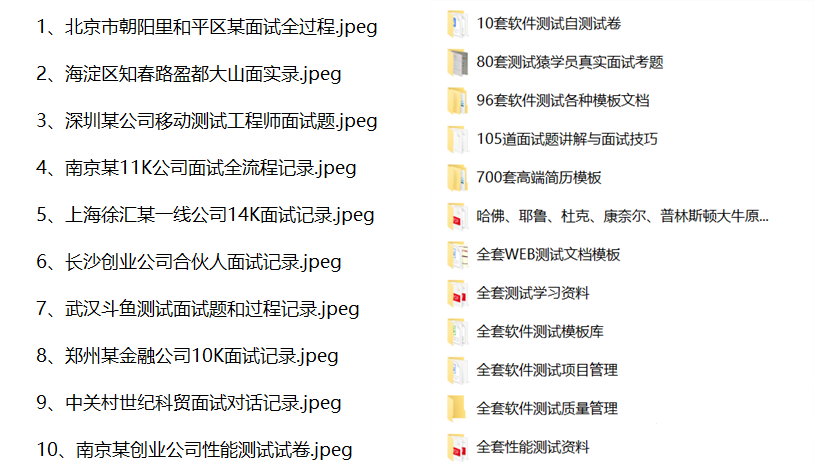
软件测试面试文档
我们学习必然是为了找到高薪的工作,下面这些面试题是来自阿里、腾讯、字节等一线互联网大厂最新的面试资料,并且有字节大佬给出了权威的解答,刷完这一套面试资料相信大家都能找到满意的工作。
视频文档获取方式:
这份文档和视频资料,对于想从事【软件测试】的朋友来说应该是最全面最完整的备战仓库,这个仓库也陪伴我走过了最艰难的路程,希望也能帮助到你!以上均可以分享,点下方小卡片即可自行领取。


发表评论