负载均衡式——online judge😎

前言🙌
online judge 项目
一、项目介绍
在线oj系统,是一个能够自动对用户提交的程序源代码进行编译、执行和评测的在线平台。online judge项目实现的主要意义是为了帮助我们更好地适应工作和学习中的编程需求。online judge系统具有丰富的题库和实时反馈功能,可以帮助我们更好地进行编程练习和测试。 此外,负载均衡在线oj系统还可以进行项目的扩展,具有方便的使用和活跃的社区互动等优势,可以提高我们的学习效果和团队协作能力。
学习编程技术的小伙伴,我相信一定是做过在线oj的。而本项目就是借鉴于leetcode和牛客网等各大知名的刷题网站提供的在线oj功能,实现自己的一个在线oj系统。
二、项目技术栈
所⽤技术栈:
- c++ stl 标准库
- boost 准标准库,应用于本项目实现字符串切割的功能需求。
- cpp-httplib 第三⽅开源⽹络库
- ctemplate 第三⽅开源前端⽹⻚渲染库
- jsoncpp 第三⽅开源序列化、反序列化库
- 负载均衡设计
- 多进程、多线程
- ace前端在线编辑器(了解)
- html/css/js/jquery/ajax (了解)
三、项目使用环境
- centos7云服务器
- vscode
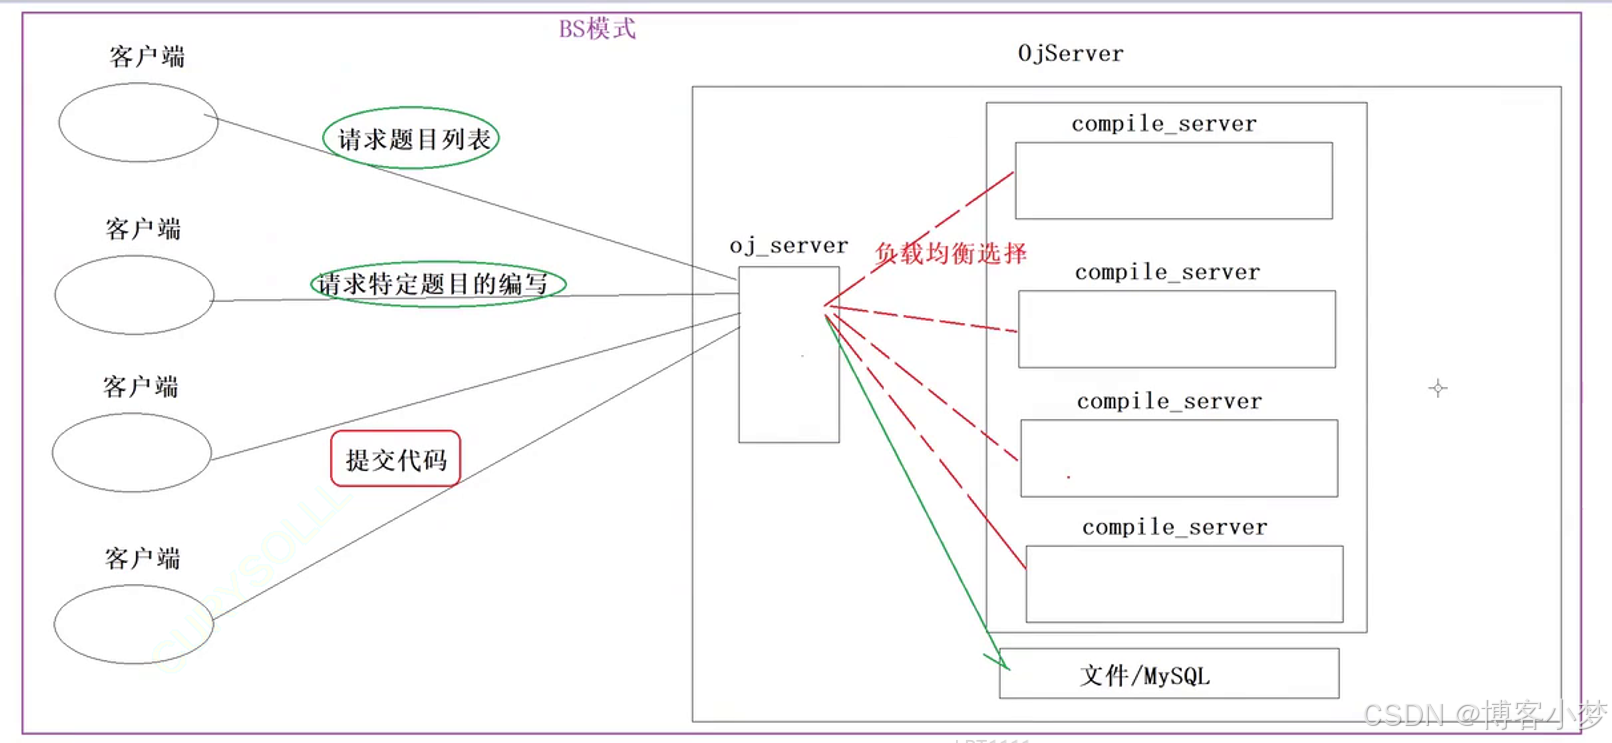
四、项目宏观框架
我们的项⽬核⼼是三个模块
- comm :公共模块
- compile_server :编译与运⾏模块
- oj_server :获取题⽬列表,查看题⽬编写题⽬界⾯,负载均衡,其他功能
leetcode 结构:只实现类似 leetcode 的题⽬列表+在线编程功能
五、项目后端服务实现过程
1、comm模块设计
我们将所有功能模块,所要使用的共性功能封装成comm模块,从而实现复用,提高项目整体的开发效率。
1.1 log.hpp实现
log.hpp实现的核心点分析:
- 在c语言和c++中,__ file __和 __ line __ 是两个非常有用的预定义宏(predefined macros)。它们主要用于调试目的,帮助开发者追踪错误发生的具体位置。 __ file __ 是一个字符串常量,表示当前源代码文件的名称。这个宏在编译时被自动替换为包含它的源文件名。 __ line __ 是一个十进制整型常量,表示当前源代码中的行号。这个宏在编译时自动替换为它在源代码中的行号。
- 单 # 作用:表示将该变量转换成对应的字符串表示。例如我们的enum菜单中,1 对应 debug,则会将1 转化为debug。
- #define 设计的一个log宏函数,当调用宏函数时,会在调用的地方进行替换成log函数。
功能代码的整体实现:
namespace ns_log
{
    using namespace ns_util;
    // 日志等级
    enum
    {
        infor = 0,
        debug,
        warning,
        error,
        fatal
    };

    inline std::ostream &log(const std::string& level, const std::string& file, int line)
    {
        // 日志等级信息
        std::string logmessage = "[";
        logmessage += level;
        logmessage += "]";

        // 日志出错在哪个文件名的信息
        logmessage += "[";
        logmessage += file;
        logmessage += "]";

        // 日志出错在哪一行的信息
        logmessage += "[";
        logmessage += std::to_string(line);
        logmessage += "]";

        // 日志打印的时间信息
        logmessage += "[";
        logmessage += timeutil::gettimestamp();
        logmessage += "]";

        //将上述信息加载到cout内部的缓冲区中
        std::cout << logmessage;
        return std::cout;
    }
// 单#:表示将该变量转换成对应的字符串表示
#define log(level) log(#level, __file__, __line__)
}
1.2 util.hpp实现
util.hpp 实现的核心点分析:
-
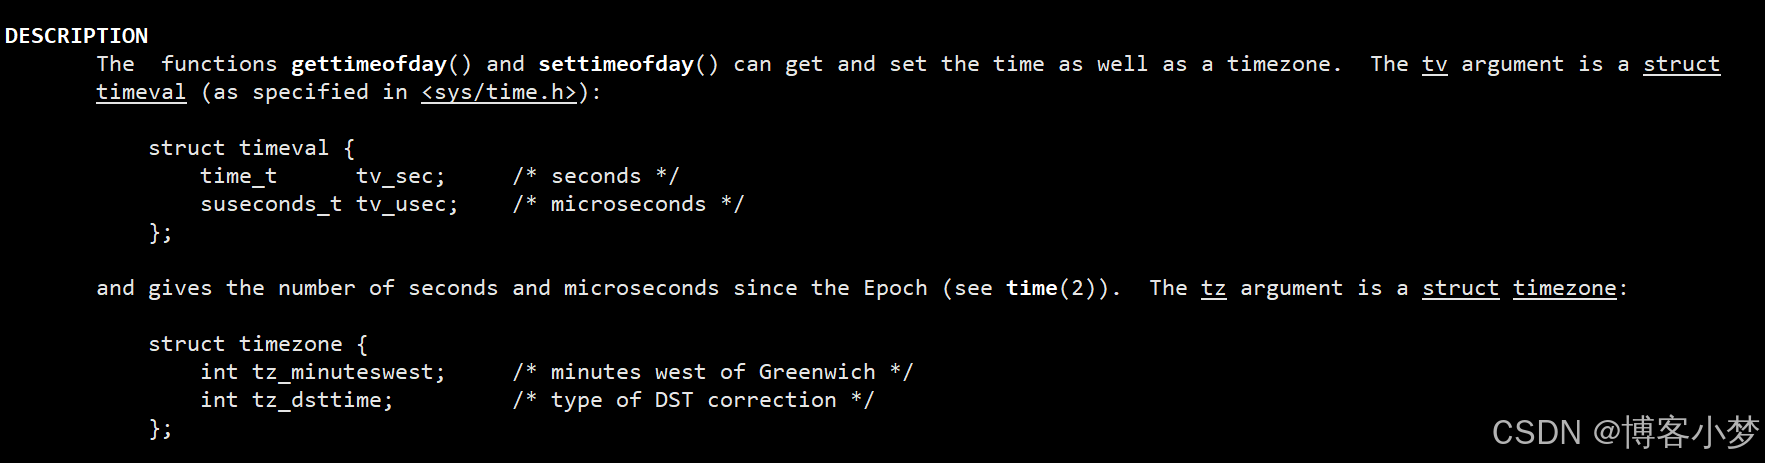
获取时间信息方法:本项目使用了系统调用gettimeofday函数,来获取对应的时间信息。
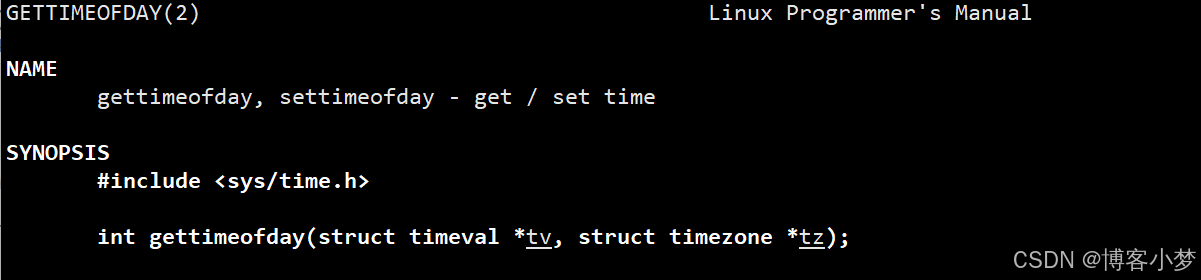
参数类型的解析:
-
路径 + 具体文件名字形成方法:编译时需要有的临时文件,构建源文件路径+后缀的完整文件名,例如,1234 -> . . /temp/1234.cpp
-
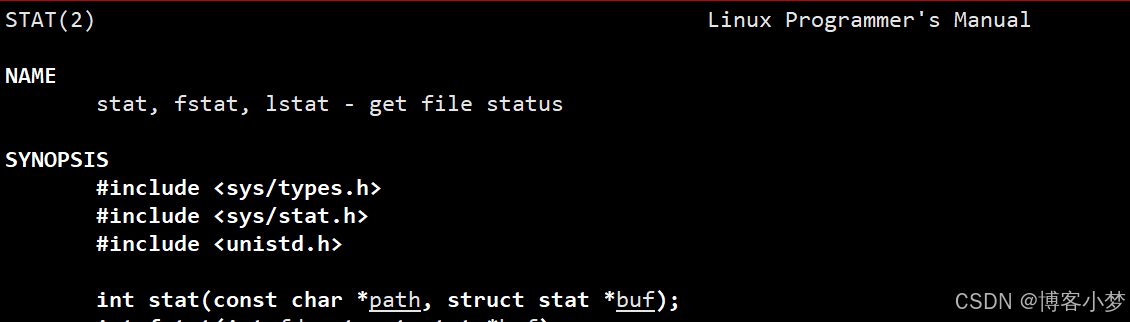
对于文件一些操作方法 :这里设计了判断一个可执行文件是否存在、形成唯一文件名、读文件、写文件方法。
其中判断可执行文件是否存在,使用了系统调用接口stat。该接口可以获得一个文件的属性。我们都知道文件 = 内容 + 属性。如果属性存在,那么这个文件也是一定存在的。
形成唯一文件名,我们采用的是毫秒级时间戳 + 唯一的递增id相结合形成一个相对唯一的文件名。由于存在多个执行流进入该函数,造成多执行流并发访问的问题。我们使用atomic_uint 类型进行唯一的递增id的设计,保证它是唯一的。 -
字符串切割方法: 我们使用了boost准标准库中的split函数接口实现了字符串切割。可以将字符串按照指定的分隔符拆分成多个子字符串,并将这些子字符串存储在指定的容器中。第一个参数是用于保存分割后结果的容器,通常使用 std::vector < std::string > 类型。第二个参数是需要被分割的原始字符串。第三个参数是分隔符,可以是一个字符或一组字符。这个参数决定了如何分割源字符串。boost::split 还提供了一个可选的第四个参数 boost::token_compress_on,当连续出现多个分隔符时,可以用来合并这些分隔符。
功能代码的整体实现:
namespace ns_util
{
    class timeutil
    {
    public:
        // 获取1970年1月1日至今的秒数 --- 时间戳
        static std::string gettimestamp()
        {
            struct timeval tvl;
            gettimeofday(&tvl, nullptr);
            return std::to_string(tvl.tv_sec);
        }
        static std::string getmsleveltimestamp()
        {
            struct timeval tvl;
            gettimeofday(&tvl, nullptr);
            return std::to_string(tvl.tv_sec * 1000 + tvl.tv_usec / 1000);
        }
    };

    const std::string temp_path = "../temp/";

    class pathutil
    {
    public:
        // 形成我们的不同类别临时文件的路径
        static std::string addsuffix(const std::string &file_name, const std::string &suffix)
        {
            std::string pathname = temp_path;
            pathname += file_name;
            pathname += suffix;
            return pathname;
        }

        static std::string src(const std::string &file_name)
        {
            return addsuffix(file_name, ".cpp");
        }
        // 构建可执行程序的完整路径+后缀名
        static std::string exe(const std::string &file_name)
        {
            return addsuffix(file_name, ".exe");
        }
        static std::string compilererror(const std::string &file_name)
        {
            return addsuffix(file_name, ".compile_error");
        }

        static std::string stdin(const std::string &file_name)
        {
            return addsuffix(file_name, ".stdin");
        }
        static std::string stdout(const std::string &file_name)
        {
            return addsuffix(file_name, ".stdout");
        }
        static std::string stderr(const std::string &file_name)
        {
            return addsuffix(file_name, ".stderr");
        }
    };

    class fileutil
    {
    public:
        static bool isfileexists(const std::string &path_name)
        {
            struct stat st;
            // stat:获得一个文件的属性  如果文件存在 ---- 属性也存在
            if (stat(path_name.c_str(), &st) == 0)
                return true;
            else
                return false;
        }
        // 形成唯一的文件名
        static std::string uniqfilename()
        {
            static std::atomic_uint id(0);
            id++;
            std::string ms = timeutil::getmsleveltimestamp();
            std::string uniq_id = std::to_string(id);
            return ms + "_" + uniq_id;
        }

        static bool writefile(const std::string &path_name, const std::string &content)
        {
            std::ofstream out(path_name);
            if (!out.is_open())
            {
                return false;
            }
            out.write(content.c_str(), content.size());
            out.close();
            return true;
        }

        static bool readfile(const std::string &path_name, std::string *content, bool keep = false)
        {
            content->clear();
            std::ifstream in(path_name);
            if (!in.is_open())
            {
                return false;
            }
            std::string line;
            while (std::getline(in, line))
            {
                *(content) += line;
                *(content) += keep ? "\n" : "";
            }
            in.close();
            return true;
        }
    };

    class stringutil
    {
    public:
        static void spilestring(const std::string &target, std::vector<std::string> *out, const std::string &sep)
        {
            boost::split((*out), target, boost::is_any_of(sep), boost::algorithm::token_compress_on);
        }
    };
}
2、compiler_server 模块设计
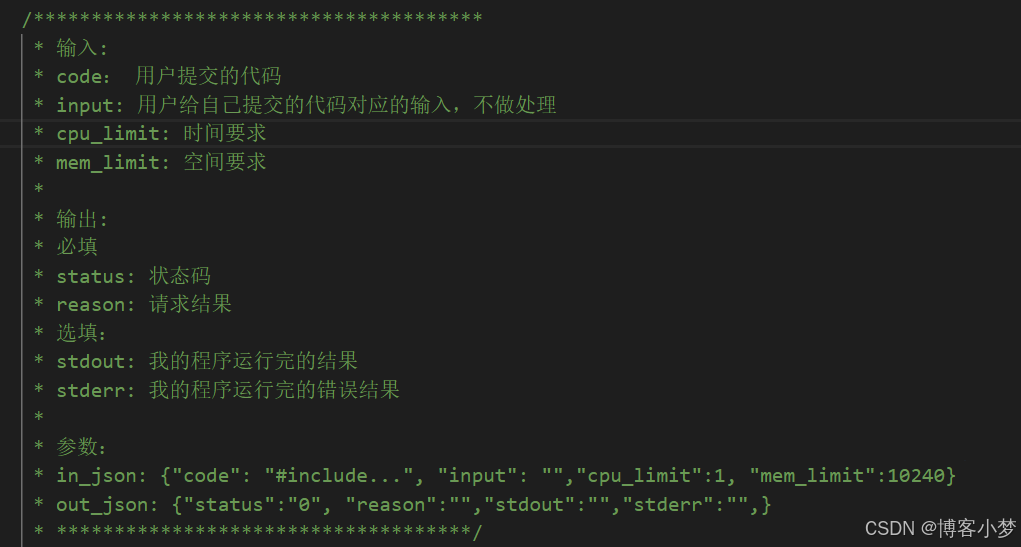
提供的服务:编译并运⾏代码,得到格式化的相关的结果
2.1compile.hpp文件代码编写
compile.hpp代码编写重难点分析:
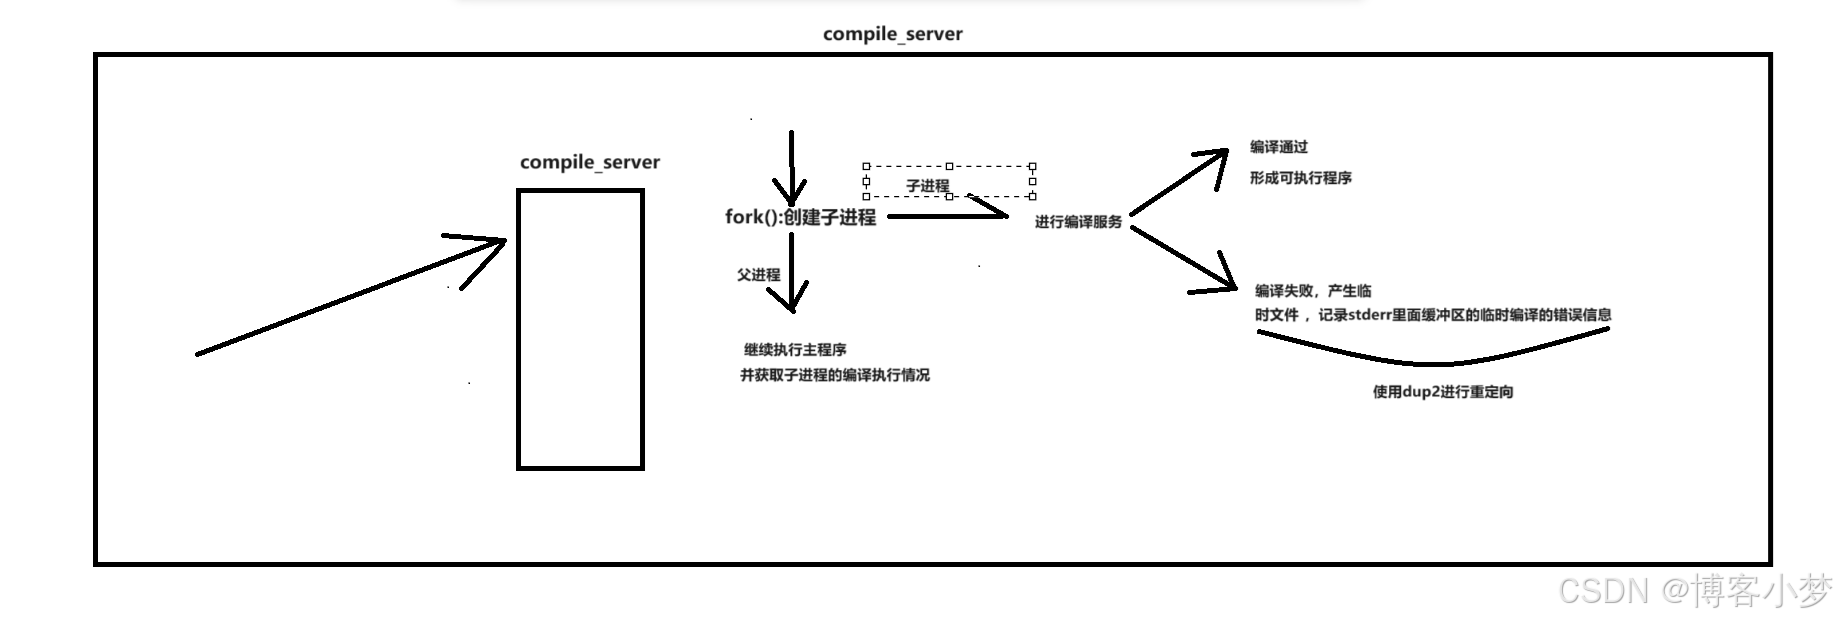
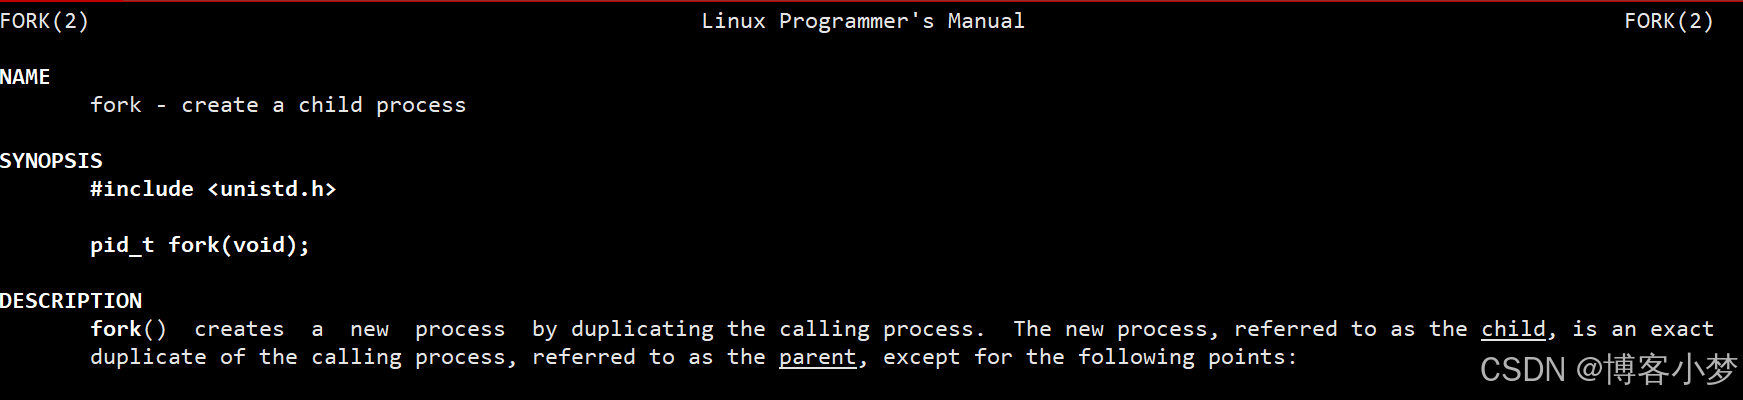
- 采用多进程系统编程技术:利用系统调用fork函数进行创建子进程,帮助我们完成编译服务,父进程等待子进程的退出并回收子进程的相关资源,并继续执行主程序判断子进程编译执行的结果。
fork()函数的接口信息:
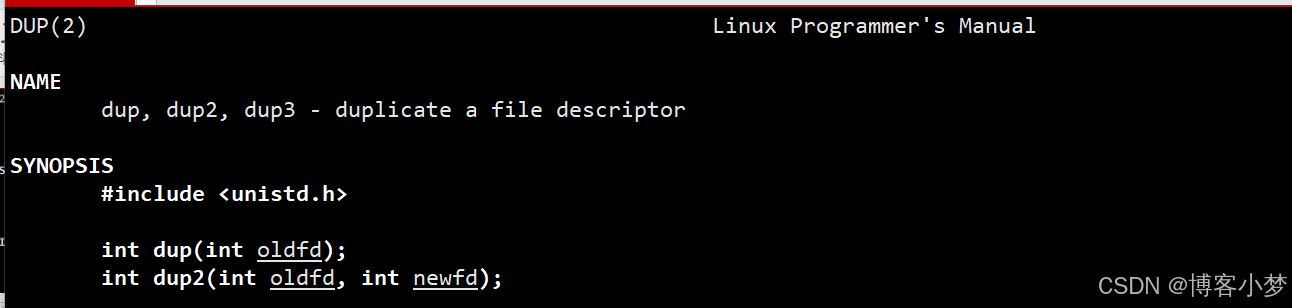
- 由于子进程的pcb会继承父进程许多的信息,文件描述符也会被拷贝。因此我们可以在子进程中使用系统调用dup2接口,将stderr(2)进行重定向到我们指定的的临时文件中,这样就可以实现将编译错误信息记录在相应的临时文件中。
- 如何让我们的子进程去进行编译程序呢?这里使用到了进程程序替换。本项目使用的是exelp接口。

- 父进程使用waitpid方法,等待子进程的退出,并将他回收。这是必须要做的。如果父进程不等待子进程,会系统会产生僵尸进程,导致系统资源不断地变少。父进程调用util.hpp中的文件操作方法,判断子进程编译运行的情况。
- 调用log.hpp的log宏函数,打印日志信息,有助于查看程序运行的信息,排查错误。
功能代码的整体实现:
// 实现编译功能
namespace ns_compile
{
    using namespace ns_util;
    using namespace ns_log;
    class compiler
    {
    public:
        compiler()
        {
        }
        // 根据给的文件名进行编译
        static bool compile(const std::string file_name)
        {
            pid_t id = fork();
            if (id < 0)
            {
                log(error) << "内部错误,创建⼦进程失败" << "\n";
                return false;
            }
            else if (id == 0)
            {
                // 创建编译错误文件,并进行重定向
                umask(0);
                int _stderr = open(pathutil::compilererror(file_name).c_str(), o_creat | o_wronly, 0644);
                if (_stderr < 0)
                {
                    log(warning) << "没有成功形成compilererror⽂件" << "\n";
                    exit(1);
                }
                log(infor) << "成功形成compilererror⽂件" << "\n";

                dup2(_stderr, 2);

                // 子进程去进行完成编译工作
                // 使用exec进行进程程序替换,调用编译器
                // 编译的时候,我们会产生很多临时文件
                // 需要以nullptr结尾
                // 注意有些函数接口是需要c语言风格的字符串,string 进行转换。!!!

                execlp("g++", "g++", "-o", pathutil::exe(file_name).c_str(),
                       pathutil::src(file_name).c_str(), "-std=c++11", "-d","compiler_online",nullptr);
                log(error) << "启动编译器g++失败,可能是参数错误" << "\n";
                exit(-1);
            }
            else
            {
                // 父进程
                pid_t rid = waitpid(id, nullptr, 0);
                // 对于子进程是否完成编译成功进行判断。
                if (fileutil::isfileexists(pathutil::exe(file_name)))
                {
                    // 编译成功
                    log(info) << pathutil::src(file_name) << " 编译成功!" << "\n";
                    return true;
                }
            }
            // 编译不成功
            log(error) << "编译失败,没有形成可执⾏程序" << "\n";
            return false;
        }
        ~compiler()
        {
        }

    private:
    };

}
2.2 runner.hpp文件代码编写
runner.hpp代码编写重难点分析:
1:程序运行:
- 代码跑完,结果正确
- 代码跑完,结果不正确
- 代码没跑完,异常了
2:一个程序在默认启动的时候
- 标准输入: 我们这里不处理
- 标准输出: 程序运行完成,输出结果是什么
- 标准错误: 运行时错误信息
3:资源条件的约束
防止用户上传恶意代码,从而形成恶意可执行。我们需要对这个进行排查。
- 我们再刷leetcode时,会发现每一道题目都有时间和空间的约束。
- 我们通过下面代码就能够对我们的运行程序进行资源的限制
使用setrlimit系统调用接口实现。
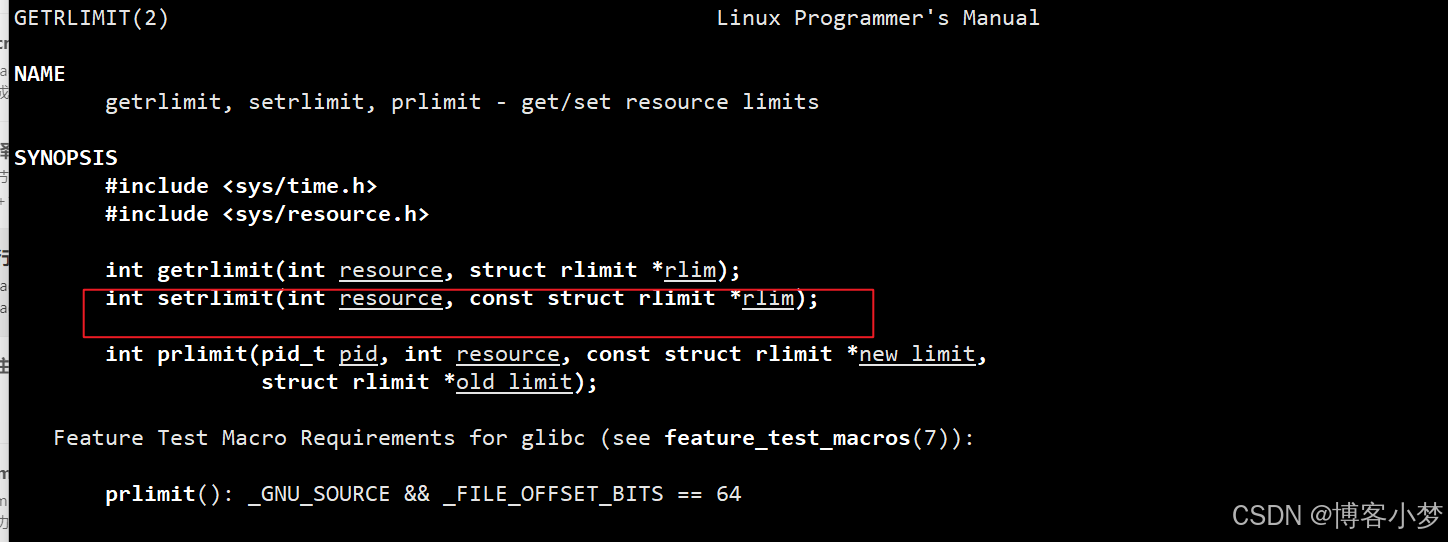
结构体的解析和内部属性。rlimit_cur:表示当前设置的资源数量,rlimit_max表示最大设置的资源数量。第二个参数是设置软限制和硬限制。非特权进程,os需要对其进行受限,我们在该项目编写时都是非特权的,设置rlim_max为无穷即可,rlim_cur设置为我们想要的值。

资源限制的代码设计:
		static void setproclimit(int _cpu_limit, int _mem_limit)
        {
            // 设置cpu时长
            struct rlimit cpu_rlimit;
            cpu_rlimit.rlim_max = rlim_infinity;
            cpu_rlimit.rlim_cur = _cpu_limit;
            setrlimit(rlimit_cpu, &cpu_rlimit);

            // 设置内存大小
            struct rlimit mem_rlimit;
            mem_rlimit.rlim_max = rlim_infinity;
            mem_rlimit.rlim_cur = _mem_limit * 1024; //转化成为kb
            setrlimit(rlimit_as, &mem_rlimit);
        }
我们这里只是从时间和内存这两个方面进行排查,也可以进行扩展,只是比较复杂。好的在线oj,因为每一个不同的题目要求不一样,因此,无法进行统一。
run需要考虑代码跑完,结果正确与否吗??我们无需考虑!结果正确与否:是由我们的测试用例决定的!我们只考虑:是否正确运行完毕
功能代码的整体实现:
namespace ns_runner
{
    using namespace ns_util;
    using namespace ns_log;

    class runner
    {
    public:
        runner() {}
        ~runner() {}

    public:
        //提供设置进程占用资源大小的接口
        static void setproclimit(int _cpu_limit, int _mem_limit)
        {
            // 设置cpu时长
            struct rlimit cpu_rlimit;
            cpu_rlimit.rlim_max = rlim_infinity;
            cpu_rlimit.rlim_cur = _cpu_limit;
            setrlimit(rlimit_cpu, &cpu_rlimit);

            // 设置内存大小
            struct rlimit mem_rlimit;
            mem_rlimit.rlim_max = rlim_infinity;
            mem_rlimit.rlim_cur = _mem_limit * 1024; //转化成为kb
            setrlimit(rlimit_as, &mem_rlimit);
        }
        static int run(const std::string &file_name, int cpu_limit, int mem_limit)
        {
            std::string _execute = pathutil::exe(file_name);
            std::string _stdin   = pathutil::stdin(file_name);
            std::string _stdout  = pathutil::stdout(file_name);
            std::string _stderr  = pathutil::stderr(file_name);

            umask(0);
            int _stdin_fd = open(_stdin.c_str(), o_creat|o_rdonly, 0644);
            int _stdout_fd = open(_stdout.c_str(), o_creat|o_wronly, 0644);
            int _stderr_fd = open(_stderr.c_str(), o_creat|o_wronly, 0644);

            if(_stdin_fd < 0 || _stdout_fd < 0 || _stderr_fd < 0){
                log(error) << "运行时打开标准文件失败" << "\n";
                return -1; //代表打开文件失败
            }

            pid_t pid = fork();
            if (pid < 0)
            {
                log(error) << "运行时创建子进程失败" << "\n";
                close(_stdin_fd);
                close(_stdout_fd);
                close(_stderr_fd);
                return -2; //代表创建子进程失败
            }
            else if (pid == 0)
            {
                dup2(_stdin_fd, 0);
                dup2(_stdout_fd, 1);
                dup2(_stderr_fd, 2);

                setproclimit(cpu_limit, mem_limit);

                execl(_execute.c_str(), _execute.c_str(), nullptr);
                exit(1);
            }
            else
            {
                close(_stdin_fd);
                close(_stdout_fd);
                close(_stderr_fd);
                int status = 0;
                waitpid(pid, &status, 0);
                // 程序运行异常,一定是因为因为收到了信号!
                log(info) << "运行完毕, info: " << (status & 0x7f) << "\n";
                return status & 0x7f;
            }
        }
    };
}
2.3 compile_run.hpp文件代码编写
compile_run.hpp代码编写重难点分析:
- 先做一个宏观上的设计:
- 通过compile_run.hpp模块的编写,使我们的编译和运行模块相结合起来。
- 通过传入的json字符串进行反序列化,初始化我们的json对象,然后获取需要的信息。形成源文件、对源文件编译形成可执行、对可执行文件运行。再把运行得到的信息填充到json对象中,经过序列化形成json字符串,然后通过out_json带出去。
- 每一次运行后成功后,都会产生很多的临时文件,我们可以设计一个函数,对这些生成的临时文件进行一个清理。
功能代码的整体实现:
namespace ns_compile_run
{
    using namespace ns_compile;
    using namespace ns_runner;

    class compile_run
    {
    public:
        compile_run(){};
        ~compile_run(){};

        static void removetempfile(const std::string& file_name)
        {
            //清理文件的个数是不确定的,但是有哪些我们是知道的
            std::string _src = pathutil::src(file_name);
            if(fileutil::isfileexists(_src)) unlink(_src.c_str());

            std::string _exe = pathutil::exe(file_name);
            if(fileutil::isfileexists(_exe)) unlink(_exe.c_str());

            std::string _compileerror = pathutil::compilererror(file_name);
            if(fileutil::isfileexists(_compileerror)) unlink(_compileerror.c_str());

            std::string _stdin = pathutil::stdin(file_name);
            if(fileutil::isfileexists(_stdin)) unlink(_stdin.c_str());

            std::string _stdout = pathutil::stdout(file_name);
            if(fileutil::isfileexists(_stdout)) unlink(_stdout.c_str());

            std::string _stderr = pathutil::stderr(file_name);
            if(fileutil::isfileexists(_stderr)) unlink(_stderr.c_str());

        }

        static std::string statustostr(int status, const std::string &file_name)
        {
            std::string desc;
            switch (status)
            {
            case 0:
                desc = "编译运行成功";
                break;
            case -1:
                desc = "提交的代码是空";
                break;
            case -2:
                desc = "未知错误";
                break;
            case -3:
                fileutil::readfile(pathutil::compilererror(file_name), &desc, true);
                break;
            case sigabrt: // 6
                desc = "内存超过范围";
                break;
            case sigxcpu: // 24
                desc = "cpu使用超时";
                break;
            case sigfpe: // 8
                desc = "浮点数溢出";
                break;
            default:
                desc = "未知: " + std::to_string(status);
                break;
            }
            return desc;
        }
        static void start(const std::string &in_json, std::string *out_json)
        {
            //序列化
            json::value in_value;
            json::reader reader;
            reader.parse(in_json, in_value);

            std::string code = in_value["code"].asstring();
            std::string input = in_value["input"].asstring();
            int cpu_limit = in_value["cpu_limit"].asint();
            int mem_limit = in_value["mem_limit"].asint();

            int cr_status = 1;
            int c_status = 1;
            int r_status = 1;
            std::string file_name;
            int run_result;

            if (code.size() == 0)
            {
                // 代码为空
                cr_status = -1;
                goto end;
            }
            file_name = fileutil::uniqfilename();

            // 将获得的代码形成源文件src
            if (!fileutil::writefile(pathutil::src(file_name), code))
            {
                // 写入失败了,发生未知错误
                cr_status = -2;
                goto end;
            }
            // 写入成功
            // 对src文件进行编译
            if (!compiler::compile(file_name))
            {
                // 编译失败
                cr_status = -3;
                goto end;
            }
            // 编译成功,形成可执行
            // 运行
            run_result = runner::run(file_name, cpu_limit, mem_limit);
            if (run_result > 0)
            {
                // run失败(异常)
                cr_status = run_result;
            }
            else if (run_result < 0)
            {
                // run发送内部错误,未知错误到导致
                cr_status = -2;
            }
            else
            {
                // run完毕
                cr_status = 0;
            }
        end:
            // 对每一个编译运行情况进行统一的差错处理!
            json::value out_value;
            out_value["status"] = cr_status;
            out_value["reason"] = statustostr(cr_status, file_name);
            if (cr_status == 0)
            {
                // 编译运行的整个过程都是成功的
                std::string _stdout;
                fileutil::readfile(pathutil::stdout(file_name), &_stdout, true);
                out_value["stdout"] = _stdout;

                std::string _stderr;
                fileutil::readfile(pathutil::stderr(file_name), &_stderr, true);
                out_value["stderr"] = _stderr;
            }
            json::fastwriter write;
            *out_json = write.write(out_value);

            removetempfile(file_name);
        }
    };
}
2.4 compile_server.cc文件代码编写
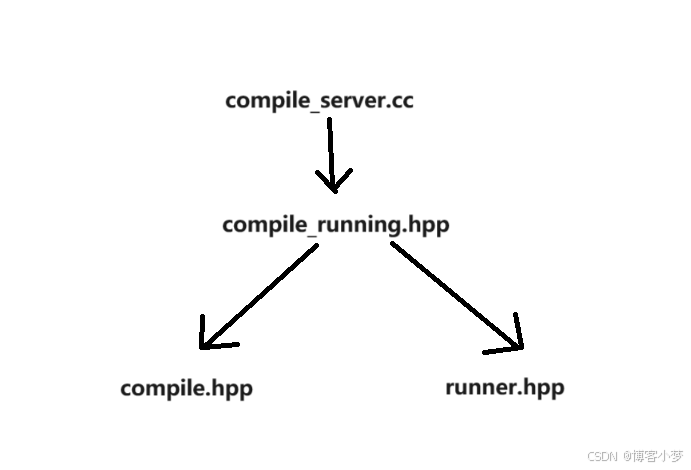
各个文件间的调用逻辑:
compile_server.cc代码编写重难点分析:
- 接⼊cpp-httplib:header-only,只需要将.h拷⻉到项⽬中,即可直接使⽤
- cpp-httplib:需要使⽤⾼版本的gcc,建议是gcc 7,8,9 [如果没有升级,cpp-httplib:要么就是编译报错,要么就是运⾏出错]
- cpp-httplib: 阻塞式多线程的⼀个⽹络http库
- 测试的时候,可以采⽤postman进⾏测试
- 我们使用的post方法,将编译链接服务打包形成网络服务。我们使用lambda表达式。这样使得代码更加简洁。我们获取客户端的数据,并将运行的结果返回给客户。让我们的服务器一直处于监听状态,一旦访问,便可以进行服务。
功能代码的整体实现:
#include "compile_runing.hpp"
#include "../comm/httplib.h"
using namespace ns_compile_run;
using namespace httplib;
void usage(std::string proc)
{
    std::cerr << "usage: " << "\n\t" << proc << " port" << std::endl;
}

int main(int argc, char* argv[])
{
    if(argc != 2)
    {
        usage(argv[0]);
        return 0;
    }

    server svr;
    svr.post("/compile_and_run",[](const request &req, response &resp){
        std::string in_json = req.body;
        std::string out_json;
        if(!in_json.empty())
        {
            compile_run::start(in_json, &out_json);
            resp.set_content(out_json, "application/json;charset=utf-8");
        }
    });
    svr.listen("0.0.0.0", atoi(argv[1]));
}
3、设计文件版题库
两批⽂件构成
- 第⼀个:questions.list : 题⽬列表(不需要题⽬的内容)
- 第⼆个:题⽬的描述,题⽬的预设置代码(header.cpp), 测试⽤例代码(tail.cpp)
这两个内容是通过题⽬的编号,产⽣关联的。
当⽤⼾提交⾃⼰的代码的时候:header.cpp
#include <iostream>
#include <string>
#include <vector>
#include <map>
#include <algorithm>
using namespace std;
class solution{
public:
	bool ispalindrome(int x)
	{
		//将你的代码写在下⾯
		//code
		//code
		//code
		//code
		//code
		return true;
	}
};
oj不是只把上⾯的代码提交给compile_and_run, ⽽是要拼接上该题号对应的测试⽤例 : tail.cpp。
#include <iostream>
#include <string>
#include <vector>
#include <map>
#include <algorithm>
using namespace std;
class solution{
public:
	bool ispalindrome(int x)
	{
		//将你的代码写在下⾯
		//code
		//code
		//code
		//code
		//code
		return true;
	}
};
最终提交给编译服务主机的代码是:
#include <iostream>
#include <string>
#include <vector>
#include <map>
#include <algorithm>
using namespace std;
class solution{
public:
	bool ispalindrome(int x)
	{
		//将你的代码写在下⾯
		//code
		//code
		//code
		//code
		//code
		return true;
	}
};
// 下⾯的代码,仅仅是为了让我们设计测试⽤例的时候,不要报错。
// 我们不想让编译器编译的时候,保留它,⽽是裁剪掉(g++ -d compiler_online)
#ifndef compiler_online
#include "header.cpp"
#endif

void test1()
{
    bool ret = solution().palindromenumber(121);
    if (ret)
    {
        cout << "通过用例1, 测试121通过 ... ok!" << endl;
    }
    else
    {
        std::cout << "没有通过用例1, 测试的值是: 121" << std::endl;
    }
}

void test2()
{
    bool ret = solution().palindromenumber(-10);
    if (!ret)
    {
        cout << "通过用例2, 测试-10通过 ... ok!" << endl;
    }
    else
    {
        std::cout << "没有通过用例2, 测试的值是: -10" << std::endl;
    }
}

int main()
{
    test1();
    test2();
}
4、oj_server 模块设计——基于mvc
4.1 初步使用一下cpp-httplib。
功能代码的整体实现:
#include <iostream>
#include "../comm/httplib.h"
//进行服务路由功能
using namespace httplib;
int main()
{
server svr;
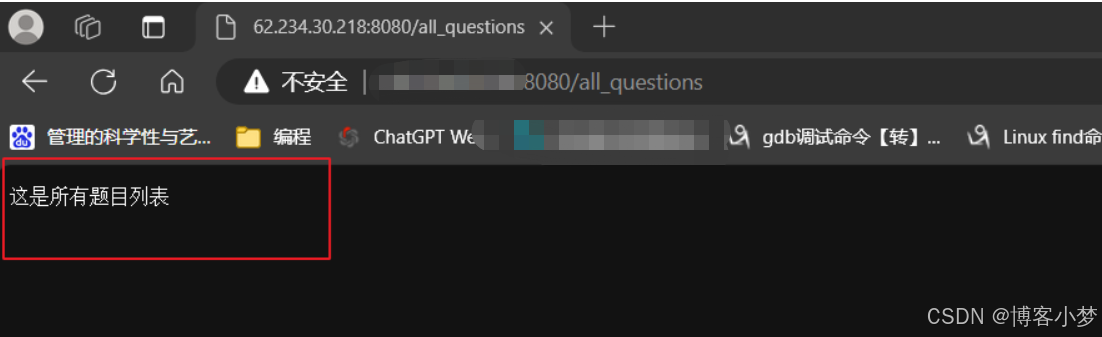
//获取所有题目
svr.get("/all_questions",[](const request& req, response& resp){
resp.set_content("这是所有题目列表","text/plain;charset=utf-8");
});
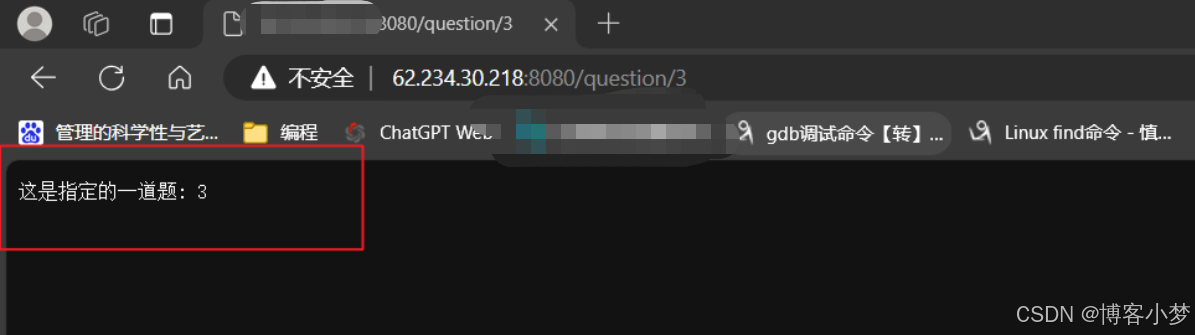
//用户根据题号获取特定的一道题
svr.get(r"(/question/(\d+))",[](const request& req, response& resp){
std::string number = req.matches[1];
resp.set_content("这是指定的一道题: " + number,"text/plain;charset=utf-8");
});
//用户提交代码,使用我们的判题功能。
svr.get(r"(/judge/(\d+))",[](const request& req, response& resp){
std::string number = req.matches[1];
resp.set_content("这是指定题目的判题功能: " + number, "text/plain;charset=utf-8");
});
svr.set_base_dir("./wwwroot");
svr.listen("0.0.0.0",8080);
return 0;
}
同级目录下,创建wwwroot文件夹。里面存放首页网页。
功能代码的整体实现:
<!doctype html>
<html lang="en">
<head>
    <meta charset="utf-8">
    <meta name="viewport" content="width=device-width, initial-scale=1.0">
    <title>这是题目列表</title>
</head>
<body>

</body>
</html>
效果:

4.2 oj_model.hpp文件代码编写
compile_server.cc代码编写重难点分析:
- oj_model.hpp文件主要是用于数据交互,我们的数据就是题目list的相关信息。
- 首先就是将我们的题目列表的信息从文件加载到内存中,和读取每一道题目的题目描述、预设值函数头代码、对应的测试用例代码。形成每一个question。
question的设计:

- 提供获取一个题目的问题细节方法和获取所有题目问题细节的方法。
功能代码的整体实现:
class model
    {
    public:
        model(){
            assert(loadquestionslist(questions_list));
        };
        ~model(){};

        bool loadquestionslist(const string& questionslist)
        {
            //首先打开题目信息文件
            ifstream in(questionslist);
            if(!in.is_open())
            {
                //打开文件失败
                log(fatal) << " 加载题库失败,请检查是否存在题库文件"  << "\n";
                return false;
            }
            //打开成功
            string line;
            while(getline(in,line))
            {
                vector<string> lines;
                // 1 判断回⽂数 简单 1 30000
                //对于获得每一行进行切割
                stringutil::spilestring(line,&lines," ");
                if(lines.size() != 5)
                {
                    log(warning) << "加载部分题目失败,请检查文件格式" << "\n";
                }
                question q;
                q.number = lines[0];
                q.title = lines[1];
                q.dif_level = lines[2];
                q.cpu_limit = stoi(lines[3]);
                q.mem_limit = stoi(lines[4]);

                std::string path = question_path;
                path += q.number;

                fileutil::readfile(path + "/desc.txt",&(q.desc), true);
                fileutil::readfile(path + "/header.cpp",&(q.header),true);
                fileutil::readfile(path + "/tail.cpp",&(q.tail),true);

                questions.insert({q.number, q});

            }
            //加载成功
            log(infor) << "加载题库...成功!" << "\n";
            in.close();

            return true;
        }

        bool getallquestions(vector<question>* out)
        {
            if(questions.size() == 0)
            {
                //没有题目数据/或者加载题目数据失败
                log(error) << "用户获取题库失败" << "\n";
                return false;
            }
            //有题目数据信息
            for(auto& q : questions)
            {
                out->push_back(q.second);
            }
            return true;

        }

        bool getonequestion(const string& number, question* q)
        {
            const auto& iter = questions.find(number);
            if(iter == questions.end())
            {
                //题目列表找不到用户申请的题目编号
                log(error) << "用户获取题目失败,题目编号: "  << number << "\n";
                return false;
            }
            *q = iter->second;
            return true;
        }

    private:
        //题目:问题细节
        unordered_map<string, question> questions;

    };
4.3 oj_control.hpp文件代码编写
oj_control.hpp代码编写重难点分析:
- 先描述在组织,我们对于每一台进行编译服务的主机进行描述。
  		string _ip;     // 提供编译服务主机的ip
        int _port;      // 提供编译服务主机的端口号
        uint64_t _load; // 主机的负载均衡系数
        mutex *_mtx;    // c++的mutex是禁止拷贝的,所以这里定义指针
具体的方法实现:我们使用的网络库是基于多线程的,因此,当很多网络服务到来时,可能有多个执行流进入同一台主机,从而对于该主机的负载情况进行修改,因此必须加锁进行保护。
		// 获取主机的负载情况
        uint64_t load()
        {
            uint64_t load = 0;
            if (_mtx)
                _mtx->lock();
            load = _load;
            if (_mtx)
                _mtx->unlock();
            return load;
        }

        // 增加主机的负载
        void incload()
        {
            if (_mtx)
                _mtx->lock();
            _load++;
            if (_mtx)
                _mtx->unlock();
        }
        // 清除主机的负载
        void clearload()
        {
            if (_mtx)
                _mtx->lock();
            _load = 0;
            if (_mtx)
                _mtx->unlock();
        }

        // 减少主机的负载
        void decload()
        {
            if (_mtx)
                _mtx->lock();
            _load--;
            if (_mtx)
                _mtx->unlock();
        }
- 负载均衡设计:
- 首先先将主机列表配置文件进行加载,并将他添加至在线主机列表和主机列表中。
具体代码实现:
- 首先先将主机列表配置文件进行加载,并将他添加至在线主机列表和主机列表中。
 		bool loadconf(const string &machine_conf)
        {
            ifstream in(machine_conf);
            if (!in.is_open())
            {
                // 没有成功打开文件
                log(fatal) << " 打开machine_conf出错" << "\n";
                return false;
            }
            // 打开文件成功

            string line;
            while (getline(in, line))
            {
                vector<string> tokens;
                stringutil::spilestring(line, &tokens, ":");
                if (tokens.size() != 2)
                {
                    log(warning) << "machine_conf文件,格式有误" << "\n";
                    continue;
                }
                // 成功切分
                machine m;
                m._ip = tokens[0];
                m._port = stoi(tokens[1]);
                m._load = 0;
                m._mtx = new mutex();
                online.push_back(machines.size());
                machines.push_back(m);
            }
            log(infor) << "成功加载machine_conf文件" << "\n";
            in.close(); // 记得关闭文件
            return true;
        }
- 智能选择主机方法设计,选择一个在线列表中,负载系数最低的主机进行处理当前的网络服务。需要加锁保护。
具体实现代码:
		bool smartchoice(int *id, machine **m)
        {
            _mtx.lock();

            int onlinenum = online.size();
            if (onlinenum == 0)
            {
                log(fatal) << " 所有主机都离线了,请运维的老铁过来看看 " << "\n";
                _mtx.unlock();
                return false;
            }
            *id = online[0];
            *m = &machines[online[0]];
            uint64_t min_load = machines[online[0]].load();
            for (int i = 1; i < onlinenum; i++)
            {
                uint64_t cur_load = machines[online[i]].load();
                if (cur_load < min_load)
                {
                    min_load = cur_load;
                    *id = online[i];
                    *m = &machines[online[i]];
                }
            }
            _mtx.unlock();
            return true;
        }
- 当一台主机离线后,我们需要对它的负载系数进行一个清0操作。如果不清零,可能他离线后,它的负载系数还是一个比较高的值,当让它再次上线后,就无法调用到这台主机了。需要加锁保护
具体实现代码:
		// 将指定的一台主机进行离线
        void offlinemachines(int witch)
        {
            _mtx.lock();
            for (auto iter = online.begin(); iter != online.end(); iter++)
            {
                if (*iter == witch)
                {
                    // 清除主机的负载系数
                    machines[witch].clearload();

                    online.erase(iter);
                    offline.push_back(witch);
                    break; //   直接break,迭代器失效不影响
                }
            }
            _mtx.unlock();
        }
- 一键上线功能设计。当我们所有的主机都挂掉了,我们需要将主机重新上线,进行编译服务。需要加锁保护。
主要实现代码:
 		void onlinemachines()
        {
            _mtx.lock();
            online.insert(online.end(), offline.begin(), offline.end());
            cout << "所有主机都上线啦!" << endl;
            _mtx.unlock();
        }
- control结构体的设计:
 		model _model;              // 提供后台数据
        view _view;                // 提供html渲染功能
        loadbalance _load_balance; // 核心负载均衡器
- 调用获取所有题目列表的信息方法,并调用oj_view模块中的形成网页的方法,形成一个题目列表的网页。
具体实现代码:
		bool allquestions(string *html)
        {
            vector<question> all;
            bool ret = true;
            if (_model.getallquestions(&all))
            {
                // 对题目进行排序
                sort(all.begin(), all.end(), [](const question &q1, const question &q2)
                     { return q1.number < q2.number; });
                // 获取题目数据成功
                // 形成网页
                _view.allexpandhtml(all, html);
            }
            else
            {
                *html = "获取题⽬失败, 形成题⽬列表失败";
                ret = false;
                // 获取题目信息失败
            }
            return ret;
        }
- 调用获取所有题目列表的信息方法,并调用oj_view模块中的形成网页的方法,形成指定题目的网页。
具体实现代码:
		bool onequestion(const string &number, string *html)
        {
            question q;
            bool ret = true;
            if (_model.getonequestion(number, &q))
            {
                // 获取指定题目信息成功
                // 形成网页
                _view.oneexpandhtml(q, html);
            }
            else
            {
                *html = "指定题⽬: " + number + " 不存在!";
                ret = false;
            }
            return ret;
        }
- 提供外部调用一键上线方法的接口:
 		void recoverymachine()
        {
            _load_balance.onlinemachines();
        }
- 设计题目的judge服务方法。首先进行反序列化和序列化操作,形成需要编译运行的json字符串。
具体代码实现:
		void judge(const string &number, const string in_json, string *out_json)
        {
            // 0. 根据题⽬编号,直接拿到对应的题⽬细节
            question q;
            _model.getonequestion(number, &q);

            json::reader reader;
            json::value in_value;
            reader.parse(in_json, in_value);
            string code = in_value["code"].asstring();

            json::value compile_value;
            compile_value["input"] = in_value["input"].asstring(); // 注意asstring()和ascstring()接口。
            compile_value["code"] = code + q.tail;
            compile_value["cpu_limit"] = q.cpu_limit;
            compile_value["mem_limit"] = q.mem_limit;
            json::fastwriter writer;
            string compile_string = writer.write(compile_value);

            while (true)
            {
                int id = 0;
                machine *m = nullptr;
                if (!_load_balance.smartchoice(&id, &m))
                {
                    log(error) << "失败" << "\n";
                    break;
                }

                client cli(m->_ip, m->_port);
                m->incload();
                log(infor) << "选出编译服务主机,详情: " << m->_ip << ":" << m->_port << " 负载系数:" << m->load() << "\n";
                if (auto res = cli.post("/compile_and_run", compile_string, "application/json;charset=utf-8"))
                {
                    log(infor) << "然后发起http请求" << "\n";

                    if (res->status == 200)
                    {

                        *out_json = res->body;
                        m->decload();
                        log(infor) << "请求和编译服务成功..." << "\n";
                        break;
                    }
                    m->decload();
                }
                else // 请求失败
                {
                    log(error) << " 当前请求的主机id: " << id << "详情: " << m->_ip << ":" << m->_port << " 可能已经离线" << "\n";
                    _load_balance.offlinemachines(id);
                    _load_balance.showmachines();
                }
            }
        }
4.4 oj_view.hpp文件代码编写
oj_view.hpp代码编写重难点分析:
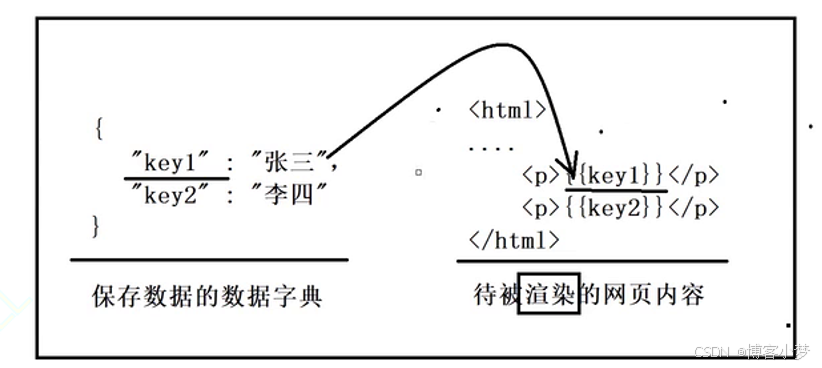
本质其实就是完成四部曲的编写即可:
- 形成路径
- 形成数据字典
- 获取被渲染的html的对象
- 完成渲染
将所有题目列表信息形成网页
		void allexpandhtml(std::vector<question>& all, std::string* html)
        {

            std::string src_path = template_path + "all_questions.html";

            ctemplate::templatedictionary root("all_questions");
            for(const auto& q : all)
            {
                ctemplate::templatedictionary* sub = root.addsectiondictionary("question_list");
                sub->setvalue("number",q.number);
                sub->setvalue("title",q.title);
                sub->setvalue("dif_level",q.dif_level);
            }


            ctemplate::template *tpl = ctemplate::template::gettemplate(src_path,ctemplate::do_not_strip);

            tpl->expand(html,&root);

        }
- 将特定的题目细节形成网页
void oneexpandhtml(question& q, std::string* html)
        {

            std::string src_path = template_path + "one_question.html";

            ctemplate::templatedictionary root("one_question");
            root.setvalue("number",q.number);
            root.setvalue("title",q.title);
            root.setvalue("dif_level",q.dif_level);
            root.setvalue("desc",q.desc);
            root.setvalue("header",q.header);

            ctemplate::template *tpl = ctemplate::template::gettemplate(src_path,ctemplate::do_not_strip);

            tpl->expand(html,&root);

        }
4.5 oj_server.cc文件代码编写
调用get方法,实现网络服务。获取所有题目、用户根据题号获取特定的一道题、用户提交代码,使用我们的判题功能。(1. 每道题的测试用例 2. compile_and_run)。
//进行服务路由功能
using namespace httplib;
using namespace ns_control;

static control* ctl_ptr = nullptr;

void recovery(int signum)
{
    ctl_ptr->recoverymachine();
}


int main()
{
    signal(sigquit,recovery);
    server svr;
    control ctl;
    ctl_ptr = &ctl;
    svr.get("/all_questions",[&ctl](const request& req, response& resp){
        std::string html;
        ctl.allquestions(&html);
        resp.set_content(html,"text/html;charset=utf-8");
    });
    svr.get(r"(/question/(\d+))",[&ctl](const request& req, response& resp){
        std::string number = req.matches[1];
        std::string html;
        ctl.onequestion(number,&html);
        //ctl.question(number,&html);
        resp.set_content(html,"text/html;charset=utf-8");

    });
    svr.post(r"(/judge/(\d+))",[&ctl](const request& req, response& resp){
        std::string number = req.matches[1];
        std::string in_json = req.body;
        std::string out_json;
        ctl.judge(number,in_json,&out_json);
        resp.set_content(out_json, "application/json;charset=utf-8");

    });
    svr.set_base_dir("./wwwroot");
    svr.listen("0.0.0.0",8080);
    return 0;
}
六、项目前端页面实现过程
我主要是做后端开发的项目,前端没有那么重要,只是了解一下前端的一些基础语法和调用简单的接口,大家了解一下即可。这里就不做详细的分析啦,大家想要前端页面的代码,可以直接到我的gitee里面copy即可~
本项目实现了一个简单版的网页前端。一共有三个网页:
- 简单的主页网页
- 所有题目列表信息的网页
- 特定题目细节信息和用户在线oj的网页。
效果展示:
-
前端主网页

-
题目列表网页
我这里只录入两道题目作为测试~

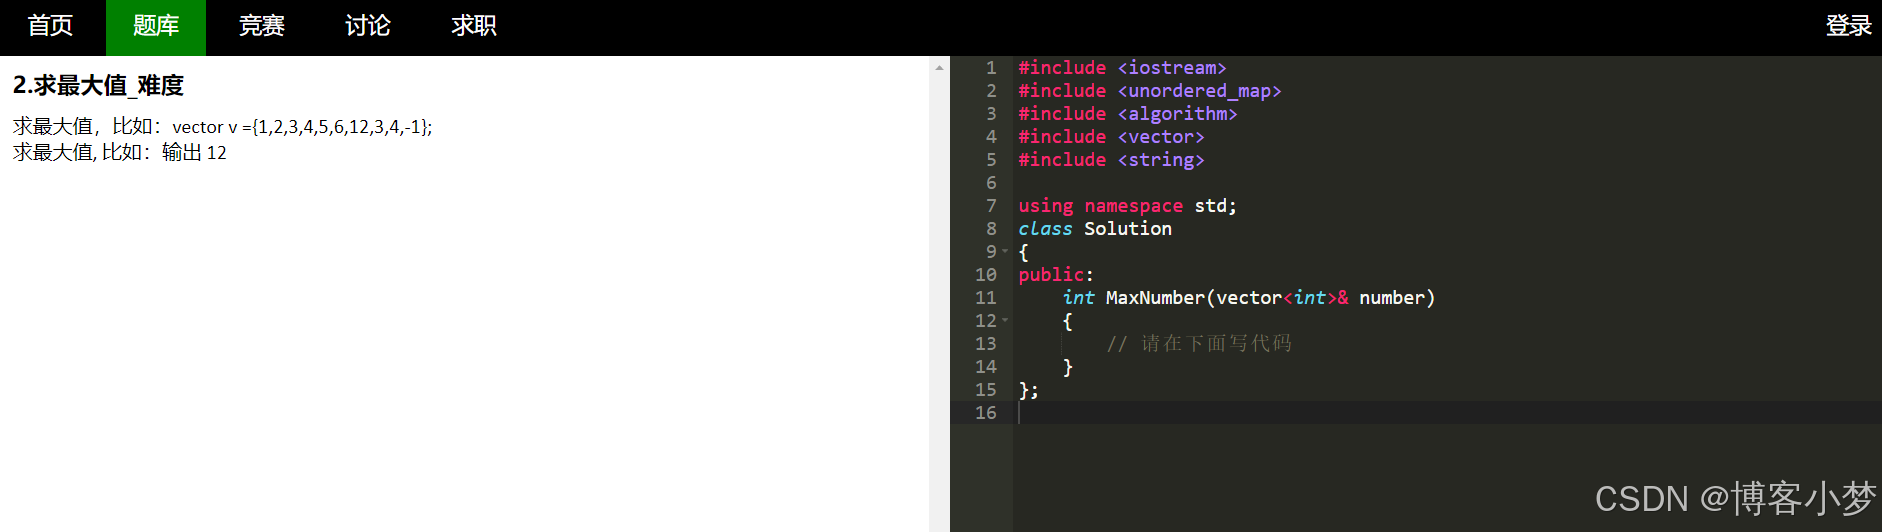
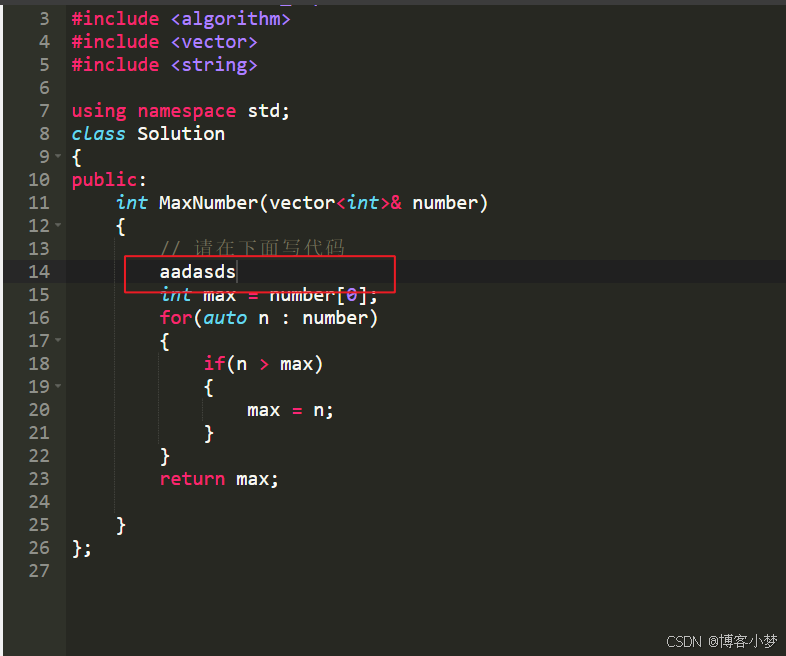
-
指定题目细节和在线oj网页
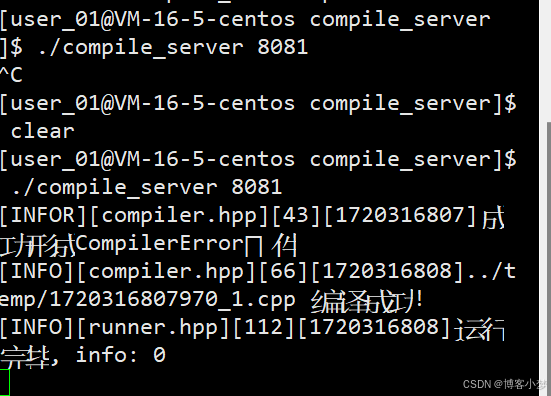
七、 项目演示过程
-
首先启动我们的三台编译服务的主机

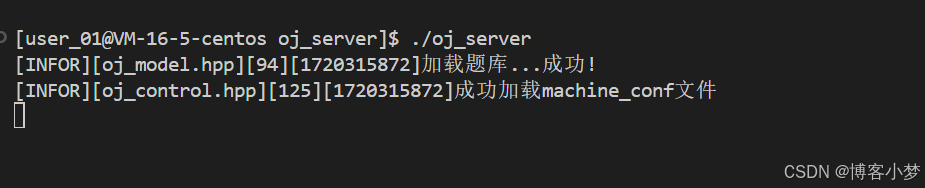
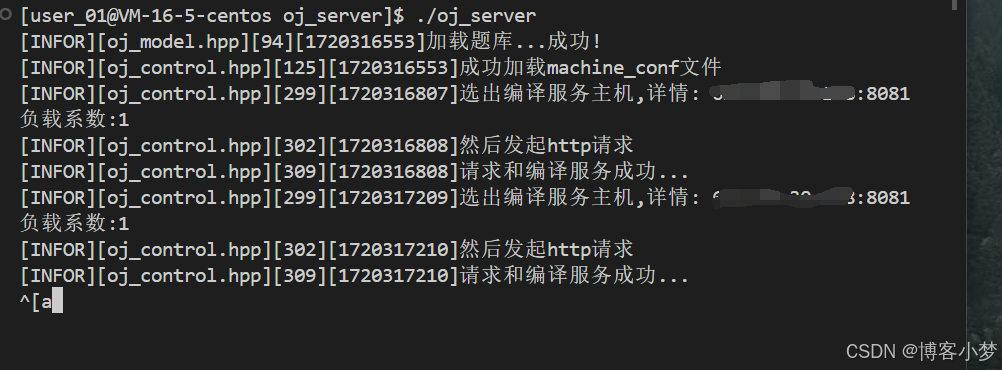
-
启动我们的oj_server主机,负责将用户提交的代码传输到编译服务主机。
3. 前端主网页
-
题目列表网页
我这里只录入两道题目作为测试~
-
指定题目细节和在线oj网页
-
进行编译和提交代码
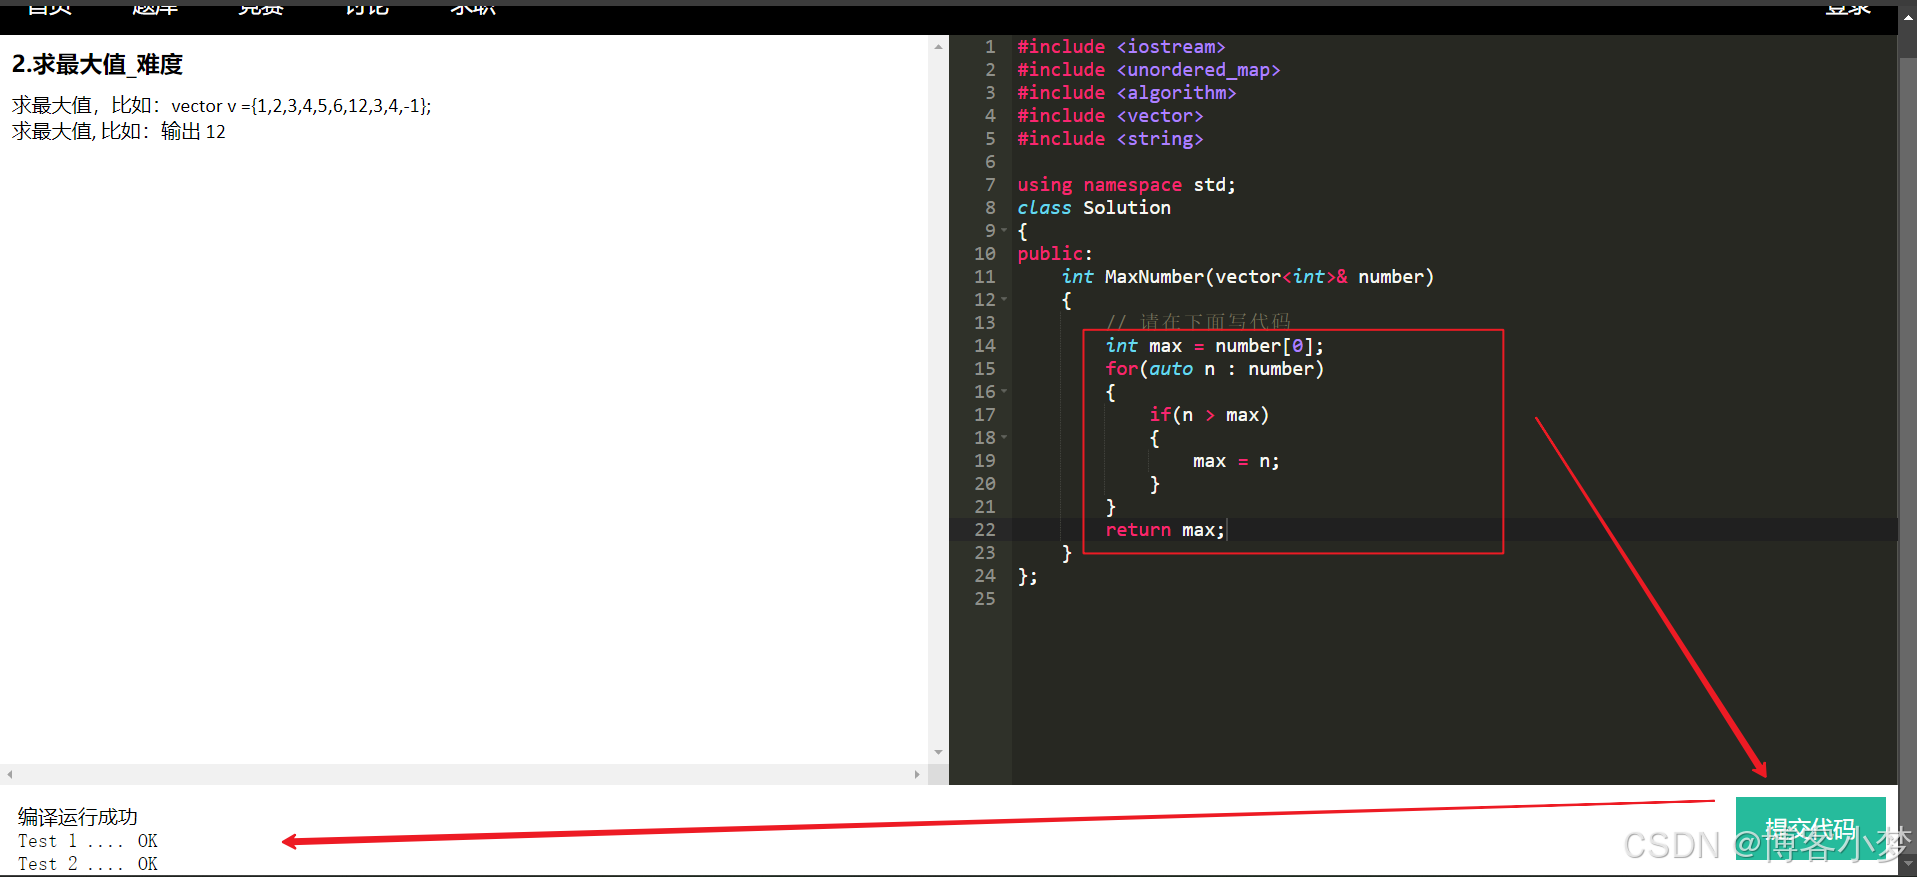
我们可以看到,在线oj的基本功能都是可以跑通的。
-
测试一下常见的错误,看能否让用户看到错误信息。
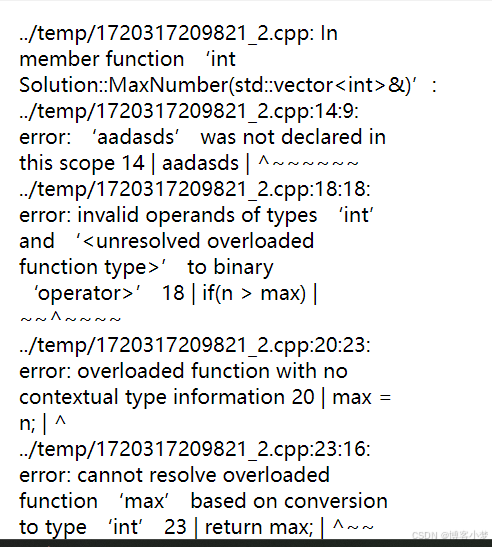
可以看到,能够返回错误信息。
八、项目的扩展方向
项目目前实现了查看题库,和对题目进行在线oj的功能。本项目还有很多扩展的地方。
- 基于注册和登陆的录题功能
- 业务扩展,⾃⼰写⼀个论坛,接⼊到在线oj中
- 即便是编译服务在其他机器上,也其实是不太安全的,可以将编译服务部署在docker
- ⽬前后端compiler的服务我们使⽤的是http⽅式请求(仅仅是因为简单),但是也可以将我们的compiler服务,设计成为远程过程调⽤,用rest_rpc,替换我们的httplib
- 功能上更完善⼀下,判断⼀道题⽬正确之后,⾃动下⼀道题⽬
- 题库目前只实现文件版的,可以实现成用数据库来存储题库。
- 其他


发表评论