- 对于文章中出现的任何错误请大家批评指出,一定及时修改。
- 有任何想要讨论和学习的问题可联系我:zhuyc@vip.163.com。
- 发布文章的风格因专栏而异,均自成体系,不足之处请大家指正。
flume实现kafka数据持久化存储到hdfs
本文关键字:flume、kafka、hdfs、实时数据、存储
文章目录
一、场景描述
对于一些实时产生的数据,除了做实时计算以外,一般还需要归档保存,用于离线数据分析。使用flume的配置可以实现对数据的处理,并按一定的时间频率存储,本例中将从kafka中按天存储数据到hdfs的不同文件夹。
1. 数据输入
本场景中数据来自kafka中某个topic订阅,数据格式为json。
2. 数据管道
使用flume作为数据处理管道,通过配置实现自定义存储规则。
3. 数据输出
最终数据将存储在hdfs中,每一天的数据将对应一个单独的文件夹。
二、组件介绍
1. kafka
如果需要参考安装步骤可以点击:kafka 3.x的解压安装 - linux
2. hadoop
如果需要参考安装步骤可以点击:hadoop 3.x各模式部署 - ubuntu
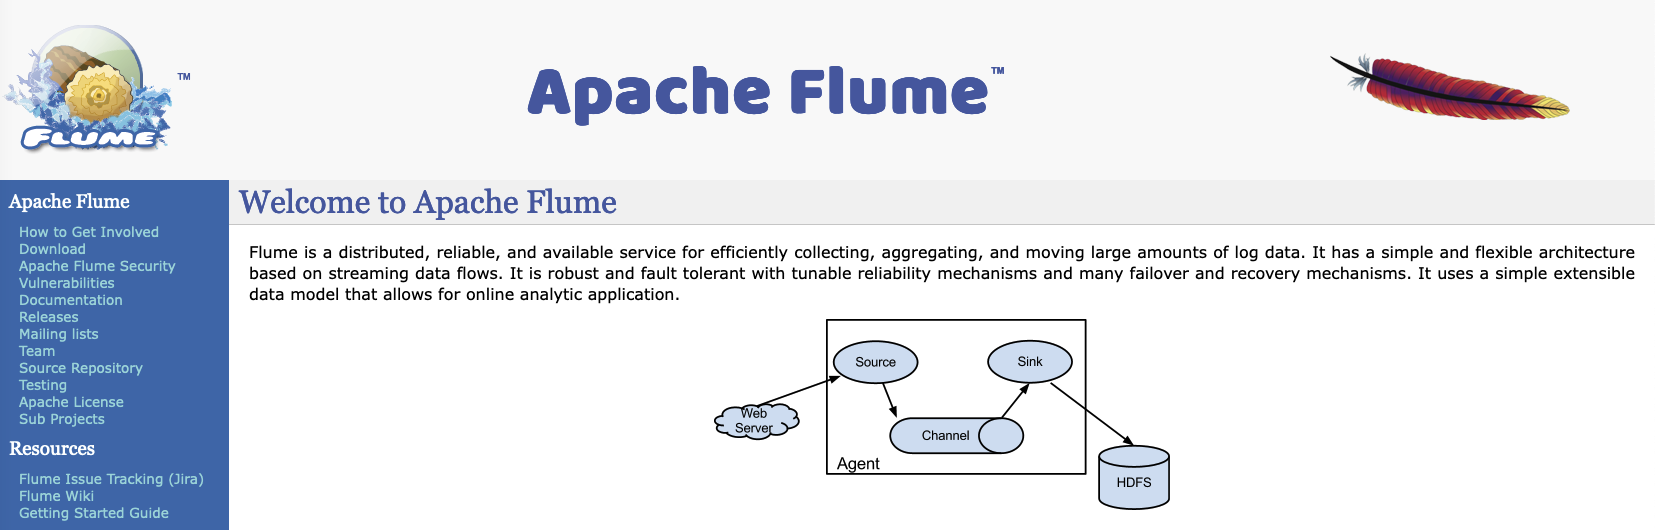
3. flume
flume的运行只需要预先配置好jdk即可,安装过程只需要解压以及环境变量的配置。
三、前置准备
1. flume下载
- 点击download -> 选择binary中的tar.gz

- 进入镜像地址列表,右键复制下载链接
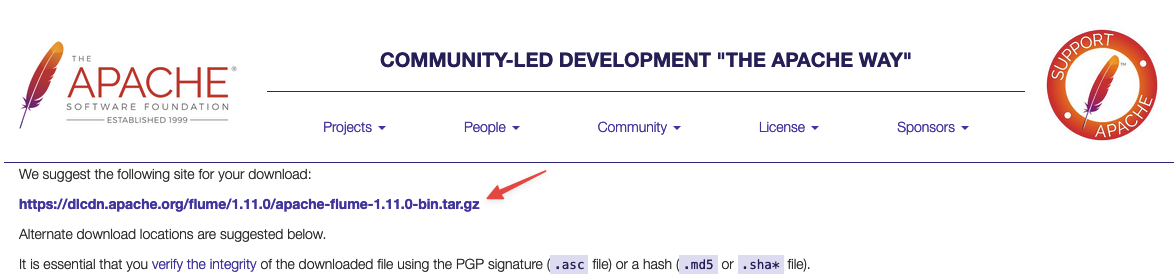
- 使用wget下载到linux系统
wget https://dlcdn.apache.org/flume/1.11.0/apache-flume-1.11.0-bin.tar.gz

2. flume安装
关于前置环境jdk的安装可以参考:hadoop 3.x各模式部署 - ubuntu中前置环境的部分【点击可直接跳转到指定位置】。
- flume解压缩
tar -zvxf apache-flume-1.11.0-bin.tar.gz
- 环境变量配置
vi ~/.bashrc

export flume_home=/path/to/apache-flume-1.11.0-bin
export path=$path:$flume_home/bin
3. 数据源准备
可以在kafka中创建一个新的topic用于测试,具体步骤可以参考:kafka 3.x的解压安装 - linux中console测试的部分【点击可直接跳转到指定位置】。
四、配置文件
在flume中主要需要配置3个部分,source、channel、sink。本例中source为kafka,sink为hdfs,channel同样有多种选择。
1. 以内存为channel
- 优缺点
- 优点:速度较快,不会占用额外硬盘空间
- 缺点:只依赖kafka的偏移量记录,flume自身不会存储偏移量信息
- 核心配置项
- agent.sources.kafka-source.batchsize:每一批次处理的数据量,可以根据需要修改
- agent.sources.kafka-source.kafka.bootstrap.servers:kafka的订阅地址,包含主机及端口号
- agent.sources.kafka-source.kafka.topics:kafka的topic名称
- agent.sinks.hdfs-sink.hdfs.path:最终数据在hdfs的保存路径,父级目录需要手动创建
- 在flume的conf文件夹中新建配置文件kafka-memory-hdfs.conf:
# name the components on this agent
agent.sources = kafka-source
agent.channels = memory-channel
agent.sinks = hdfs-sink

# describe/configure the source
agent.sources.kafka-source.type = org.apache.flume.source.kafka.kafkasource
agent.sources.kafka-source.batchsize = 1000
agent.sources.kafka-source.kafka.bootstrap.servers = localhost:9092
agent.sources.kafka-source.kafka.topics = my-topic
agent.sources.kafka-source.kafka.consumer.group.id = flume-memory-hdfs
agent.sources.kafka-source.kafka.consumer.auto.offset.reset = earliest

# describe/configure the channel
agent.channels.memory-channel.type = memory
agent.channels.memory-channel.capacity = 10000
agent.channels.memory-channel.transactioncapacity = 1000

# describe the sink
agent.sinks.hdfs-sink.type = hdfs
agent.sinks.hdfs-sink.hdfs.path = /flume_data/%y-%m-%d
agent.sinks.hdfs-sink.hdfs.filesuffix = .jsonl
agent.sinks.hdfs-sink.hdfs.rollinterval = 3600
agent.sinks.hdfs-sink.hdfs.rollsize = 0
agent.sinks.hdfs-sink.hdfs.rollcount = 1000
agent.sinks.hdfs-sink.transactioncapacity = 1000
agent.sinks.hdfs-sink.hdfs.filetype = datastream
agent.sinks.hdfs-sink.hdfs.writeformat = text

# bind the source and sink to the channel
agent.sources.kafka-source.channels = memory-channel
agent.sinks.hdfs-sink.channel = memory-channel
2. 以文件为channel
- 优缺点
- 优点:可以保证数据不丢失,将数据状态保存在本地磁盘上
- 缺点:会额外占用硬盘存储空间,读写速度相对较慢,需要合理移除历史文件
- 核心配置项
- agent.sources.kafka-source.batchsize:每一批次处理的数据量,可以根据需要修改
- agent.sources.kafka-source.kafka.bootstrap.servers:kafka的订阅地址,包含主机及端口号
- agent.sources.kafka-source.kafka.topics:kafka的topic名称
- agent.channels.file-channel.checkpointdir:本地磁盘路径,需要预先创建父级目录
- agent.channels.file-channel.usedualcheckpoints:设置为true则开启双重机制,可额外设置一个备份路径
- agent.channels.file-channel.maxfilesize:单位为字节,当达到文件大小时会自动滚动新建
- agent.sinks.hdfs-sink.hdfs.path:最终数据在hdfs的保存路径,父级目录需要手动创建
- 在flume的conf文件夹中新建配置文件kafka-file-hdfs.conf:
# name the components on this agent
agent.sources = kafka-source
agent.channels = file-channel
agent.sinks = hdfs-sink

# describe/configure the source
agent.sources.kafka-source.type = org.apache.flume.source.kafka.kafkasource
agent.sources.kafka-source.batchsize = 1000
agent.sources.kafka-source.kafka.bootstrap.servers = localhost:9092
agent.sources.kafka-source.kafka.topics = my-topic
agent.sources.kafka-source.kafka.consumer.group.id = flume-file-hdfs
agent.sources.kafka-source.kafka.consumer.auto.offset.reset = earliest

# describe/configure the channel
agent.channels.file-channel.type = file
agent.channels.file-channel.capacity = 10000
agent.channels.file-channel.transactioncapacity = 1000
agent.channels.file-channel.checkpointdir = /tmp/flume/checkpoint/
agent.channels.file-channel.backupcheckpointdir = /tmp/flume/backup/
agent.channels.file-channel.checkpointinterval = 300
agent.channels.file-channel.maxfilesize = 104857600
agent.channels.file-channel.usedualcheckpoints = true

# describe the sink
agent.sinks.hdfs-sink.type = hdfs
agent.sinks.hdfs-sink.hdfs.path = /flume_data/%y-%m-%d
agent.sinks.hdfs-sink.hdfs.filesuffix = .jsonl
agent.sinks.hdfs-sink.hdfs.rollinterval = 3600
agent.sinks.hdfs-sink.hdfs.rollsize = 0
agent.sinks.hdfs-sink.hdfs.rollcount = 1000
agent.sinks.hdfs-sink.transactioncapacity = 1000
agent.sinks.hdfs-sink.hdfs.filetype = datastream
agent.sinks.hdfs-sink.hdfs.writeformat = text

# bind the source and sink to the channel
agent.sources.kafka-source.channels = file-channel
agent.sinks.hdfs-sink.channel = file-channel
五、运行测试
开始执行后,会按照预先配置的存储规则 %y-%m-%d,将每一天产生的数据存放在不同的文件夹,但是由于数据是分批到达的,所以每个文件夹中会有多个文件,但是这不影响数据的计算,如果需要可以合并整理。
1. 直接运行
flume启动时可以通过conf -f参数指定配置文件,建议分配较多的内存,防止溢出:
nohup flume-ng agent -c conf -f ptah/to/kafka-memory-hdfs.conf -n agent -dflume.root.logger=info,console -xmx2g &
运行日志可以在flume_home/flume.log中找到,测试稳定后可以将进程挂在后台执行。
2. 监控运行
如果需要方便的进行指标监控,可以在启动时加入prometheus,具体安装步骤可以查看可以自定义指标的监控工具 - prometheus的安装部署。
- jmx环境准备
下载jar包存储在合适位置:jmx_prometheus_javaagent-0.18.0.jar
- 配置文件修改
在flume的conf配置文件中【kafka-memory-hdfs.conf/kafka-file-hdfs.conf】添加如下内容:
flume.monitoring.type = jmx
- 添加监控规则:config.yaml
新建一个config.yaml文件,存放在合适位置。
startdelayseconds: 0
ssl: false
lowercaseoutputname: false
lowercaseoutputlabelnames: false
whitelistobjectnames:
  - 'org.apache.flume.*:*'
blacklistobjectnames: []
- 添加监控配置:prometheus.yml
在scrape_configs配置中增加一组和flume相关的job,修改后需要重新加载配置文件或者重启prometheus进程
scrape_configs:
  # the job name is added as a label `job=<job_name>` to any timeseries scraped from this config.
  - job_name: "prometheus"

    # metrics_path defaults to '/metrics'
    # scheme defaults to 'http'.

    static_configs:
      - targets: ["localhost:9090"]

  - job_name: "flume"
    static_configs:
      - targets: ["localhost:9998"]
- 启动命令
在启动flume时,额外指定jar包所在路径,以及监控规则文件所在路径,设置的端口号为9998,与prometheus中的设置保持一致。
nohup flume-ng agent -c conf -f path/to/kafka-memory-hdfs.conf -n agent -dflume.root.logger=info,console -xmx2g -javaagent:/path/to/jmx_prometheus_javaagent-0.18.0.jar=9998:/path/to/config.yaml &
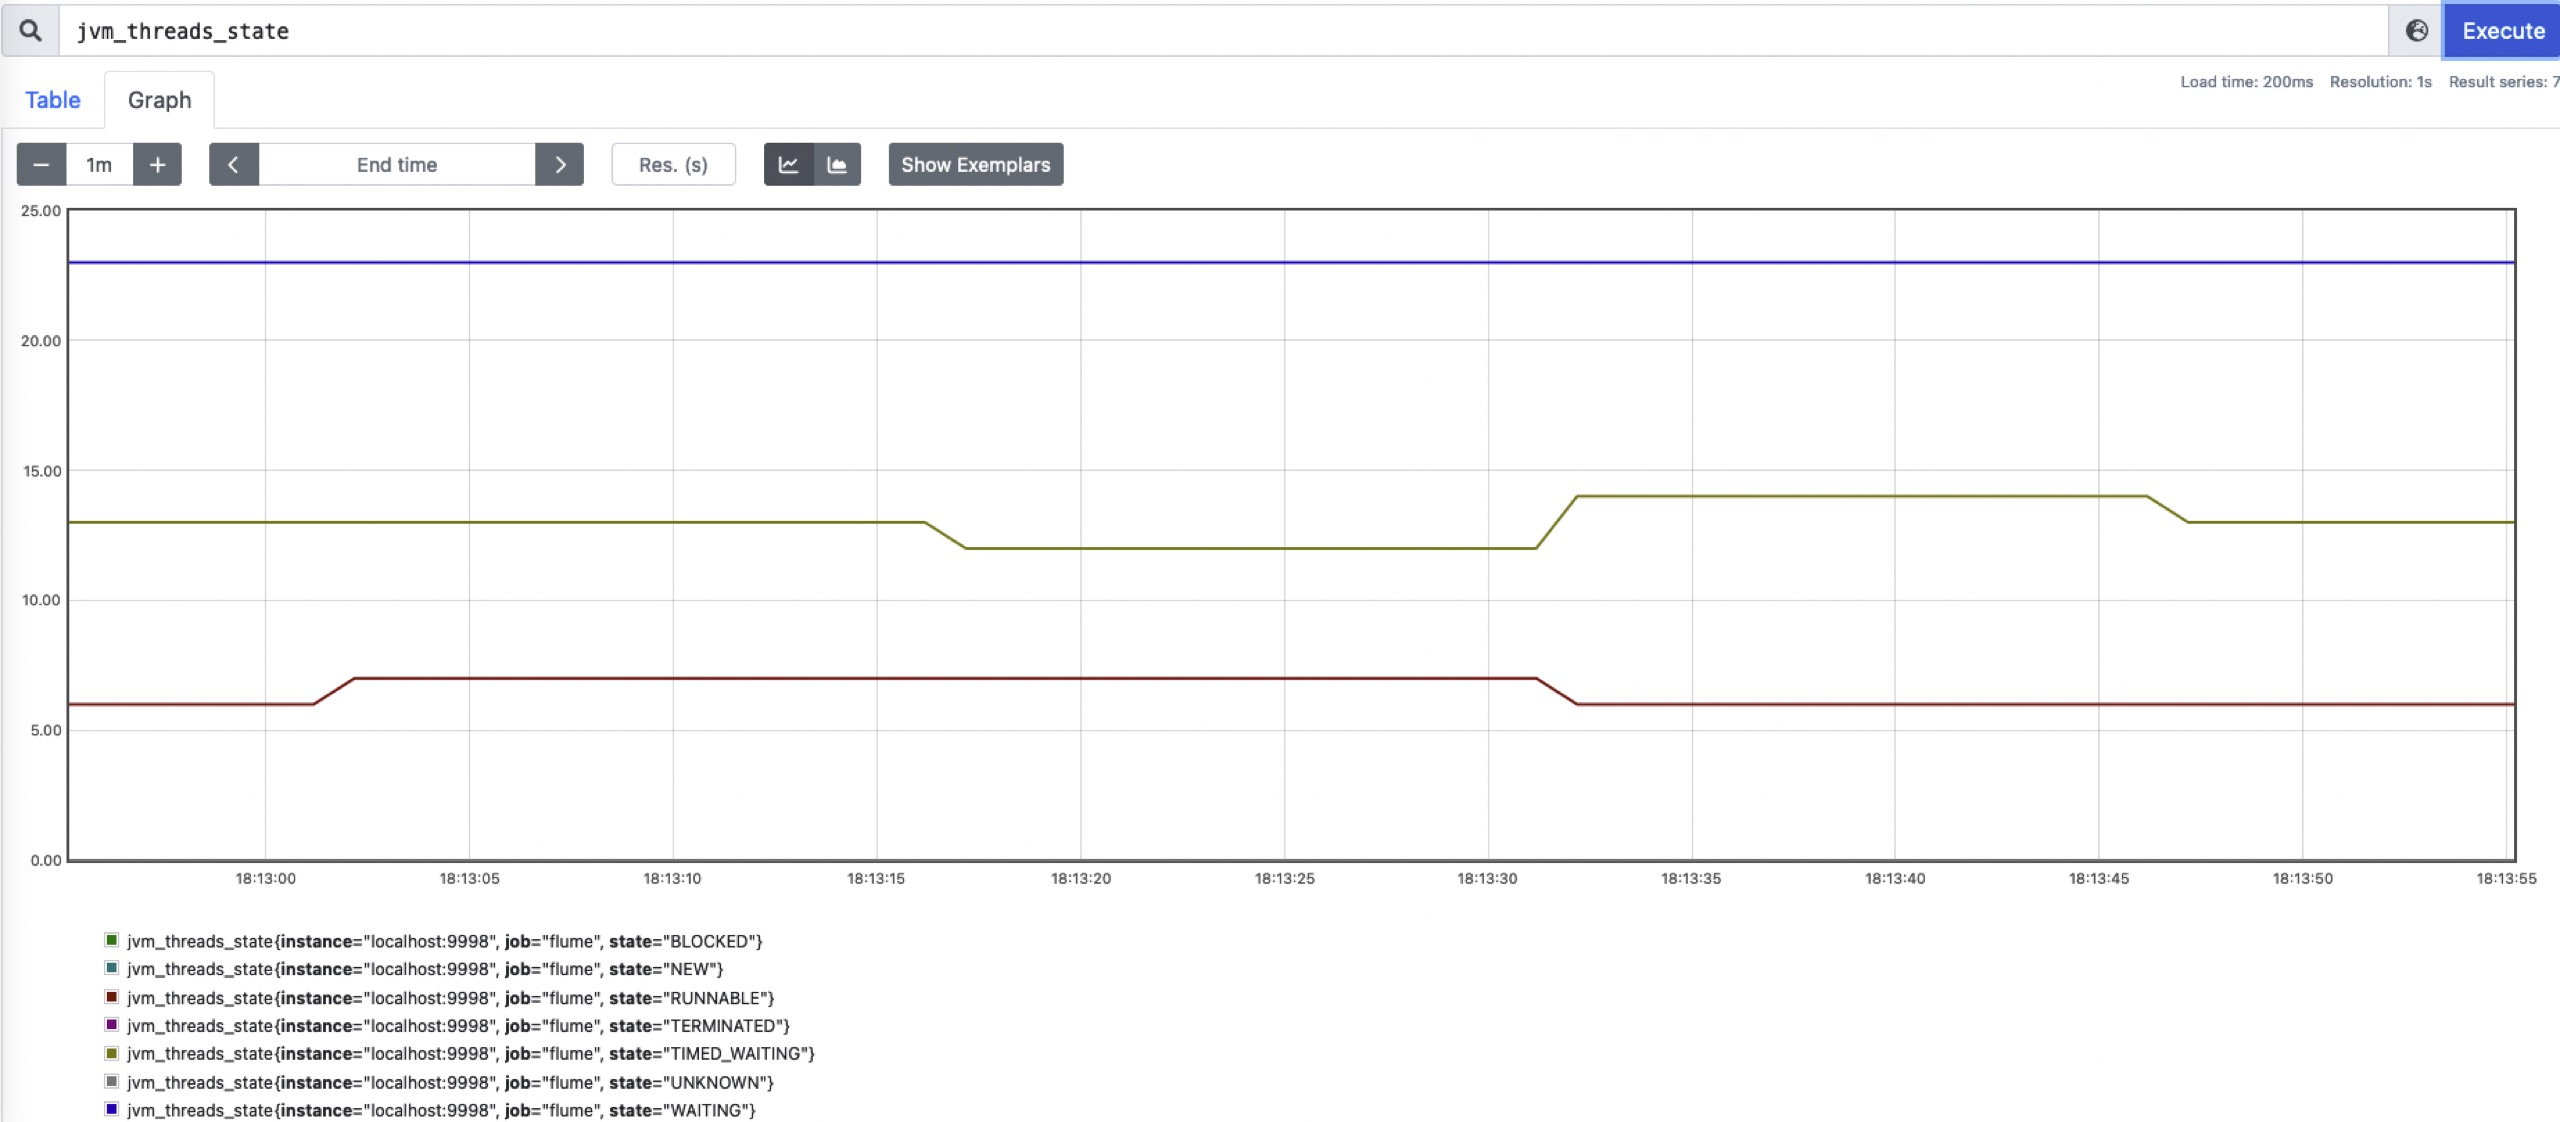
- 监控效果
部署完成后可以通过jvm_threads_state指标来查看flume的进程状态:


发表评论