功能需求:(图片可根据自行更换)
1.、右侧标签的位置是随机生成,左侧标签和右侧标签的垂直位置是一致的,
2、通过滑动条控制左侧标签与右侧标签重叠(误差控制在2px)表示验证通过,
3、否则验证失败,重新生成随机位置。
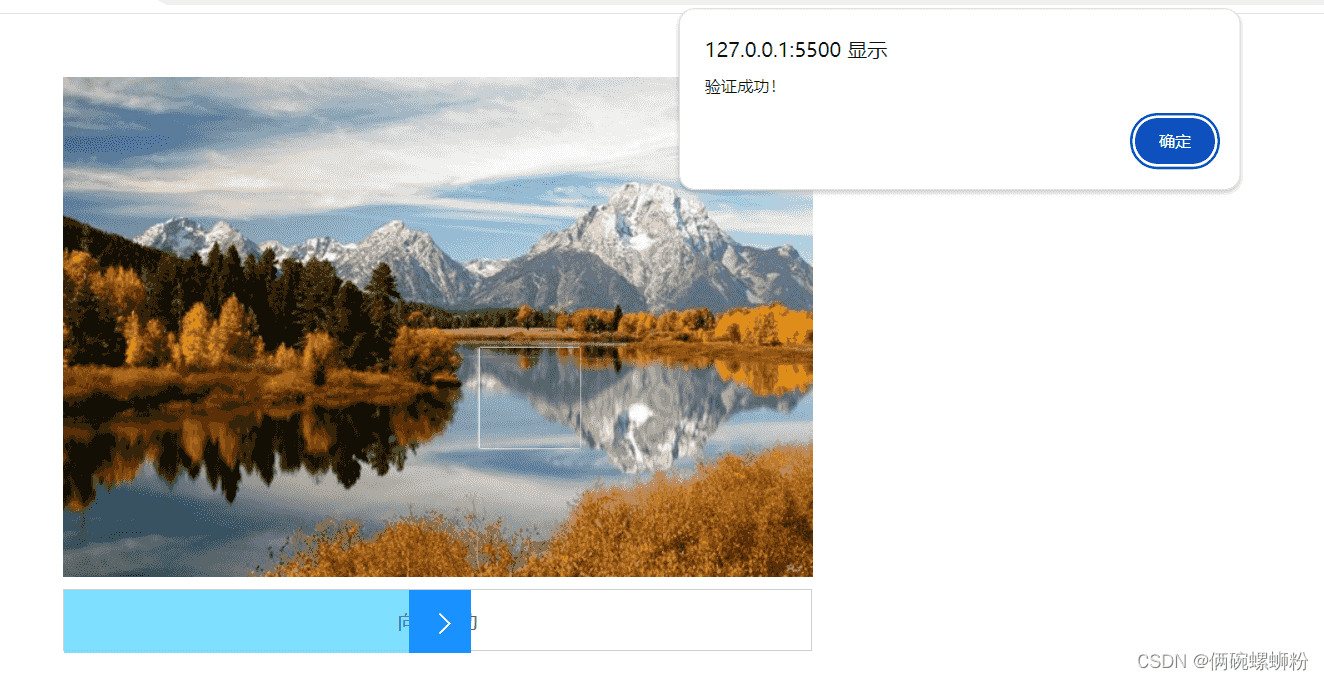
一、效果展示
·效果示例图

二、代码区域
2.1 核心代码区域
鼠标按下滑块时,需要获取鼠标在当前页面的坐标,以及判断滑块的移动范围。
// 鼠标按下滑块
        lielement.onmousedown = function (e) {
            rx = e.pagex - wrap.offsetleft;
            var mx = containerwidth - lielement.offsetwidth;
            isdown = true;//鼠标按下
            // 鼠标在页面移动
            document.onmousemove = function (event) {
                // 计算出滑块的位置(鼠标在页面的坐标 减去  鼠标在滑块的坐标)
                // x = event.pagex - rx - lielement.offsetwidth  + cx;
                x = event.pagex - rx - lielement.offsetwidth;
                // 判断是否超出滑动范围
                if (x <= 0) x = 0;
                if (x >= mx) x = mx;
                // 设置滑块的位置
                lielement.style["left"] = x + "px";
                divelement.style["width"] = x + "px";

                // 设置红色标签的位置
                red_x = red_cur_x + x;
                console.log("red_x:", red_x);
                if (red_x >= (containerwidth - red.offsetwidth)) red_x = containerwidth - red.offsetwidth
                red.style["left"] = red_x + "px";
            }
        }
鼠标在页面松开时,判断滑块是否到达缺口的检测范围内,误差为2px。
// 鼠标在页面松开
        document.onmouseup = function () {
            // 解绑鼠标移动事件
            document.onmousemove = null;
            // cx = x;

            //判断鼠标是否按下滑块
            if (isdown) {
                // 检查红色和绿色标签的位置
                // console.log("红色盒子的x位置:",red_x);
                // console.log("绿色盒子的x位置:",green_x);

                // 判断是否验证通过
                if (red_x <= (green_x + 2) && red_x >= (green_x - 2)) {
                    alert("验证成功!")
                    console.log("验证通过!");
                }
                else {
                    console.log("验证失败~~");
                    alert("验证失败~~");
                    // 刷新页面
                    window.location.reload();
                }
            }
            // 重置布尔值
            isdown = false;
        }
2.2详细代码区域
2.2.1css代码
    <style>
        * {
            padding: 0;
            margin: 0;
            list-style: none;
        }

        .wrap {
            width: 600px;
            height: 460px;
            margin: 50px;
        }

        .wrap-container {
            width: 600px;
            height: 400px;
            background-color: #ccc;
            /* 相对定位 */
            position: relative;
        }

        .wrap-container .bg {
            width: 600px;
            height: 400px;
            background-image: url(./images/1.jpg);
            background-size: cover;
        }

        .wrap-container .box {
            width: 80px;
            height: 80px;
            position: absolute;
            top: 50px;
            box-shadow: 0px 0px 2px #fff;
        }

        .wrap-container .red {
            background-color: red;
            left: 0;
            /* 层级 */
            z-index: 1000;
            background-repeat: no-repeat;
        }

        .wrap-container .green {
            background-color: rgba(255, 255, 255, .5);
            left: 200px;
        }

        .wrap-side {
            width: 598px;
            height: 48px;
            background-color: #fff;
            margin-top: 10px;
            position: relative;
            border: 1px solid #ccc;
        }

        .wrap-side p {
            color: #666;
            text-align: center;
            line-height: 50px;
            /* 禁止选择文本 */
            user-select: none;
        }

        .wrap-side ul {
            position: absolute;
            top: 0;
            left: 0;
            width: 600px;
            height: 50px;
        }

        .wrap-side ul li {
            width: 50px;
            height: 50px;
            background-color: #1890ff;
            cursor: move;
            position: absolute;
            left: 0px;
            top: 0;
            text-align: center;
            line-height: 50px;
        }

        .wrap-side ul li::before {
            content: "";
            display: inline-block;
            width: 10px;
            height: 10px;
            border-right: 2px solid #fff;
            border-top: 2px solid #fff;
            /* 旋转属性 */
            transform: rotate(45deg);
            /* 垂直对齐 */
            vertical-align: middle;
        }

        .wrap-side div {
            width: 0px;
            height: 50px;
            background-color: rgba(0, 191, 255, .5);
            position: absolute;
            left: 0px;
            top: 0;
        }
    </style>
2.2.2 html代码
<div class="wrap">
        <div class="wrap-container">
            <div class="bg" style="background-image: url(./images/1.jpg);"></div>
            <div class="box red"></div>
            <div class="box green"></div>
        </div>
        <div class="wrap-side">
            <p>向右滑动</p>
            <!-- 滑动条 -->
            <ul>
                <li></li>
            </ul>
            <!-- 滑动经过的地方设置背景 -->
            <div></div>
        </div>
    </div>
2.2.3 js代码
存放照片的数组中的照片路径用户可根据自己存放的路径进行修改(建议选择尺寸一致的照片)。
// 1. 获取页面相关的元素
        var wrap = document.queryselector(".wrap");
        var wrapcontainer = document.queryselector(".wrap-container");
        var bg = document.queryselector(".wrap-container .bg");
        var red = document.queryselector(".wrap-container .red");
        var green = document.queryselector(".wrap-container .green");
        var lielement = document.queryselector(".wrap-side ul li");
        var divelement = document.queryselector(".wrap-side div");

        // 采用数组记录图片路径
        var arr = [
            '.\/images\/1.jpg',
            '.\/images\/2.jpeg',
            '.\/images\/3.jpg',
            '.\/images\/4.jpg',
            '.\/images\/5.jpg',
            '.\/images\/6.jpeg',
        ]

        // 2. 封装函数 生成随机数
        var getrdnum = function (min, max) {
            // 获取指定范围的随机数
            return math.floor(math.random() * (max - min) + min);
        }

        // 3. 记录滑动所需的数据
        // 记录.wrap标签的在页面的位置
        var oleft = wrap.offsetleft;
        var otop = wrap.offsettop;

        // 记录.wrap-container标签的尺寸
        var containerwidth = wrapcontainer.offsetwidth;
        var containerheight = wrapcontainer.offsetheight;

        // 记录绿色标签和红色标签的位置范围
        // var min_slide_x = 0;
        var min_slide_x = containerwidth / 2;
        var max_silde_x = containerwidth - green.offsetwidth;
        var min_slide_y = 0;
        var max_silde_y = containerheight - green.offsetheight;

        // 记录红色标签可滑动的范围
        var red_slide_x = containerwidth - red.offsetwidth;

        // 封装函数 获取绿色标签的随机的位置
        var getpos = function () {
            // 返回坐标
            return {
                x: getrdnum(min_slide_x, max_silde_x),
                y: getrdnum(min_slide_y, max_silde_y),
                x0: getrdnum(0, min_slide_x - red.offsetwidth)// 红色标签的水平位置
            }
        }
        // 封装函数 设置绿色/红色盒子的位置
        var setpos = function () {
            var point = getpos();
            green.style['left'] = point.x + "px";
            green.style['top'] = point.y + "px";
            red.style['left'] = point.x0 + "px";
            red.style['top'] = point.y + "px";

            // 选择.green标签区域对应的图片
            // 随机的索引值
            var index = math.floor(math.random() * arr.length);
            var path = `url(${arr[index]})`;
            // 设置背景图
            bg.style['backgroundimage'] = path;
            red.style['backgroundimage'] = path;
            // 计算出截取的部分图片
            var posx = point.x;
            var posy = point.y;
            // 设置.red标签的背景图位置
            red.style['backgroundposition'] = `-${posx}px -${posy}px`;
        }
        setpos();

        // 记录红色标签当前的位置
        var red_cur_x = parseint(getcomputedstyle(red)['left']);

        // 设置滑动条
        // 记录滑块的位置
        var x = 0;

        // 记录鼠标在滑块中的位置
        var rx = 0;

        // 记录滑块当前位置
        // var cx = 0;

        // 记录红色盒子的位置(和绿色盒子的位置进行判断)
        var red_x = 0;
        // 记录绿色盒子的位置(获取初始值即可)
        var green_x = parseint(getcomputedstyle(green)['left']);

        // 定义布尔值 判断鼠标是否按下
        var isdown = false;

        // 鼠标按下滑块
        lielement.onmousedown = function (e) {
            rx = e.pagex - wrap.offsetleft;
            var mx = containerwidth - lielement.offsetwidth;
            isdown = true;//鼠标按下
            // 鼠标在页面移动
            document.onmousemove = function (event) {
                // 计算出滑块的位置(鼠标在页面的坐标 减去  鼠标在滑块的坐标)
                // x = event.pagex - rx - lielement.offsetwidth  + cx;
                x = event.pagex - rx - lielement.offsetwidth;
                // 判断是否超出滑动范围
                if (x <= 0) x = 0;
                if (x >= mx) x = mx;
                // 设置滑块的位置
                lielement.style["left"] = x + "px";
                divelement.style["width"] = x + "px";

                // 设置红色标签的位置
                red_x = red_cur_x + x;
                console.log("red_x:", red_x);
                if (red_x >= (containerwidth - red.offsetwidth)) red_x = containerwidth - red.offsetwidth
                red.style["left"] = red_x + "px";


            }
        }
        // 鼠标在页面松开
        document.onmouseup = function () {
            // 解绑鼠标移动事件
            document.onmousemove = null;
            // cx = x;

            //判断鼠标是否按下滑块
            if (isdown) {
                // 检查红色和绿色标签的位置
                // console.log("红色盒子的x位置:",red_x);
                // console.log("绿色盒子的x位置:",green_x);

                // 判断是否验证通过
                if (red_x <= (green_x + 2) && red_x >= (green_x - 2)) {
                    alert("验证成功!")
                    console.log("验证通过!");
                }
                else {
                    console.log("验证失败~~");
                    alert("验证失败~~");
                    // 刷新页面
                    window.location.reload();
                }
            }

            // 重置布尔值
            isdown = false;
        }
三、个人总结
实现该功能运用了鼠标点击事件及鼠标松开事件,其中需要滤清如何获取滑块在照片中的位置以及如何将底部滑块与左侧滑块的坐标相联系,这是此案例的关键所在。
到此这篇关于javascript滑动验证功能实现的文章就介绍到这了,更多相关js滑动验证实现内容请搜索代码网以前的文章或继续浏览下面的相关文章希望大家以后多多支持代码网!


发表评论