前言
三月以前,我也写过《android 烟花效果》,这篇我相当于做了个基础框架,在此基础上扩展和填充,就能扩展出很多效果。不过,当时,我在这篇文章中着重强调了一件事
重点:构建闭合空间
之所以强调这件事的原因是,只有闭合空间的图形才能填充颜色、图片纹理。我们知道,canvas 绘制方法仅仅只有圆、弧、矩形、圆角矩形是可以闭合的,除此之外就是path了。
想象一下,如果让你画一个三角形并填充上颜色,你可能的方法只有通过裁剪path或者使用path绘制才行,而path也有性能问题。
另外,闭合空间的填充也是件不容易的事。
所以,那篇文章中的烟花效果,本质上还不够完美,因为一些特殊的填充效果还是很难实现。
新方案

目前我觉得可行的方案有两种
基于数学和paint线宽渐变
如:贝塞尔曲线函数 + strokewidth渐渐增大 + color 变化
这种方式是利用贝塞尔曲线计算出路径(不用path,根据数学公式描绘),然后再规定的时间内让paint的strokewidth随着贝塞尔曲线 * time的偏移而增大,就能绘制出效果不错的的烟花条。
基于绘制缓冲
首先,要知道什么是缓冲,缓冲其实就是通常意义上存储数据的对象,比如byte数组、bytebuffer等,但如果再聚焦android 平台,我们还有fbo、vbo等。当然,最容易被忽略的是bitmap,bitmap 其实也是fbo的一种,不过这里我称之为“可视化缓冲”。
如果追踪的具体的对象上,除了bitmap之外,layer也是缓冲。
为什么使用缓冲可以优化烟花效果呢?
我们先了解下缓冲的特性:
- 占用空间较大,狭义上来说,这种数据不仅仅占用空间大,而且(虚拟)内存需要连续
- 空间可复用性强,如享元模式的bytebuffer、alpha离屏渲染buffer、inbitmap等
- 会产生脏数据,比如上一次buffer中的数据,如果没有清理的话依然会保存
- 数据可复用性强,脏数据并不一定“脏”,有时还能复用
我们最终利用的还是空间可复用性和数据可复用性,如果我们以每次都在上次的数据中绘制,那么,意味着可以绘制出更多效果,间接解决了闭合空间填充问题。
那么,本篇我们选哪种呢?
最终方案
本篇,我们就选择基于缓冲的方案了,因为总的来说,第一种方式可能需要很多次的绘制,相当考验cpu。而使用绘制缓冲的的话,我们还可以复用上次的数据,这就相当于将上一次的绘制画面保留,然后再一次绘制时,在之前的基础上进一步完善,这种显然是利用“空间换取时间”的做法。
详细设计
本篇使用了绘制缓冲,原则上使用bitmap是可以的,但是在使用的过程中发现,bitmap在xformode绘制时性能还是很差,显然提升流畅度是必要原则。那么,你可能想到利用线程异步绘制,是的,我也打算这么做,但是想到使用线程渲染,那为什么不使用textureview、surfaceview或者glsurfaceview呢?于是,我就没有再使用bitmap的想法了。
但是,基于做以往的经验,我选了个兼容性最好性能最差的textureview,其实我这里本打算选glsurfaceview的,因为其性能和兼容性都是居中水平,不过涉及到顶点、纹理的一套东西,打算后续在音视频专栏写这类文章,因此本篇就选texureview了。
简单说下surfaceview的问题,性能最好,但其不适合在滑动的页面调用,因为有些设备会出现画面漂移和缩放的问题,另外不支持clipchildren等,理论上也是适合本篇的,但是如果app回到后台,其surface会自动销毁,因此,控制线程的逻辑就会有些复杂。
在这里我们看下textureview源码,其创建的surfacetexture并不是单缓冲模式,但是又有设置缓冲buffersize大小的操作,此外textlayer负责提供缓冲,因此,这里至少是双缓冲。
    mlayer = mattachinfo.mthreadedrenderer.createtexturelayer();
    boolean createnewsurface = (msurface == null);
    if (createnewsurface) {
        // create a new surfacetexture for the layer.
        msurface = new surfacetexture(false); //非单缓冲
        ncreatenativewindow(msurface);
    }
    mlayer.setsurfacetexture(msurface);
    msurface.setdefaultbuffersize(getwidth(), getheight());
    msurface.setonframeavailablelistener(mupdatelistener, mattachinfo.mhandler);

    if (mlistener != null && createnewsurface) {
        mlistener.onsurfacetextureavailable(msurface, getwidth(), getheight());
    }
    mlayer.setlayerpaint(mlayerpaint);
}
下面是我们的详细流程。
实现烟花逻辑
下面是我们本篇的实现流程。
定义fireexploreview
我们本篇基于textureview实现绘制逻辑,而textureview必须要开启硬件加速,其次我们要实现textureview.surfacetexturelistener,用于监听surfacetexture的创建和销毁。理论上,textureview的surfacetexture可以复用的,其次,如果onsurfacetexturedestroyed返回false,那么surfacetexture的销毁是由你自己控制的,textureview不会主动销毁。
@override
public boolean onsurfacetexturedestroyed(surfacetexture surface) {

    return false;
}
另外,我们要知道,默认情况下textureview使用的是texturelayer,绘制完成之后,需要在renderthread上使用gl去合成,这也是性能较差的主要原因。尤其是低配设备,使用textureview也做不到性能优化,最终还是得使用surfaceview或者gltextureview或者glsurfaceview,当然我比较推荐gl系列,主要是离屏渲染可以避免mediacodec切换surface引发黑屏和卡住的问题。
当然,这里我们肯定也要使用到线程和surface了,相关代码如下
@override
public void onsurfacetextureavailable(surfacetexture surfacetexture, int width, int height) {
    drawthread = new thread(this);
    this.surfacetexture = surfacetexture;
    this.surface = new surface(this.surfacetexture);
    this.isrunning = true;
    this.drawthread.start();
}

@override
public boolean onsurfacetexturedestroyed(surfacetexture surface) {
    isrunning = false;
    if (drawthread != null) {
        try {
            drawthread.interrupt();
        }catch (throwable e){
            e.printstacktrace();
        }
    }
    drawthread = null;
    //不让textureview 销毁surfacetexture,这里返回false
    return false;
}
定义粒子
无论任何时候,不要把粒子不当对象,一些开发者对粒子对象嗤之以鼻,这显然是不对的,不受管理的粒子凭什么听你的指挥。
当然,任何粒子的运动需要符合运动学方程,而二维平面的运动是可以拆分为x轴和y轴单方向的运动的。
static final float gravity = 0.0f;
static final float fraction = 0.88f;
static final float speed = 50f; //最大速度


static class particle {
    private float opacity;  //透明度
    private float dy; // y 轴速度
    private float dx; // x 轴速度
    private int color; //此颜色
    private float radius; //半径
    private float y; // y坐标
    private float x; // x坐标

    particle(float x, float y, float r, int color, float speedx, float speedy) {
        this.x = x;
        this.y = y;
        this.radius = r;
        this.color = color;
        this.dx = speedx;
        this.dy = speedy;
        this.opacity = 1f;
    }

    void draw(canvas canvas, paint paint) {
        int save = canvas.save();
        paint.setalpha((int) (this.opacity * 255));
        paint.setcolor(this.color);
        canvas.drawcircle(this.x, this.y, this.radius, paint);
        canvas.restoretocount(save);
    }

    void update() {
        this.dy += gravity;
        //加上重力因子,那么就会出现粒子重力现象,这里我们不使用时间了,这样简单点

        this.dx *= fraction;  // fraction 是小于1的,用于降低速度
        this.dy *= fraction;  // fraction 是小于1的,用于降低速度

        this.x += this.dx;
        this.y += this.dy;

        this.opacity -= 0.03; //透明度递减
    }
}
上面是粒子以及更新方法、绘制逻辑。
管理粒子
我们使用list管理粒子
static final int maxparticlecount = 300;
list<particle> particles = new arraylist<>(maxparticlecount);
初始化粒子
粒子的初始化是非常重要的,初始化位置的正确与否会影响粒子的整体效果,显然,这里我们需要注意。
float angleincrement = (float) ((math.pi * 2) / maxparticlecount); //平分 360度
float[] hsl = new float[3];

for (int i = 0; i < maxparticlecount; i++) {
    hsl[0] = (float) (math.random() * 360);
    hsl[1] = 0.5f;
    hsl[2] = 0.5f;
    int hsltocolor = hsltocolor(hsl);

    particle p = new particle(x, y,
            2.5f,
            hsltocolor,
            (float) (math.cos(angleincrement * i) * math.random() * speed),
            (float) (math.sin(angleincrement * i) * math.random() * speed)
    );
    particles.add(p);
}
不过,在这里我们还需要注意的是,这里我们使用hls,这是一种色彩空间,和rgb不一样的是,他有hue(色调)、饱和度、亮度为基准,因此,有利于亮色的表示,因此适合获取强调亮度的色彩。
与rgb的转换逻辑如下
public static int hsltocolor(@nonnull float[] hsl) {
    final float h = hsl[0];
    final float s = hsl[1];
    final float l = hsl[2];

    final float c = (1f - math.abs(2 * l - 1f)) * s;
    final float m = l - 0.5f * c;
    final float x = c * (1f - math.abs((h / 60f % 2f) - 1f));

    final int huesegment = (int) h / 60;

    int r = 0, g = 0, b = 0;

    switch (huesegment) {
        case 0:
            r = math.round(255 * (c + m));
            g = math.round(255 * (x + m));
            b = math.round(255 * m);
            break;
        case 1:
            r = math.round(255 * (x + m));
            g = math.round(255 * (c + m));
            b = math.round(255 * m);
            break;
        case 2:
            r = math.round(255 * m);
            g = math.round(255 * (c + m));
            b = math.round(255 * (x + m));
            break;
        case 3:
            r = math.round(255 * m);
            g = math.round(255 * (x + m));
            b = math.round(255 * (c + m));
            break;
        case 4:
            r = math.round(255 * (x + m));
            g = math.round(255 * m);
            b = math.round(255 * (c + m));
            break;
        case 5:
        case 6:
            r = math.round(255 * (c + m));
            g = math.round(255 * m);
            b = math.round(255 * (x + m));
            break;
    }

    r = constrain(r, 0, 255);
    g = constrain(g, 0, 255);
    b = constrain(b, 0, 255);

    return color.rgb(r, g, b);
}
private static int constrain(int amount, int low, int high) {
    return amount < low ? low : math.min(amount, high);
}
粒子绘制
绘制当然简单了,方法实现不是很复杂,调用如下逻辑即可,当然,opacity<=0 的粒子我们并没有移除,原因是因为remove 时, 可能引发arraylist内存重整,这个是相当消耗性能的,因此,还不如遍历效率高。
protected void drawparticles(canvas canvas) {
    canvas.drawcolor(0x10000000); //为了让烟花减弱效果,每次加深绘制
    for (int i = 0; i < particles.size(); i++) {
        particle particle = particles.get(i);
        if (particle.opacity > 0) {
            particle.draw(canvas, mpaint);
            particle.update();
        }
    }
}
缓冲复用
那么,以上就是完整的绘制逻辑了,至于surface调用逻辑呢,其实也很简单。
不过这里要注意的是,只有接受到command=true的时候,我们才清理画布,不然,我们要保留缓冲区中的数据。我们知道,一般view在ondraw的时候,rendernode给你的canvas都是清理过的,而这里,我们每次通过lockcanvas拿到的canvas是带有上次缓冲数据的。
if (build.version.sdk_int >= build.version_codes.m) {
    canvas = surface.lockhardwarecanvas();
} else {
    canvas = surface.lockcanvas(null);
}

if(iscommand){

    canvas.drawcolor(0x99000000, porterduff.mode.clear); //清理画布
    explode(getwidth() / 2f, getheight() / 2f);  //粒子初始化
    iscommand = false;
}
//绘制粒子
drawparticles(canvas);

surface.unlockcanvasandpost(canvas);
显然,我们能得到两条经验:
- lockcanvas获取到的canvas是带有上次绘制数据的
- 利用缓冲绘制不仅强调结果,而且还强调过程,一般的canvas绘制仅仅强调结果
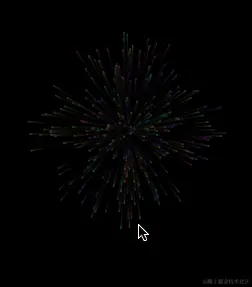
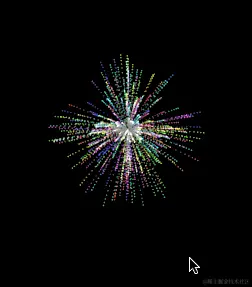
blend效果增强
实际上面的效果还有点差,就是尖端亮度太低,为此,我们可以使用blend进行增强,我们设置blendmode为plus,另外上面我们的重力是0,现在我们调整一下gravity=0.25f。
paintcompat.setblendmode(mpaint, blendmodecompat.plus);
效果
多线程绘制
总的来说,textureview可以在一些情况下显著提升性能,当然,前提是你的主线程流畅。
这里的逻辑就是textureview的用法了,我们就不继续深入了,本篇末尾提供源码。
新问题
评论区有同学反馈,在真机上很卡,我试了一下,发现不是卡,而是textureview 不是单缓冲,两次缓冲在没有clear时会有交替闪烁问题。
因此,为了优化闪烁问题,我把可视化缓冲bitmap重新加进来,使用之后在上是没有问题的,但是由于android 6.0 之前的系统无法使用lockhardwarecanvas,卡顿是比较明显的。
为啥模拟器表现比较好,可能刷新率比较低。
性能优化
由于使用bitmap作为缓冲,性能有所降低,我们这里进行如下优化
- 减少绘制区域大小
- 移除surface 清理 canvas.drawcolor(0x00000000, porterduff.mode.clear);
- android 6.0+版本使用硬件canvas
缩小绘制区域收益明显,后续考虑先缩小后绘制,再利用matrix放大。
总结
以上是本篇的内容,也是我们要掌握的技巧,很多时候,我们对canvas的绘制,过于强调结果,结果设计了很多复杂的算法,其实,基于过程的绘制显然更加简单和优化。
到这里本篇就结束了,希望本篇对你有所帮助。
源码
public class fireexploreview extends textureview implements textureview.surfacetexturelistener, runnable {
    private textpaint mpaint;
    private surfacetexture surfacetexture;
    private surface surface;
    private bitmapcanvas mbitmapcanvas;
    private boolean updateonsizechanged = false;
    private volatile boolean isrunning = false;
    private final object locksurface = new object();

    {
        initpaint();
    }
    public fireexploreview(context context) {
        this(context, null);
    }
    public fireexploreview(context context, @nullable attributeset attrs) {
        super(context, attrs);
        setsurfacetexturelistener(this);
    }

    private void initpaint() {
        //否则提供给外部纹理绘制
        mpaint = new textpaint(paint.anti_alias_flag);
        mpaint.setantialias(true);
        mpaint.setstyle(paint.style.fill_and_stroke);
        mpaint.setstrokecap(paint.cap.round);
        mpaint.setstyle(paint.style.fill);
        paintcompat.setblendmode(mpaint, blendmodecompat.plus);

    }

    static final float gravity = 0.21f;
    static final float fraction = 0.88f;
    static final int maxparticlecount = 300;
    list<particle> particles = new arraylist<>(maxparticlecount);
    float[] hsl = new float[3];

    volatile boolean iscommand = false;
    static final float speed = 60f;
    thread drawthread = null;

    public void startexplore() {
        iscommand = true;
    }

    //初始化粒子
    void explode(float x, float y) {
        float angleincrement = (float) ((math.pi * 2) / maxparticlecount);
        for (int i = 0; i < maxparticlecount; i++) {
            hsl[0] = (float) (math.random() * 360);
            hsl[1] = 0.5f;
            hsl[2] = 0.5f;
            int hsltocolor = hsltocolor(hsl);

            particle p = null;
            if (particles.size() > i) {
                p = particles.get(i);
            }

            if (p == null) {
                p = new particle();
                particles.add(p);
            }
            p.init(x, y,
                    4f,
                    hsltocolor,
                    (float) (math.cos(angleincrement * i) * math.random() * speed),
                    (float) (math.sin(angleincrement * i) * math.random() * speed)
            );
        }
    }


    protected void drawparticles(canvas canvas) {
        canvas.drawcolor(0x10000000);
        for (int i = 0; i < particles.size(); i++) {
            particle particle = particles.get(i);
            if (particle.opacity > 0) {
                particle.draw(canvas, mpaint);
                particle.update();
            }
        }
    }


    static class particle {
        private float opacity;
        private float dy;
        private float dx;
        private int color;
        private float radius;
        private float y;
        private float x;

        public void init(float x, float y, float r, int color, float speedx, float speedy) {
            this.x = x;
            this.y = y;
            this.radius = r;
            this.color = color;
            this.dx = speedx;
            this.dy = speedy;
            this.opacity = 1f;
        }
        void draw(canvas canvas, paint paint) {
            int save = canvas.save();
            paint.setcolor(argb((int) (this.opacity * 255),color.red(this.color),color.green(this.color),color.blue(this.color)));
            canvas.drawcircle(this.x, this.y, this.radius, paint);
            canvas.restoretocount(save);
        }

        void update() {
            this.dy += gravity;

            this.dx *= fraction;
            this.dy *= fraction;

            this.x += this.dx;
            this.y += this.dy;

            this.opacity -= 0.02;
        }


    }


    matrix matrix = new matrix();
    @override
    public void run() {
        while (true) {
            synchronized (this) {
                try {
                    this.wait(16);
                } catch (interruptedexception e) {
                    e.printstacktrace();
                }
            }
            if (!isrunning || thread.currentthread().isinterrupted()) {
                synchronized (locksurface) {
                    if (surface != null && surface.isvalid()) {
                        surface.release();
                    }
                    surface = null;
                }
                break;
            }

            canvas canvas = null;
            synchronized (locksurface) {
                if(mbitmapcanvas == null || updateonsizechanged) {
                    updateonsizechanged = false;
                    mbitmapcanvas = createbitmapcanvas(getwidth(),getheight());
                }

                if(iscommand){
                    mbitmapcanvas.bitmap.erasecolor(0x00000000);
                    explode(mbitmapcanvas.getwidth() / 2f, mbitmapcanvas.getheight() / 2f);
                    iscommand = false;
                }
                //这里其实目前没有加锁的必要,考虑到如果有其他surfacetexture相关操作会加锁,这里先加锁吧
                if (android.os.build.version.sdk_int >= android.os.build.version_codes.m) {
                     canvas = surface.lockhardwarecanvas();
                }else {
                    canvas = surface.lockcanvas(null);
                }
                bitmap bitmap = mbitmapcanvas.getbitmap();
                drawparticles(mbitmapcanvas);
                matrix.reset();
                matrix.settranslate((getwidth() - bitmap.getwidth()) / 2f, (getheight() - bitmap.getheight()) / 2f);
                canvas.drawbitmap(mbitmapcanvas.getbitmap(), matrix, null);
                surface.unlockcanvasandpost(canvas);
            }
        }

    }

    private bitmapcanvas createbitmapcanvas(int width,int height){
        if(mbitmapcanvas != null){
            mbitmapcanvas.recycle();
        }
        int size = math.max(math.min(width,height),1);
        return new bitmapcanvas(bitmap.createbitmap(size,size, bitmap.config.argb_8888));
    }

    static class bitmapcanvas extends canvas{
        bitmap bitmap;

        public bitmapcanvas(bitmap bitmap) {
            super(bitmap);
            this.bitmap = bitmap;
        }

        public bitmap getbitmap() {
            return bitmap;
        }

        public void recycle() {
            if(bitmap == null || bitmap.isrecycled()){
                return;
            }
            bitmap.recycle();
        }
    }

    @override
    public void onsurfacetextureavailable(surfacetexture surfacetexture, int width, int height) {
        this.drawthread = new thread(this);
        this.surfacetexture = surfacetexture;
        this.surface = new surface(this.surfacetexture);
        this.isrunning = true;
        this.drawthread.start();
    }

    @override
    public void onsurfacetexturesizechanged(surfacetexture surface, int width, int height) {
        updateonsizechanged = true;
    }

    @override
    public boolean onsurfacetexturedestroyed(surfacetexture surface) {
        isrunning = false;
        if (drawthread != null) {
            try {
                drawthread.interrupt();
            }catch (throwable e){
                e.printstacktrace();
            }
        }
        drawthread = null;
        return false;
    }

    @override
    public void onsurfacetextureupdated(surfacetexture surface) {

    }


    @colorint
    public static int hsltocolor(@nonnull float[] hsl) {
        final float h = hsl[0];
        final float s = hsl[1];
        final float l = hsl[2];

        final float c = (1f - math.abs(2 * l - 1f)) * s;
        final float m = l - 0.5f * c;
        final float x = c * (1f - math.abs((h / 60f % 2f) - 1f));

        final int huesegment = (int) h / 60;

        int r = 0, g = 0, b = 0;

        switch (huesegment) {
            case 0:
                r = math.round(255 * (c + m));
                g = math.round(255 * (x + m));
                b = math.round(255 * m);
                break;
            case 1:
                r = math.round(255 * (x + m));
                g = math.round(255 * (c + m));
                b = math.round(255 * m);
                break;
            case 2:
                r = math.round(255 * m);
                g = math.round(255 * (c + m));
                b = math.round(255 * (x + m));
                break;
            case 3:
                r = math.round(255 * m);
                g = math.round(255 * (x + m));
                b = math.round(255 * (c + m));
                break;
            case 4:
                r = math.round(255 * (x + m));
                g = math.round(255 * m);
                b = math.round(255 * (c + m));
                break;
            case 5:
            case 6:
                r = math.round(255 * (c + m));
                g = math.round(255 * m);
                b = math.round(255 * (x + m));
                break;
        }

        r = constrain(r, 0, 255);
        g = constrain(g, 0, 255);
        b = constrain(b, 0, 255);

        return color.rgb(r, g, b);
    }
    private static int constrain(int amount, int low, int high) {
        return amount < low ? low : math.min(amount, high);
    }

    public static int argb(
            @intrange(from = 0, to = 255) int alpha,
            @intrange(from = 0, to = 255) int red,
            @intrange(from = 0, to = 255) int green,
            @intrange(from = 0, to = 255) int blue) {
        return (alpha << 24) | (red << 16) | (green << 8) | blue;
    }
    public void release(){
        synchronized (locksurface) {
            isrunning = false;
            updateonsizechanged = false;
            if (surface != null && surface.isvalid()) {
                surface.release();
            }
            surface = null;
        }
    }
}
以上就是android基于绘制缓冲实现烟花效果的详细内容,更多关于android烟花效果的资料请关注代码网其它相关文章!


发表评论